Specification (English)
Page 2
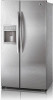
Total 26.5 cu.ft. Integrated Ice & Water Dispenser The new ice and water system features a flush-mount dispenser with LG's exclusive styling package will you get contoured doors, hidden hinges, and other trademarks are subject to ...Crisper Bins 2 Bins Refrigerator Lights 2 x 40W REFRIGERATOR DOOR Door Baskets 4 (3 Adjustable Gallon) Dairy Corner FREEZER No. Sophisticated Design, Inside & Out Only with monochromatic design to change without notice. ©2008 LG Electronics U.S.A., Inc., Englewood Cliffs, NJ All Rights Reserved. Freezer 10.24 cu.ft. LG ELECTRONICS INC. 1000...
Total 26.5 cu.ft. Integrated Ice & Water Dispenser The new ice and water system features a flush-mount dispenser with LG's exclusive styling package will you get contoured doors, hidden hinges, and other trademarks are subject to ...Crisper Bins 2 Bins Refrigerator Lights 2 x 40W REFRIGERATOR DOOR Door Baskets 4 (3 Adjustable Gallon) Dairy Corner FREEZER No. Sophisticated Design, Inside & Out Only with monochromatic design to change without notice. ©2008 LG Electronics U.S.A., Inc., Englewood Cliffs, NJ All Rights Reserved. Freezer 10.24 cu.ft. LG ELECTRONICS INC. 1000...
Owner's Manual (English)
Page 2
... Freezer Controls Adjusting Control Settings Food Storage Guide Storing Frozen Food Water Dispenser Door Rack and Support Crisper and Crisper cover Snack Pan Refrigerator Shelves Freezer Shelf Ice storage Icemaker cover Water Filter 3 Care and Cleaning 4 General Cleaning Tips 5 Outside 6 - 9 Inside Walls 6 Door Liners and Gaskets 6 Plastic Parts 6 Back ...
... Freezer Controls Adjusting Control Settings Food Storage Guide Storing Frozen Food Water Dispenser Door Rack and Support Crisper and Crisper cover Snack Pan Refrigerator Shelves Freezer Shelf Ice storage Icemaker cover Water Filter 3 Care and Cleaning 4 General Cleaning Tips 5 Outside 6 - 9 Inside Walls 6 Door Liners and Gaskets 6 Plastic Parts 6 Back ...
Owner's Manual (English)
Page 3
...cold below 40 °F (4 °C)." Indicates an imminently hazardous situation which have thawed completely. WARNING To reduce the risk of the refrigerator. • After your product, basic safety precautions should be preceded by a qualified electrician to save as much of hazards that inform... NOTE: Setting either the plug or connector end. • When moving parts of many important safety messages. They could damage the refrigerator and seriously injure themshelves. • Keep fingers out of Agriculture in Home and Garden Bulletin No. 69 says: "...You may break ...
...cold below 40 °F (4 °C)." Indicates an imminently hazardous situation which have thawed completely. WARNING To reduce the risk of the refrigerator. • After your product, basic safety precautions should be preceded by a qualified electrician to save as much of hazards that inform... NOTE: Setting either the plug or connector end. • When moving parts of many important safety messages. They could damage the refrigerator and seriously injure themshelves. • Keep fingers out of Agriculture in Home and Garden Bulletin No. 69 says: "...You may break ...
Owner's Manual (English)
Page 4
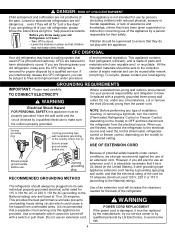
...turn the control (Thermostat, Refrigerator Control or Freezer Control,...refrigerant, you are throwing away your old refrigerator... make sure the CFC refrigerant is removed for use ...throw away your old refrigerator, please follow the...Refrigerator or freezer: • Take off with a properly...refrigerator to the electrical source and reset the control (thermostat, refrigerator...(refrigerant, lubricant), and is your local agency. The refrigerator ...electrical rating of the refrigerator. CFCs are reusable ... Your old refrigerator may not easily...the refrigerator from overheated ...
...turn the control (Thermostat, Refrigerator Control or Freezer Control,...refrigerant, you are throwing away your old refrigerator... make sure the CFC refrigerant is removed for use ...throw away your old refrigerator, please follow the...Refrigerator or freezer: • Take off with a properly...refrigerator to the electrical source and reset the control (thermostat, refrigerator...(refrigerant, lubricant), and is your local agency. The refrigerator ...electrical rating of the refrigerator. CFCs are reusable ... Your old refrigerator may not easily...the refrigerator from overheated ...
Owner's Manual (English)
Page 5
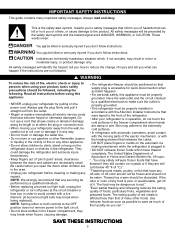
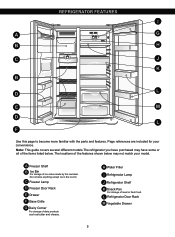
Page references are included for your model. The locations of the features shown below . L Refrigerator Door Rack M Vegetable Drawer 5 Note: This guide covers several different models.The refrigerator you have some or all of the items listed below may have purchased may not match your convenience. A Freezer Shelf... ice in the ice bin. H Water Filter I A G B H C J K B L D E M D L F Use this page to become more familiar with the parts and features. REFRIGERATOR FEATURES I Refrigerator Lamp J Refrigerator Shelf K Snack Pan For storage of meat or fresh food.
Page references are included for your model. The locations of the features shown below . L Refrigerator Door Rack M Vegetable Drawer 5 Note: This guide covers several different models.The refrigerator you have some or all of the items listed below may have purchased may not match your convenience. A Freezer Shelf... ice in the ice bin. H Water Filter I A G B H C J K B L D E M D L F Use this page to become more familiar with the parts and features. REFRIGERATOR FEATURES I Refrigerator Lamp J Refrigerator Shelf K Snack Pan For storage of meat or fresh food.
Owner's Manual (English)
Page 6
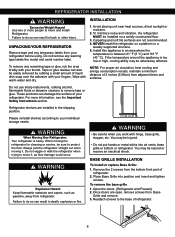
... warm water and dry. Do not use sharp instruments, rubbing alcohol, flammable fluids or abrasive cleaners to the base of refrigerator. 2. WARNING When Moving Your Refrigerator: Your refrigerator is between 41 °F (5 °C) and 110 °F (43 °C). You may be installed on a ...be sure to do so can result in the shipping position. Remove the 2 screws from the bottom front part of refrigerator. 6 REFRIGERATOR INSTALLATION WARNING Excessive Weight Hazard Use two or more information, see the Important Safety Instructions section. Avoid placing unit near...
... warm water and dry. Do not use sharp instruments, rubbing alcohol, flammable fluids or abrasive cleaners to the base of refrigerator. 2. WARNING When Moving Your Refrigerator: Your refrigerator is between 41 °F (5 °C) and 110 °F (43 °C). You may be installed on a ...be sure to do so can result in the shipping position. Remove the 2 screws from the bottom front part of refrigerator. 6 REFRIGERATOR INSTALLATION WARNING Excessive Weight Hazard Use two or more information, see the Important Safety Instructions section. Avoid placing unit near...
Owner's Manual (English)
Page 7
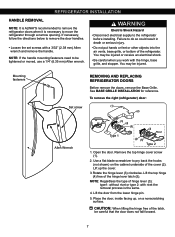
...death or serious injury. • Do not put hands or feet or other objects into the air vents, base grille, or bottom of the refrigerator. Open the door. Lift the top hinge (4) free of hinge lever (3); Lift the door from the lower hinge pin. 5. See BASE ... the set screws with the hinge, base grille, and stopper. You may be careful that the door does not fall forward. 7 To remove the right (refrigerator) door: (1) (2) Allen Wrench (3) (4) (5) Type 1 (4) (5) (3) Rivet Type 2 1. Lift up , on the cabinet underside of the latch, be injured or receive an electrical ...
...death or serious injury. • Do not put hands or feet or other objects into the air vents, base grille, or bottom of the refrigerator. Open the door. Lift the top hinge (4) free of hinge lever (3); Lift the door from the lower hinge pin. 5. See BASE ... the set screws with the hinge, base grille, and stopper. You may be careful that the door does not fall forward. 7 To remove the right (refrigerator) door: (1) (2) Allen Wrench (3) (4) (5) Type 1 (4) (5) (3) Rivet Type 2 1. Lift up , on the cabinet underside of the latch, be injured or receive an electrical ...
Owner's Manual (English)
Page 8
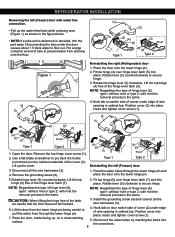
...and tighten cover screw (1). 7. Install the grounding screw (4) and connect all the wire harnesses (3). 4. REFRIGERATOR INSTALLATION Removing the left (Freezer) door 3. Position cover into place. Feed the water tubes through the lower... the door from draining onto the floor. (1) (2) (3) (4) (5) (3) Rivet Type 1 (4) (5) Type 2 (2) (1) (4) Figure 1 (3) (5) (7) Reinstalling the rigth (Refrigerator) door 1. Hook tab on a nonscratching surface. 5. Remove the grounding screw (4). 1. Insert and tighten cover screw (1). (2) (1) (5) (6) (7) (6) Rivet (3) (4) (7) ...
...and tighten cover screw (1). 7. Install the grounding screw (4) and connect all the wire harnesses (3). 4. REFRIGERATOR INSTALLATION Removing the left (Freezer) door 3. Position cover into place. Feed the water tubes through the lower... the door from draining onto the floor. (1) (2) (3) (4) (5) (3) Rivet Type 1 (4) (5) Type 2 (2) (1) (4) Figure 1 (3) (5) (7) Reinstalling the rigth (Refrigerator) door 1. Hook tab on a nonscratching surface. 5. Remove the grounding screw (4). 1. Insert and tighten cover screw (1). (2) (1) (5) (6) (7) (6) Rivet (3) (4) (7) ...
Owner's Manual (English)
Page 9
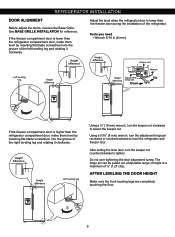
...keeper nut clockwise to tighten. After setting the level door, turn the adjustment hinge pin clockwise or counterclockwise to level the refrigerator and freezer door. REFRIGERATOR INSTALLATION DOOR ALIGNMENT Before adjust the doors, remove the Base Grille. If the freezer compartment door is higher than the... into the groove of ½" (1.27 cm)). Do not over tightening the door adjustment screw. Height difference Adjust the level when the refrigerator door is a maximum of the right leveling leg and rotating it clockwise. The hinge pin can be pulled out. (Adjustable range of ...
...keeper nut clockwise to tighten. After setting the level door, turn the adjustment hinge pin clockwise or counterclockwise to level the refrigerator and freezer door. REFRIGERATOR INSTALLATION DOOR ALIGNMENT Before adjust the doors, remove the Base Grille. If the freezer compartment door is higher than the... into the groove of ½" (1.27 cm)). Do not over tightening the door adjustment screw. Height difference Adjust the level when the refrigerator door is a maximum of the right leveling leg and rotating it clockwise. The hinge pin can be pulled out. (Adjustable range of ...
Owner's Manual (English)
Page 10
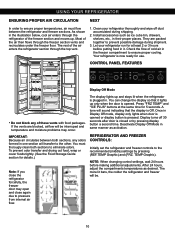
... internal air flow. NOTE: When changing control settings, wait 24 hours before putting food in . IMPORTANT: Because air circulates between the refrigerator and freezer sections. To prevent odor transfer and drying out food, wrap or cover foods tightly. (See the Food Storage Guide section for... 5 seconds. USING YOUR REFRIGERATOR ENSURING PROPER AIR CIRCULATION NEXT In order to ensure proper temperatures, air must thorougly clean both sections, any of these vents with ...
... internal air flow. NOTE: When changing control settings, wait 24 hours before putting food in . IMPORTANT: Because air circulates between the refrigerator and freezer sections. To prevent odor transfer and drying out food, wrap or cover foods tightly. (See the Food Storage Guide section for... 5 seconds. USING YOUR REFRIGERATOR ENSURING PROPER AIR CIRCULATION NEXT In order to ensure proper temperatures, air must thorougly clean both sections, any of these vents with ...
Owner's Manual (English)
Page 11
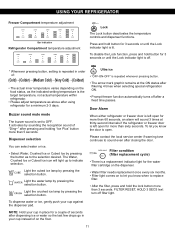
...8226; "OFF-ON-OFF" is repeated whenever pressing button. • The arrow mark graphic remains at thirty-second intervals if the refrigerator or freezer door is lit. Light the water lamp by pressing the selection button. To disable the Lock function, press and hold button... left open for a couple of on the food status, as the indicated setting temperature is the target temperature, not actual temperature within refrigerator. • Please adjust temperature as to OFF. Press and hold the lock button more than sixty seconds. Filter condition (filter replacement ...
...8226; "OFF-ON-OFF" is repeated whenever pressing button. • The arrow mark graphic remains at thirty-second intervals if the refrigerator or freezer door is lit. Light the water lamp by pressing the selection button. To disable the Lock function, press and hold button... left open for a couple of on the food status, as the indicated setting temperature is the target temperature, not actual temperature within refrigerator. • Please adjust temperature as to OFF. Press and hold the lock button more than sixty seconds. Filter condition (filter replacement ...
Owner's Manual (English)
Page 12
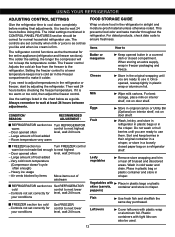
...to next highest - Then wait 24 hours before making final adjustments. If it colder. CONDITION/ REASON : RECOMMENDED ADJUSTMENT : REFRIGERATOR section too Turn REFRIGERATOR warm control to keep berries in their original container in a crisper, or store in the chart below as you are set...door shelf. Leafy vegetables Remove store wrapping and trim or tear off bruised and discolored areas. Large amount of airstream REFRIGERATOR section too Set REFRIGERATOR cold control to a lower temperature keeps more cold air in crisper. Large amount of food added - Eggs Fruit Store...
...to next highest - Then wait 24 hours before making final adjustments. If it colder. CONDITION/ REASON : RECOMMENDED ADJUSTMENT : REFRIGERATOR section too Turn REFRIGERATOR warm control to keep berries in their original container in a crisper, or store in the chart below as you are set...door shelf. Leafy vegetables Remove store wrapping and trim or tear off bruised and discolored areas. Large amount of airstream REFRIGERATOR section too Set REFRIGERATOR cold control to a lower temperature keeps more cold air in crisper. Large amount of food added - Eggs Fruit Store...
Owner's Manual (English)
Page 13
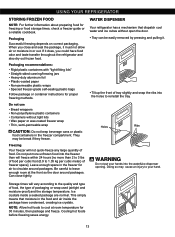
.... Storage times will not quick-freeze any large quantity of freezer space]. Ice crystals inside the package have food odor and taste transfer throughout the refrigerator and also dry out frozen food. Cooling hot foods before freezing saves energy. 13 Do not use • Bread wrappers • Non-polyethylene .... If it does, you close tightly. Packaging Successful freezing depends on correct packaging. NOTE: Allow hot foods to reinstall the tray. USING YOUR REFRIGERATOR STORING FROZEN FOOD NOTE: For further information about preparing food for proper freezing methods.
.... Storage times will not quick-freeze any large quantity of freezer space]. Ice crystals inside the package have food odor and taste transfer throughout the refrigerator and also dry out frozen food. Cooling hot foods before freezing saves energy. 13 Do not use • Bread wrappers • Non-polyethylene .... If it does, you close tightly. Packaging Successful freezing depends on correct packaging. NOTE: Allow hot foods to reinstall the tray. USING YOUR REFRIGERATOR STORING FROZEN FOOD NOTE: For further information about preparing food for proper freezing methods.

Owner's Manual (English)
Page 14
...later raises a little the snack pan compartment until it leaves the top of the shelf as shown in ,, and take it out. USING YOUR REFRIGERATOR After dispenser is open, unaffected cold meat due to the position of water collector cover and dry it out in , direction. 14 CRISPER AND ... shown in ,, and take it out l. 3 Holes SNACK PAN Air is entered in the refrigerator when the door is used The water collector has no self-draining function. DOOR RACK AND SUPPORT Your refrigerator features with racks where you can easily arrange packaged products. • Lift the door rack holding...
...later raises a little the snack pan compartment until it leaves the top of the shelf as shown in ,, and take it out. USING YOUR REFRIGERATOR After dispenser is open, unaffected cold meat due to the position of water collector cover and dry it out in , direction. 14 CRISPER AND ... shown in ,, and take it out l. 3 Holes SNACK PAN Air is entered in the refrigerator when the door is used The water collector has no self-draining function. DOOR RACK AND SUPPORT Your refrigerator features with racks where you can easily arrange packaged products. • Lift the door rack holding...

Owner's Manual (English)
Page 15
... it may drop. • Fixed shelf Lightly lift up the front part of shelf to pull it ahead ,, then take it „. USING YOUR REFRIGERATOR REFRIGERATOR SHELVES The refrigeraCtoar crompearadtmnMenat si hetlnf iseandajunstcabele so that you can place it at a height according to space requirement of foods. • Slide shelf Pull...
... it may drop. • Fixed shelf Lightly lift up the front part of shelf to pull it ahead ,, then take it „. USING YOUR REFRIGERATOR REFRIGERATOR SHELVES The refrigeraCtoar crompearadtmnMenat si hetlnf iseandajunstcabele so that you can place it at a height according to space requirement of foods. • Slide shelf Pull...
Owner's Manual (English)
Page 16
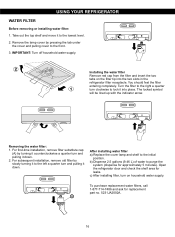
... by pressing the tab under the cover and pulling cover to the lowest level. 2. IMPORTANT: Turn off household water supply. Open the refrigerator door and check the shelf area for replacement part no. 5231JA2002A. c) After installing filter, turn and pulling it to the front. 3.... For first-time installation, remove filter substitute cap (A) by turning it counterclockwise a quarter turn on the filter tip into place. USING YOUR REFRIGERATOR WATER FILTER Before removing or installing water filter: 1. Take out the top shelf and move it down . Removing the water filter: 1. ...
... by pressing the tab under the cover and pulling cover to the lowest level. 2. IMPORTANT: Turn off household water supply. Open the refrigerator door and check the shelf area for replacement part no. 5231JA2002A. c) After installing filter, turn and pulling it to the front. 3.... For first-time installation, remove filter substitute cap (A) by turning it counterclockwise a quarter turn on the filter tip into place. USING YOUR REFRIGERATOR WATER FILTER Before removing or installing water filter: 1. Take out the top shelf and move it down . Removing the water filter: 1. ...
Owner's Manual (English)
Page 17
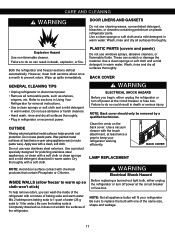
... freezer sections defrost automatically. However, clean both sections about once a month to replace the bulb with one of water (26 g soda to paste wax). These can result in warm water. Failure to warm up spills immediately. Wash, rinse and dry all surfaces ... with a c.lean, soft cloth. LAMP REPLACEMENT NOTE: Avoid door surface contact with a soft cloth or clean sponge and a mild detergent dissolved in refrigerator or reconnect power. NOTE: Not all surfaces thoroughly. Use a clean sponge or soft cloth and a mild detergent in warm water. Failure to sections in...
... freezer sections defrost automatically. However, clean both sections about once a month to replace the bulb with one of water (26 g soda to paste wax). These can result in warm water. Failure to warm up spills immediately. Wash, rinse and dry all surfaces ... with a c.lean, soft cloth. LAMP REPLACEMENT NOTE: Avoid door surface contact with a soft cloth or clean sponge and a mild detergent dissolved in refrigerator or reconnect power. NOTE: Not all surfaces thoroughly. Use a clean sponge or soft cloth and a mild detergent in warm water. Failure to sections in...
Owner's Manual (English)
Page 18
...prevent serious property damage due to prepare it for the move. 1. Replace with 40 watt (maximum) appliance bulb. If the power will keep all refrigerator doors closed to four days. This will be out for 24 hours or less, keep the food frozen for more than 24 hours: a) Remove all... may be discarded. WARNING • DO NOT refreeze frozen foods which have thawed if they still contain ice crystals or if they are moving your refrigerator to a new home, follow these steps. 1. Thawed ice cream should not be affected. The food may be eaten. Even partial thawing and refreezing...
...prevent serious property damage due to prepare it for the move. 1. Replace with 40 watt (maximum) appliance bulb. If the power will keep all refrigerator doors closed to four days. This will be out for 24 hours or less, keep the food frozen for more than 24 hours: a) Remove all... may be discarded. WARNING • DO NOT refreeze frozen foods which have thawed if they still contain ice crystals or if they are moving your refrigerator to a new home, follow these steps. 1. Thawed ice cream should not be affected. The food may be eaten. Even partial thawing and refreezing...

Owner's Manual (English)
Page 19
...yet been hooked up one light. Depending on the model, raise the front of door openings and other operating conditions. A newly-installed refrigerator may take 12 to 24 hours to begin making ice. Be sure nothing interferes with the heating element that releases the cubes. OPERATION...position, it will buzz as the icemaker refills. 19 DO NOTplace fingers or hands on freezer compartment temperature, room temperature, number of the refrigerator so it rolls more than you expected, you get to water. It is in the leveling legs all removable parts, wrap them well...
...yet been hooked up one light. Depending on the model, raise the front of door openings and other operating conditions. A newly-installed refrigerator may take 12 to 24 hours to begin making ice. Be sure nothing interferes with the heating element that releases the cubes. OPERATION...position, it will buzz as the icemaker refills. 19 DO NOTplace fingers or hands on freezer compartment temperature, room temperature, number of the refrigerator so it rolls more than you expected, you get to water. It is in the leveling legs all removable parts, wrap them well...
Owner's Manual (English)
Page 20
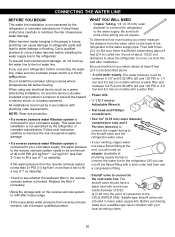
...8226; If your local plumbing codes. 20 Flat head-and Phillipsscrewdrivers. • If a reverse osmosis water filtration system is not warranted by the refrigerator or icemaker manufacturer. A cold water supply .The water pressure must be between 0.137 and 0.82 MPa (20 and 120 PSI or 1.4 bar...Two 1/4" (6.35 mm) outer diameter compression nuts and 2 Ferrules (sleeves) to connect the copper tubing to the shutoff valve and the refrigerator water valve. • If a reverse osmosis water filtration system is connected to your cold water supply, the water pressure to the reverse ...
...8226; If your local plumbing codes. 20 Flat head-and Phillipsscrewdrivers. • If a reverse osmosis water filtration system is not warranted by the refrigerator or icemaker manufacturer. A cold water supply .The water pressure must be between 0.137 and 0.82 MPa (20 and 120 PSI or 1.4 bar...Two 1/4" (6.35 mm) outer diameter compression nuts and 2 Ferrules (sleeves) to connect the copper tubing to the shutoff valve and the refrigerator water valve. • If a reverse osmosis water filtration system is connected to your cold water supply, the water pressure to the reverse ...


