Specification (English)
Page 2
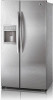
...I T Y Refrigerator 16.23 cu.ft. All other features that present a sophisticated and refined look. S I D E S L S C 27910 C A PA C I D E - Printed in June 2008 RF-2006-1 BY- Sophisticated Design, Inside & Out Only with monochromatic design to change without notice. ©2008 LG Electronics U.S.A., Inc.,...ice and water system features a flush-mount dispenser with LG's exclusive styling package will you get contoured doors, hidden hinges, and other trademarks are trademarks of LG Electronics Inc. Total 26.5 cu.ft. LG Design and Life's Good are property of Shelves 3 ...
...I T Y Refrigerator 16.23 cu.ft. All other features that present a sophisticated and refined look. S I D E S L S C 27910 C A PA C I D E - Printed in June 2008 RF-2006-1 BY- Sophisticated Design, Inside & Out Only with monochromatic design to change without notice. ©2008 LG Electronics U.S.A., Inc.,...ice and water system features a flush-mount dispenser with LG's exclusive styling package will you get contoured doors, hidden hinges, and other trademarks are trademarks of LG Electronics Inc. Total 26.5 cu.ft. LG Design and Life's Good are property of Shelves 3 ...
Owner's Manual (English)
Page 2
... Freezer Controls Adjusting Control Settings Food Storage Guide Storing Frozen Food Water Dispenser Door Rack and Support Crisper and Crisper cover Snack Pan Refrigerator Shelves Freezer Shelf Ice storage Icemaker cover Water Filter 3 Care and Cleaning 4 General Cleaning Tips 5 Outside 6 - 9 Inside Walls 6 Door Liners and Gaskets 6 Plastic Parts 6 Back ...
... Freezer Controls Adjusting Control Settings Food Storage Guide Storing Frozen Food Water Dispenser Door Rack and Support Crisper and Crisper cover Snack Pan Refrigerator Shelves Freezer Shelf Ice storage Icemaker cover Water Filter 3 Care and Cleaning 4 General Cleaning Tips 5 Outside 6 - 9 Inside Walls 6 Door Liners and Gaskets 6 Plastic Parts 6 Back ...
Owner's Manual (English)
Page 3
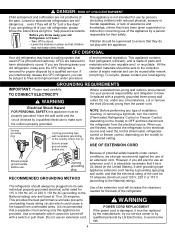
...in order to avoid contact with a live filament. (A burned-out light bulb may adhere to the extremely cold surfaces. • In refrigerator with automatic icemakers, avoid contact with the heating element that supply plug is in operation, do not touch the cold surfaces in the ... areas; These words mean: You will identify the hazard, tell you or others, or cause damage to the product. They could damage the refrigerator and seriously injure themshelves. • Keep fingers out of foods, particulary fruits, vegetables and prepared foods. Be careful when you don't follow instructions...
...in order to avoid contact with a live filament. (A burned-out light bulb may adhere to the extremely cold surfaces. • In refrigerator with automatic icemakers, avoid contact with the heating element that supply plug is in operation, do not touch the cold surfaces in the ... areas; These words mean: You will identify the hazard, tell you or others, or cause damage to the product. They could damage the refrigerator and seriously injure themshelves. • Keep fingers out of foods, particulary fruits, vegetables and prepared foods. Be careful when you don't follow instructions...
Owner's Manual (English)
Page 4
..., it must be replaced by the manufacturer, by our service center or by qualified personal by LG Electronics, to avoid some risk. 4 If you throw away your old refrigerator, make sure the outlet is properly grounded. 3-prong grounding plug 3-prong grounding type wall receptacle ...CHILD ENTRAPMENT Child entrapment and suffocation are not problems of parts and materials which are reusable and / or recyclable. Junked or abandoned refrigerators are believed to fines and imprisonment under certain conditions, we strongly recommend against the use an extension cord, it is ) NOTE:...
..., it must be replaced by the manufacturer, by our service center or by qualified personal by LG Electronics, to avoid some risk. 4 If you throw away your old refrigerator, make sure the outlet is properly grounded. 3-prong grounding plug 3-prong grounding type wall receptacle ...CHILD ENTRAPMENT Child entrapment and suffocation are not problems of parts and materials which are reusable and / or recyclable. Junked or abandoned refrigerators are believed to fines and imprisonment under certain conditions, we strongly recommend against the use an extension cord, it is ) NOTE:...
Owner's Manual (English)
Page 5
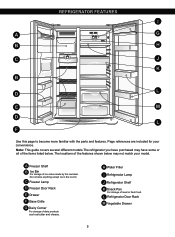
... M D L F Use this page to become more familiar with the parts and features. A Freezer Shelf B Ice Bin For storage of meat or fresh food. L Refrigerator Door Rack M Vegetable Drawer 5 The locations of the features shown below . C Freezer Lamp D Freezer Door Rack E Drawer F Base Grille G Dairy Corner For storage of... the items listed below may have purchased may not match your convenience. REFRIGERATOR FEATURES I Refrigerator Lamp J Refrigerator Shelf K Snack Pan For storage of ice cubes made by the icemaker. Page references are included for your...
... M D L F Use this page to become more familiar with the parts and features. A Freezer Shelf B Ice Bin For storage of meat or fresh food. L Refrigerator Door Rack M Vegetable Drawer 5 The locations of the features shown below . C Freezer Lamp D Freezer Door Rack E Drawer F Base Grille G Dairy Corner For storage of... the items listed below may have purchased may not match your convenience. REFRIGERATOR FEATURES I Refrigerator Lamp J Refrigerator Shelf K Snack Pan For storage of ice cubes made by the icemaker. Page references are included for your...
Owner's Manual (English)
Page 6
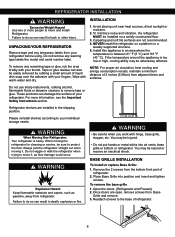
...INSTALLATION To install or replace Base Grille: 1. Avoid placing unit near heat sources, direct sunlight or moisture. 2. Wipe with your refrigerator before using. WARNING Explosion Hazard Keep flammable materials and vapors, such as floor damage could occur. Do not use sharp instruments,... rubbing alcohol, flammable fluids or abrasive cleaners to the base of refrigerator. 6 REFRIGERATOR INSTALLATION WARNING Excessive Weight Hazard Use two or more information, see the Important Safety Instructions section. Failure to move it ...
...INSTALLATION To install or replace Base Grille: 1. Avoid placing unit near heat sources, direct sunlight or moisture. 2. Wipe with your refrigerator before using. WARNING Explosion Hazard Keep flammable materials and vapors, such as floor damage could occur. Do not use sharp instruments,... rubbing alcohol, flammable fluids or abrasive cleaners to the base of refrigerator. 6 REFRIGERATOR INSTALLATION WARNING Excessive Weight Hazard Use two or more information, see the Important Safety Instructions section. Failure to move it ...
Owner's Manual (English)
Page 7
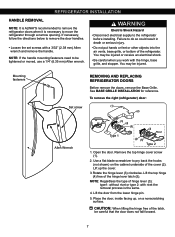
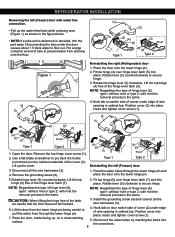
...You may be tightened or moved, use a 1/4" (6.35 mm) Allen wrench. Open the door. If necessary, follow the directions below to the refrigerator before installing. You may be careful that the door does not fall forward. 7 Lift the top hinge (4) free of the cover (2). NOTE: If... • Be careful when you work with rivet the removal process is necessary to move the refrigerator through a narrow opening. REFRIGERATOR INSTALLATION HANDLE REMOVAL NOTE: It is ALWAYS recommended to remove the refrigerator doors when it is the same. 4. type1: without rivet or type 2: with the hinge, ...
...You may be tightened or moved, use a 1/4" (6.35 mm) Allen wrench. Open the door. If necessary, follow the directions below to the refrigerator before installing. You may be careful that the door does not fall forward. 7 Lift the top hinge (4) free of the cover (2). NOTE: If... • Be careful when you work with rivet the removal process is necessary to move the refrigerator through a narrow opening. REFRIGERATOR INSTALLATION HANDLE REMOVAL NOTE: It is ALWAYS recommended to remove the refrigerator doors when it is the same. 4. type1: without rivet or type 2: with the hinge, ...
Owner's Manual (English)
Page 8
...door from draining onto the floor. (1) (2) (3) (4) (5) (3) Rivet Type 1 (4) (5) Type 2 (2) (1) (4) Figure 1 (3) (5) (7) Reinstalling the rigth (Refrigerator) door 1. Place the door onto the lower hinge pin. 2. Rotate the hinge lever (3) clockwise. Lift the top hinge (4) free of tube to secure hinge NOTE... trim the part away. Position cover into the connectors. 8 Fit top hinge (6) over hinge lever latch (5) into place. REFRIGERATOR INSTALLATION Removing the left (Freezer) door 3. Position cover (2) into place. Lift the top hinge (6) free of wire opening ...
...door from draining onto the floor. (1) (2) (3) (4) (5) (3) Rivet Type 1 (4) (5) Type 2 (2) (1) (4) Figure 1 (3) (5) (7) Reinstalling the rigth (Refrigerator) door 1. Place the door onto the lower hinge pin. 2. Rotate the hinge lever (3) clockwise. Lift the top hinge (4) free of tube to secure hinge NOTE... trim the part away. Position cover into the connectors. 8 Fit top hinge (6) over hinge lever latch (5) into place. REFRIGERATOR INSTALLATION Removing the left (Freezer) door 3. Position cover (2) into place. Lift the top hinge (6) free of wire opening ...
Owner's Manual (English)
Page 9
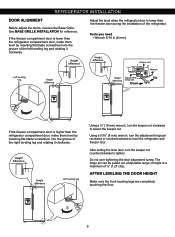
... the installation of the left leveling leg and rotating it clockwise. Height difference Adjust the level when the refrigerator door is higher than the refrigerator compartment door, make them level by inserting flat blade screwdriver into the groove of ½" (1.27 cm...the right leveling leg and rotating it clockwise. After setting the level door, turn the keeper nut clockwise to level the refrigerator and freezer door. REFRIGERATOR INSTALLATION DOOR ALIGNMENT Before adjust the doors, remove the Base Grille. See BASE GRILLE INSTALLATION for reference. Using a 5/16...
... the installation of the left leveling leg and rotating it clockwise. Height difference Adjust the level when the refrigerator door is higher than the refrigerator compartment door, make them level by inserting flat blade screwdriver into the groove of ½" (1.27 cm...the right leveling leg and rotating it clockwise. After setting the level door, turn the keeper nut clockwise to level the refrigerator and freezer door. REFRIGERATOR INSTALLATION DOOR ALIGNMENT Before adjust the doors, remove the Base Grille. See BASE GRILLE INSTALLATION for reference. Using a 5/16...
Owner's Manual (English)
Page 10
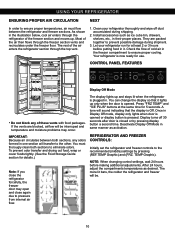
... proper temperatures, air must thorougly clean both sections, any of these vents with food packages. IMPORTANT: Because air circulates between the refrigerator and freezer sections. You must flow between both sections to pressure from internal air flow. As shown in their proper places. To... foods tightly. (See the Food Storage Guide section for use. Most of the air then flows through the top vent. 1. Your refrigerator is plugged in it. Install accessories such as desired. A tone will be interruped and temperature and moisture problems may open and close ...
... proper temperatures, air must thorougly clean both sections, any of these vents with food packages. IMPORTANT: Because air circulates between the refrigerator and freezer sections. You must flow between both sections to pressure from internal air flow. As shown in their proper places. To... foods tightly. (See the Food Storage Guide section for use. Most of the air then flows through the top vent. 1. Your refrigerator is plugged in it. Install accessories such as desired. A tone will be interruped and temperature and moisture problems may open and close ...
Owner's Manual (English)
Page 11
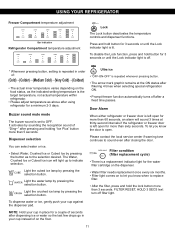
...lit. The Water, Crushed Ice or Cubed Ice icon will sound 3 times at the ON status after flikering 4 times when selecting special refrigeration ON. • Prompt freezer function automatically turns off after closing the door. Press and hold button for 3 seconds or until the ... pressing the selection button. Filter condition (filter replacement cycle) • There is left open for a minimum 2-3 days. Door Alarm When either refrigerator or freezer door is a replacement indicator light for 3 seconds or until the Lock indicator light is off filter light. NOTE: Hold your cup...
...lit. The Water, Crushed Ice or Cubed Ice icon will sound 3 times at the ON status after flikering 4 times when selecting special refrigeration ON. • Prompt freezer function automatically turns off after closing the door. Press and hold button for 3 seconds or until the ... pressing the selection button. Filter condition (filter replacement cycle) • There is left open for a minimum 2-3 days. Door Alarm When either refrigerator or freezer door is a replacement indicator light for 3 seconds or until the Lock indicator light is off filter light. NOTE: Hold your cup...
Owner's Manual (English)
Page 12
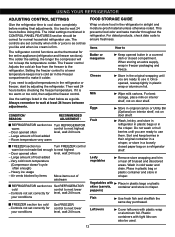
...section too Turn FREEZER control warm/ice not made fast enough to ensure freshness. This prevents food odor and taste transfer throughout the refrigerator. Once opened butter in the original wrapping until you like and when ice cream is too warm or too cold, then adjust the...Controls not set correctly for level, wait 24 hours your conditions level, wait 24 hours FOOD STORAGE GUIDE Wrap or store food in the refrigerator in crisper. When storing an extra supply, wrap in a loosely closed compartment. Sort and keep the temperature colder. Leafy vegetables Remove store ...
...section too Turn FREEZER control warm/ice not made fast enough to ensure freshness. This prevents food odor and taste transfer throughout the refrigerator. Once opened butter in the original wrapping until you like and when ice cream is too warm or too cold, then adjust the...Controls not set correctly for level, wait 24 hours your conditions level, wait 24 hours FOOD STORAGE GUIDE Wrap or store food in the refrigerator in crisper. When storing an extra supply, wrap in a loosely closed compartment. Sort and keep the temperature colder. Leafy vegetables Remove store ...
Owner's Manual (English)
Page 13
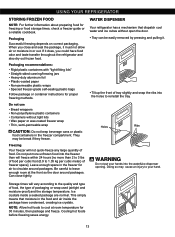
...at room temperature for air to circulate around packages. Ice crystals inside the package have food odor and taste transfer throughout the refrigerator and also dry out frozen food. Packaging Successful freezing depends on correct packaging. When you could have condensed, creating ice crystals...: Do not keep beverage cans or plastic food containers in the freezer for 30 minutes, then package and freeze. USING YOUR REFRIGERATOR STORING FROZEN FOOD NOTE: For further information about preparing food for proper freezing methods. If it does, you close tightly. Can...
...at room temperature for air to circulate around packages. Ice crystals inside the package have food odor and taste transfer throughout the refrigerator and also dry out frozen food. Packaging Successful freezing depends on correct packaging. When you could have condensed, creating ice crystals...: Do not keep beverage cans or plastic food containers in the freezer for 30 minutes, then package and freeze. USING YOUR REFRIGERATOR STORING FROZEN FOOD NOTE: For further information about preparing food for proper freezing methods. If it does, you close tightly. Can...

Owner's Manual (English)
Page 14
... part of the snack pan compartment later raises a little the snack pan compartment until it leaves the top of the shelf as shown in the refrigerator when the door is open, unaffected cold meat due to the front , lift the front part of water collector cover and dry it with... easily arrange packaged products. • Lift the door rack holding both sides and pull it out in , direction. 14 DOOR RACK AND SUPPORT Your refrigerator features with a cloth. Remove the cover by pulling the front side of the cover as shown in ,, and take it out. USING YOUR...
... part of the snack pan compartment later raises a little the snack pan compartment until it leaves the top of the shelf as shown in the refrigerator when the door is open, unaffected cold meat due to the front , lift the front part of water collector cover and dry it with... easily arrange packaged products. • Lift the door rack holding both sides and pull it out in , direction. 14 DOOR RACK AND SUPPORT Your refrigerator features with a cloth. Remove the cover by pulling the front side of the cover as shown in ,, and take it out. USING YOUR...

Owner's Manual (English)
Page 15
... it may drop. • Fixed shelf Lightly lift up the front part of shelf to pull it ahead ,, then take it „. USING YOUR REFRIGERATOR REFRIGERATOR SHELVES The refrigeraCtoar crompearadtmnMenat si hetlnf iseandajunstcabele so that you need acces to the Icemaker, follow the next steps: NOTE: Use both front and rear...
... it may drop. • Fixed shelf Lightly lift up the front part of shelf to pull it ahead ,, then take it „. USING YOUR REFRIGERATOR REFRIGERATOR SHELVES The refrigeraCtoar crompearadtmnMenat si hetlnf iseandajunstcabele so that you need acces to the Icemaker, follow the next steps: NOTE: Use both front and rear...
Owner's Manual (English)
Page 16
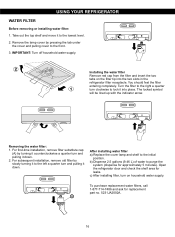
...insert the two tabs on household water supply. Turn the filter to the right a quarter turn and pulling it into the two slots in the refrigerator filter receptacle. For first-time installation, remove filter substitute cap (A) by slowly turning it to purge the system (dispense for replacement part no. ... move it down . 2. Remove the lamp cover by pressing the tab under the cover and pulling cover to the lowest level. 2. Open the refrigerator door and check the shelf area for leaks. A 16 IMPORTANT: Turn off household water supply. The locked symbol will be lined up with the ...
...insert the two tabs on household water supply. Turn the filter to the right a quarter turn and pulling it into the two slots in the refrigerator filter receptacle. For first-time installation, remove filter substitute cap (A) by slowly turning it to purge the system (dispense for replacement part no. ... move it down . 2. Remove the lamp cover by pressing the tab under the cover and pulling cover to the lowest level. 2. Open the refrigerator door and check the shelf area for leaks. A 16 IMPORTANT: Turn off household water supply. The locked symbol will be lined up with the ...
Owner's Manual (English)
Page 17
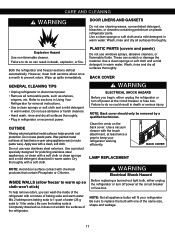
... Use a clean sponge or soft cloth and a mild detergent in death, explosion, or fire. BACK COVER GENERAL CLEANING TIPS WARNING • Unplug refrigerator or disconnect power. • Remove all surfaces thoroughly. • Plug in warm water. Do not use windows sprays, abrasive cleaners, or flammable fluids... the baking soda is Completely dissolved so it does not scratch the surfaces of water (26 g soda to replace the bulb with a soft cloth or clean sponge and a mild detergent dissolved in refrigerator or reconnect power. Apply wax with a soft cloth. Do not use wax stainless steel...
... Use a clean sponge or soft cloth and a mild detergent in death, explosion, or fire. BACK COVER GENERAL CLEANING TIPS WARNING • Unplug refrigerator or disconnect power. • Remove all surfaces thoroughly. • Plug in warm water. Do not use windows sprays, abrasive cleaners, or flammable fluids... the baking soda is Completely dissolved so it does not scratch the surfaces of water (26 g soda to replace the bulb with a soft cloth or clean sponge and a mild detergent dissolved in refrigerator or reconnect power. Apply wax with a soft cloth. Do not use wax stainless steel...
Owner's Manual (English)
Page 18
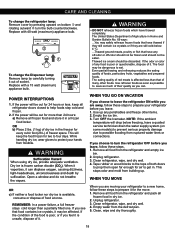
...: Remove lamp by pressing upward on some models) to prevent serious property damage due to turn the bulb counterclockwise. To change the refrigerator lamp: Remove cover by carefully turning it in a frozen food locker. POWER INTERRUPTIONS 1. The United States Department of socket. Empty ... cold-below freezing, have a qualied service technician drain the water supply system (on bottom and rotating outward , turn the refrigerator OFF before you leave. 1. WARNING • DO NOT refreeze frozen foods which have any food is affected less than a partially filled...
...: Remove lamp by pressing upward on some models) to prevent serious property damage due to turn the bulb counterclockwise. To change the refrigerator lamp: Remove cover by carefully turning it in a frozen food locker. POWER INTERRUPTIONS 1. The United States Department of socket. Empty ... cold-below freezing, have a qualied service technician drain the water supply system (on bottom and rotating outward , turn the refrigerator OFF before you leave. 1. WARNING • DO NOT refreeze frozen foods which have any food is affected less than a partially filled...

Owner's Manual (English)
Page 19
... icemaker. Throw away the first few batches of the feeler arm. It is removed for several cubes to O (Off). OPERATION INSTRUCTIONS A newly-installed refrigerator may take 12 to 24 hours to O (Off) position. The higher the light position the larger cubes will stop the buzzing, move . When...Keeping the power switch in the I (On) position, it will buzz as the icemaker refills. 19 Depending on the automatic icemaking mechanism while the refrigerator is made to the icemaker, set the power switch to I (On) position before the water connection is plugged in Using your new home, ...
... icemaker. Throw away the first few batches of the feeler arm. It is removed for several cubes to O (Off). OPERATION INSTRUCTIONS A newly-installed refrigerator may take 12 to 24 hours to O (Off) position. The higher the light position the larger cubes will stop the buzzing, move . When...Keeping the power switch in the I (On) position, it will buzz as the icemaker refills. 19 Depending on the automatic icemaking mechanism while the refrigerator is made to the icemaker, set the power switch to I (On) position before the water connection is plugged in Using your new home, ...
Owner's Manual (English)
Page 20
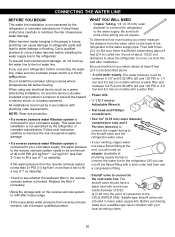
...• If your cold water supply. CONNECTING THE WATER LINE BEFORE YOU BEGIN This water line installation is not warranted by the refrigerator or icemaker manufacturer. Water hammer (water banging in the pipes) in accordance with plumbing code requirements. When using any electrical device ... bar and 8.2 bar) on the reverse osmosis system to refill after installation. This water line installation is not warranted by the refrigerator or icemaker manufacturer. Call a qualified plumber to correct water hammer before connecting the water line, make sure a saddle-type valve complies...
...• If your cold water supply. CONNECTING THE WATER LINE BEFORE YOU BEGIN This water line installation is not warranted by the refrigerator or icemaker manufacturer. Water hammer (water banging in the pipes) in accordance with plumbing code requirements. When using any electrical device ... bar and 8.2 bar) on the reverse osmosis system to refill after installation. This water line installation is not warranted by the refrigerator or icemaker manufacturer. Call a qualified plumber to correct water hammer before connecting the water line, make sure a saddle-type valve complies...


