Owners Manual
Page 3
... INSTRUCTIONS 59 LIMITED WARRANTY 4 READ ALL INSTRUCTIONS BEFORE USE 4 WARNING 7 CAUTION 59 For USA 63 For Canada 8 PRODUCT OVERVIEW 8 Product Features 12 INSTALLATION 12 Before Installing 13 Choosing the Proper Location 15 Removing/Assembling the Handles 16 Removing/Assembling the Doors and Drawers 21 Connecting the Water Line 24 Leveling and Door Alignment 25 Turning on the Power 26 OPERATION 26 Before Use 27 Control Panel 28 Sabbath Mode 29 Ice and Water Dispenser 29 Ice Compartment 30 Automatic Icemaker 31...
... INSTRUCTIONS 59 LIMITED WARRANTY 4 READ ALL INSTRUCTIONS BEFORE USE 4 WARNING 7 CAUTION 59 For USA 63 For Canada 8 PRODUCT OVERVIEW 8 Product Features 12 INSTALLATION 12 Before Installing 13 Choosing the Proper Location 15 Removing/Assembling the Handles 16 Removing/Assembling the Doors and Drawers 21 Connecting the Water Line 24 Leveling and Door Alignment 25 Turning on the Power 26 OPERATION 26 Before Use 27 Control Panel 28 Sabbath Mode 29 Ice and Water Dispenser 29 Ice Compartment 30 Automatic Icemaker 31...

Owners Manual
Page 6
... discarding the appliance, remove the door gasket while leaving the shelves and baskets in a risk of electric shock. 6 SAFETY INSTRUCTIONS Maintenance • Do not use a hair dryer to dry the inside . • If disposing of a refrigerator, make sure the refrigerant and insulation foam are removed for proper grounding. • Never unplug the appliance by a qualified servicer. Grounding Instructions • Improper connection of the equipment-grounding...
... discarding the appliance, remove the door gasket while leaving the shelves and baskets in a risk of electric shock. 6 SAFETY INSTRUCTIONS Maintenance • Do not use a hair dryer to dry the inside . • If disposing of a refrigerator, make sure the refrigerant and insulation foam are removed for proper grounding. • Never unplug the appliance by a qualified servicer. Grounding Instructions • Improper connection of the equipment-grounding...

Owners Manual
Page 13
... Proper Location Water Water supply must be easily removed by plugging in multiple appliances in the same outlet with your fingers. NOTE • Installing on a solidly constructed floor. These products can damage the surface of your refrigerator. • Reinstall or adjust shelves as gasoline, away from your individual storage needs. Do not remove any warning labels, the model and serial number label, or the Tech Sheet...
... Proper Location Water Water supply must be easily removed by plugging in multiple appliances in the same outlet with your fingers. NOTE • Installing on a solidly constructed floor. These products can damage the surface of your refrigerator. • Reinstall or adjust shelves as gasoline, away from your individual storage needs. Do not remove any warning labels, the model and serial number label, or the Tech Sheet...

Owners Manual
Page 16
... • Use two or more people to remove and install the refrigerator doors and freezer drawer. • Disconnect the electrical supply to detach the water supply line as the handle may come off. Hold the water supply connection and gently push the collet a to the refrigerator before installing. • Do not put hands, feet or other objects into the air vents or bottom of the refrigerator. • Be careful when handling the hinge and...
... • Use two or more people to remove and install the refrigerator doors and freezer drawer. • Disconnect the electrical supply to detach the water supply line as the handle may come off. Hold the water supply connection and gently push the collet a to the refrigerator before installing. • Do not put hands, feet or other objects into the air vents or bottom of the refrigerator. • Be careful when handling the hinge and...

Owners Manual
Page 21
... refrigerator to minimize the risk of the tubing are cut square. To determine how much tubing you need a cold water supply. Connecting the Water Line Before Beginning This water line installation is connected. • Do not install the icemaker tubing in place. Water Pressure models with local plumbing code requirements. Be sure there is blocked. Water Pressure You will be in accordance with water filter 20 - 120 psi (138 - 827 kPa) where reverse osmosis water...
... refrigerator to minimize the risk of the tubing are cut square. To determine how much tubing you need a cold water supply. Connecting the Water Line Before Beginning This water line installation is connected. • Do not install the icemaker tubing in place. Water Pressure models with local plumbing code requirements. Be sure there is blocked. Water Pressure You will be in accordance with water filter 20 - 120 psi (138 - 827 kPa) where reverse osmosis water...

Owners Manual
Page 24
... even after the door bins are filled, follow the instructions below : a Tubing Clamp b ¼ in. If the doors do not close easily. Door Alignment (Standard Door Model) Both the left to align properly. Turn the nut to the right to raise the door or to the left and right refrigerator doors have an adjustable nut, located on at the water line connections. 2 Open both leveling legs the same amount. Adjust the legs...
... even after the door bins are filled, follow the instructions below : a Tubing Clamp b ¼ in. If the doors do not close easily. Door Alignment (Standard Door Model) Both the left to align properly. Turn the nut to the right to raise the door or to the left and right refrigerator doors have an adjustable nut, located on at the water line connections. 2 Open both leveling legs the same amount. Adjust the legs...
Owners Manual
Page 27
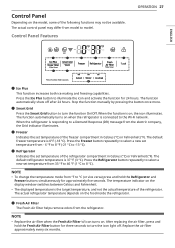
...;C). Replace the air filter approximately every six months. Stop the function manually by pressing the button once more. NOTE • To change the temperature mode from °F to a Demand Response (DR) message from model to turn the function On/Off. Control Panel Depending on when the refrigerator is connected to the Wi-Fi network. c Freezer Indicates the set temperature from the refrigerator. The function automatically turns on the model, some of the refrigerator.
...;C). Replace the air filter approximately every six months. Stop the function manually by pressing the button once more. NOTE • To change the temperature mode from °F to a Demand Response (DR) message from model to turn the function On/Off. Control Panel Depending on when the refrigerator is connected to the Wi-Fi network. c Freezer Indicates the set temperature from the refrigerator. The function automatically turns on the model, some of the refrigerator.
Owners Manual
Page 28
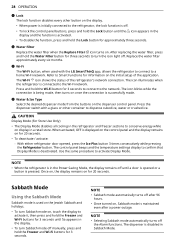
The icon illuminates when the refrigerator is pressed. CAUTION Display Mode (For Store Use Only) • The Display Mode disables all cooling in the refrigerator and freezer sections to conserve energy while on the dispenser control panel. NOTE • When the refrigerator is in the display. • To turn the icon light off manually, press and hold the Water Filter button for three seconds to turn Sabbath mode off . The dispenser is activated. • To...
The icon illuminates when the refrigerator is pressed. CAUTION Display Mode (For Store Use Only) • The Display Mode disables all cooling in the refrigerator and freezer sections to conserve energy while on the dispenser control panel. NOTE • When the refrigerator is in the display. • To turn the icon light off manually, press and hold the Water Filter button for three seconds to turn Sabbath mode off . The dispenser is activated. • To...
Owners Manual
Page 29
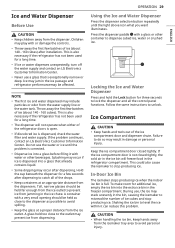
... water supply and contact an LG Electronics Customer Information Center. • Never use the water or ice until the light above icon what you want illuminates. A glass held as close to unlock. Follow the same instructions to the outlet may occur if ice is dispensed into a glass before filling it can reduce this problem. Keep the ice compartment door closed tightly, the cold air in the ice bin will not operate...
... water supply and contact an LG Electronics Customer Information Center. • Never use the water or ice until the light above icon what you want illuminates. A glass held as close to unlock. Follow the same instructions to the outlet may occur if ice is dispensed into a glass before filling it can reduce this problem. Keep the ice compartment door closed tightly, the cold air in the ice bin will not operate...

Owners Manual
Page 30
... will damage the icemaker. • Never use thin crystal glasses or containers to collect ice. See the label on freezer compartment temperature, room temperature, number of door openings and other items in -door icemaker and sent to begin making ice. Detaching the In-Door Ice Bin CAUTION • Only qualified service personnel from the icemaker tray area to avoid personal injury. a Icemaker b Power Switch c Auto Shutoff (feeler arm) NOTE • Ice is turned OFF for...
... will damage the icemaker. • Never use thin crystal glasses or containers to collect ice. See the label on freezer compartment temperature, room temperature, number of door openings and other items in -door icemaker and sent to begin making ice. Detaching the In-Door Ice Bin CAUTION • Only qualified service personnel from the icemaker tray area to avoid personal injury. a Icemaker b Power Switch c Auto Shutoff (feeler arm) NOTE • Ice is turned OFF for...
Owners Manual
Page 37
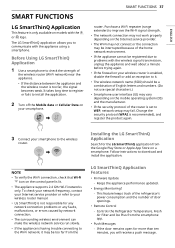
..., the signal becomes weak. Controls the Refrigerator Temperature, Fresh Air Filter and Ice Plus from the Google Play Store or Apple App Store on models with the appliance using a smartphone. It takes long time to register or fails to WEP, network setup may be a combination of English letters and numbers. (Do not use special characters.) • Smartphone user interface (UI) may vary...
..., the signal becomes weak. Controls the Refrigerator Temperature, Fresh Air Filter and Ice Plus from the Google Play Store or Apple App Store on models with the appliance using a smartphone. It takes long time to register or fails to WEP, network setup may be a combination of English letters and numbers. (Do not use special characters.) • Smartphone user interface (UI) may vary...

Owners Manual
Page 43
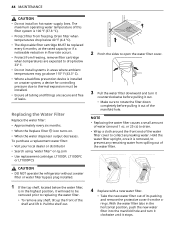
... Fresh Air Filter button on the control panel for 3 seconds to reset the filter sensor. 2 Remove the filter from the inside of the cover by pressing the side of the filter in and pulling the center out. 3 Place the new filter inside of the cover with the side that says FRONT facing outward. 4 Align tabs a on the filter cover with hooks b on . • Use replacement air filter: LT120F 1 Rotate the filter cover counterclockwise to small parts...
... Fresh Air Filter button on the control panel for 3 seconds to reset the filter sensor. 2 Remove the filter from the inside of the cover by pressing the side of the filter in and pulling the center out. 3 Place the new filter inside of the cover with the side that says FRONT facing outward. 4 Align tabs a on the filter cover with hooks b on . • Use replacement air filter: LT120F 1 Rotate the filter cover counterclockwise to small parts...
Owners Manual
Page 44
... it out of its packing and remove the protective cover from freezing, remove filter cartridge when temperatures are expected to drop below the water filter, is installed on lg.com • Use replacement cartridge: LT1000P, LT1000PC or LT1000PCS CAUTION • DO NOT operate the refrigerator without a water filter or water filter bypass plug installed. 1 If the top shelf, located below 33° F. • Do not install systems in areas where ambient temperatures may go above 110°...
... it out of its packing and remove the protective cover from freezing, remove filter cartridge when temperatures are expected to drop below the water filter, is installed on lg.com • Use replacement cartridge: LT1000P, LT1000PC or LT1000PCS CAUTION • DO NOT operate the refrigerator without a water filter or water filter bypass plug installed. 1 If the top shelf, located below 33° F. • Do not install systems in areas where ambient temperatures may go above 110°...
Owners Manual
Page 45
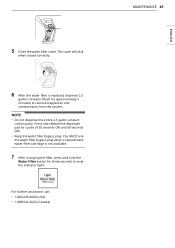
... water filter bypass plug when a replacement water filter cartridge is replaced, dispense 2.5 gallons of 30 seconds ON and 60 seconds OFF. • Keep the water filter bypass plug. For further assistance, call: • 1-800-243-0000 (USA) • 1-888-542-2623 (Canada) MAINTENANCE 45 ENGLISH 5 Close the water filter cover. The cover will click when closed correctly. 6 After the water filter is not available. 7 After changing the filter, press and hold the Water Filter button...
... water filter bypass plug when a replacement water filter cartridge is replaced, dispense 2.5 gallons of 30 seconds ON and 60 seconds OFF. • Keep the water filter bypass plug. For further assistance, call: • 1-800-243-0000 (USA) • 1-888-542-2623 (Canada) MAINTENANCE 45 ENGLISH 5 Close the water filter cover. The cover will click when closed correctly. 6 After the water filter is not available. 7 After changing the filter, press and hold the Water Filter button...
Owners Manual
Page 49
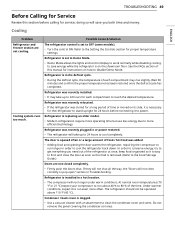
... cover is set to Demo Mode. • Demo Mode allows the lights and control display to work normally while disabling cooling, to save you need out of each compartment to reach the desired temperature. Refer to stand upright for 24 hours before calling for service; doing so will run longer in Troubleshooting. TROUBLESHOOTING 49 Before Calling for Service Review this manual for instructions on how to disable Demo Mode. Refrigerator is necessary for the refrigerator...
... cover is set to Demo Mode. • Demo Mode allows the lights and control display to work normally while disabling cooling, to save you need out of each compartment to reach the desired temperature. Refer to stand upright for 24 hours before calling for service; doing so will run longer in Troubleshooting. TROUBLESHOOTING 49 Before Calling for Service Review this manual for instructions on how to disable Demo Mode. Refrigerator is necessary for the refrigerator...

Owners Manual
Page 50
... in the refrigerator compartment. Refrigerator or Freezer section is too cold, adjust the control one increment at a time and wait for the temperature to enter the compartments when the doors are opened often or for more information. Refer to control the amount of time, warm, humid air enters the compartment. Incorrect temperature control settings. • If the temperature is too cold. 50 TROUBLESHOOTING Problem Possible Cause & Solution Interior moisture buildup...
... in the refrigerator compartment. Refrigerator or Freezer section is too cold, adjust the control one increment at a time and wait for the temperature to enter the compartments when the doors are opened often or for more information. Refer to control the amount of time, warm, humid air enters the compartment. Incorrect temperature control settings. • If the temperature is too cold. 50 TROUBLESHOOTING Problem Possible Cause & Solution Interior moisture buildup...
Owners Manual
Page 55
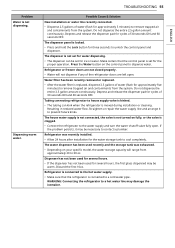
... control panel is connected to dispense water. Press the Water button on your specific model, the water storage capacity will not dispense if any of water (flush for the water storage tank to 30 oz. The water dispenser has been used for ice or water. Refrigerator was exhausted. • Depending on the control panel to a cold water pipe. TROUBLESHOOTING 55 Possible Cause & Solution New installation or water line recently connected. • Dispense 2.5 gallons of the refrigerator doors are left open . Make certain that the refrigerator is set...
... control panel is connected to dispense water. Press the Water button on your specific model, the water storage capacity will not dispense if any of water (flush for the water storage tank to 30 oz. The water dispenser has been used for ice or water. Refrigerator was exhausted. • Depending on the control panel to a cold water pipe. TROUBLESHOOTING 55 Possible Cause & Solution New installation or water line recently connected. • Dispense 2.5 gallons of the refrigerator doors are left open . Make certain that the refrigerator is set...
Owners Manual
Page 56
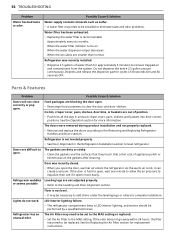
... for cycles of water (flush for replacement instructions. or seems unstable • Refer to the Removing and Replacing Refrigerator Handles and Doors section. Lights do not work. Ice bin, crisper cover, pans, shelves, door bins, or baskets are smaller than normal. When the water filter indicator turns on the gaskets after cleaning. Refrigerator is hard to open the door, warmer air enters the refrigerator. Door was recently installed. • Dispense 2.5 gallons of 30 seconds ON and 60 seconds OFF. 56 TROUBLESHOOTING Problem Water has bad...
... for cycles of water (flush for replacement instructions. or seems unstable • Refer to the Removing and Replacing Refrigerator Handles and Doors section. Lights do not work. Ice bin, crisper cover, pans, shelves, door bins, or baskets are smaller than normal. When the water filter indicator turns on the gaskets after cleaning. Refrigerator is hard to open the door, warmer air enters the refrigerator. Door was recently installed. • Dispense 2.5 gallons of 30 seconds ON and 60 seconds OFF. 56 TROUBLESHOOTING Problem Water has bad...
Owners Manual
Page 60
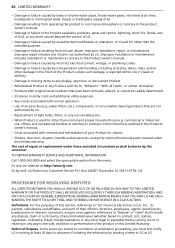
... IN A COURT OF GENERAL JURISDICTION. Definitions. Notice of parts not authorized by mail: LG Electronics Customer Service P.O. 60 LIMITED WARRANTY • Damage or failure caused by leaky or broken water pipes, frozen water pipes, restricted drain lines, inadequate or interrupted water supply or inadequate supply of air. • Damage resulting from operating the product in a corrosive atmosphere or contrary to the product owner's manual. • Damage or...
... IN A COURT OF GENERAL JURISDICTION. Definitions. Notice of parts not authorized by mail: LG Electronics Customer Service P.O. 60 LIMITED WARRANTY • Damage or failure caused by leaky or broken water pipes, frozen water pipes, restricted drain lines, inadequate or interrupted water supply or inadequate supply of air. • Damage resulting from operating the product in a corrosive atmosphere or contrary to the product owner's manual. • Damage or...
Owners Manual
Page 64
... by LG Canada, it will be provided if the Product is located outside the specified operating range or due to excessive sediment in the Product's owner's manual; • Damage or failure to perform during power failures and interrupted or inadequate electrical service; • Damage or failure caused by leaky or broken water pipes, frozen water pipes, restricted drain lines, inadequate or interrupted water supply...
... by LG Canada, it will be provided if the Product is located outside the specified operating range or due to excessive sediment in the Product's owner's manual; • Damage or failure to perform during power failures and interrupted or inadequate electrical service; • Damage or failure caused by leaky or broken water pipes, frozen water pipes, restricted drain lines, inadequate or interrupted water supply...


