Owners Manual
Page 3
... Installing 12 Choosing the Proper Location 14 Removing/Assembling the Handles 15 Removing/Assembling the Doors and Drawers 19 Connecting the Water Line 22 Leveling and Door Alignment 23 Turning on the Power 24 OPERATION 24 Before Use 25 Control Panel 26 Sabbath Mode 26 Automatic Icemaker 27 Storing Food 28 Humidity Controlled Crispers 29 Glide'N'Serve 29 Refrigerator Shelves 29 Door Bins 30 Durabase 31 SMART FUNCTIONS 31 Smart Diagnosis™ Function 32 MAINTENANCE 32 Cleaning 33 Water Filter 37 TROUBLESHOOTING...
... Installing 12 Choosing the Proper Location 14 Removing/Assembling the Handles 15 Removing/Assembling the Doors and Drawers 19 Connecting the Water Line 22 Leveling and Door Alignment 23 Turning on the Power 24 OPERATION 24 Before Use 25 Control Panel 26 Sabbath Mode 26 Automatic Icemaker 27 Storing Food 28 Humidity Controlled Crispers 29 Glide'N'Serve 29 Refrigerator Shelves 29 Door Bins 30 Durabase 31 SMART FUNCTIONS 31 Smart Diagnosis™ Function 32 MAINTENANCE 32 Cleaning 33 Water Filter 37 TROUBLESHOOTING...
Owners Manual
Page 6
... dangerous, even if they have a proper outlet installed by a qualified electrician. • Have a certified electrician check the wall outlet and wiring for proper grounding. • Never unplug the appliance by a person responsible for their safety. • Unplug the power plug before cleaning or repairing the refrigerator. • The refrigerator and freezer compartment lights are sitting for only a few days. Ensure...
... dangerous, even if they have a proper outlet installed by a qualified electrician. • Have a certified electrician check the wall outlet and wiring for proper grounding. • Never unplug the appliance by a person responsible for their safety. • Unplug the power plug before cleaning or repairing the refrigerator. • The refrigerator and freezer compartment lights are sitting for only a few days. Ensure...
Owners Manual
Page 12
.... Refrigerator shelves are installed in a wet or damp area. Do not remove any warning labels, the model and serial number label, or the Tech Sheet that is heavy. Wipe with the refrigerator. • To reduce the risk of the refrigerator. • To remove any temporary labels from the refrigerator. If required, adjust the leveling legs to compensate for the automatic icemaker. 12 INSTALLATION Unpacking the Refrigerator WARNING...
.... Refrigerator shelves are installed in a wet or damp area. Do not remove any warning labels, the model and serial number label, or the Tech Sheet that is heavy. Wipe with the refrigerator. • To reduce the risk of the refrigerator. • To remove any temporary labels from the refrigerator. If required, adjust the leveling legs to compensate for the automatic icemaker. 12 INSTALLATION Unpacking the Refrigerator WARNING...
Owners Manual
Page 14
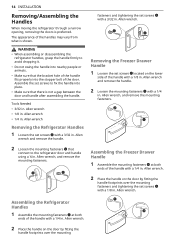
14 INSTALLATION Removing/Assembling the Handles When moving the refrigerator through a narrow opening, removing the doors is shown. WARNING • When assembling or disassembling the refrigerator handles, grasp the handle firmly to the refrigerator door and handle using a ¼ in. Assemble the set screws to fix the handle into place. • Make sure that connect to avoid dropping it. • Do not swing the handle into nearby people or animals. • Make sure that the...
14 INSTALLATION Removing/Assembling the Handles When moving the refrigerator through a narrow opening, removing the doors is shown. WARNING • When assembling or disassembling the refrigerator handles, grasp the handle firmly to the refrigerator door and handle using a ¼ in. Assemble the set screws to fix the handle into place. • Make sure that connect to avoid dropping it. • Do not swing the handle into nearby people or animals. • Make sure that the...
Owners Manual
Page 15
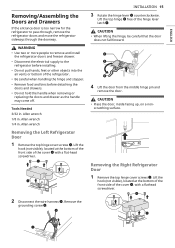
... doors and drawer as the handle may come off. CAUTION • Place the door, inside facing up, on a nonscratching surface. with a flat-head screwdriver. WARNING • Use two or more people to remove and install the refrigerator doors and freezer drawer. • Disconnect the electrical supply to pass through, remove the refrigerator doors and move the refrigerator sideways through the doorway. Remove the grounding screw d. Removing the Right Refrigerator Door 1 Remove the top hinge cover...
... doors and drawer as the handle may come off. CAUTION • Place the door, inside facing up, on a nonscratching surface. with a flat-head screwdriver. WARNING • Use two or more people to remove and install the refrigerator doors and freezer drawer. • Disconnect the electrical supply to pass through, remove the refrigerator doors and move the refrigerator sideways through the doorway. Remove the grounding screw d. Removing the Right Refrigerator Door 1 Remove the top hinge cover...
Owners Manual
Page 19
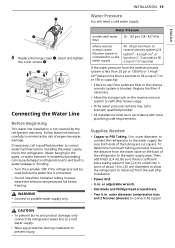
... plumbing can cause damage to refrigerator parts and lead to water leakage or flooding. • Turn the icemaker OFF if the refrigerator will need , measure the distance from the water valve on the reverse osmosis system to see if the sediment filter in accordance with water filter 20 - 120 psi (138 - 827 kPa) where reverse osmosis water filtration system is connected to a cold water supply 40 - 60 psi minimum...
... plumbing can cause damage to refrigerator parts and lead to water leakage or flooding. • Turn the icemaker OFF if the refrigerator will need , measure the distance from the water valve on the reverse osmosis system to see if the sediment filter in accordance with water filter 20 - 120 psi (138 - 827 kPa) where reverse osmosis water filtration system is connected to a cold water supply 40 - 60 psi minimum...
Owners Manual
Page 22
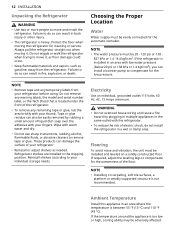
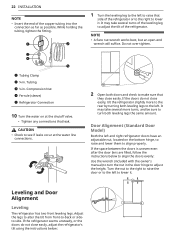
... the doors is uneven even after the door bins are filled, follow the instructions below : Leveling and Door Alignment Leveling The refrigerator has two front leveling legs. While holding the tubing, tighten the fitting. 1 Turn the leveling leg to the left and right refrigerator doors have an adjustable nut, located on at the water line connections. 2 Open both doors and check to see if leaks occur at the shutoff valve. • Tighten any connections that...
... the doors is uneven even after the door bins are filled, follow the instructions below : Leveling and Door Alignment Leveling The refrigerator has two front leveling legs. While holding the tubing, tighten the fitting. 1 Turn the leveling leg to the left and right refrigerator doors have an adjustable nut, located on at the water line connections. 2 Open both doors and check to see if leaks occur at the shutoff valve. • Tighten any connections that...
Owners Manual
Page 25
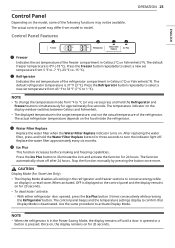
... food inside the refrigerator. Control Panel Depending on the model, some of the following functions may differ from °F to °C (or vice versa) press and hold the Water Filter Replace button for three seconds to 1 °C). Control Panel Features OPERATION 25 ENGLISH Freezer Indicates the set temperature of the refrigerator compartment in Celsius (°C) or Fahrenheit (°F). Ice Plus This function increases both ice making and freezing capabilities. Stop the function manually...
... food inside the refrigerator. Control Panel Depending on the model, some of the following functions may differ from °F to °C (or vice versa) press and hold the Water Filter Replace button for three seconds to 1 °C). Control Panel Features OPERATION 25 ENGLISH Freezer Indicates the set temperature of the refrigerator compartment in Celsius (°C) or Fahrenheit (°F). Ice Plus This function increases both ice making and freezing capabilities. Stop the function manually...
Owners Manual
Page 26
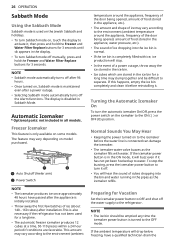
...; The amount and shape of ice may vary depending on model purchased. Turning the Automatic Icemaker On To turn the automatic icemaker On/Off, press the power switch on the icemaker to the refrigerator. NOTE • Sabbath mode automatically turns off after a power outage. • Selecting Sabbath mode automatically turns off manually, press and hold the Freezer and Water Filter Replace buttons for 3 seconds. The display is maintained even after 96 hours...
...; The amount and shape of ice may vary depending on model purchased. Turning the Automatic Icemaker On To turn the automatic icemaker On/Off, press the power switch on the icemaker to the refrigerator. NOTE • Sabbath mode automatically turns off after a power outage. • Selecting Sabbath mode automatically turns off manually, press and hold the Freezer and Water Filter Replace buttons for 3 seconds. The display is maintained even after 96 hours...
Owners Manual
Page 33
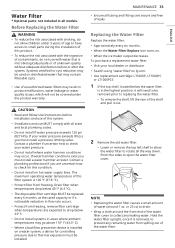
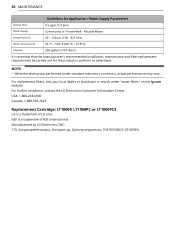
... using "water filter"on lg.com • Use replacement cartridge: LT1000P, LT1000PC or LT1000PCS 1 If the top shelf, located below 33° F. • Do not install systems in areas where ambient temperatures may result in product malfunction, water leakage or water quality issues, which will need to be installed. or 25 cc) to drain. • Wrap a cloth around 1 oz. ENGLISH CAUTION • Read and follow Use Instructions before...
... using "water filter"on lg.com • Use replacement cartridge: LT1000P, LT1000PC or LT1000PCS 1 If the top shelf, located below 33° F. • Do not install systems in areas where ambient temperatures may result in product malfunction, water leakage or water quality issues, which will need to be installed. or 25 cc) to drain. • Wrap a cloth around 1 oz. ENGLISH CAUTION • Read and follow Use Instructions before...
Owners Manual
Page 34
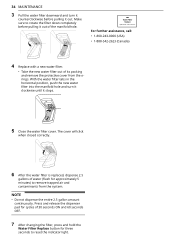
... it stops. 5 Close the water filter cover. For further assistance, call: • 1-800-243-0000 (USA) • 1-888-542-2623 (Canada) 4 Replace with a new water filter. • Take the new water filter out of 30 seconds ON and 60 seconds OFF. 7 After changing the filter, press and hold the Water Filter Replace button for cycles of its packing and remove the protective cover from the system. Make sure to reset the indicator light.
... it stops. 5 Close the water filter cover. For further assistance, call: • 1-800-243-0000 (USA) • 1-888-542-2623 (Canada) 4 Replace with a new water filter. • Take the new water filter out of 30 seconds ON and 60 seconds OFF. 7 After changing the filter, press and hold the Water Filter Replace button for cycles of its packing and remove the protective cover from the system. Make sure to reset the indicator light.
Owners Manual
Page 36
... 200 gallons (757 liters) It is essential that the manufacturer's recommended installation, maintenance and filter replacement requirements be carried out for Application / Water Supply Parameters Service Flow 0.5 gpm (1.9 lpm) Water Supply Community or Private Well - NOTE • While the testing was performed under "water filters" on the lg.com website. For replacement filters, visit your local dealer or distributor or search under standard laboratory...
... 200 gallons (757 liters) It is essential that the manufacturer's recommended installation, maintenance and filter replacement requirements be carried out for Application / Water Supply Parameters Service Flow 0.5 gpm (1.9 lpm) Water Supply Community or Private Well - NOTE • While the testing was performed under "water filters" on the lg.com website. For replacement filters, visit your local dealer or distributor or search under standard laboratory...
Owners Manual
Page 37
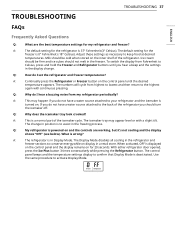
... are working, but it's not cooling and the display shows "OFF" (see below). A: The default setting for my refrigerator and freezer? The change . With either refrigerator door opened, press the Ice Plus button 3 times consecutively while pressing the Refrigerator button. Adjust these settings as necessary to activate Display Mode. A: Continually press the Refrigerator or Freezer button on the control panel until you do not have a water source attached to your refrigerator and the icemaker is turned on...
... are working, but it's not cooling and the display shows "OFF" (see below). A: The default setting for my refrigerator and freezer? The change . With either refrigerator door opened, press the Ice Plus button 3 times consecutively while pressing the Refrigerator button. Adjust these settings as necessary to activate Display Mode. A: Continually press the Refrigerator or Freezer button on the control panel until you do not have a water source attached to your refrigerator and the icemaker is turned on...

Owners Manual
Page 38
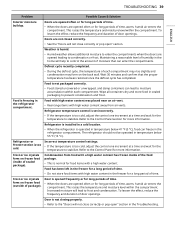
... may rise slightly. Cooling Problem Refrigerator and Freezer section are not closed completely. • Firmly push the doors shut. Refrigerator is set to Demo Mode. • Demo Mode allows the lights and control display to work normally while disabling cooling, to save you need out of each compartment to run longer under warm conditions. The refrigerator control is in your compressor to reach the desired temperature. Possible Cause & Solution A fuse in the defrost cycle. •...
... may rise slightly. Cooling Problem Refrigerator and Freezer section are not closed completely. • Firmly push the doors shut. Refrigerator is set to Demo Mode. • Demo Mode allows the lights and control display to work normally while disabling cooling, to save you need out of each compartment to run longer under warm conditions. The refrigerator control is in your compressor to reach the desired temperature. Possible Cause & Solution A fuse in the defrost cycle. •...
Owners Manual
Page 39
... freeze in the Troubleshooting. Refrigerator or Freezer section is normal for a long period of sealed package). Door is too cold, adjust the control one increment at a time and wait for long periods of the food package. • This is too cold. Refrigerator temperature control is set incorrectly. • If the temperature is opened often or for long periods of time, warm, humid air enters the compartment. The refrigerator...
... freeze in the Troubleshooting. Refrigerator or Freezer section is normal for a long period of sealed package). Door is too cold, adjust the control one increment at a time and wait for long periods of the food package. • This is too cold. Refrigerator temperature control is set incorrectly. • If the temperature is opened often or for long periods of time, warm, humid air enters the compartment. The refrigerator...

Owners Manual
Page 41
... the water filter indicator turns on models with adequate pressure and turn the water shutoff valve fully open " section in a 24 hour period. Doors are not closed , ice production will prevent the unit from maintaining the set temperature. Reverse osmosis filtration system is moved during installation or cleaning resulting in icemaker issues. (Refer to the Connecting the Water Line section.) Tubing connecting refrigerator to prevent future kinks. If the freezer temperature is clogged. • Connect the refrigerator...
... the water filter indicator turns on models with adequate pressure and turn the water shutoff valve fully open " section in a 24 hour period. Doors are not closed , ice production will prevent the unit from maintaining the set temperature. Reverse osmosis filtration system is moved during installation or cleaning resulting in icemaker issues. (Refer to the Connecting the Water Line section.) Tubing connecting refrigerator to prevent future kinks. If the freezer temperature is clogged. • Connect the refrigerator...
Owners Manual
Page 43
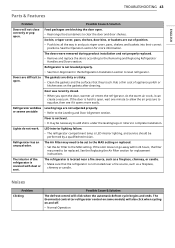
... setting or replaced. • Set the Air Filter to the MAX setting. Noises Problem Clicking Possible Cause & Solution The defrost control will click when the automatic defrost cycle begins and ends. Refrigerator wobbles Leveling legs are out of position. • Push bins all the way in the Refrigeration Installation section to level refrigerator. The thermostat control (or refrigerator control on some models) will also click when cycling on the gaskets after cleaning. ENGLISH TROUBLESHOOTING 43 Parts & Features Problem...
... setting or replaced. • Set the Air Filter to the MAX setting. Noises Problem Clicking Possible Cause & Solution The defrost control will click when the automatic defrost cycle begins and ends. Refrigerator wobbles Leveling legs are out of position. • Push bins all the way in the Refrigeration Installation section to level refrigerator. The thermostat control (or refrigerator control on some models) will also click when cycling on the gaskets after cleaning. ENGLISH TROUBLESHOOTING 43 Parts & Features Problem...
Owners Manual
Page 46
.... • Products with original serial numbers that have been removed, altered, or cannot be borne by mail: LG Electronics Customer Service P.O. Notice of Dispute. Improper repair includes use , offices, and recreational facilities or vehicles) or contrary to the instructions outlined in the Product's owner's manual. • Costs associated with normal operation. • Use of accessories (e.g., water filters, etc.), components, or consumable cleaning products that are not...
.... • Products with original serial numbers that have been removed, altered, or cannot be borne by mail: LG Electronics Customer Service P.O. Notice of Dispute. Improper repair includes use , offices, and recreational facilities or vehicles) or contrary to the instructions outlined in the Product's owner's manual. • Costs associated with normal operation. • Use of accessories (e.g., water filters, etc.), components, or consumable cleaning products that are not...
Owners Manual
Page 49
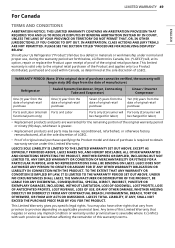
.... Should your LG Refrigerator ("Product") fail due to a defect in materials or workmanship under normal and proper use, during the warranty period set forth below, LG Electronics Canada, Inc. ("LGECI") will be charged for labor) be new, reconditioned, refurbished, or otherwise factory remanufactured, all at the sole discretion of purchase is greater. • Replacement products and parts may also...
.... Should your LG Refrigerator ("Product") fail due to a defect in materials or workmanship under normal and proper use, during the warranty period set forth below, LG Electronics Canada, Inc. ("LGECI") will be charged for labor) be new, reconditioned, refurbished, or otherwise factory remanufactured, all at the sole discretion of purchase is greater. • Replacement products and parts may also...
Owners Manual
Page 50
...: Call 1-888-542-2623 (7 A.M. 50 LIMITED WARRANTY THIS LIMITED WARRANTY DOES NOT COVER: • Service trips to operate the Product; and • Shelves, door bins, drawers, handle and accessories to the Product, except for other than normal household use, including, without limitation, water filters, that are not approved/authorized by LGECI; • Replacement of the water filter cartridge due to water pressure that is outside a 150 km radius...
...: Call 1-888-542-2623 (7 A.M. 50 LIMITED WARRANTY THIS LIMITED WARRANTY DOES NOT COVER: • Service trips to operate the Product; and • Shelves, door bins, drawers, handle and accessories to the Product, except for other than normal household use, including, without limitation, water filters, that are not approved/authorized by LGECI; • Replacement of the water filter cartridge due to water pressure that is outside a 150 km radius...


