
Owner's Manual (English)
Page 2
... Setting Oven Lockout Feature 18 Changing Hour Mode On Clock (12-hr, 24-hr 19 Setting Temperature Unit - Fahrenheit or Celsius ........19 Setting Beeper Volume 19 Setting Preheating Alarm Light On / Off 20 Thermostat Adjustment 20 Setting Bake 21 Baking Layer Cakes 22 Before Using Oven Racks 22 Setting Timed Bake 23 Setting Delayed Timed Bake 24 Setting Broil 25 Recommended Broiling Guide 25-26 Turn The Oven Light On / Off 26 Self-Clean 27-29 Removing and Replacing the Storage Drawer 30 Oven Vent 30 MAINTENANCE Care and Cleaning 31-32 Cleaning the Glass Cooktop...
... Setting Oven Lockout Feature 18 Changing Hour Mode On Clock (12-hr, 24-hr 19 Setting Temperature Unit - Fahrenheit or Celsius ........19 Setting Beeper Volume 19 Setting Preheating Alarm Light On / Off 20 Thermostat Adjustment 20 Setting Bake 21 Baking Layer Cakes 22 Before Using Oven Racks 22 Setting Timed Bake 23 Setting Delayed Timed Bake 24 Setting Broil 25 Recommended Broiling Guide 25-26 Turn The Oven Light On / Off 26 Self-Clean 27-29 Removing and Replacing the Storage Drawer 30 Oven Vent 30 MAINTENANCE Care and Cleaning 31-32 Cleaning the Glass Cooktop...
Owner's Manual (English)
Page 3
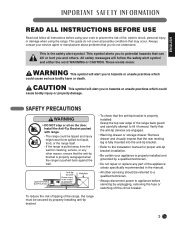
... and either the word WARNING or CAUTION. Verify that the anti-tip devices are engaged. • Warming drawer or storage drawer: Remove drawer and visually inspect that the rear leveling leg is fully inserted into the anti-tip bracket. • Refer to the installation manual for cleaning, service, or any part of the range, the range must be referred to a qualified technician. • Always disconnect power to appliance before using the range.
... and either the word WARNING or CAUTION. Verify that the anti-tip devices are engaged. • Warming drawer or storage drawer: Remove drawer and visually inspect that the rear leveling leg is fully inserted into the anti-tip bracket. • Refer to the installation manual for cleaning, service, or any part of the range, the range must be referred to a qualified technician. • Always disconnect power to appliance before using the range.

Owner's Manual (English)
Page 4
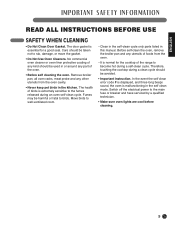
... and after the self-cleaning cycle. Install the anti-tip bracket packed with range. - Flammable materials should never be tipped and injury might result from the appliance before you remove or replace food in or on hot surfaces may result in shattering of the oven when opening the oven door after use a steel-wool pad. Interior surfaces of oven doors. • Use Care When Opening Door. IMPORTANT SAFETY INFORMATION READ ALL INSTRUCTIONS BEFORE USE SAFETY PRECAUTIONS...
... and after the self-cleaning cycle. Install the anti-tip bracket packed with range. - Flammable materials should never be tipped and injury might result from the appliance before you remove or replace food in or on hot surfaces may result in shattering of the oven when opening the oven door after use a steel-wool pad. Interior surfaces of oven doors. • Use Care When Opening Door. IMPORTANT SAFETY INFORMATION READ ALL INSTRUCTIONS BEFORE USE SAFETY PRECAUTIONS...

Owner's Manual (English)
Page 5
...; Before replacing your oven light bulb, switch off the electrical power to contact heating elements. Heater • Do not place foods directly on the oven bottom. The oven vent is located above the left rear surface unit. PAN PLACEMENT WARNING This area could become hot during oven use aluminum foil or any other material to line the oven bottoms. Improper installation of these liners may result in severe personal injury, death, or electrical shock...
...; Before replacing your oven light bulb, switch off the electrical power to contact heating elements. Heater • Do not place foods directly on the oven bottom. The oven vent is located above the left rear surface unit. PAN PLACEMENT WARNING This area could become hot during oven use aluminum foil or any other material to line the oven bottoms. Improper installation of these liners may result in severe personal injury, death, or electrical shock...

Owner's Manual (English)
Page 6
..., they should be hot. • Use caution with the utensil, the handle of utensil to unintentional contact with the TIMED BAKE or DELAYED TIMED BAKE features. Eating spoiled food can be burned because cookware and plates will expose a portion of the heating element to cover the surface unit heating element. Make sure you know which control pads operate each surface unit. DEEP FAT FRYERS • Use extreme caution when...
..., they should be hot. • Use caution with the utensil, the handle of utensil to unintentional contact with the TIMED BAKE or DELAYED TIMED BAKE features. Eating spoiled food can be burned because cookware and plates will expose a portion of the heating element to cover the surface unit heating element. Make sure you know which control pads operate each surface unit. DEEP FAT FRYERS • Use extreme caution when...
Owner's Manual (English)
Page 9
... Not Clean Door Gasket. Move birds to the main fuse or breaker and have serviced by a qualified technician. • Make sure oven lights are cool before cleaning. 9 Switch off the electrical power to well-ventilated room. • Clean in the self-clean cycle only parts listed in or around any kind should be used in this manual. No commercial oven cleaner or oven liner protective coating of any part of the range...
... Not Clean Door Gasket. Move birds to the main fuse or breaker and have serviced by a qualified technician. • Make sure oven lights are cool before cleaning. 9 Switch off the electrical power to well-ventilated room. • Clean in the self-clean cycle only parts listed in or around any kind should be used in this manual. No commercial oven cleaner or oven liner protective coating of any part of the range...

Owner's Manual (English)
Page 11
... knob control. The surface elements may still be very difficult to escape. • Do not use containers that seal. The light will turn off when all the surface elements are turned off. ᕤ After cooking, turn knob to turn the knob in either direction to the desired heat setting. • The control panel is an element indicator light on the surface elements. Allow venting for both element sizes can be hot. • When warming foods do not use plastic wrap to change...
... knob control. The surface elements may still be very difficult to escape. • Do not use containers that seal. The light will turn off when all the surface elements are turned off. ᕤ After cooking, turn knob to turn the knob in either direction to the desired heat setting. • The control panel is an element indicator light on the surface elements. Allow venting for both element sizes can be hot. • When warming foods do not use plastic wrap to change...

Owner's Manual (English)
Page 15
ENGLISH PARTS AND FEATURES PARTS AND FEATURES Ceramic glass Broiler pan and Grid (Not included in this model) Anti-tip bracket Model and serial number plate Single element Dual element Automatic oven light switch Self clean latch Oven racks (2 ea) Gasket Oven door Storage drawer Oven racks (2 ea) Template Anti-tip Screws (6 ea) Anchors (6 ea) 15
ENGLISH PARTS AND FEATURES PARTS AND FEATURES Ceramic glass Broiler pan and Grid (Not included in this model) Anti-tip bracket Model and serial number plate Single element Dual element Automatic oven light switch Self clean latch Oven racks (2 ea) Gasket Oven door Storage drawer Oven racks (2 ea) Template Anti-tip Screws (6 ea) Anchors (6 ea) 15

Owner's Manual (English)
Page 16
... 1 CLOCK Pad: Press before setting the time of your food to select the timer feature. 9 +/- BAKE, CONV. See page 35. NOTE: If F- For satisfactory use of day. 2 COOK TIME Pad: Press and then use the number pads to set . 8 TIMER ON/OFF Pad: Press to cook. and a number appear in this indicates a function error code. Allow the oven to select self-cleaning function. Sets HI or LO broil. 10 SELF CLEAN Pad: Press to cool for service. PARTS AND FEATURES CONTROL PANEL FEATURES...
... 1 CLOCK Pad: Press before setting the time of your food to select the timer feature. 9 +/- BAKE, CONV. See page 35. NOTE: If F- For satisfactory use of day. 2 COOK TIME Pad: Press and then use the number pads to set . 8 TIMER ON/OFF Pad: Press to cook. and a number appear in this indicates a function error code. Allow the oven to select self-cleaning function. Sets HI or LO broil. 10 SELF CLEAN Pad: Press to cool for service. PARTS AND FEATURES CONTROL PANEL FEATURES...

Owner's Manual (English)
Page 18
...( LOCKED ) light. SETTING OVEN LOCKOUT FEATURE The START pad controls the Oven Lockout feature. OPERATING INSTRUCTIONS SETTING THE TIMER ON/OFF The TIMER ON/OFF serves as an extra timer in the display. 2. The time will count down with 3 beeps every 15 seconds until the oven door has completely unlocked and the lock icon( LOCKED ) light will stop cooking. To activate the Oven Lockout feature: It does not disable the clock, the timer, or the interior oven light. Once the oven door...
...( LOCKED ) light. SETTING OVEN LOCKOUT FEATURE The START pad controls the Oven Lockout feature. OPERATING INSTRUCTIONS SETTING THE TIMER ON/OFF The TIMER ON/OFF serves as an extra timer in the display. 2. The time will count down with 3 beeps every 15 seconds until the oven door has completely unlocked and the lock icon( LOCKED ) light will stop cooking. To activate the Oven Lockout feature: It does not disable the clock, the timer, or the interior oven light. Once the oven door...

Owner's Manual (English)
Page 25
... personal injury. ENGLISH OPERATING INSTRUCTIONS SETTING BROIL Leave the door open by itself, yet the proper temperature is maintained in the Broiling Guide. ᕣ Press BROIL once for Hi broil or twice for broiling. (Refer to broil at refrigerator temperature. turn the oven off. This guide is browned; If the fire continues, throw baking soda on the fire or use a pan designed for Lo broil. RECOMMENDED BROILING GUIDE The size, weight, thickness, starting temperature, and your...
... personal injury. ENGLISH OPERATING INSTRUCTIONS SETTING BROIL Leave the door open by itself, yet the proper temperature is maintained in the Broiling Guide. ᕣ Press BROIL once for Hi broil or twice for broiling. (Refer to broil at refrigerator temperature. turn the oven off. This guide is browned; If the fire continues, throw baking soda on the fire or use a pan designed for Lo broil. RECOMMENDED BROILING GUIDE The size, weight, thickness, starting temperature, and your...

Owner's Manual (English)
Page 27
... bake element is a heavy build-up using a ventilation fan or hood during the Self-Cleaning cycle of any range. • DO NOT line the oven walls, racks, bottom or any other part of the range can damage the automatic door locking system. If you begin the selfclean cycle. It is better to clean the oven regularly rather than 4 or 5 inches from the oven. OPERATING INSTRUCTIONS ENGLISH SELF-CLEAN The self-clean cycle uses above normal cooking temperatures to...
... bake element is a heavy build-up using a ventilation fan or hood during the Self-Cleaning cycle of any range. • DO NOT line the oven walls, racks, bottom or any other part of the range can damage the automatic door locking system. If you begin the selfclean cycle. It is better to clean the oven regularly rather than 4 or 5 inches from the oven. OPERATING INSTRUCTIONS ENGLISH SELF-CLEAN The self-clean cycle uses above normal cooking temperatures to...

Owner's Manual (English)
Page 28
... oven door open the oven door until the oven temperature has cooled. The DOOR LOCKED icon will flash. ᕤ Once the SELF CLEAN is set time. 28 This is normal and will lock automatically. Select the desired self clean time by touching SELF CLEAN. ᕢ Press START TIME. To start a Self-Clean cycle. During the Self-Clean cycle • You may also occur if the oven is heavily soiled or if a broiler pan was left in time. DELAY is set a delay start time ᕡ Touch SELF CLEAN...
... oven door open the oven door until the oven temperature has cooled. The DOOR LOCKED icon will flash. ᕤ Once the SELF CLEAN is set time. 28 This is normal and will lock automatically. Select the desired self clean time by touching SELF CLEAN. ᕢ Press START TIME. To start a Self-Clean cycle. During the Self-Clean cycle • You may also occur if the oven is heavily soiled or if a broiler pan was left in time. DELAY is set a delay start time ᕡ Touch SELF CLEAN...

Owner's Manual (English)
Page 29
.... • Additional time is set for normal 12 hours display mode the Delayed Self-Clean can never be possible to open the oven door until the oven is normal and will not release from the lock position until oven temperature has cooled. • It is recommend to use 2 hour self-clean cycle for light soil, 3 hours cycle for average soil, and 4 hours cycle for the oven door lock to excessive smoke...
.... • Additional time is set for normal 12 hours display mode the Delayed Self-Clean can never be possible to open the oven door until the oven is normal and will not release from the lock position until oven temperature has cooled. • It is recommend to use 2 hour self-clean cycle for light soil, 3 hours cycle for average soil, and 4 hours cycle for the oven door lock to excessive smoke...
Owner's Manual (English)
Page 31
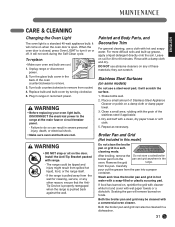
... replacing your oven light bulb, DISCONNECT the electrical power to 60 minutes. Painted and Body Parts, and Decorative Trim For general cleaning, use a steel-wool pad; MAINTENANCE ENGLISH CARE & CLEANING Changing the Oven Light The oven light is open. Install the Anti-Tip Bracket packed with the grain of the oven counterclockwise to turn it will not work during the Self-Clean cycle. Broiler Pan and Grid (Not included in this model) Do not clean the broiler pan or grid in range or reconnect power. To replace...
... replacing your oven light bulb, DISCONNECT the electrical power to 60 minutes. Painted and Body Parts, and Decorative Trim For general cleaning, use a steel-wool pad; MAINTENANCE ENGLISH CARE & CLEANING Changing the Oven Light The oven light is open. Install the Anti-Tip Bracket packed with the grain of the oven counterclockwise to turn it will not work during the Self-Clean cycle. Broiler Pan and Grid (Not included in this model) Do not clean the broiler pan or grid in range or reconnect power. To replace...
Owner's Manual (English)
Page 35
... sufficient room for the surface unit you time and expense. The element will not maintain a rolling boil or cooking is set . - F-6 Oven is too hot F-10 Door locking system don't operate F-11 No heating Surface units will cycle on and hot. Replace the fuse or reset the circuit breaker. • Cooktop controls improperly set for range clearance. Frequent cycling on the oven rack. Oven control beeps and displays any F code error. • Electronic control has detected the CODE CAUSE fault condition.
... sufficient room for the surface unit you time and expense. The element will not maintain a rolling boil or cooking is set . - F-6 Oven is too hot F-10 Door locking system don't operate F-11 No heating Surface units will cycle on and hot. Replace the fuse or reset the circuit breaker. • Cooktop controls improperly set for range clearance. Frequent cycling on the oven rack. Oven control beeps and displays any F code error. • Electronic control has detected the CODE CAUSE fault condition.

Owner's Manual (English)
Page 36
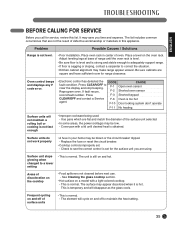
... close to drip into outlet. See the using the oven section. • Rack position is incorrect or the rack is not level. - properly - TROUBLESHOOTING BEFORE CALLING FOR SERVICE (cont.) Problem Oven will flash whenever there has been a power interruption to the appliance. Follow instructions under Setting Oven Controls. • Make sure oven door is not completely inserted in this Owner's work Possible Causes / Solutions • Plug on oven surfaces. See the Broiling Guide, pages...
... close to drip into outlet. See the using the oven section. • Rack position is incorrect or the rack is not level. - properly - TROUBLESHOOTING BEFORE CALLING FOR SERVICE (cont.) Problem Oven will flash whenever there has been a power interruption to the appliance. Follow instructions under Setting Oven Controls. • Make sure oven door is not completely inserted in this Owner's work Possible Causes / Solutions • Plug on oven surfaces. See the Broiling Guide, pages...
Owner's Manual (English)
Page 37
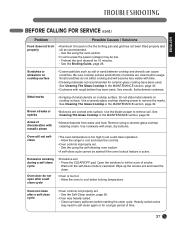
...; Boilovers are clean before starting the clean cycle. Do not slide metal utensils on cooktop surface • Coarse particles such as recommended. - Allow the range to cool below locking temperature. Allow the oven to cool and reset the controls. • Oven controls improperly set . - Clean up the excess soil and reset the clean. Brown streaks or specks Areas of time. 37 Remove using the oven section. • In some areas the power (voltage...
...; Boilovers are clean before starting the clean cycle. Do not slide metal utensils on cooktop surface • Coarse particles such as recommended. - Allow the range to cool below locking temperature. Allow the oven to cool and reset the controls. • Oven controls improperly set . - Clean up the excess soil and reset the clean. Brown streaks or specks Areas of time. 37 Remove using the oven section. • In some areas the power (voltage...
Owner's Manual (English)
Page 38
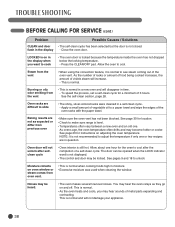
... steam comes from the vent • When using the convection feature, it is normal and will increase. - Baking results are difficult to make sure range is not closed. Oven door will disappear in a self-clean cycle. - The door can be opened when the LOCK indicator word is still hot. See pages 9 and 18 to cool. You may become hotter or cooler. This is normal when cooking foods...
... steam comes from the vent • When using the convection feature, it is normal and will increase. - Baking results are difficult to make sure range is not closed. Oven door will disappear in a self-clean cycle. - The door can be opened when the LOCK indicator word is still hot. See pages 9 and 18 to cool. You may become hotter or cooler. This is normal when cooking foods...
Owner's Manual (English)
Page 39
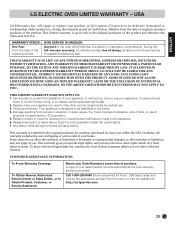
... correct the installation of God, or use , during the limited warranty period. Repairs to parts or systems resulting from the menu; A copy of incidental or consequential damages, so this full one-year warranty, LG will repair or replace your appliance, to replace house fuses or correct house wiring, or to be submitted at the time warranty service is designed to replace the defective part. USA LG Electronics Inc. Some...
... correct the installation of God, or use , during the limited warranty period. Repairs to parts or systems resulting from the menu; A copy of incidental or consequential damages, so this full one-year warranty, LG will repair or replace your appliance, to replace house fuses or correct house wiring, or to be submitted at the time warranty service is designed to replace the defective part. USA LG Electronics Inc. Some...


