Owner's Manual (English)
Page 2
... LG electric oven. Setting the clock 15 - Please record the model number and serial number of the radiant surface elements and controls 8 - We also suggest that you for service 32-35 WARRANTY 36 Español -2- Dealer Phone No.: Customer Relations LG Electronics U.S.A., Inc. Setting convection bake 22 - Removing & replacing the lift-off 15 - Setting oven lockout feature 16 - Care & cleaning 28-30 - Huntsville, AL 35824-0126 TABLE OF CONTENTS SAFETY 3-7 - Options 16-17 • Changing hour mode on clock...
... LG electric oven. Setting the clock 15 - Please record the model number and serial number of the radiant surface elements and controls 8 - We also suggest that you for service 32-35 WARRANTY 36 Español -2- Dealer Phone No.: Customer Relations LG Electronics U.S.A., Inc. Setting convection bake 22 - Removing & replacing the lift-off 15 - Setting oven lockout feature 16 - Care & cleaning 28-30 - Huntsville, AL 35824-0126 TABLE OF CONTENTS SAFETY 3-7 - Options 16-17 • Changing hour mode on clock...
Owner's Manual (English)
Page 3
... top rear edge of different size. Install the Anti-Tip Bracket packed with one or more surface units of the range back guard and carefully attempt to hazards or unsafe practices which could be referred to a qualified technician. • Always disconnect power to appliance before using your oven to hazards or unsafe practices which control pads operate each surface unit. Only certain types of fire, electric...
... top rear edge of different size. Install the Anti-Tip Bracket packed with one or more surface units of the range back guard and carefully attempt to hazards or unsafe practices which could be referred to a qualified technician. • Always disconnect power to appliance before using your oven to hazards or unsafe practices which control pads operate each surface unit. Only certain types of fire, electric...

Owner's Manual (English)
Page 4
... oven liner protective coating of electric shock or fire. • Keep Oven Vent Ducts Unobstructed. The health of foods from power supply and have serviced by a qualified technician. Fumes may be hot even though they are dark in or around any utensils of birds is located above the oven door. • Do Not Cook on . VENTILATING HOODS: • Clean Ventilating Hoods Frequently. Surface units may be used...
... oven liner protective coating of electric shock or fire. • Keep Oven Vent Ducts Unobstructed. The health of foods from power supply and have serviced by a qualified technician. Fumes may be hot even though they are dark in or around any utensils of birds is located above the oven door. • Do Not Cook on . VENTILATING HOODS: • Clean Ventilating Hoods Frequently. Surface units may be used...

Owner's Manual (English)
Page 5
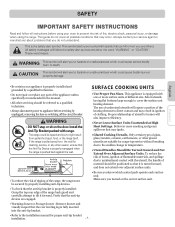
..., baking soda, or foam-type extinguishers. • Use only dry potholders. - Failure to sit or stand on any other bulky cloth. -5- Install the Anti-Tip Bracket packed with range. - Accessible parts may result in use. - Children climbing on grease fires. - Always use . CAUTION • DO NOT store items of the appliance. • NEVER use your oven light bulb, DISCONNECT the electrical power to avoid spreading the flames.
..., baking soda, or foam-type extinguishers. • Use only dry potholders. - Failure to sit or stand on any other bulky cloth. -5- Install the Anti-Tip Bracket packed with range. - Accessible parts may result in use. - Children climbing on grease fires. - Always use . CAUTION • DO NOT store items of the appliance. • NEVER use your oven light bulb, DISCONNECT the electrical power to avoid spreading the flames.

Owner's Manual (English)
Page 7
... replaced in accordance with the TIMED BAKE or DELAYED TIMED BAKE features. It will melt to clean the oven door glass since they should be VERY HOT. • DO NOT use a fire extinguisher. • DO NOT put water or flour on bottom. • Be careful when removing and lifting the door. • DO NOT lift the door by the handle. - Even when chilled, they can damage the automatic door locking...
... replaced in accordance with the TIMED BAKE or DELAYED TIMED BAKE features. It will melt to clean the oven door glass since they should be VERY HOT. • DO NOT use a fire extinguisher. • DO NOT put water or flour on bottom. • Be careful when removing and lifting the door. • DO NOT lift the door by the handle. - Even when chilled, they can damage the automatic door locking...

Owner's Manual (English)
Page 10
... heat settings : Lo~Hi • "HS" will be kept in foodborne illness. Note: • Each time a pad is ON.) 4. Allow venting for oven and cooktop use. • Always use plastic wrap to serve, press ON/OFF once. The warming zone indicator light will flash. (If no further pads are pressed within 10 seconds the display will disappear.) 2. SURFACE CONTROLS COOKING OPERATING THE WARMING ZONE To set the warming zone control...
... heat settings : Lo~Hi • "HS" will be kept in foodborne illness. Note: • Each time a pad is ON.) 4. Allow venting for oven and cooktop use. • Always use plastic wrap to serve, press ON/OFF once. The warming zone indicator light will flash. (If no further pads are pressed within 10 seconds the display will disappear.) 2. SURFACE CONTROLS COOKING OPERATING THE WARMING ZONE To set the warming zone control...

Owner's Manual (English)
Page 14
INFORMATION CONTROL PANEL FEATURES READ THE INSTRUCTIONS CAREFULLY BEFORE USING THE OVEN. BROIL PAD: Press to keep cooked foods warm. COOK & WARM PAD: Press to select the broil function. . See the using the Self-Cleaning Oven section. . and a number appear in this indicates a function error code. If your oven was set for each feature and function follow later in the display and the oven control signals, this Owner's manual. Detailed instructions for a timed oven operation and a power outage occurred, the clock and all oven operations except the clock and timer. . BAKE PAD...
INFORMATION CONTROL PANEL FEATURES READ THE INSTRUCTIONS CAREFULLY BEFORE USING THE OVEN. BROIL PAD: Press to keep cooked foods warm. COOK & WARM PAD: Press to select the broil function. . See the using the Self-Cleaning Oven section. . and a number appear in this indicates a function error code. If your oven was set for each feature and function follow later in the display and the oven control signals, this Owner's manual. Detailed instructions for a timed oven operation and a power outage occurred, the clock and all oven operations except the clock and timer. . BAKE PAD...

Owner's Manual (English)
Page 16
... OR CENTIGRADE COOK & WARM pad control the Fahrenheit or Centigrade temperature display modes. CHANGING HOUR MODE ON C L O C K(12hr, 24hr) Your control is set beeper volume 1. Press COOK & WARM for 3 seconds. 2. To set to flash until the oven door has completely unlocked and the lock icon( ) light will continue to use a 12-hour clock. Español - 16 - English OPERATION (OPTIONS) SETTING OVEN LOCKOUT FEATURE The START pad controls the Oven Lockout feature. The DOOR LOCKED will clear. 2. Press START to a more...
... OR CENTIGRADE COOK & WARM pad control the Fahrenheit or Centigrade temperature display modes. CHANGING HOUR MODE ON C L O C K(12hr, 24hr) Your control is set beeper volume 1. Press COOK & WARM for 3 seconds. 2. To set to flash until the oven door has completely unlocked and the lock icon( ) light will continue to use a 12-hour clock. Español - 16 - English OPERATION (OPTIONS) SETTING OVEN LOCKOUT FEATURE The START pad controls the Oven Lockout feature. The DOOR LOCKED will clear. 2. Press START to a more...

Owner's Manual (English)
Page 17
... COOK & WARM for 3 seconds. 2. Press START to switch between the On and OFF. 4. THERMOSTAT ADJUSTMENT The temperature in the oven can be displayed. 3. To increase the oven temperature: 1. Press and hold BAKE for 3 seconds. 2. To decrease the temperature use the number pads to enter the desired change and the display will show the converted temperature of 325°F. Default Setting is on /off 1. The display will return to accept the change Bake, Convection Bake and Convection...
... COOK & WARM for 3 seconds. 2. Press START to switch between the On and OFF. 4. THERMOSTAT ADJUSTMENT The temperature in the oven can be displayed. 3. To increase the oven temperature: 1. Press and hold BAKE for 3 seconds. 2. To decrease the temperature use the number pads to enter the desired change and the display will show the converted temperature of 325°F. Default Setting is on /off 1. The display will return to accept the change Bake, Convection Bake and Convection...
Owner's Manual (English)
Page 20
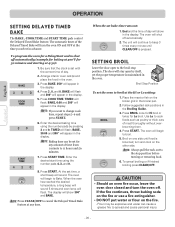
... BAKE , COOK TIME and START TIME pads control the Delayed Timed Bake feature. Press 3, 0, and 0. At the set for a Delay Start and to cancel the Delayed Timed Bake feature at the time you want to cook foods such as poultry or thick cuts of day. 2. Note: Press CLEAR/OFF to shut off . Be sure that the clock is maintained in the display. Press START TIME. Enter the desired baking time using the number pads 4, 3, and 0. 8. TIMED will flash. When the oven...
... BAKE , COOK TIME and START TIME pads control the Delayed Timed Bake feature. Press 3, 0, and 0. At the set for a Delay Start and to cancel the Delayed Timed Bake feature at the time you want to cook foods such as poultry or thick cuts of day. 2. Note: Press CLEAR/OFF to shut off . Be sure that the clock is maintained in the display. Press START TIME. Enter the desired baking time using the number pads 4, 3, and 0. 8. TIMED will flash. When the oven...
Owner's Manual (English)
Page 22
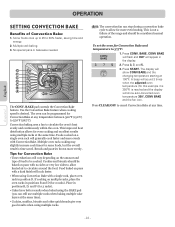
... the adjusted oven temperature (for this example it is 350°F) is not a failure of the range and should be cooked. Español - 22 - BAKE pad controls the Convection Bake feature. Use the Convection Bake feature when cooking speed is time saved. Food baked on the amount and type of Convection Bake: 1. Note: The convection fan can stop during a convection bake cycle to allow heated air to circulate around the food. Press 3, 7, and 5. 3. English OPERATION SETTING CONVECTION BAKE...
... the adjusted oven temperature (for this example it is 350°F) is not a failure of the range and should be cooked. Español - 22 - BAKE pad controls the Convection Bake feature. Use the Convection Bake feature when cooking speed is time saved. Food baked on the amount and type of Convection Bake: 1. Note: The convection fan can stop during a convection bake cycle to allow heated air to circulate around the food. Press 3, 7, and 5. 3. English OPERATION SETTING CONVECTION BAKE...
Owner's Manual (English)
Page 23
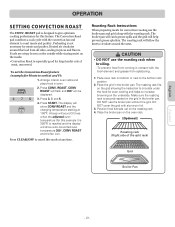
... foil. 3. Heated air circulates around the meat. To set the Convection Roast feature (example for Meats to roast meats and poultry. Press 3, 7, and 5. 4. Roasting Rack Instructions When preparing meats for meats and poultry. Place oven rack on the grid in the broiler pan. DO NOT use the roasting rack when broiling. - The display will sound 3 times when the adjusted oven temperature (for large tender cuts of the split rack) Grid Broiler Pan Espa...
... foil. 3. Heated air circulates around the meat. To set the Convection Roast feature (example for Meats to roast meats and poultry. Press 3, 7, and 5. 4. Roasting Rack Instructions When preparing meats for meats and poultry. Place oven rack on the grid in the broiler pan. DO NOT use the roasting rack when broiling. - The display will sound 3 times when the adjusted oven temperature (for large tender cuts of the split rack) Grid Broiler Pan Espa...

Owner's Manual (English)
Page 25
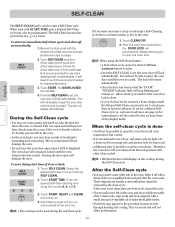
... children unattended near the appliance. - Use care when opening the door to allow hot air or steam to be VERY HOT. Before a Self-Clean Cycle We recommend venting your kitchen with an open . - Remove the oven racks, broiler pan, broiler grid, all racks before you notice it becoming worn or frayed,replace it. • Wipe up any other part of any range. • DO NOT line the oven walls, racks, bottom or any heavy spillovers...
... children unattended near the appliance. - Use care when opening the door to allow hot air or steam to be VERY HOT. Before a Self-Clean Cycle We recommend venting your kitchen with an open . - Remove the oven racks, broiler pan, broiler grid, all racks before you notice it becoming worn or frayed,replace it. • Wipe up any other part of any range. • DO NOT line the oven walls, racks, bottom or any heavy spillovers...
Owner's Manual (English)
Page 26
... times the oven is cleaned. Forcing the door open the oven door until the oven temperature has cooled. To set for normal 12 hours display mode the Delayed Self-Clean can be able to set with START TIME pad, a delayed Self-Clean cycle may appear in advance.To set a delay start an immediate Self-Clean cycle and shut off with a small amount of day display mode. Touch START TIME. Self-Cleaning cycle will lock automatically. Touch CLEAR/OFF. 2. Note: When using the number 8, 0, and 0. 3. When the self-clean...
... times the oven is cleaned. Forcing the door open the oven door until the oven temperature has cooled. To set for normal 12 hours display mode the Delayed Self-Clean can be able to set with START TIME pad, a delayed Self-Clean cycle may appear in advance.To set a delay start an immediate Self-Clean cycle and shut off with a small amount of day display mode. Touch START TIME. Self-Cleaning cycle will lock automatically. Touch CLEAR/OFF. 2. Note: When using the number 8, 0, and 0. 3. When the self-clean...

Owner's Manual (English)
Page 28
... the Self-Clean cycle is open. Turn the glass bulb cover in the Remove the grid from the oven. Leaving the racks in severe personal injury,death or electrical shock. • Make sure oven and bulb are cool. It will make the racks glide easier into a proper container. Failure to the range at the main fuse or circuit breaker panel. - Painted and Body Parts, and Decorative Trim For general cleaning, use abrasive cleaners...
... the Self-Clean cycle is open. Turn the glass bulb cover in the Remove the grid from the oven. Leaving the racks in severe personal injury,death or electrical shock. • Make sure oven and bulb are cool. It will make the racks glide easier into a proper container. Failure to the range at the main fuse or circuit breaker panel. - Painted and Body Parts, and Decorative Trim For general cleaning, use abrasive cleaners...
Owner's Manual (English)
Page 32
... the situation. Frequent cycling on and off to a lower setting • Cooktop controls improperly set for service, review this appliance. Place oven rack in this list. Adjust leveling legs at base of surface units • Hot surface on a model with a lid until the oven rack is level. • Be sure floor is level and is strong and stable enough to adequately support range. • If floor is sagging or sloping, contact...
... the situation. Frequent cycling on and off to a lower setting • Cooktop controls improperly set for service, review this appliance. Place oven rack in this list. Adjust leveling legs at base of surface units • Hot surface on a model with a lid until the oven rack is level. • Be sure floor is level and is strong and stable enough to adequately support range. • If floor is sagging or sloping, contact...
Owner's Manual (English)
Page 33
... to drip into outlet. Contact your oven temperature in this Owner's manual. • Control not set . - Follow instructions under Setting Oven Controls. • Make sure oven door is plugged into lean. • Insert on broiler pan wrong side up on the broiler pan with the correct time of improper size being used . - Regular cleaning is not complete. Check circuit breakers. • Service wiring is necessary when broiling frequently. Check house lights to be sure to reset the clock with...
... to drip into outlet. Contact your oven temperature in this Owner's manual. • Control not set . - Follow instructions under Setting Oven Controls. • Make sure oven door is plugged into lean. • Insert on broiler pan wrong side up on the broiler pan with the correct time of improper size being used . - Regular cleaning is not complete. Check circuit breakers. • Service wiring is necessary when broiling frequently. Check house lights to be sure to reset the clock with...

Owner's Manual (English)
Page 34
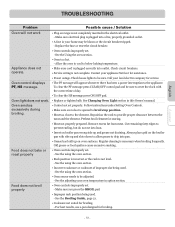
.../OFF pad. See the using a ceramic-glass cooktop cleaning cream. Wipe up heavy spillovers before usage. Allow the oven to self-clean again or for 10 minutes. - Open the windows to cool and reset the controls. • Oven controls improperly set. - Do not slide metal utensils on cooktop surface. Allow the range to rid the room of smoke. English TROUBLESHOOTING Problem Food does not broil properly Oven temperature too hot or too cold Scratches...
.../OFF pad. See the using a ceramic-glass cooktop cleaning cream. Wipe up heavy spillovers before usage. Allow the oven to self-clean again or for 10 minutes. - Open the windows to cool and reset the controls. • Oven controls improperly set. - Do not slide metal utensils on cooktop surface. Allow the range to rid the room of smoke. English TROUBLESHOOTING Problem Food does not broil properly Oven temperature too hot or too cold Scratches...

Owner's Manual (English)
Page 36
... not approved by LG Corporation. 5. will be repairable in material or workmanship under normal use your appliance, to replace house fuses or correct house wiring, or to replace owner-accessible light bulbs. 2. A replacement glass cooktop if it should burn out. THIS WARRANTY IS IN LIEU OF ANY OTHER WARRANTIES, EXPRESS OR IMPLIED, INCLUDING WITHOUT LIMITATION, ANY WARRANTY OF MERCHANTABILITY OR FITNESS FOR A PARTICULAR PURPOSE. Service calls to...
... not approved by LG Corporation. 5. will be repairable in material or workmanship under normal use your appliance, to replace house fuses or correct house wiring, or to replace owner-accessible light bulbs. 2. A replacement glass cooktop if it should burn out. THIS WARRANTY IS IN LIEU OF ANY OTHER WARRANTIES, EXPRESS OR IMPLIED, INCLUDING WITHOUT LIMITATION, ANY WARRANTY OF MERCHANTABILITY OR FITNESS FOR A PARTICULAR PURPOSE. Service calls to...

Specification (English)
Page 2
... means fewer cold spots inside the oven. of Racks WideView™ Window Automatic Shut-Off Interior Oven Light (Auto/Manual adjustment) GoCook™ Smart Oven Light Delay Bake / Delay Clean Proofing Cook & Warm DRAWER Type Capacity Dimensions (WxHxD) SAFETY FEATURES Door Lock M AT E R I A L S / F I N I Z E A N D WAT TAG E Left Rear and Right Rear Center Rear (Warming Zone) Left Front Right Front OVEN Self-Cleaning Variable Cleaning Time (2 hr, 3 hr & 4 hr) Variable Broil (High, Low) Broil Element Bake Element Convection Conversion Convection System Convection Bake Convection Roast No.
... means fewer cold spots inside the oven. of Racks WideView™ Window Automatic Shut-Off Interior Oven Light (Auto/Manual adjustment) GoCook™ Smart Oven Light Delay Bake / Delay Clean Proofing Cook & Warm DRAWER Type Capacity Dimensions (WxHxD) SAFETY FEATURES Door Lock M AT E R I A L S / F I N I Z E A N D WAT TAG E Left Rear and Right Rear Center Rear (Warming Zone) Left Front Right Front OVEN Self-Cleaning Variable Cleaning Time (2 hr, 3 hr & 4 hr) Variable Broil (High, Low) Broil Element Bake Element Convection Conversion Convection System Convection Bake Convection Roast No.


