
Owner's Manual
Page 2
...(U.S.A.) Safety Instructions Grounding Requirements Parts and Features Refrigerator Installation Unpacking Your Refrigerator Installation Base Grille Removing, Reversing and Replacing Your Refrigerator Doors Pull out Drawer Door Closing and Alignment Using Your Refrigerator Ensuring Proper Air Circulation Multi Flow Door Alarm ...Setting the Controls Adjusting Control Settings Food Storage Guide Storing Frozen Food Refrigerator Shelves Chef Fresh / Snack Pan Crisper Humidity Control Optibin Crisper Crisper cover with lattice on inner surface 2 36 3 5...
...(U.S.A.) Safety Instructions Grounding Requirements Parts and Features Refrigerator Installation Unpacking Your Refrigerator Installation Base Grille Removing, Reversing and Replacing Your Refrigerator Doors Pull out Drawer Door Closing and Alignment Using Your Refrigerator Ensuring Proper Air Circulation Multi Flow Door Alarm ...Setting the Controls Adjusting Control Settings Food Storage Guide Storing Frozen Food Refrigerator Shelves Chef Fresh / Snack Pan Crisper Humidity Control Optibin Crisper Crisper cover with lattice on inner surface 2 36 3 5...

Owner's Manual
Page 3
... and/or after delivery. 6. If the product is applicable to prove date of your product type (Refrigerator), model number, serial number, and ZIP/Postal Code ready. 3 including Alaska, Hawaii, and U.S. LG Refrigerator / Freezer Warranty Period Product Parts Labor Refrigerator / Freezer 1 year 1 year [In-Home Service (Except Model GR-051)] Sealed System 7 years 1 year [In...
... and/or after delivery. 6. If the product is applicable to prove date of your product type (Refrigerator), model number, serial number, and ZIP/Postal Code ready. 3 including Alaska, Hawaii, and U.S. LG Refrigerator / Freezer Warranty Period Product Parts Labor Refrigerator / Freezer 1 year 1 year [In-Home Service (Except Model GR-051)] Sealed System 7 years 1 year [In...

Owner's Manual
Page 5
...following: NEVER unplug your product, basic safety precautions should be careful not to save as much of their quality as described in the refrigerator. The eating quality of Agriculture in the freezer compartment when hands are not followed. they are still cold below 40°F (4&#...other foods. IMPORTANT SAFETY INSTRUCTIONS SAFETY MESSAGES This guide contains many other appliance. Before replacing a burned-out light bulb, unplug the refrigerator or turn off -color should not be refrozen and should not be killed or seriously injured if you open the doors when ...
...following: NEVER unplug your product, basic safety precautions should be careful not to save as much of their quality as described in the refrigerator. The eating quality of Agriculture in the freezer compartment when hands are not followed. they are still cold below 40°F (4&#...other foods. IMPORTANT SAFETY INSTRUCTIONS SAFETY MESSAGES This guide contains many other appliance. Before replacing a burned-out light bulb, unplug the refrigerator or turn off -color should not be refrozen and should not be killed or seriously injured if you open the doors when ...

Owner's Manual
Page 6
... and obligation to avoid some risk. 6 Electrical Shock Hazard FOR PERSONAL SAFETY, this CFC refrigerant, you are finished, reconnect the refrigerator to the electrical source and reset the control (Thermostat, Refrigerator Control or Freezer Control, depending on the model) to make sure the outlet is properly ...If the power cord is recommended that it must be replaced by the manufacturer, by our service center or by qualified personal by LG Electronics, to have a cooling system that children may not easily climb inside. However, if you are still dangerous... WARNING Do not...
... and obligation to avoid some risk. 6 Electrical Shock Hazard FOR PERSONAL SAFETY, this CFC refrigerant, you are finished, reconnect the refrigerator to the electrical source and reset the control (Thermostat, Refrigerator Control or Freezer Control, depending on the model) to make sure the outlet is properly ...If the power cord is recommended that it must be replaced by the manufacturer, by our service center or by qualified personal by LG Electronics, to have a cooling system that children may not easily climb inside. However, if you are still dangerous... WARNING Do not...

Owner's Manual
Page 7
The locations of the features shown below . A Digital Sensor Control B Refrigerator Light C Shelves D Temperature Control E Chef Fresh / Snack Pan F Can Dispenser G Optibin Crisper Keeps fruits and vegetable fresh and crisper H Ice Bin I Q J R ...familiar with the parts and features. PARTS AND FEATURES A B C L D M E N F O G H P I Ice Tray (Inside of H)* J Durabase K Divider L Dairy Bin M Design-A-Door N Egg Box O Refrigerator Door Rack P Freezer Light Q Pull out Drawer R Customcube Icemaker* *on some or all of the items listed below may have purchased may not match your...
The locations of the features shown below . A Digital Sensor Control B Refrigerator Light C Shelves D Temperature Control E Chef Fresh / Snack Pan F Can Dispenser G Optibin Crisper Keeps fruits and vegetable fresh and crisper H Ice Bin I Q J R ...familiar with the parts and features. PARTS AND FEATURES A B C L D M E N F O G H P I Ice Tray (Inside of H)* J Durabase K Divider L Dairy Bin M Design-A-Door N Egg Box O Refrigerator Door Rack P Freezer Light Q Pull out Drawer R Customcube Icemaker* *on some or all of the items listed below may have purchased may not match your...

Owner's Manual
Page 8
... section to become more familiar with the parts and features. NOTE: This guide covers several different models. The refrigerator you have some models 8 PARTS AND FEATURES A B J C K D L E M F N G H I Divider J Dairy Bin K Design-A-Door L Pull out Drawer M Refrigerator Door Rack N Freezer Light O Customcube Icemaker* *on some or all of the features shown below . The locations...
... section to become more familiar with the parts and features. NOTE: This guide covers several different models. The refrigerator you have some models 8 PARTS AND FEATURES A B J C K D L E M F N G H I Divider J Dairy Bin K Design-A-Door L Pull out Drawer M Refrigerator Door Rack N Freezer Light O Customcube Icemaker* *on some or all of the features shown below . The locations...

Owner's Manual
Page 9
... become more familiar with the parts and features. The locations of the features shown below . PARTS AND FEATURES A B I Dairy Bin J Design-A-Door K Wire Freezer Shelf L Refrigerator Door Rack M Freezer Light N Freezer Door Rack *on some or all of the items listed below may have purchased may not match your model. NOTE...
... become more familiar with the parts and features. The locations of the features shown below . PARTS AND FEATURES A B I Dairy Bin J Design-A-Door K Wire Freezer Shelf L Refrigerator Door Rack M Freezer Light N Freezer Door Rack *on some or all of the items listed below may have purchased may not match your model. NOTE...

Owner's Manual
Page 10
... They are installed in the metal panel. 2. You may be easily removed by tipping the cabinet slightly. Pull the grille toward the refrigerator until it . To avoid vibration, the unit must be injured or receive an electrical shock. Turn the leveling screws clockwise ( ) to... NEXT 1. The front should be turned easily by rubbing a small amount of your individual storage needs. Too small a distance from refrigerator. UNPACKING YOUR REFRIGERATOR Remove tape and any warningtype labels, the model and serial number label, or the TechSheet that is too low or high, cooling ...
... They are installed in the metal panel. 2. You may be easily removed by tipping the cabinet slightly. Pull the grille toward the refrigerator until it . To avoid vibration, the unit must be injured or receive an electrical shock. Turn the leveling screws clockwise ( ) to... NEXT 1. The front should be turned easily by rubbing a small amount of your individual storage needs. Too small a distance from refrigerator. UNPACKING YOUR REFRIGERATOR Remove tape and any warningtype labels, the model and serial number label, or the TechSheet that is too low or high, cooling ...

Owner's Manual
Page 11
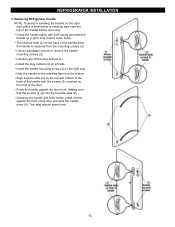
...handle to opposite side of the handle with both hands and pull up (1). Reinstall top hinge cover (7). 9 8 10 7 11 Lift the Refrigerator door (3) slightly and remove it . Loosen the screw (5), remove the stoppers (6), and attach them on the opposite side). Pry off the ...cover (4) using a slotted screwdriver and attach it on the right. 2. Removing Refrigerator Handle Take of the refrigerator door(2). 11 2 1 3. Install the top hinge (6) with the screws (2) and the screws (3). Loosen the 2 screws (8) and the ...
...handle to opposite side of the handle with both hands and pull up (1). Reinstall top hinge cover (7). 9 8 10 7 11 Lift the Refrigerator door (3) slightly and remove it . Loosen the screw (5), remove the stoppers (6), and attach them on the opposite side). Pry off the ...cover (4) using a slotted screwdriver and attach it on the right. 2. Removing Refrigerator Handle Take of the refrigerator door(2). 11 2 1 3. Install the top hinge (6) with the screws (2) and the screws (3). Loosen the 2 screws (8) and the ...

Owner's Manual
Page 12
Then pull out the handle. (This may require some force). •Assembly is the reverse order of the door. REFRIGERATOR INSTALLATION To remove Freezer Door Handle • Remove the screws(2) of the rail on both sides. •Grasp the handle tightly with both hands,and ...
Then pull out the handle. (This may require some force). •Assembly is the reverse order of the door. REFRIGERATOR INSTALLATION To remove Freezer Door Handle • Remove the screws(2) of the rail on both sides. •Grasp the handle tightly with both hands,and ...
Owner's Manual
Page 13
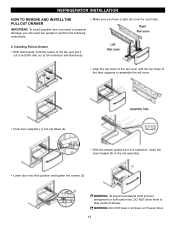
WARNING: DO NOT step or sit down on Freezer Door. 13 REFRIGERATOR INSTALLATION HOW TO REMOVE AND INSTALL THE PULLOUT DRAWER IMPORTANT: To avoid possible injur or product or property damage, you have a right rail cover for ...
WARNING: DO NOT step or sit down on Freezer Door. 13 REFRIGERATOR INSTALLATION HOW TO REMOVE AND INSTALL THE PULLOUT DRAWER IMPORTANT: To avoid possible injur or product or property damage, you have a right rail cover for ...

Owner's Manual
Page 14
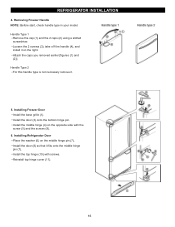
...it . Loosen the screw (5), remove the stoppers (6) and attach them on the left (on the left side of f the top hinge (2). Removing Refrigerator Door Remove the top hinge cover (1). HOW TO REVERSE DOOR OPENING DIRECT ION (when converting from doors. Loosen the 2 screws (11), the 2...bins from the left . Pry off the cover (4) using a slotted screwdriver and attach it on the right. 2. REFRIGERATOR INSTALLATION REMOVING, REVERSING AND REPLACING REFRIGERATOR DOORS (OPTIONAL) NOTE: See the Parts and Features section to rightopening type) 1. IMPORTANT: Before you begin, turn the...
...it . Loosen the screw (5), remove the stoppers (6) and attach them on the left (on the left side of f the top hinge (2). Removing Refrigerator Door Remove the top hinge cover (1). HOW TO REVERSE DOOR OPENING DIRECT ION (when converting from doors. Loosen the 2 screws (11), the 2...bins from the left . Pry off the cover (4) using a slotted screwdriver and attach it on the right. 2. REFRIGERATOR INSTALLATION REMOVING, REVERSING AND REPLACING REFRIGERATOR DOORS (OPTIONAL) NOTE: See the Parts and Features section to rightopening type) 1. IMPORTANT: Before you begin, turn the...
Owner's Manual
Page 15
... it firmly against the door front, making sure that the screws (3) go into the keyhole slots (2). Install the handle mounting screw (3) on left side. Removing Refrigerator Handle NOTE: To assist in installing the handle on the back of the handle before removing. The keyhole slots (2) on the right side, place a small... against the front of the door. Install the plug buttons (4) on the right side Hold the handle so the masking tape is at the bottom. REFRIGERATOR INSTALLATION 3.
... it firmly against the door front, making sure that the screws (3) go into the keyhole slots (2). Install the handle mounting screw (3) on left side. Removing Refrigerator Handle NOTE: To assist in installing the handle on the back of the handle before removing. The keyhole slots (2) on the right side, place a small... against the front of the door. Install the plug buttons (4) on the right side Hold the handle so the masking tape is at the bottom. REFRIGERATOR INSTALLATION 3.
Owner's Manual
Page 16
...(3), take of f the handle (4), and install it on the opposite side with screws. Install the middle hinge (4) on the right. Installing Refrigerator Door Place the washer (6) on the middle hinge pin (7). Install the top hinge (10) with the screw (5) and the screws (9). 6....the cap (1) and the 2 caps (2) using a slotted screwdriver. Installing Freezer Door Install the base grille (1). Reinstall top hinge cover (11). 16 REFRIGERATOR INSTALLLLAATTIIOONN 4. Install the door (8) so that it . 5. Handle Type 2 For this handle type is not neccesary remove it fits onto the middle ...
...(3), take of f the handle (4), and install it on the opposite side with screws. Install the middle hinge (4) on the right. Installing Refrigerator Door Place the washer (6) on the middle hinge pin (7). Install the top hinge (10) with the screw (5) and the screws (9). 6....the cap (1) and the 2 caps (2) using a slotted screwdriver. Installing Freezer Door Install the base grille (1). Reinstall top hinge cover (11). 16 REFRIGERATOR INSTALLLLAATTIIOONN 4. Install the door (8) so that it . 5. Handle Type 2 For this handle type is not neccesary remove it fits onto the middle ...
Owner's Manual
Page 17
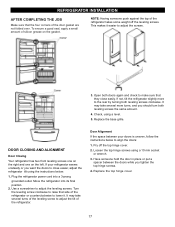
... top hinge screws. 4. Replace the top hinge cover. 17 NOTE: Having someone hold the door in place or put a spacer between your refrigerator seems unsteady or you should turn both doors again and check to the rear by turning both leveling screws clockwise. It may take several turns...lower it easier to adjust the leveling screws. Check, using a 10 mm socket or wrench. 3. Have someone push against the top of the refrigerator or counterclockwise to adjust the tilt of the door gasket are not folded over. This makes it . Turn the leveling screw clockwise to align ...
... top hinge screws. 4. Replace the top hinge cover. 17 NOTE: Having someone hold the door in place or put a spacer between your refrigerator seems unsteady or you should turn both doors again and check to the rear by turning both leveling screws clockwise. It may take several turns...lower it easier to adjust the leveling screws. Check, using a 10 mm socket or wrench. 3. Have someone push against the top of the refrigerator or counterclockwise to adjust the tilt of the door gasket are not folded over. This makes it . Turn the leveling screw clockwise to align ...

Owner's Manual
Page 18
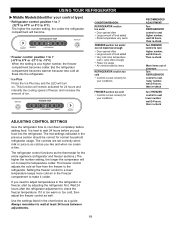
... damaged, efficiency may occur. Ice Plus: Press the Ice Plus key and the LED will become. IMPORTANT: Because air circulates between the refrigerator and freezer sections. These tones repeat every 30 seconds. The rest of the air then flows through the bottom of escaping cool air. Then... new food is at this setting for details.) NOTE: To change °F/°C press and HOLD COLDER key cof freezer and COLDER key of refrigerator over 1 sec. This function will transfer to the other. at 0°F ( -18°C). The cooling fan operates more powerful and effective ...
... damaged, efficiency may occur. Ice Plus: Press the Ice Plus key and the LED will become. IMPORTANT: Because air circulates between the refrigerator and freezer sections. These tones repeat every 30 seconds. The rest of the air then flows through the bottom of escaping cool air. Then... new food is at this setting for details.) NOTE: To change °F/°C press and HOLD COLDER key cof freezer and COLDER key of refrigerator over 1 sec. This function will transfer to the other. at 0°F ( -18°C). The cooling fan operates more powerful and effective ...
Owner's Manual
Page 19
... items out of food added Very cold room temperature (can't cycle often enough) Heavy ice usage Air vents blocked by adjusting the refrigerator first. Wait 24 hours after the refrigerator adjustment to make it is firm. This function will run to cool down completely before you need to the...to -13°C) When the setting is best to wait 24 hours before adding food. Use the settings listed in the refrigerator or freezer, start by items REFRIGERATOR section too cold Controls not set correctly for your conditions FREEZER section too cold Controls not set correctly when milk or juice ...
... items out of food added Very cold room temperature (can't cycle often enough) Heavy ice usage Air vents blocked by adjusting the refrigerator first. Wait 24 hours after the refrigerator adjustment to make it is firm. This function will run to cool down completely before you need to the...to -13°C) When the setting is best to wait 24 hours before adding food. Use the settings listed in the refrigerator or freezer, start by items REFRIGERATOR section too cold Controls not set correctly for your conditions FREEZER section too cold Controls not set correctly when milk or juice ...
Owner's Manual
Page 20
... freezer than will not quick-freeze any large quantity of freezer space). Ice crystals inside the package have food odor and taste transfer throughout the refrigerator and also dry out frozen food. NOTE: Do not store food near the sensor; Place in a plastic bag or plastic container and store in ... information about preparing food for proper freezing methods. Dry ice is airtight and moisture-proof. Wash in original carton on interior shelf, not on a refrigerator shelf. When you do not breathe the vapors. 20 they may cause the sensor to ensure freshness. USING YOUR...
... freezer than will not quick-freeze any large quantity of freezer space). Ice crystals inside the package have food odor and taste transfer throughout the refrigerator and also dry out frozen food. NOTE: Do not store food near the sensor; Place in a plastic bag or plastic container and store in ... information about preparing food for proper freezing methods. Dry ice is airtight and moisture-proof. Wash in original carton on interior shelf, not on a refrigerator shelf. When you do not breathe the vapors. 20 they may cause the sensor to ensure freshness. USING YOUR...

Owner's Manual
Page 21
... the shelf in the direction of (1) and lift it will also reduce the amount of (2). Storing similar food items together in your refrigerator and adjusting the shelves to fit different heights of the shelf so that shelves are made with warm water when they are adjustable to ...will shatter into the slots at a desired height. Lift up and guide the shelf hooks into small pebblesized pieces. USING YOUR REFRIGERATOR REFRIGERATOR SHELVES The shelves in your refrigerator are cold. To slide the shelf out, carefully pull front of the shelf up the shelf to avoid dropping them. To...
... the shelf in the direction of (1) and lift it will also reduce the amount of (2). Storing similar food items together in your refrigerator and adjusting the shelves to fit different heights of the shelf so that shelves are made with warm water when they are adjustable to ...will shatter into the slots at a desired height. Lift up and guide the shelf hooks into small pebblesized pieces. USING YOUR REFRIGERATOR REFRIGERATOR SHELVES The shelves in your refrigerator are cold. To slide the shelf out, carefully pull front of the shelf up the shelf to avoid dropping them. To...
Owner's Manual
Page 22
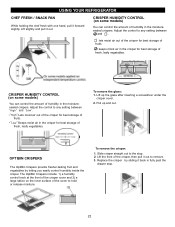
... air out of the crisper for best storage of humidity in the moisturesealed crispers. Slide crisper straight out to hold or release moisture. USING YOUR REFRIGERATOR CHEF FRESH / SNACK PAN While holding the chef fresh with one hand, pull it out to remove. 3. CRISPER HUMIDITY CONTROL (on some models) You can...
... air out of the crisper for best storage of humidity in the moisturesealed crispers. Slide crisper straight out to hold or release moisture. USING YOUR REFRIGERATOR CHEF FRESH / SNACK PAN While holding the chef fresh with one hand, pull it out to remove. 3. CRISPER HUMIDITY CONTROL (on some models) You can...


