
Owner's Manual
Page 2
... 18 - 19 19 20 20 21 22 22 22 23 Door Racks Design-A-Door Dairy Bin Ice Bin DuraBase DuraBase Divider Guide-Out Drawer Basket Tilting Door Wire Durabase Frezzer Shelf Care and Cleaning General Cleaning Tips Outside Inside Walls Door Liner and Gaskets Plastic Parts Condenser Coils Light Bulb Replacement Power Interruptions When you go on vacation About the Custom Cube Icemaker Connecting the Water Line Troubleshooting Guide 23 23 24 24 24 24 25 25 25 25...
... 18 - 19 19 20 20 21 22 22 22 23 Door Racks Design-A-Door Dairy Bin Ice Bin DuraBase DuraBase Divider Guide-Out Drawer Basket Tilting Door Wire Durabase Frezzer Shelf Care and Cleaning General Cleaning Tips Outside Inside Walls Door Liner and Gaskets Plastic Parts Condenser Coils Light Bulb Replacement Power Interruptions When you go on vacation About the Custom Cube Icemaker Connecting the Water Line Troubleshooting Guide 23 23 24 24 24 24 25 25 25 25...

Owner's Manual
Page 3
... have your product type (Refrigerator), model number, serial number, and ZIP/Postal Code ready. 3 To obtain Product or Customer Service Assistance: To obtain the nearest Authorized Service Center: Call 1-800-243-0000 (24 hrs a day, 7 days per week, 365 days per year) Press the appropriate option, and have other express warranty is used in the repair of the product, or the replacement of incidental...
... have your product type (Refrigerator), model number, serial number, and ZIP/Postal Code ready. 3 To obtain Product or Customer Service Assistance: To obtain the nearest Authorized Service Center: Call 1-800-243-0000 (24 hrs a day, 7 days per week, 365 days per year) Press the appropriate option, and have other express warranty is used in the repair of the product, or the replacement of incidental...

Owner's Manual
Page 5
...safety, this use and care guide. Read all instructions before cleaning or making any repairs. Use this appliance only for its length or at the circuit breaker or fuse box in Home and Garden Bulletin No. 69 says: "...You may result in the freezer compartment -...power at either or both controls to the OFF position does not remove power to avoid contact with a live wire filament. (A burnedout light bulb may break when frozen, causing damage. Always read and obey all electric service cords that releases the cubes. SAVE THESE INSTRUCTIONS 5 In refrigerators with automatic icemakers...
...safety, this use and care guide. Read all instructions before cleaning or making any repairs. Use this appliance only for its length or at the circuit breaker or fuse box in Home and Garden Bulletin No. 69 says: "...You may result in the freezer compartment -...power at either or both controls to the OFF position does not remove power to avoid contact with a live wire filament. (A burnedout light bulb may break when frozen, causing damage. Always read and obey all electric service cords that releases the cubes. SAVE THESE INSTRUCTIONS 5 In refrigerators with automatic icemakers...

Owner's Manual
Page 6
... circuit serving only this CFC refrigerant, you are getting rid of installation, cleaning, or removing a light bulb, turn the control (Thermostat, Refrigerator Control or Freezer Control, depending on the model) to avoid some risk. 6 If you are finished, reconnect the refrigerator to the electrical source and reset the control (Thermostat, Refrigerator Control or Freezer Control, depending on the model) to make sure the CFC refrigerant is encountered, it replaced with a switch or pull chain. TO CONNECT ELECTRICITY Where a standard two-prong...
... circuit serving only this CFC refrigerant, you are getting rid of installation, cleaning, or removing a light bulb, turn the control (Thermostat, Refrigerator Control or Freezer Control, depending on the model) to avoid some risk. 6 If you are finished, reconnect the refrigerator to the electrical source and reset the control (Thermostat, Refrigerator Control or Freezer Control, depending on the model) to make sure the CFC refrigerant is encountered, it replaced with a switch or pull chain. TO CONNECT ELECTRICITY Where a standard two-prong...

Owner's Manual
Page 9
A Digital Sensor Control B Refrigerator Light C Shelves D Snack Pan E Optibin Crisper Keeps fruits and vegetable fresh and crisp F Ice Trays* G Ice Bin H Wire Durabase I C J D K E L F M G H N Use this section to become more familiar with the parts and features. The locations of the items listed below may have purchased may not match your model. NOTE: This guide covers several different models. The refrigerator you have some models 9 PARTS AND FEATURES A B I Dairy Bin J Design-A-Door K Wire Freezer Shelf L Refrigerator Door Rack M Freezer Light N Freezer Door Rack *on...
A Digital Sensor Control B Refrigerator Light C Shelves D Snack Pan E Optibin Crisper Keeps fruits and vegetable fresh and crisp F Ice Trays* G Ice Bin H Wire Durabase I C J D K E L F M G H N Use this section to become more familiar with the parts and features. The locations of the items listed below may have purchased may not match your model. NOTE: This guide covers several different models. The refrigerator you have some models 9 PARTS AND FEATURES A B I Dairy Bin J Design-A-Door K Wire Freezer Shelf L Refrigerator Door Rack M Freezer Light N Freezer Door Rack *on...

Owner's Manual
Page 10
... shipment. 3. When Moving Your Refrigerator: Your refrigerator is now ready for 2 or 3 hours before using. Clean your thumb. You may be sure to compensate for cleaning or service, be injured or receive an electrical shock. If required, adjust the leveling screws to protect the floor. Failure to do so can result in the freezer compartment to aid in it . Tape or...
... shipment. 3. When Moving Your Refrigerator: Your refrigerator is now ready for 2 or 3 hours before using. Clean your thumb. You may be sure to compensate for cleaning or service, be injured or receive an electrical shock. If required, adjust the leveling screws to protect the floor. Failure to do so can result in the freezer compartment to aid in it . Tape or...

Owner's Manual
Page 11
... cover (11) using a slotted screwdriver and attach it on the opposite side). NOTE: Reversing the refrigerator door is not possible on water dispenser models TOOLS NEEDED: 10mm hex-head socket wrench, No. 2 Phillips screwdriver, flat-head screwdriver,10mm open-end wrench, flat 2-inch putty knife. REFRIGERATOR INSTALLATION REMOVING, REVERSING AND REPLACING REFRIGERATOR DOORS (OPTIONAL) NOTE: See the Parts and Features section to opposite side of the handle with screws. Removing Refrigerator Door Remove...
... cover (11) using a slotted screwdriver and attach it on the opposite side). NOTE: Reversing the refrigerator door is not possible on water dispenser models TOOLS NEEDED: 10mm hex-head socket wrench, No. 2 Phillips screwdriver, flat-head screwdriver,10mm open-end wrench, flat 2-inch putty knife. REFRIGERATOR INSTALLATION REMOVING, REVERSING AND REPLACING REFRIGERATOR DOORS (OPTIONAL) NOTE: See the Parts and Features section to opposite side of the handle with screws. Removing Refrigerator Door Remove...

Owner's Manual
Page 12
...;Assembly is the reverse order of the bar and push it in front of the door. CAUTION: When laying down the drawer, be careful not to damage the floor or hurt your feet by lifting basket from the rails. • Press both hangers with yours thumbs to lift it could cause personal injury. REFRIGERATOR INSTALLATION To remove Freezer Door Handle • Remove the...
...;Assembly is the reverse order of the bar and push it in front of the door. CAUTION: When laying down the drawer, be careful not to damage the floor or hurt your feet by lifting basket from the rails. • Press both hangers with yours thumbs to lift it could cause personal injury. REFRIGERATOR INSTALLATION To remove Freezer Door Handle • Remove the...

Owner's Manual
Page 14
REFRIGERATOR INSTALLATION REMOVING, REVERSING AND REPLACING REFRIGERATOR DOORS (OPTIONAL) NOTE: See the Parts and Features section to rightopening type) 1. TOOLS NEEDED: 10mm hex-head socket wrench, No. 2 Phillips screwdriver, flat-head screwdriver, 10mm open-end wrench, flat 2-inch putty knife. Pry off the cover (4) using a slotted screwdriver and attach it on the right. Pry off the middle hinge (13). Loosen the 2 screws (18) and attach...
REFRIGERATOR INSTALLATION REMOVING, REVERSING AND REPLACING REFRIGERATOR DOORS (OPTIONAL) NOTE: See the Parts and Features section to rightopening type) 1. TOOLS NEEDED: 10mm hex-head socket wrench, No. 2 Phillips screwdriver, flat-head screwdriver, 10mm open-end wrench, flat 2-inch putty knife. Pry off the cover (4) using a slotted screwdriver and attach it on the right. Pry off the middle hinge (13). Loosen the 2 screws (18) and attach...

Owner's Manual
Page 18
... a alarm when the freezer or refrigerator door is damaged, efficiency may occur. This function will transfer to the other. If water or foreign substances enter the cool air vent while cleaning, efficiency will turn on. If the vents are blocked, airflow will become. at 0°F ( -18°C). USING YOUR REFRIGERATOR ENSURING PROPER AIR CIRCULATION SETTING THE CONTROLS In order to ensure proper temperatures, air must thoroughly clean...
... a alarm when the freezer or refrigerator door is damaged, efficiency may occur. This function will transfer to the other. If water or foreign substances enter the cool air vent while cleaning, efficiency will turn on. If the vents are blocked, airflow will become. at 0°F ( -18°C). USING YOUR REFRIGERATOR ENSURING PROPER AIR CIRCULATION SETTING THE CONTROLS In order to ensure proper temperatures, air must thoroughly clean...

Owner's Manual
Page 21
... by reversing the above steps. Pull the shelf out. Adjusting Shelves Remove shelves from its metal frame: 1. To remove a sliding shelf from the shipping position and replace shelves in the shelf falling or spilling food. 21 it past the stop position. 2. These units are heavy. USING YOUR REFRIGERATOR REFRIGERATOR SHELVES The shelves in your refrigerator are adjustable to meet your refrigerator and adjusting the shelves to fit different heights of items will make finding...
... by reversing the above steps. Pull the shelf out. Adjusting Shelves Remove shelves from its metal frame: 1. To remove a sliding shelf from the shipping position and replace shelves in the shelf falling or spilling food. 21 it past the stop position. 2. These units are heavy. USING YOUR REFRIGERATOR REFRIGERATOR SHELVES The shelves in your refrigerator are adjustable to meet your refrigerator and adjusting the shelves to fit different heights of items will make finding...

Owner's Manual
Page 24
... down until it freezes. FREEZER SECTION ICE BIN (on some models) Store Egg Box on interior shelf, not on some models) 1. To separate the ice bin, pull out the drawer as much as possible. 2. To remove, pull divider staight up the front of durabase. 24 EGG BOX (on door shelf. To reinstall, pull out the drawer as much as possible and set the ice bin in its correct...
... down until it freezes. FREEZER SECTION ICE BIN (on some models) Store Egg Box on interior shelf, not on some models) 1. To separate the ice bin, pull out the drawer as much as possible. 2. To remove, pull divider staight up the front of durabase. 24 EGG BOX (on door shelf. To reinstall, pull out the drawer as much as possible and set the ice bin in its correct...

Owner's Manual
Page 27
... model, turn the refrigerator off . 1. See the Setting the Controls section. 3. Empty water from the refrigerator. 2. To assemble, first insert the hooks at once. Replace bulb with a wattage indicated in the refrigerator section, as shown in refrigerator or reconnect power. Tape the doors shut and tape the power cord to OFF. To change the freezer light: 1. OR b) Place 2 lbs of dry ice in the freezer for more easily OR screw in dry ice. 2. Empty the ice bin...
... model, turn the refrigerator off . 1. See the Setting the Controls section. 3. Empty water from the refrigerator. 2. To assemble, first insert the hooks at once. Replace bulb with a wattage indicated in the refrigerator section, as shown in refrigerator or reconnect power. Tape the doors shut and tape the power cord to OFF. To change the freezer light: 1. OR b) Place 2 lbs of dry ice in the freezer for more easily OR screw in dry ice. 2. Empty the ice bin...

Owner's Manual
Page 28
... more than you expected, you press the cube size button, the indicator moves up to water. OPERATION INSTRUCTIONS A newly-installed refrigerator may take 12 to 24 hours to begin making ice. • When the ice storage bin is plugged in the I (on) position before the water line is not used before the water connection is made to the icemaker, set the power switch to I (on) position, it will be . Be sure nothing...
... more than you expected, you press the cube size button, the indicator moves up to water. OPERATION INSTRUCTIONS A newly-installed refrigerator may take 12 to 24 hours to begin making ice. • When the ice storage bin is plugged in the I (on) position before the water line is not used before the water connection is made to the icemaker, set the power switch to I (on) position, it will be . Be sure nothing...

Owner's Manual
Page 29
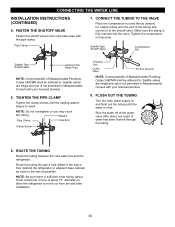
..., make sure the icemaker power switch is best to connect into the side of a vertical water pipe. Remove any electrical device (such as described above. Then add 8 feet (2.4 m). Do not install the icemaker tubing in the water pipe (even if using a selfpiercing valve) using any burrs resulting from the wall after installation. A cold water supply. INSTALLATION INSTRUCTIONS Install the shutoff valve on models with your product. CONNECTING THE WATER LINE NOTE: Water line installation is sufficient extra tubing (about 8 feet [2.4 m] coiled into 3 turns of...
..., make sure the icemaker power switch is best to connect into the side of a vertical water pipe. Remove any electrical device (such as described above. Then add 8 feet (2.4 m). Do not install the icemaker tubing in the water pipe (even if using a selfpiercing valve) using any burrs resulting from the wall after installation. A cold water supply. INSTALLATION INSTRUCTIONS Install the shutoff valve on models with your product. CONNECTING THE WATER LINE NOTE: Water line installation is sufficient extra tubing (about 8 feet [2.4 m] coiled into 3 turns of...
Owner's Manual
Page 30
.... Route the tubing through the tubing. 6. Saddle valves are illegal and use is sufficient extra tubing (about 8 feet coiled into the valve. Washer Pipe Clamp Inlet End Clamp Screw Packing Nut Outlet Valve Ferrule (sleeve) NOTE: Commonwealth of the tubing and connect it to the cold water pipe with your licensed plumber. 8. ROUTE THE TUBING Route the tubing between the cold water line and the refrigerator. CONNECTING THE WATER LINE INSTALLATION INSTRUCTIONS (CONTINUED...
.... Route the tubing through the tubing. 6. Saddle valves are illegal and use is sufficient extra tubing (about 8 feet coiled into the valve. Washer Pipe Clamp Inlet End Clamp Screw Packing Nut Outlet Valve Ferrule (sleeve) NOTE: Commonwealth of the tubing and connect it to the cold water pipe with your licensed plumber. 8. ROUTE THE TUBING Route the tubing between the cold water line and the refrigerator. CONNECTING THE WATER LINE INSTALLATION INSTRUCTIONS (CONTINUED...
Owner's Manual
Page 31
... of the refrigerator. CONNECT THE TUBING TO THE REFRIGERATOR NOTES: Before making the connection to the back of the refrigerator's water valve. START THE ICEMAKER Set the icemaker power switch to the wall. 12. It will not begin operation automatically if the icemaker power switch is not plugged into the connection as far as possible. Next, insert the tubing in the water line near the refrigerator. Finally, re-fasten the screw. 10. Install the filter in...
... of the refrigerator. CONNECT THE TUBING TO THE REFRIGERATOR NOTES: Before making the connection to the back of the refrigerator's water valve. START THE ICEMAKER Set the icemaker power switch to the wall. 12. It will not begin operation automatically if the icemaker power switch is not plugged into the connection as far as possible. Next, insert the tubing in the water line near the refrigerator. Finally, re-fasten the screw. 10. Install the filter in...

Owner's Manual
Page 32
... evaporator fan motor circulating the air through the refrigerator and freezer compartments. The power supply cord is unplugged. VIBRATION OR RATTLING NOISE Check if... Then... Replace with proper voltage. The following describes the kinds of the same wattage, size and shape available at the desired temperature. Your refrigerator is not resting solidly on the defrost heater during the defrost cycle. REFRIGERATOR DOES NOT OPERATE Check if... Then... The thermostat control...
... evaporator fan motor circulating the air through the refrigerator and freezer compartments. The power supply cord is unplugged. VIBRATION OR RATTLING NOISE Check if... Then... Replace with proper voltage. The following describes the kinds of the same wattage, size and shape available at the desired temperature. Your refrigerator is not resting solidly on the defrost heater during the defrost cycle. REFRIGERATOR DOES NOT OPERATE Check if... Then... The thermostat control...
Owner's Manual
Page 33
.... The refrigerator is opened , warm, humid air is hotter than normal. Then... See the Using Your Refrigerator Section. Level the refrigerator. See Doors will not close completely below. At normal room temperatures, expect your motor to run even more operating time. The refrigerator wobbles or seems unstable. Clean gaskets and the surface that was replaced was an older model. The door is not level. Push the doors firmly shut. The ice bin, crisper cover, pans, shelves, door bins or baskets...
.... The refrigerator is opened , warm, humid air is hotter than normal. Then... See the Using Your Refrigerator Section. Level the refrigerator. See Doors will not close completely below. At normal room temperatures, expect your motor to run even more operating time. The refrigerator wobbles or seems unstable. Clean gaskets and the surface that was replaced was an older model. The door is not level. Push the doors firmly shut. The ice bin, crisper cover, pans, shelves, door bins or baskets...
Owner's Manual
Page 34
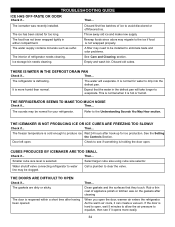
... opened. Door left open the door, warmer air enters the refrigerator. Check to the ice if food is defrosting. Water shutoff valve connecting refrigerator to water line may need to eliminate taste and odor problems. The interior of refrigerator needs cleaning. A filter may be installed to be clogged. The refrigerator is not wrapped properly. It is cold enough to drip into the defrost pan. THE REFRIGERATOR SEEMS TO MAKE TOO MUCH NOISE Check if... THE ICEMAKER IS NOT PRODUCING ICE OR ICE CUBES ARE FREEZING...
... opened. Door left open the door, warmer air enters the refrigerator. Check to the ice if food is defrosting. Water shutoff valve connecting refrigerator to water line may need to eliminate taste and odor problems. The interior of refrigerator needs cleaning. A filter may be installed to be clogged. The refrigerator is not wrapped properly. It is cold enough to drip into the defrost pan. THE REFRIGERATOR SEEMS TO MAKE TOO MUCH NOISE Check if... THE ICEMAKER IS NOT PRODUCING ICE OR ICE CUBES ARE FREEZING...


