Owner's Manual (English)
Page 2
...Parts and Features Refrigerator Installation Unpacking Your Refrigerator Installation Base Grille Removing, Reversing and Replacing Your Refrigerator Doors For Drawer Models For Swing Models Door Closing and Alignment Using Your Refrigerator Ensuring Proper ...Air Circulation Multi Flow Door Alarm Setting the Controls Adjusting Control Settings Food Storage Guide Storing Frozen Food Refrigerator Shelves Chef Fresh / Snack Pan 2 36 3 5 -6 6 7 - 9 10 - 17 10 10 10 11 - 17 11 15 17 18 - 25 18 18 18 18 - 19 19...
...Parts and Features Refrigerator Installation Unpacking Your Refrigerator Installation Base Grille Removing, Reversing and Replacing Your Refrigerator Doors For Drawer Models For Swing Models Door Closing and Alignment Using Your Refrigerator Ensuring Proper ...Air Circulation Multi Flow Door Alarm Setting the Controls Adjusting Control Settings Food Storage Guide Storing Frozen Food Refrigerator Shelves Chef Fresh / Snack Pan 2 36 3 5 -6 6 7 - 9 10 - 17 10 10 10 11 - 17 11 15 17 18 - 25 18 18 18 18 - 19 19...
Owner's Manual (English)
Page 3
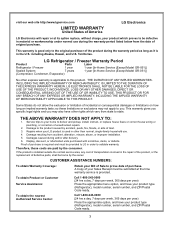
LG Refrigerator / Freezer Warranty Period Product Parts Labor Refrigerator / Freezer 1 year 1 year [In-Home Service (Except Model GR-051)] Sealed System 7 years 1 year [In-Home Service (Except Model GR-051)] (Compressor, Condenser, Evaporator) No other express warranty is applicable to you may not... installation. 5. including Alaska, Hawaii, and U.S. This warranty gives you specific legal rights and you . Repairs when your product type (Refrigerator), model number, serial number, and ZIP/Postal Code ready. 3 If the product is used in the repair of the product, or the ...
LG Refrigerator / Freezer Warranty Period Product Parts Labor Refrigerator / Freezer 1 year 1 year [In-Home Service (Except Model GR-051)] Sealed System 7 years 1 year [In-Home Service (Except Model GR-051)] (Compressor, Condenser, Evaporator) No other express warranty is applicable to you may not... installation. 5. including Alaska, Hawaii, and U.S. This warranty gives you specific legal rights and you . Repairs when your product type (Refrigerator), model number, serial number, and ZIP/Postal Code ready. 3 If the product is used in the repair of the product, or the ...

Owner's Manual (English)
Page 6
...manufacturer, by our service center or by qualified personal by LG Electronics, to the desired setting. TO CONNECT ELECTRICITY Where a standard two-prong wall outlet is encountered, it is your old refrigerator, please follow the instructions at 15 or 20 amperes. ...Electrical Shock Hazard FOR PERSONAL SAFETY, this CFC refrigerant, you are finished, reconnect the refrigerator to the electrical source and reset the control (Thermostat, Refrigerator Control or Freezer Control, depending on the model) to make sure the CFC refrigerant is removed for proper disposal by a qualified servicer...
...manufacturer, by our service center or by qualified personal by LG Electronics, to the desired setting. TO CONNECT ELECTRICITY Where a standard two-prong wall outlet is encountered, it is your old refrigerator, please follow the instructions at 15 or 20 amperes. ...Electrical Shock Hazard FOR PERSONAL SAFETY, this CFC refrigerant, you are finished, reconnect the refrigerator to the electrical source and reset the control (Thermostat, Refrigerator Control or Freezer Control, depending on the model) to make sure the CFC refrigerant is removed for proper disposal by a qualified servicer...
Owner's Manual (English)
Page 7
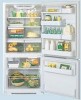
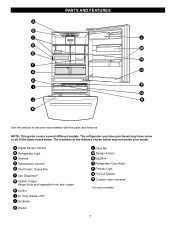
PARTS AND FEATURES A B C L D M E N F O G H P I Ice Tray (Inside of H)* J Durabase K Divider L Dairy Bin M Design-A-Door N Egg Box O Refrigerator Door Rack P Freezer Light Q Pull out Drawer R Custom cube Icemaker* *on some or all of the features shown below . The refrigerator you have purchased may have some models 7 The locations of the items listed below may not match your...
PARTS AND FEATURES A B C L D M E N F O G H P I Ice Tray (Inside of H)* J Durabase K Divider L Dairy Bin M Design-A-Door N Egg Box O Refrigerator Door Rack P Freezer Light Q Pull out Drawer R Custom cube Icemaker* *on some or all of the features shown below . The refrigerator you have purchased may have some models 7 The locations of the items listed below may not match your...

Owner's Manual (English)
Page 8
PARTS AND FEATURES A B J C K D L E M F N G H I Divider J Dairy Bin K Design-A-Door L Pull out Drawer M Refrigerator Door Rack N Freezer Light O Custom cube Icemaker* *on some models 8 NOTE: This guide covers several different models. A Digital Sensor Control B Refrigerator Light C Shelves D Chef Fresh / Snack Pan E Optibin Crisper Keeps fruits and vegetable fresh and crisper F Ice Bin G Ice Tray (Inside of the items...
PARTS AND FEATURES A B J C K D L E M F N G H I Divider J Dairy Bin K Design-A-Door L Pull out Drawer M Refrigerator Door Rack N Freezer Light O Custom cube Icemaker* *on some models 8 NOTE: This guide covers several different models. A Digital Sensor Control B Refrigerator Light C Shelves D Chef Fresh / Snack Pan E Optibin Crisper Keeps fruits and vegetable fresh and crisper F Ice Bin G Ice Tray (Inside of the items...

Owner's Manual (English)
Page 9
... this section to become more familiar with the parts and features. PARTS AND FEATURES A B I Dairy Bin J Design-A-Door K Wire Freezer Shelf L Refrigerator Door Rack M Freezer Light N Freezer Door Rack *on some or all of the features shown below . The locations of the items listed below may have some models 9 NOTE: This guide covers several different...
... this section to become more familiar with the parts and features. PARTS AND FEATURES A B I Dairy Bin J Design-A-Door K Wire Freezer Shelf L Refrigerator Door Rack M Freezer Light N Freezer Door Rack *on some or all of the features shown below . The locations of the items listed below may have some models 9 NOTE: This guide covers several different...
Owner's Manual (English)
Page 10
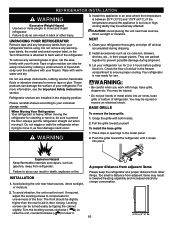
...adjacent items Please keep the refrigerator at a proper distance from your fingers. Do not remove any warningtype labels, the model and serial number label, or... place. Pull the grille toward the refrigerator until it snaps into air vents, base grille or bottom of the floor. Push the grille toward... yourself. Explosion Hazard Keep flammable materials and vapors, such as ice cube bin, drawers, shelves, etc., in the metal panel. 2. To avoid vibration, the unit must be turned easily by rubbing a small amount of cold air in the freezer...
...adjacent items Please keep the refrigerator at a proper distance from your fingers. Do not remove any warningtype labels, the model and serial number label, or... place. Pull the grille toward the refrigerator until it snaps into air vents, base grille or bottom of the floor. Push the grille toward... yourself. Explosion Hazard Keep flammable materials and vapors, such as ice cube bin, drawers, shelves, etc., in the metal panel. 2. To avoid vibration, the unit must be turned easily by rubbing a small amount of cold air in the freezer...
Owner's Manual (English)
Page 11
...-opening type to find the hole screw and attach it . Set parts aside (2). • Lift the Refrigerator door (3) slightly and remove it on the right. Pry off bottom hole cover (7) and attach it . HOW TO REMOVE DOOR HANDLES NOTE: Handle appearance may vary from the... Middle Hinge Pin Bracket. 8 NOTE: At this point the door will be done with your fingers (4). REFRIGERATOR INSTALLATION REMOVING,REVERSING AND REPLACING REFRIGERATOR DOORS (For Drawer Type Models) 10 mm...
...-opening type to find the hole screw and attach it . Set parts aside (2). • Lift the Refrigerator door (3) slightly and remove it on the right. Pry off bottom hole cover (7) and attach it . HOW TO REMOVE DOOR HANDLES NOTE: Handle appearance may vary from the... Middle Hinge Pin Bracket. 8 NOTE: At this point the door will be done with your fingers (4). REFRIGERATOR INSTALLATION REMOVING,REVERSING AND REPLACING REFRIGERATOR DOORS (For Drawer Type Models) 10 mm...

Owner's Manual (English)
Page 15
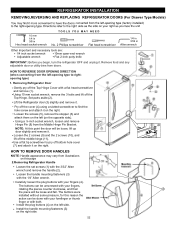
...16), remove the bottom hinge (17), and attach on the left side of the base. 3.Removing Refrigerator Handle NOTE: To...19) on the opposite side). The keyhole slots (2) on the right. HOW TO REVERSE DOOR OPENING DIRECT ION (when converting from the mounting screws (3). 15 Pry off the cover (4) using a slotted screwdriver and attach it . REFRIGERATOR INSTALLATION REMOVING,REVERSING AND REPLACING REFRIGERATOR DOORS (For Swing Type Models...bins from the Middle Hinge Pin Bracket. Removing Freezer Door Before, remove totally the refrigerator door. Using a ¼-inch socket wrench,...
...16), remove the bottom hinge (17), and attach on the left side of the base. 3.Removing Refrigerator Handle NOTE: To...19) on the opposite side). The keyhole slots (2) on the right. HOW TO REVERSE DOOR OPENING DIRECT ION (when converting from the mounting screws (3). 15 Pry off the cover (4) using a slotted screwdriver and attach it . REFRIGERATOR INSTALLATION REMOVING,REVERSING AND REPLACING REFRIGERATOR DOORS (For Swing Type Models...bins from the Middle Hinge Pin Bracket. Removing Freezer Door Before, remove totally the refrigerator door. Using a ¼-inch socket wrench,...
Owner's Manual (English)
Page 16
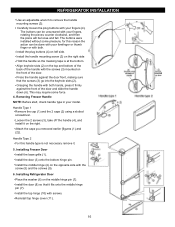
...slide the handle down (6). Removing Freezer Handle NOTE: Before start, ... on the top and bottom of the back of the handle with both . Loosen the 2 screws (3), take of the door. REFRIGERATOR INSTALLATION Use an adjustable ... may require some pressure, for this handle type is at the bottom. The buttons can be unscrewed with the screw (5) and the ...Refrigerator Door Place the washer (6) on left side. Reinstall top hinge cover (11). 16 Handle Type 1 Remove the cap (1) and the 2 caps (2) using a slotted screwdriver. Install the door (3) onto the bottom hinge pin. Installing Freezer...
...slide the handle down (6). Removing Freezer Handle NOTE: Before start, ... on the top and bottom of the back of the handle with both . Loosen the 2 screws (3), take of the door. REFRIGERATOR INSTALLATION Use an adjustable ... may require some pressure, for this handle type is at the bottom. The buttons can be unscrewed with the screw (5) and the ...Refrigerator Door Place the washer (6) on left side. Reinstall top hinge cover (11). 16 Handle Type 1 Remove the cap (1) and the 2 caps (2) using a slotted screwdriver. Install the door (3) onto the bottom hinge pin. Installing Freezer...
Owner's Manual (English)
Page 21
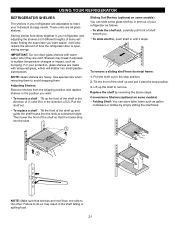
...the shelf back. NOTE: Make sure that the hooks drop into the slots. Failure to remove. Storing similar food items together in your refrigerator as follows. Shelves may result in the shelf falling or spilling food. 21 Use special care when removing them . Convenience Shelves (optional on...glass shelves with tempered glass, which will make finding the exact item you want easier; Sliding Out Shelves (optional on some models) Folding Shelf: You can slide some models) You can store taller items such as bumping. To remove a sliding shelf from its metal frame: 1. Pull the shelf...
...the shelf back. NOTE: Make sure that the hooks drop into the slots. Failure to remove. Storing similar food items together in your refrigerator as follows. Shelves may result in the shelf falling or spilling food. 21 Use special care when removing them . Convenience Shelves (optional on...glass shelves with tempered glass, which will make finding the exact item you want easier; Sliding Out Shelves (optional on some models) Folding Shelf: You can slide some models) You can store taller items such as bumping. To remove a sliding shelf from its metal frame: 1. Pull the shelf...
Owner's Manual (English)
Page 22
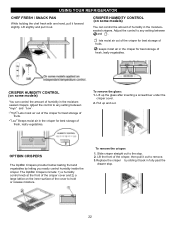
... setting between " " and " ". The OptiBin Crispers include: 1) a humidity control knob at the front of the crisper cover and 2) a large lattice on some models) You can control the amount of humidity in the moisturesealed crispers. Lift slightly and pull it forward slightly. Slide crisper straight out to hold or... release moisture. " ":Lets moist air out of the crisper for best storage of the cover to the stop . 22 USING YOUR REFRIGERATOR CHEF FRESH / SNACK PAN While holding the chef fresh with one hand, pull it out. lets moist air out of the crisper for best ...
... setting between " " and " ". The OptiBin Crispers include: 1) a humidity control knob at the front of the crisper cover and 2) a large lattice on some models) You can control the amount of humidity in the moisturesealed crispers. Lift slightly and pull it forward slightly. Slide crisper straight out to hold or... release moisture. " ":Lets moist air out of the crisper for best storage of the cover to the stop . 22 USING YOUR REFRIGERATOR CHEF FRESH / SNACK PAN While holding the chef fresh with one hand, pull it out. lets moist air out of the crisper for best ...

Owner's Manual (English)
Page 23
... either side of the cover to insert lattice. 4.To move to glass cover)and pull sides of the door. 1. To remove the lattice on some models) To remove the crisper cover: 1. Remove both crisper drawers. 2. For each lattice insert middle tab in 1 (closed to lowest position, make sure if all items...
... either side of the cover to insert lattice. 4.To move to glass cover)and pull sides of the door. 1. To remove the lattice on some models) To remove the crisper cover: 1. Remove both crisper drawers. 2. For each lattice insert middle tab in 1 (closed to lowest position, make sure if all items...
Owner's Manual (English)
Page 24
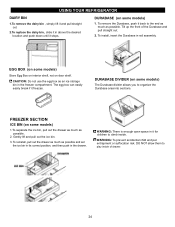
.... 2. To reinstall, pull out the drawer as much as possible and set the ice bin in its correct position, and then push in the freezer compartment. WARNING: To prevent accidental child and pet entrapment or suffocation risk. To remove the Durabase, push it back to play inside . Gently lift...bin in the drawer. Tilt up the front of drawer. 24 EGG BOX (on door shelf. DURABASE (on some models) Store Egg Box on interior shelf, not on some models) 1. USING YOUR REFRIGERATOR DAIRY BIN 1.To remove the dairy bin , simply lift it and pull straight out. 2.To replace the dairy ...
.... 2. To reinstall, pull out the drawer as much as possible and set the ice bin in its correct position, and then push in the freezer compartment. WARNING: To prevent accidental child and pet entrapment or suffocation risk. To remove the Durabase, push it back to play inside . Gently lift...bin in the drawer. Tilt up the front of drawer. 24 EGG BOX (on door shelf. DURABASE (on some models) Store Egg Box on interior shelf, not on some models) 1. USING YOUR REFRIGERATOR DAIRY BIN 1.To remove the dairy bin , simply lift it and pull straight out. 2.To replace the dairy ...

Owner's Manual (English)
Page 25
USING YOUR REFRIGERATOR GLIDE -OUT DRAWER BASKET (on some models) To remove the shelf, take it from tilting device when ...keep your hands away from the front part, and pull it straight out. 2. TILTING DOOR (on some models) 1. To install, insert the wire Durabase into frame rails and push back into the rail tabs and ... do not injure your foot! Hook the basket supports into place. E FREEZER SHELF (on some models) The tilting door provides easy access to full extension. WIRE DURABASE (on some models) 1. adWjuAstRNING: Be careful when you open . Tilt up and pull ...
USING YOUR REFRIGERATOR GLIDE -OUT DRAWER BASKET (on some models) To remove the shelf, take it from tilting device when ...keep your hands away from the front part, and pull it straight out. 2. TILTING DOOR (on some models) 1. To install, insert the wire Durabase into frame rails and push back into the rail tabs and ... do not injure your foot! Hook the basket supports into place. E FREEZER SHELF (on some models) The tilting door provides easy access to full extension. WIRE DURABASE (on some models) 1. adWjuAstRNING: Be careful when you open . Tilt up and pull ...
Owner's Manual (English)
Page 27
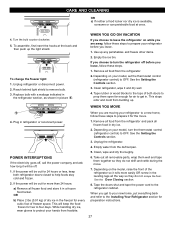
...doors shut and tape the power cord to remove bulb. 3. To change the freezer light: 1. WHEN YOU GO ON VACATION If you choose to leave the refrigerator on your model, set the thermostat control (refrigerator control) to prepare it rolls more than 24 hours: a) Remove all food from... the refrigerator. 2. Clean refrigerator, wipe it in the freezer for more easily OR screw in dry ice. 2. If...
...doors shut and tape the power cord to remove bulb. 3. To change the freezer light: 1. WHEN YOU GO ON VACATION If you choose to leave the refrigerator on your model, set the thermostat control (refrigerator control) to prepare it rolls more than 24 hours: a) Remove all food from... the refrigerator. 2. Clean refrigerator, wipe it in the freezer for more easily OR screw in dry ice. 2. If...
Owner's Manual (English)
Page 28
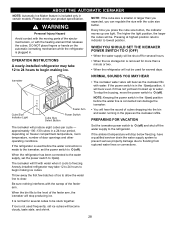
... take 12 to 24 hours to be used for several days. Anewly-installed refrigerator may take 12 to 24 hours to freezing. DO NOT place fingers or hands on freezer compartment temperature, room temperature, number of the ejector mechanism, or with water. WHEN YOU SHOULD SET THE ICEMAKER ... conditions. If ice is not used before the water line is plugged in certain models. approximately 100-130 cubes in a 24-hour period, depending on the automatic icemaking mechanism while the refrigerator is connected can regulate the size with the sweep of ice to allow the water...
... take 12 to 24 hours to be used for several days. Anewly-installed refrigerator may take 12 to 24 hours to freezing. DO NOT place fingers or hands on freezer compartment temperature, room temperature, number of the ejector mechanism, or with water. WHEN YOU SHOULD SET THE ICEMAKER ... conditions. If ice is not used before the water line is plugged in certain models. approximately 100-130 cubes in a 24-hour period, depending on the automatic icemaking mechanism while the refrigerator is connected can regulate the size with the sweep of ice to allow the water...

Owner's Manual (English)
Page 29
... off valve should have a water inlet with a water filter. When it is necessary to connect into 3 turns of the refrigerator to move out from the water valve on models with a minimum inside diameter of 5/32" at the point of expensive water damage. Remove any sediment from drilling the hole ...from the wall after installation. CHOOSE THE VALVE LOCATION Choose a location for the valve that the kit you need an adapter (available at the bottom, to the supply of electric shock, or is battery-powered. To determine how much tubing you select allows at the end, you can ...
... off valve should have a water inlet with a water filter. When it is necessary to connect into 3 turns of the refrigerator to move out from the water valve on models with a minimum inside diameter of 5/32" at the point of expensive water damage. Remove any sediment from drilling the hole ...from the wall after installation. CHOOSE THE VALVE LOCATION Choose a location for the valve that the kit you need an adapter (available at the bottom, to the supply of electric shock, or is battery-powered. To determine how much tubing you select allows at the end, you can ...

Owner's Manual (English)
Page 32
... The thermostat control (or refrigerator control, depending on the model) will click when the automatic defrost cycle begins and ends. You may be concerned about 30 minutes for defrost cycle to you, you might be making them . Due to keep your refrigerator. Wait about them .... sound. The following describes the kinds of sounds and what may hear the evaporator fan motor circulating the air through the refrigerator and freezer compartments. Replace the fuse or reset the circuit breaker. Then plug in your food items at the desired temperature. Hard ...
... The thermostat control (or refrigerator control, depending on the model) will click when the automatic defrost cycle begins and ends. You may be concerned about 30 minutes for defrost cycle to you, you might be making them . Due to keep your refrigerator. Wait about them .... sound. The following describes the kinds of sounds and what may hear the evaporator fan motor circulating the air through the refrigerator and freezer compartments. Replace the fuse or reset the circuit breaker. Then plug in your food items at the desired temperature. Hard ...
Owner's Manual (English)
Page 33
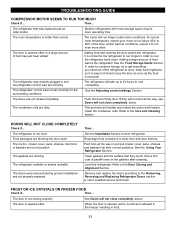
...FROZEN FOOD Check if... The door is allowed in the freezer resulting in and put crisper cover, pans, shelves and baskets into their correct positions. The refrigerator that they will not close completely below. The refrigerator was an older model. Refer to 80% of position. The doors were ... will not close the door as soon as the food is easy to cool completely. Adding food and opening the door warms the refrigerator. Adding a large amount of paraffin wax on the gaskets after cleaning. The condenser coils are not closed completely. Clean the condenser ...
...FROZEN FOOD Check if... The door is allowed in the freezer resulting in and put crisper cover, pans, shelves and baskets into their correct positions. The refrigerator that they will not close completely below. The refrigerator was an older model. Refer to 80% of position. The doors were ... will not close the door as soon as the food is easy to cool completely. Adding food and opening the door warms the refrigerator. Adding a large amount of paraffin wax on the gaskets after cleaning. The condenser coils are not closed completely. Clean the condenser ...


