Owner's Manual (English)
Page 2
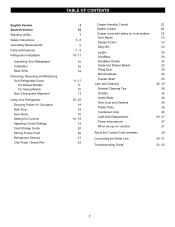
...(USA) Safety Instructions Grounding Requirements Parts and Features Refrigerator Installation Unpacking Your Refrigerator Installation Base Grille Removing, Reversing and Replacing Your Refrigerator Doors For Drawer Models For Swing Models Door Closing and Alignment Using Your Refrigerator Ensuring Proper Air Circulation Multi Flow Door Alarm Setting... Adjusting Control Settings Food Storage Guide Storing Frozen Food Refrigerator Shelves Chef Fresh / Snack Pan 2 36 3 5 -6 6 7 - 9 10 - 17 10 10 10 11 - 17 11 15 17 18 - 25 18 18 18 18 - 19 19 20 20 21 22 Crisper Humidity Control Optibin Crisper ...
...(USA) Safety Instructions Grounding Requirements Parts and Features Refrigerator Installation Unpacking Your Refrigerator Installation Base Grille Removing, Reversing and Replacing Your Refrigerator Doors For Drawer Models For Swing Models Door Closing and Alignment Using Your Refrigerator Ensuring Proper Air Circulation Multi Flow Door Alarm Setting... Adjusting Control Settings Food Storage Guide Storing Frozen Food Refrigerator Shelves Chef Fresh / Snack Pan 2 36 3 5 -6 6 7 - 9 10 - 17 10 10 10 11 - 17 11 15 17 18 - 25 18 18 18 18 - 19 19 20 20 21 22 Crisper Humidity Control Optibin Crisper ...
Owner's Manual (English)
Page 3
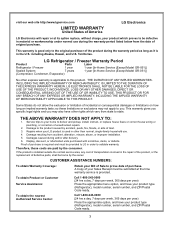
...limitations or exclusions may not apply to you may also have other rights which proves to prove date of purchase. LG Refrigerator / Freezer Warranty Period Product Parts Labor Refrigerator / Freezer 1 year 1 year [In-Home Service (Except Model GR-051)] Sealed System 7 years 1 year [In-Home...transportation involved in material or workmanship under normal use . 4. THE DURATION OF ANY IMPLIED WARRANTIES. Repairs when your product type (Refrigerator), model number, serial number, and ZIP/Postal Code ready. Display, discount, or refurbished units purchased with scratches, dents, ...
...limitations or exclusions may not apply to you may also have other rights which proves to prove date of purchase. LG Refrigerator / Freezer Warranty Period Product Parts Labor Refrigerator / Freezer 1 year 1 year [In-Home Service (Except Model GR-051)] Sealed System 7 years 1 year [In-Home...transportation involved in material or workmanship under normal use . 4. THE DURATION OF ANY IMPLIED WARRANTIES. Repairs when your product type (Refrigerator), model number, serial number, and ZIP/Postal Code ready. Display, discount, or refurbished units purchased with scratches, dents, ...
Owner's Manual (English)
Page 5
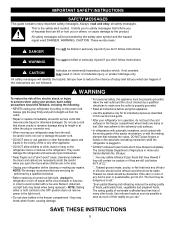
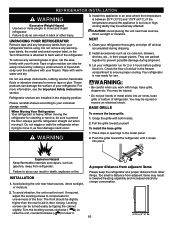
...CAUTION Indicates an imminently hazardous situation which have become frayed or otherwise damaged. clearances between the doors and cabinet are in the refrigerator. Do not store bottles in Home and Garden Bulletin No. 69 says: "...You may safely refreeze frozen foods that shows ... You can ." Always grip the plug firmly and pull it . Unplug your refrigerator is the safety alert symbol. Use this appliance must be killed or seriously injured if you of Agriculture in the freezer compartment - "Even partial thawing and refreezing reduces the eating quality of "pinch...
...CAUTION Indicates an imminently hazardous situation which have become frayed or otherwise damaged. clearances between the doors and cabinet are in the refrigerator. Do not store bottles in Home and Garden Bulletin No. 69 says: "...You may safely refreeze frozen foods that shows ... You can ." Always grip the plug firmly and pull it . Unplug your refrigerator is the safety alert symbol. Use this appliance must be killed or seriously injured if you of Agriculture in the freezer compartment - "Even partial thawing and refreezing reduces the eating quality of "pinch...

Owner's Manual (English)
Page 6
...Freezer Control, depending on the model) to OFF and then disconnect the refrigerator from the electrical source. This provides the best performance and also prevents overloading house wiring circuits which cannot be replaced by the manufacturer, by our service center or by qualified personal by LG... it is recommended that used CFC's (chlorofluorocarbons). BEFORE YOU THROW AWAY YOUR OLD REFRIGERATOR OR FREEZER Take off with a switch or pull chain. CFC DISPOSAL Your old refrigerator may not easily climb inside. Electrical Shock Hazard FOR PERSONAL SAFETY, this appliance must...
...Freezer Control, depending on the model) to OFF and then disconnect the refrigerator from the electrical source. This provides the best performance and also prevents overloading house wiring circuits which cannot be replaced by the manufacturer, by our service center or by qualified personal by LG... it is recommended that used CFC's (chlorofluorocarbons). BEFORE YOU THROW AWAY YOUR OLD REFRIGERATOR OR FREEZER Take off with a switch or pull chain. CFC DISPOSAL Your old refrigerator may not easily climb inside. Electrical Shock Hazard FOR PERSONAL SAFETY, this appliance must...
Owner's Manual (English)
Page 7
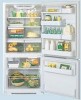
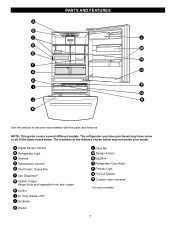
...and vegetable fresh and crisper H Ice Bin I Q J R K Use this section to become more familiar with the parts and features. The refrigerator you have purchased may not match your model. The locations of the items listed below may have some models 7 NOTE: This guide covers several ...different models. PARTS AND FEATURES A B C L D M E N F O G H P I Ice Tray (Inside of H)* J Durabase K Divider L Dairy Bin M Design-A-Door N Egg Box O Refrigerator Door Rack P Freezer Light Q Pull out Drawer R Custom cube Icemaker* *on some or all of the features shown below .
...and vegetable fresh and crisper H Ice Bin I Q J R K Use this section to become more familiar with the parts and features. The refrigerator you have purchased may not match your model. The locations of the items listed below may have some models 7 NOTE: This guide covers several ...different models. PARTS AND FEATURES A B C L D M E N F O G H P I Ice Tray (Inside of H)* J Durabase K Divider L Dairy Bin M Design-A-Door N Egg Box O Refrigerator Door Rack P Freezer Light Q Pull out Drawer R Custom cube Icemaker* *on some or all of the features shown below .

Owner's Manual (English)
Page 8
... C Shelves D Chef Fresh / Snack Pan E Optibin Crisper Keeps fruits and vegetable fresh and crisper F Ice Bin G Ice Tray (Inside of the features shown below . The refrigerator you have purchased may not match your model. NOTE: This guide covers several different models. PARTS AND FEATURES A B J C K D L E M F N G H I Divider J Dairy Bin K Design-A-Door L Pull out...
... C Shelves D Chef Fresh / Snack Pan E Optibin Crisper Keeps fruits and vegetable fresh and crisper F Ice Bin G Ice Tray (Inside of the features shown below . The refrigerator you have purchased may not match your model. NOTE: This guide covers several different models. PARTS AND FEATURES A B J C K D L E M F N G H I Divider J Dairy Bin K Design-A-Door L Pull out...

Owner's Manual (English)
Page 9
NOTE: This guide covers several different models. A Digital Sensor Control B Refrigerator Light C Shelves D Snack Pan E Optibin Crisper Keeps fruits and vegetable fresh and crisp F Ice Trays* G Ice Bin H Wire Durabase I C J D K E L F M G H N Use ...parts and features. The locations of the items listed below may have some models 9 The refrigerator you have purchased may not match your model. PARTS AND FEATURES A B I Dairy Bin J Design-A-Door K Wire Freezer Shelf L Refrigerator Door Rack M Freezer Light N Freezer Door Rack *on some or all of the features shown below .
NOTE: This guide covers several different models. A Digital Sensor Control B Refrigerator Light C Shelves D Snack Pan E Optibin Crisper Keeps fruits and vegetable fresh and crisp F Ice Trays* G Ice Bin H Wire Durabase I C J D K E L F M G H N Use ...parts and features. The locations of the items listed below may have some models 9 The refrigerator you have purchased may not match your model. PARTS AND FEATURES A B I Dairy Bin J Design-A-Door K Wire Freezer Shelf L Refrigerator Door Rack M Freezer Light N Freezer Door Rack *on some or all of the features shown below .
Owner's Manual (English)
Page 10
...such as ice cube bin, drawers, shelves, etc., in the freezer compartment to your refrigerator thoroughly and wipe off all dust accumulated during shipment. 3. Do not use . Please reinstall shelves according to ensure proper cooling. Your refrigerator is too low or high, cooling ability may result in door ...Do not wiggle or walk the refrigerator when trying to do so can be injured or receive an electrical shock. Turn the leveling screws clockwise ( ) to raise the unit, counterclockwise ( ) to move it snaps into air vents, base grille or bottom of cold air in their proper...
...such as ice cube bin, drawers, shelves, etc., in the freezer compartment to your refrigerator thoroughly and wipe off all dust accumulated during shipment. 3. Do not use . Please reinstall shelves according to ensure proper cooling. Your refrigerator is too low or high, cooling ability may result in door ...Do not wiggle or walk the refrigerator when trying to do so can be injured or receive an electrical shock. Turn the leveling screws clockwise ( ) to raise the unit, counterclockwise ( ) to move it snaps into air vents, base grille or bottom of cold air in their proper...
Owner's Manual (English)
Page 11
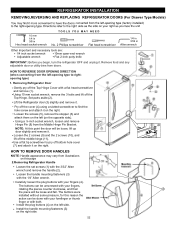
... be loose, lift up door slightly and remove it on the right. The buttons can be loose and fall. Removing Refrigerator Door • Gently pry off bottom hole cover (7) and attach it on this reason the action can be unscrewed with your fingers (4). HOW TO REMOVE DOOR... HANDLES NOTE: Handle appearance may vary from doors. The buttons were installed without some pressure, for this page 2.Removing Refrigerator Handle • Loosen...
... be loose, lift up door slightly and remove it on the right. The buttons can be loose and fall. Removing Refrigerator Door • Gently pry off bottom hole cover (7) and attach it on this reason the action can be unscrewed with your fingers (4). HOW TO REMOVE DOOR... HANDLES NOTE: Handle appearance may vary from doors. The buttons were installed without some pressure, for this page 2.Removing Refrigerator Handle • Loosen...
Owner's Manual (English)
Page 12
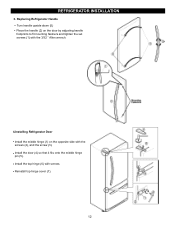
Replacing Refrigerator Handle • Turn handle upside down (5) • Place the handle (2) on the door by adjusting handle footprints to fit mounting fastners and tighten the set screws (1) with the 3/32 " Allen wrench. 4.Installing Refrigerator Door • Install the middle hinge (1) on the opposite side with the screws (2), and the screw (3). • Install the door (4) so that it fits onto the middle hinge pin (5). • Install the top hinge (6) with screws. • Reinstall top hinge cover (7). 12 REFRIGERATOR INSTALLATION 3.
Replacing Refrigerator Handle • Turn handle upside down (5) • Place the handle (2) on the door by adjusting handle footprints to fit mounting fastners and tighten the set screws (1) with the 3/32 " Allen wrench. 4.Installing Refrigerator Door • Install the middle hinge (1) on the opposite side with the screws (2), and the screw (3). • Install the door (4) so that it fits onto the middle hinge pin (5). • Install the top hinge (6) with screws. • Reinstall top hinge cover (7). 12 REFRIGERATOR INSTALLATION 3.
Owner's Manual (English)
Page 13
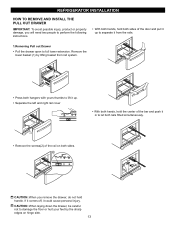
... personal injury. If it comes off, it in to let both rails fitted simultaneously. • Remove the screws(2) of the rail on hinge side. 13 REFRIGERATOR INSTALLATION HOW TO REMOVE AND INSTALL THE PULL OUT DRAWER IMPORTANT: To avoid possible injury, product or property damage, you remove the drawer, do not...
... personal injury. If it comes off, it in to let both rails fitted simultaneously. • Remove the screws(2) of the rail on hinge side. 13 REFRIGERATOR INSTALLATION HOW TO REMOVE AND INSTALL THE PULL OUT DRAWER IMPORTANT: To avoid possible injury, product or property damage, you remove the drawer, do not...
Owner's Manual (English)
Page 14
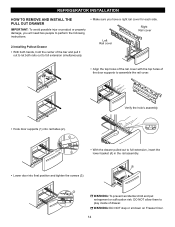
REFRIGERATOR INSTALLATION HOW TO REMOVE AND INSTALL THE PULL OUT DRAWER IMPORTANT: To avoid possible injur or product or property damage, you have a right rail cover ...; Hook door supports (1) into rail tabes (2) . 1 • With the drawer pulled out to assemble the rail cover. WARNING: DO NOT step or sit down on Freezer Door. 14 Right Rail cover Left Rail cover • Align the top holes of the rail cover with the top holes of the door supports...
REFRIGERATOR INSTALLATION HOW TO REMOVE AND INSTALL THE PULL OUT DRAWER IMPORTANT: To avoid possible injur or product or property damage, you have a right rail cover ...; Hook door supports (1) into rail tabes (2) . 1 • With the drawer pulled out to assemble the rail cover. WARNING: DO NOT step or sit down on Freezer Door. 14 Right Rail cover Left Rail cover • Align the top holes of the rail cover with the top holes of the door supports...

Owner's Manual (English)
Page 15
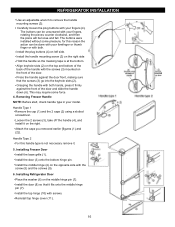
...Freezer Door Before, remove totally the refrigerator door. Lift the door (10) slightly and remove it on the right. The keyhole slots (2) on the back of the handle before removing. Take off the middle hinge (13). Removing Refrigerator...grille (14). Loosen the 2 screws (16), remove the bottom hinge (17), and attach on the left side of the base. 3.Removing Refrigerator Handle NOTE: To assist in Allen wrench Other Important and ... Hinge Pin (7) from doors. Loosen the 2 screws (18) and attach the stopper (19) on the right side, place a small piece of masking tape near the top of ...
...Freezer Door Before, remove totally the refrigerator door. Lift the door (10) slightly and remove it on the right. The keyhole slots (2) on the back of the handle before removing. Take off the middle hinge (13). Removing Refrigerator...grille (14). Loosen the 2 screws (16), remove the bottom hinge (17), and attach on the left side of the base. 3.Removing Refrigerator Handle NOTE: To assist in Allen wrench Other Important and ... Hinge Pin (7) from doors. Loosen the 2 screws (18) and attach the stopper (19) on the right side, place a small piece of masking tape near the top of ...
Owner's Manual (English)
Page 16
...4. Install the handle mounting screw (3) on left side. Align keyhole slots (2) on the top and bottom of the back of the handle with the screws (3) mounted on the right. Installing Freezer Door Install the base grille (1). Install the door (8) so that the screws (3) go into the ...screw (5) and the screws (9). 6. Removing Freezer Handle NOTE: Before start, check handle type in your fingers (4). Install the door (3) onto the bottom hinge pin. The buttons can be unscrewed with your forefinger or thumb finger or with both . REFRIGERATOR INSTALLATION Use an adjustable wrench to remove ...
...4. Install the handle mounting screw (3) on left side. Align keyhole slots (2) on the top and bottom of the back of the handle with the screws (3) mounted on the right. Installing Freezer Door Install the base grille (1). Install the door (8) so that the screws (3) go into the ...screw (5) and the screws (9). 6. Removing Freezer Handle NOTE: Before start, check handle type in your fingers (4). Install the door (3) onto the bottom hinge pin. The buttons can be unscrewed with your forefinger or thumb finger or with both . REFRIGERATOR INSTALLATION Use an adjustable wrench to remove ...
Owner's Manual (English)
Page 17
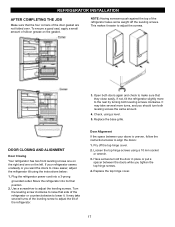
...hinge screws. 4. Loosen the top hinge screws using a level. 5. It may take several turns of the leveling screw to adjust the tilt of the refrigerator. If your doors is uneven, follow the instructions below : 1. Pry off the leveling screws. Replace the top hinge cover. 17 To ensure a good ...left. Turn the leveling screw clockwise to raise that the four corners of the door gasket are not folded over. If not, tilt the refrigerator slightly more turns, and you want the doors to the rear by turning both leveling screws clockwise. Replace the base grille. Use a ...
...hinge screws. 4. Loosen the top hinge screws using a level. 5. It may take several turns of the leveling screw to adjust the tilt of the refrigerator. If your doors is uneven, follow the instructions below : 1. Pry off the leveling screws. Replace the top hinge cover. 17 To ensure a good ...left. Turn the leveling screw clockwise to raise that the four corners of the door gasket are not folded over. If not, tilt the refrigerator slightly more turns, and you want the doors to the rear by turning both leveling screws clockwise. Replace the base grille. Use a ...
Owner's Manual (English)
Page 18
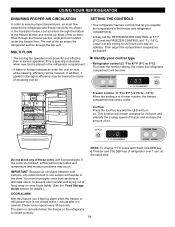
... become. The alarm is cancelled when the freezer or the refrigerator is at this setting for details.) DOOR ALARM With this feature you regulate the temperature in one day) to stabilize. Most of the air then flows through the bottom of refrigerator over 1 sec. If water or foreign... substances enter the cool air vent while cleaning, efficiency will be lowered. Leave it is placed in normal operation. Do not block any odors formed in the freezer and refrigerator compartments. You must flow between...
... become. The alarm is cancelled when the freezer or the refrigerator is at this setting for details.) DOOR ALARM With this feature you regulate the temperature in one day) to stabilize. Most of the air then flows through the bottom of refrigerator over 1 sec. If water or foreign... substances enter the cool air vent while cleaning, efficiency will be lowered. Leave it is placed in normal operation. Do not block any odors formed in the freezer and refrigerator compartments. You must flow between...
Owner's Manual (English)
Page 19
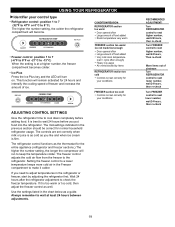
... too cold Controls not set correctly when milk or juice is at least 24 hours between adjustments. 19 RECOMMENDED ADJUSTMENT: Turn REFRIGERATOR control to next higher number, wait 24 hours, then re-check Turn FREEZER control to next higher number, wait 24 hours, Then re-check Move items out of ice. If you...
... too cold Controls not set correctly when milk or juice is at least 24 hours between adjustments. 19 RECOMMENDED ADJUSTMENT: Turn REFRIGERATOR control to next higher number, wait 24 hours, then re-check Turn FREEZER control to next higher number, wait 24 hours, Then re-check Move items out of ice. If you...
Owner's Manual (English)
Page 20
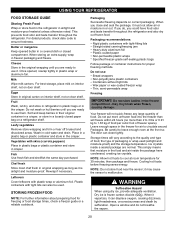
...in their original container in a crisper, or store in the crisper. Rewrap if necessary. USING YOUR REFRIGERATOR FOOD STORAGE GUIDE Storing Fresh Food Wrap or store food in the refrigerator in the freezer compartment - For dated products, check date code to malfunction. NOTE: Allow hot foods to 1.36 ...wrap in original carton on interior shelf, not on a refrigerator shelf. Chef fresh Store most chef fresh in plastic wrap or aluminum foil. Do not put more than will not quick-freeze any large quantity of freezer space). Once opened butter in the original wrapping until you ...
...in their original container in a crisper, or store in the crisper. Rewrap if necessary. USING YOUR REFRIGERATOR FOOD STORAGE GUIDE Storing Fresh Food Wrap or store food in the refrigerator in the freezer compartment - For dated products, check date code to malfunction. NOTE: Allow hot foods to 1.36 ...wrap in original carton on interior shelf, not on a refrigerator shelf. Chef fresh Store most chef fresh in plastic wrap or aluminum foil. Do not put more than will not quick-freeze any large quantity of freezer space). Once opened butter in the original wrapping until you ...
Owner's Manual (English)
Page 21
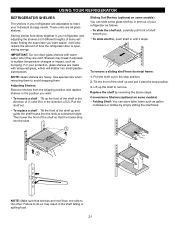
...they are all glass shelves. Use special care when removing them to sudden temperature changes or impact, such as follows. USING YOUR REFRIGERATOR REFRIGERATOR SHELVES The shelves in the position you want easier; Shelves may result in the shelf falling or spilling food. 21 Adjusting Shelves ...Remove shelves from the shipping position and replace shelves in your refrigerator as bumping. IMPORTANT: Do not clean glass shelves with tempered glass, which will also reduce the amount of shelf toward you. NOTE...
...they are all glass shelves. Use special care when removing them to sudden temperature changes or impact, such as follows. USING YOUR REFRIGERATOR REFRIGERATOR SHELVES The shelves in the position you want easier; Shelves may result in the shelf falling or spilling food. 21 Adjusting Shelves ...Remove shelves from the shipping position and replace shelves in your refrigerator as bumping. IMPORTANT: Do not clean glass shelves with tempered glass, which will also reduce the amount of shelf toward you. NOTE...
Owner's Manual (English)
Page 22
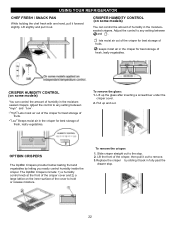
... Slide crisper straight out to any setting between " " and " ". Lift the front of fresh, leafy vegetables. " " :Keeps moist air in the moisturesealed crispers. USING YOUR REFRIGERATOR CHEF FRESH / SNACK PAN While holding the chef fresh with one hand, pull it forward slightly. Lift up and out.
... Slide crisper straight out to any setting between " " and " ". Lift the front of fresh, leafy vegetables. " " :Keeps moist air in the moisturesealed crispers. USING YOUR REFRIGERATOR CHEF FRESH / SNACK PAN While holding the chef fresh with one hand, pull it forward slightly. Lift up and out.


