
Specification
Page 1
...) Dry Air Flow (CFM) dBA Level (Front) Est. FT.) Refrigerant FEATURES Display Panel Thermostat Control Remote Controller Control Button Type Auto Swing Auto Restart Auto Door Open/Close System Timer Fan Speed Cooling Fan Only Speed Compressor Indoor/Outdoor Fan Type Type Air Discharge Water Full Indicator Outdoor Exhaust 8,000 1.8 250 53 200 R410A LED Yes LCD Remote Controller Standard Yes Yes Yes 24 Hr, On/Off 2 2 Rotary Blower Inclined and Top Yes Yes MATERIALS/FINISHES Available Colors Easy-Roll Casters Air Filter Window Installation Kit ELECTRICAL RATINGS Voltage...
...) Dry Air Flow (CFM) dBA Level (Front) Est. FT.) Refrigerant FEATURES Display Panel Thermostat Control Remote Controller Control Button Type Auto Swing Auto Restart Auto Door Open/Close System Timer Fan Speed Cooling Fan Only Speed Compressor Indoor/Outdoor Fan Type Type Air Discharge Water Full Indicator Outdoor Exhaust 8,000 1.8 250 53 200 R410A LED Yes LCD Remote Controller Standard Yes Yes Yes 24 Hr, On/Off 2 2 Rotary Blower Inclined and Top Yes Yes MATERIALS/FINISHES Available Colors Easy-Roll Casters Air Filter Window Installation Kit ELECTRICAL RATINGS Voltage...

Owners Manual
Page 1
TYPE : PORTABLE AIR CONDITIONER MODEL : LP0817WSR LP1017WSR LP1217GSR LP1417SHR LP1417GSR LP1417WSRSM P/NO : COV34636802 Rev.3 www.lg.com Copyright © 2016 - 2018 LG Electronics Inc. COV34636802 2018. 4. 23. 오후 5:11 페이지 1 ENGLISH ESPAÑOL Read this owner's manual thoroughly before operating the appliance and retain it for future reference. All Rights Reserved.
TYPE : PORTABLE AIR CONDITIONER MODEL : LP0817WSR LP1017WSR LP1217GSR LP1417SHR LP1417GSR LP1417WSRSM P/NO : COV34636802 Rev.3 www.lg.com Copyright © 2016 - 2018 LG Electronics Inc. COV34636802 2018. 4. 23. 오후 5:11 페이지 1 ENGLISH ESPAÑOL Read this owner's manual thoroughly before operating the appliance and retain it for future reference. All Rights Reserved.

Owners Manual
Page 2
COV34636802 2018. 4. 23. 오후 5:11 페이지 2 TABLE OF CONTENTS Important Safety Instructions 3 Electrical Safety 6 7 Before Using the Air Conditioner 8 Control Panel and Remote 10 Operation 12 SMART FUNCTIONS Using Smart ThinQ Application 13 15 16 16 17 Installation in Vertical-Sliding Windows 18 Installation in Horizontal-Sliding Windows 20 Heating Drainage 22 Emptying the Water Collection Tank 24 25 25 26 27 29 Arbitration Notice 30 2
COV34636802 2018. 4. 23. 오후 5:11 페이지 2 TABLE OF CONTENTS Important Safety Instructions 3 Electrical Safety 6 7 Before Using the Air Conditioner 8 Control Panel and Remote 10 Operation 12 SMART FUNCTIONS Using Smart ThinQ Application 13 15 16 16 17 Installation in Vertical-Sliding Windows 18 Installation in Horizontal-Sliding Windows 20 Heating Drainage 22 Emptying the Water Collection Tank 24 25 25 26 27 29 Arbitration Notice 30 2

Owners Manual
Page 3
... use of long-sleeved gloves and safety glasses. • Use care when unpacking and installing. CAUTION If you do not follow instructions, it could result in this manual. • Connect to a properly rated, protected, and sized power circuit to the product. All safety messages will follow instructions, it could result in minor or moderate injury or damage to avoid electrical overload. • Always plug...
... use of long-sleeved gloves and safety glasses. • Use care when unpacking and installing. CAUTION If you do not follow instructions, it could result in this manual. • Connect to a properly rated, protected, and sized power circuit to the product. All safety messages will follow instructions, it could result in minor or moderate injury or damage to avoid electrical overload. • Always plug...

Owners Manual
Page 4
... disassembled, or has missing or broken parts, including a damaged cord or plug. • Repair or immediately replace all power cords that shows cracks or abrasion damage along its intended purpose. • Never attempt to operate this appliance if it is not intended for use by persons (including children) with controls. • The interior of a gas leak (propane gas, etc.) do not...
... disassembled, or has missing or broken parts, including a damaged cord or plug. • Repair or immediately replace all power cords that shows cracks or abrasion damage along its intended purpose. • Never attempt to operate this appliance if it is not intended for use by persons (including children) with controls. • The interior of a gas leak (propane gas, etc.) do not...
Owners Manual
Page 5
... the filter securely installed. • Clean the filter every two weeks. • Do not drink water drained from obstructions. • Use a soft cloth to the product or property when using this product, follow basic precautions, including the following: Operation • This appliance is not intended for use as a precision refrigeration system. Do not use it are free from the appliance. • If the batteries leak onto...
... the filter securely installed. • Clean the filter every two weeks. • Do not drink water drained from obstructions. • Use a soft cloth to the product or property when using this product, follow basic precautions, including the following: Operation • This appliance is not intended for use as a precision refrigeration system. Do not use it are free from the appliance. • If the batteries leak onto...

Owners Manual
Page 9
ENGLISH COV34636802 2018. 4. 23. 오후 5:11 페이지 9 BEFORE USING THE AIR CONDITIONER the Press and slide to remove the battery cover on the back of the remote. • If the batteries leak onto your clothes or skin, remove contaminated clothing and rinse skin thoroughly with soap and water. Contact a physician immediately. 9 Do not use the remote if the battery has leaked. • If the battery or the liquid inside it are ingested, do not induce vomiting or give food or drink.
ENGLISH COV34636802 2018. 4. 23. 오후 5:11 페이지 9 BEFORE USING THE AIR CONDITIONER the Press and slide to remove the battery cover on the back of the remote. • If the batteries leak onto your clothes or skin, remove contaminated clothing and rinse skin thoroughly with soap and water. Contact a physician immediately. 9 Do not use the remote if the battery has leaked. • If the battery or the liquid inside it are ingested, do not induce vomiting or give food or drink.

Owners Manual
Page 10
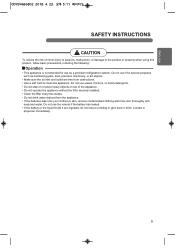
... when using the remote, remember to turn on the model. An LED illuminates to indicate the selected mode. The timer function can be changed in bright light or if there is not a clear path between High and Low settings. Press repeatedly to toggle through and select the operating mode. NOTE: The remote sensor is located on the control panel. Press this button repeatedly to toggle the fan speed...
... when using the remote, remember to turn on the model. An LED illuminates to indicate the selected mode. The timer function can be changed in bright light or if there is not a clear path between High and Low settings. Press repeatedly to toggle through and select the operating mode. NOTE: The remote sensor is located on the control panel. Press this button repeatedly to toggle the fan speed...
Owners Manual
Page 11
... display shows the set to open and shut, circulating the air more information.) If only the Cool mode is automatically set temperature, fan speed, or the selected TIMER delay. If the louvers do not move properly, unplug and plug in the power cord. DRAIN PUMP (Optional) If you use the Heat mode, you a more comfortable environment for sleep. This function can only be emptied. An E5 error code displays when the water drain tank needs...
... display shows the set to open and shut, circulating the air more information.) If only the Cool mode is automatically set temperature, fan speed, or the selected TIMER delay. If the louvers do not move properly, unplug and plug in the power cord. DRAIN PUMP (Optional) If you use the Heat mode, you a more comfortable environment for sleep. This function can only be emptied. An E5 error code displays when the water drain tank needs...

Owners Manual
Page 12
... be set temperature. 5. The desired temperature can be adjusted. Plug in the air conditioner and use the ƞ.Ơ buttons to enter the delay time. Press TIMER on the remote and use the remote to set from the room without additional cooling. COV34636802 2018. 4. 23. 오후 5:11 페이지 12 HOW TO USE OPERATION MODES COOL( ) Compressor runs and cools the room. Display Temp. Use the ƞ.Ơ and FAN buttons to Turn OFF 1. Setting the Air Conditioner to set...
... be set temperature. 5. The desired temperature can be adjusted. Plug in the air conditioner and use the ƞ.Ơ buttons to enter the delay time. Press TIMER on the remote and use the remote to set from the room without additional cooling. COV34636802 2018. 4. 23. 오후 5:11 페이지 12 HOW TO USE OPERATION MODES COOL( ) Compressor runs and cools the room. Display Temp. Use the ƞ.Ơ and FAN buttons to Turn OFF 1. Setting the Air Conditioner to set...

Owners Manual
Page 14
..., MPL, and other open source code to set various options on the appliance and in the application and connect it from the LG SmartThinQ Settings → Edit Product and register again. • The application is valid for three (3) years from the date on which you on CD-ROM for download. Firmware Update Keep the appliance performance updated. 14 Wi-Fi Function...
..., MPL, and other open source code to set various options on the appliance and in the application and connect it from the LG SmartThinQ Settings → Edit Product and register again. • The application is valid for three (3) years from the date on which you on CD-ROM for download. Firmware Update Keep the appliance performance updated. 14 Wi-Fi Function...

Owners Manual
Page 16
... step 5. 16 Attach the hose assembly onto the back of the air conditioner by inserting the edges of the mounting bracket behind the tabs at both ends of the vent hose, use a Phillips screwdriver to remove the four screws holding the grill on the diffuser, using the four screws removed in the same manner as assembling the hose to the vent hose. 8. COV34636802 2018. 4. 23...
... step 5. 16 Attach the hose assembly onto the back of the air conditioner by inserting the edges of the mounting bracket behind the tabs at both ends of the vent hose, use a Phillips screwdriver to remove the four screws holding the grill on the diffuser, using the four screws removed in the same manner as assembling the hose to the vent hose. 8. COV34636802 2018. 4. 23...

Owners Manual
Page 17
..., or horizontal-sliding windows from 27" to 34", use the window vent panel (Panel A) and an extension panel (Panel B). COV34636802 2018. 4. 23. 오후 5:11 페이지 17 INSTALLATION INSTRUCTIONS WINDOW VENT PANEL AND EXTENSIONS The window installation kit allows you to install the air conditioner in place with 1 type A screw. b For window openings from 18" to 26", use the window vent panel (Panel A) and an extension panel (Panel C). Window opening , as shown above. 2. Fig. a For window openings from 19" to 50...
..., or horizontal-sliding windows from 27" to 34", use the window vent panel (Panel A) and an extension panel (Panel B). COV34636802 2018. 4. 23. 오후 5:11 페이지 17 INSTALLATION INSTRUCTIONS WINDOW VENT PANEL AND EXTENSIONS The window installation kit allows you to install the air conditioner in place with 1 type A screw. b For window openings from 18" to 26", use the window vent panel (Panel A) and an extension panel (Panel C). Window opening , as shown above. 2. Fig. a For window openings from 19" to 50...

Owners Manual
Page 19
Insert the type C screw in the hole in the diffuser to prevent the diffuser from sliding out of the vent opening in the vent panel and slide the diffuser to lock it to lock the tabs in place. Insert the diffuser into place. Slot (1) Insert (2) Slide Align the tabs on the diffuser with the slots in the vent panel. COV34636802 2018. 4. 23. 오후 5:11 페이지 19 INSTALLATION INSTRUCTIONS INSTALLATION IN VERTICAL-SLIDING WINDOWS ENGLISH Insert the diffuser into the opening in the vent panel and slide it into the opening . 19
Insert the type C screw in the hole in the diffuser to prevent the diffuser from sliding out of the vent opening in the vent panel and slide the diffuser to lock it to lock the tabs in place. Insert the diffuser into place. Slot (1) Insert (2) Slide Align the tabs on the diffuser with the slots in the vent panel. COV34636802 2018. 4. 23. 오후 5:11 페이지 19 INSTALLATION INSTRUCTIONS INSTALLATION IN VERTICAL-SLIDING WINDOWS ENGLISH Insert the diffuser into the opening in the vent panel and slide it into the opening . 19

Owners Manual
Page 22
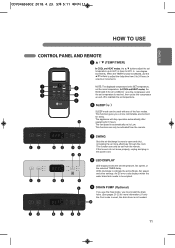
... use the Heat mode, you must install the drain hose. If using the outdoor drainage method, make sure the outlet of the upper drain port in a bucket that could be stained or damaged by pressing the Fan and Down buttons at or near freezing (32°F/0°C) follow the indoor drainage instructions. Remember to check and empty the bucket frequently to automatic drain by the draining water. INDOOR DRAINAGE 1. Set the unit...
... use the Heat mode, you must install the drain hose. If using the outdoor drainage method, make sure the outlet of the upper drain port in a bucket that could be stained or damaged by pressing the Fan and Down buttons at or near freezing (32°F/0°C) follow the indoor drainage instructions. Remember to check and empty the bucket frequently to automatic drain by the draining water. INDOOR DRAINAGE 1. Set the unit...
Owners Manual
Page 23
... the draining water. 1. Rotate the nut cover on the window vent panel and insert the other end of the drain hose through the hole in place. 5. To detach the drain hose from nearby surfaces that could be set up to drain to insert the drain hose at the back of the hose is above freezing, the unit can be stained or damaged by pressing the Fan and Down buttons...
... the draining water. 1. Rotate the nut cover on the window vent panel and insert the other end of the drain hose through the hole in place. 5. To detach the drain hose from nearby surfaces that could be set up to drain to insert the drain hose at the back of the hose is above freezing, the unit can be stained or damaged by pressing the Fan and Down buttons...
Owners Manual
Page 24
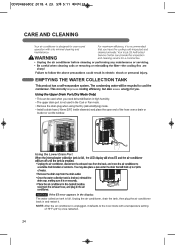
... can be used when you need dehumidification in high humidity. • The upper drain port is not used in the display: The water collection tank is unplugged, it . Unplug the air conditioner, drain the tank, then plug the air conditioner back in and restart it defaults to the Cool mode with a temperature setting of the hose over a drain or bucket or out the window. NOTE: After the air conditioner is full...
... can be used when you need dehumidification in high humidity. • The upper drain port is not used in the display: The water collection tank is unplugged, it . Unplug the air conditioner, drain the tank, then plug the air conditioner back in and restart it defaults to the Cool mode with a temperature setting of the hose over a drain or bucket or out the window. NOTE: After the air conditioner is full...

Owners Manual
Page 26
COV34636802 2018. 4. 23. 오후 5:11 페이지 26 CARE AND CLEANING STORING THE AIR CONDITIONER extended period of time: Make sure the filters and drain cap are in place Remove and clean the filters, allow them to dry completely, then reinstall them. 26
COV34636802 2018. 4. 23. 오후 5:11 페이지 26 CARE AND CLEANING STORING THE AIR CONDITIONER extended period of time: Make sure the filters and drain cap are in place Remove and clean the filters, allow them to dry completely, then reinstall them. 26

Owners Manual
Page 28
... be supported, depending on LG SmartThinQ. Error Code Possible causes Corrective Action Software problem. 28 Mobile data for the • Find the Wi-Fi network connected to your appliance on the model. To check the router frequency, check with your smartphone is turned on LG SmartThinQ.... the appliance. The password for your appliance on . Move the location of English letters and numbers. (Do not use special characters.) The router frequency is not 2.4 GHz. • Only a 2.4 GHz router frequency is supported. The wireless network name (SSID) is set incorrectly. •...
... be supported, depending on LG SmartThinQ. Error Code Possible causes Corrective Action Software problem. 28 Mobile data for the • Find the Wi-Fi network connected to your appliance on the model. To check the router frequency, check with your smartphone is turned on LG SmartThinQ.... the appliance. The password for your appliance on . Move the location of English letters and numbers. (Do not use special characters.) The router frequency is not 2.4 GHz. • Only a 2.4 GHz router frequency is supported. The wireless network name (SSID) is set incorrectly. •...

Owners Manual
Page 30
... after sending written notice to LG, you and LG shall not be entered on "Find My Model & Serial Number"). Instead of arbitration, either party may be combined or consolidated with the AAA Rules and this section. Arbitration Rules and Procedures. Send a copy of your residence shall govern this product and do not need to pay all monies...
... after sending written notice to LG, you and LG shall not be entered on "Find My Model & Serial Number"). Instead of arbitration, either party may be combined or consolidated with the AAA Rules and this section. Arbitration Rules and Procedures. Send a copy of your residence shall govern this product and do not need to pay all monies...


