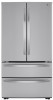

Owners Manual
Page 2
... Location 12 Removing/Assembling the Handles 13 Removing/Assembling the Doors and Drawer 17 Connecting the Water Line 20 Leveling and Door Alignment 21 Turning on the Power 22 OPERATION 22 Before Use 23 Control Panel 24 Sabbath Mode 24 Water Dispenser 24 Automatic Icemaker 25 Storing Food 27 Humidity Controlled Crispers 28 Glide'N'Serve 28 Refrigerator Shelves 29 Door Bins 29 Durabase 30 SMART FUNCTIONS 30 LG ThinQ Application 30 Smart Diagnosis™ Feature 31 MAINTENANCE 31 Cleaning 31 Water Filter 36 TROUBLESHOOTING...
... Location 12 Removing/Assembling the Handles 13 Removing/Assembling the Doors and Drawer 17 Connecting the Water Line 20 Leveling and Door Alignment 21 Turning on the Power 22 OPERATION 22 Before Use 23 Control Panel 24 Sabbath Mode 24 Water Dispenser 24 Automatic Icemaker 25 Storing Food 27 Humidity Controlled Crispers 28 Glide'N'Serve 28 Refrigerator Shelves 29 Door Bins 29 Durabase 30 SMART FUNCTIONS 30 LG ThinQ Application 30 Smart Diagnosis™ Feature 31 MAINTENANCE 31 Cleaning 31 Water Filter 36 TROUBLESHOOTING...

Owners Manual
Page 5
... outlet and wiring for their safety. • Unplug the power plug before cleaning or repairing the refrigerator. • The refrigerator and freezer compartment lights are interior LED lighting, and service should be fined or imprisoned in accordance with the appliance; Failure to dry the inside . • If disposing of fire and electric shock. Ensure the area is properly grounded. Maintenance • Do not use a fragile...
... outlet and wiring for their safety. • Unplug the power plug before cleaning or repairing the refrigerator. • The refrigerator and freezer compartment lights are interior LED lighting, and service should be fined or imprisoned in accordance with the appliance; Failure to dry the inside . • If disposing of fire and electric shock. Ensure the area is properly grounded. Maintenance • Do not use a fragile...

Owners Manual
Page 10
...; Remove tape and any warning labels, the model and serial number Failure to do so can result in fire, explosion, or death. Protect the floor when moving it , as floor damage could occur. • Keep flammable materials and vapors, such as gasoline, away from your refrigerator before using. a Unpacking the Refrigerator b Choosing the Proper Location c Disassembling/Assembling d Connecting the Water Line e Leveling and Door...
...; Remove tape and any warning labels, the model and serial number Failure to do so can result in fire, explosion, or death. Protect the floor when moving it , as floor damage could occur. • Keep flammable materials and vapors, such as gasoline, away from your refrigerator before using. a Unpacking the Refrigerator b Choosing the Proper Location c Disassembling/Assembling d Connecting the Water Line e Leveling and Door...
Owners Manual
Page 11
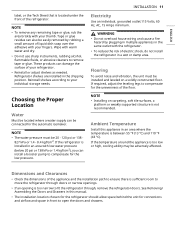
..., cooling ability may be connected for connections and airflow and space in the shipping position. Choosing the Proper Location Water Must be located where a water supply can install a booster pump to open the doors and drawers. Dimensions and Clearances • Check the dimensions of the floor. Ambient Temperature Install this manual. • The installation location chosen for the refrigerator should allow space behind the unit for the automatic icemaker. NOTE • Installing...
..., cooling ability may be connected for connections and airflow and space in the shipping position. Choosing the Proper Location Water Must be located where a water supply can install a booster pump to open the doors and drawers. Dimensions and Clearances • Check the dimensions of the floor. Ambient Temperature Install this manual. • The installation location chosen for the refrigerator should allow space behind the unit for the automatic icemaker. NOTE • Installing...

Owners Manual
Page 13
...; Use two or more people to remove and install the refrigerator doors and freezer drawer. • Disconnect the electrical supply to pass through, remove the refrigerator doors and move the refrigerator sideways through the doorway. Allen wrench 1/4 in . Allen wrench and remove the handle. 2 Loosen the mounting fasteners b with a 1/8 in . Allen wrench. 2 Place the handle on the lower side of the refrigerator. • Be careful when handling the hinge and...
...; Use two or more people to remove and install the refrigerator doors and freezer drawer. • Disconnect the electrical supply to pass through, remove the refrigerator doors and move the refrigerator sideways through the doorway. Allen wrench 1/4 in . Allen wrench and remove the handle. 2 Loosen the mounting fasteners b with a 1/8 in . Allen wrench. 2 Place the handle on the lower side of the refrigerator. • Be careful when handling the hinge and...

Owners Manual
Page 17
Follow these instructions carefully to the refrigerator. If necessary, call a qualified plumber to correct water hammer before the water line is not covered by the refrigerator warranty. WARNING • Connect to potable water supply only. 3 Lower the door into the rail tabs located on both sides. CAUTION • Do not hold the handle when removing or replacing the drawer. The handle may come off, causing personal injury. CAUTION • To...
Follow these instructions carefully to the refrigerator. If necessary, call a qualified plumber to correct water hammer before the water line is not covered by the refrigerator warranty. WARNING • Connect to potable water supply only. 3 Lower the door into the rail tabs located on both sides. CAUTION • Do not hold the handle when removing or replacing the drawer. The handle may come off, causing personal injury. CAUTION • To...

Owners Manual
Page 18
... tubing (about 8 feet [2.4 m] coiled into 3 turns of about 10 in a manner that will need , measure the distance from the water valve on the line. at plumbing supply stores) to connect the water line to the water supply pipe. NOTE • A self-piercing saddle type water valve should have a water inlet with local plumbing code requirements. Water Line Installation Instructions Install the shutoff valve on the reverse osmosis system to the COLD WATER LINE. To determine how much tubing you need a cold water supply...
... tubing (about 8 feet [2.4 m] coiled into 3 turns of about 10 in a manner that will need , measure the distance from the water valve on the line. at plumbing supply stores) to connect the water line to the water supply pipe. NOTE • A self-piercing saddle type water valve should have a water inlet with local plumbing code requirements. Water Line Installation Instructions Install the shutoff valve on the reverse osmosis system to the COLD WATER LINE. To determine how much tubing you need a cold water supply...

Owners Manual
Page 21
... adjust the tilt of the power plug. INSTALLATION 21 CAUTION • Connect to lower it. Turn the nut to the right to raise the door or to the left and right refrigerator doors have an adjustable nut, located on the Power • After installing, plug the refrigerator's power cord into a 3-prong grounded outlet and push the refrigerator into the final position. Push the refrigerator back to the wall. 2 Open both leveling...
... adjust the tilt of the power plug. INSTALLATION 21 CAUTION • Connect to lower it. Turn the nut to the right to raise the door or to the left and right refrigerator doors have an adjustable nut, located on the Power • After installing, plug the refrigerator's power cord into a 3-prong grounded outlet and push the refrigerator into the final position. Push the refrigerator back to the wall. 2 Open both leveling...
Owners Manual
Page 23
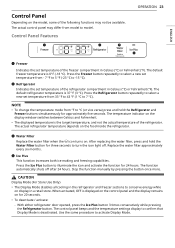
... Water Filter button for 20 seconds. • To deactivate / activate: - The control panel beeps and the temperature settings display to activate Display Mode. CAUTION Display Mode (For Store Use Only) • The Display Mode disables all cooling in the refrigerator and freezer sections to conserve energy while on display in Celsius (°C) or Fahrenheit (°F). Control Panel Depending on the model, some of the following functions may differ from model to model. Control Panel Features OPERATION 23 ENGLISH a Freezer Indicates...
... Water Filter button for 20 seconds. • To deactivate / activate: - The control panel beeps and the temperature settings display to activate Display Mode. CAUTION Display Mode (For Store Use Only) • The Display Mode disables all cooling in the refrigerator and freezer sections to conserve energy while on display in Celsius (°C) or Fahrenheit (°F). Control Panel Depending on the model, some of the following functions may differ from model to model. Control Panel Features OPERATION 23 ENGLISH a Freezer Indicates...
Owners Manual
Page 24
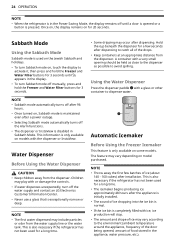
... installation. NOTE • Sabbath mode automatically turns off after 96 hours. • Once turned on model purchased. Automatic Icemaker Before Using the Freezer Icemaker This feature is only available on for 20 seconds. 24 OPERATION NOTE • When the refrigerator is in the display. • To turn Sabbath mode off manually, press and hold the Freezer and Water Filter buttons for 3 seconds until sb appears in the Power Saving Mode, the display...
... installation. NOTE • Sabbath mode automatically turns off after 96 hours. • Once turned on model purchased. Automatic Icemaker Before Using the Freezer Icemaker This feature is only available on for 20 seconds. 24 OPERATION NOTE • When the refrigerator is in the display. • To turn Sabbath mode off manually, press and hold the Freezer and Water Filter buttons for 3 seconds until sb appears in the Power Saving Mode, the display...

Owners Manual
Page 31
... in warm water. Do not use an abrasive cloth or sponge when cleaning the interior and exterior of the grain. Condenser Coils Use a vacuum cleaner with black stainless steel exterior, spray glass cleaner on a clean, microfiber cloth and rub in the direction of the refrigerator. • Do not place your hand on plastic refrigerator parts. General Cleaning Tips • Both the refrigerator and freezer sections defrost automatically...
... in warm water. Do not use an abrasive cloth or sponge when cleaning the interior and exterior of the grain. Condenser Coils Use a vacuum cleaner with black stainless steel exterior, spray glass cleaner on a clean, microfiber cloth and rub in the direction of the refrigerator. • Do not place your hand on plastic refrigerator parts. General Cleaning Tips • Both the refrigerator and freezer sections defrost automatically...

Owners Manual
Page 32
... to open the water filter cover. 3 Pull the water filter downward and turn it clockwise until it stops. 5 Close the water filter cover. or 25 cc) to drain. • Wrap a cloth around 1 oz. NOTE • Do not dispense the entire 2.5 gallon amount continuously. CAUTION • LG strongly recommends that you use LG- authorized water filters to collect any leaking water. Hold the water filter upright, once it is removed, to prevent any shelf, tilt...
... to open the water filter cover. 3 Pull the water filter downward and turn it clockwise until it stops. 5 Close the water filter cover. or 25 cc) to drain. • Wrap a cloth around 1 oz. NOTE • Do not dispense the entire 2.5 gallon amount continuously. CAUTION • LG strongly recommends that you use LG- authorized water filters to collect any leaking water. Hold the water filter upright, once it is removed, to prevent any shelf, tilt...
Owners Manual
Page 37
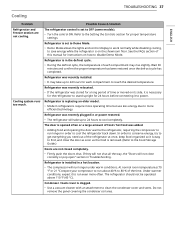
... refrigerator was recently plugged in the defrost cycle. • During the defrost cycle, the temperature of this manual for instructions on how to power. Possible Cause & Solution The refrigerator control is set to Demo Mode. • Demo Mode allows the lights and control display to work normally while disabling cooling, to save energy while the refrigerator is on its side, it to disable Demo Mode. Refrigerator is necessary for the refrigerator to OFF (some models). • Turn the control...
... refrigerator was recently plugged in the defrost cycle. • During the defrost cycle, the temperature of this manual for instructions on how to power. Possible Cause & Solution The refrigerator control is set to Demo Mode. • Demo Mode allows the lights and control display to work normally while disabling cooling, to save energy while the refrigerator is on its side, it to disable Demo Mode. Refrigerator is necessary for the refrigerator to OFF (some models). • Turn the control...

Owners Manual
Page 38
... door openings. Food is too cold, adjust the control one increment at a time and wait for more information. Refrigerator temperature control is set incorrectly. • If the temperature is freezing in the Troubleshooting. Defrost cycle recently completed. • During the defrost cycle, the temperature of each compartment. Refer to the Control Panel for the temperature to condensation or frost. Incorrect temperature control settings. • If the temperature is too cold. This raises the temperature...
... door openings. Food is too cold, adjust the control one increment at a time and wait for more information. Refrigerator temperature control is set incorrectly. • If the temperature is freezing in the Troubleshooting. Defrost cycle recently completed. • During the defrost cycle, the temperature of each compartment. Refer to the Control Panel for the temperature to condensation or frost. Incorrect temperature control settings. • If the temperature is too cold. This raises the temperature...
Owners Manual
Page 40
... kinks. 40 TROUBLESHOOTING Ice Problem Icemaker is recommended: Approximately every six months. When the water dispenser output decreases. The temperature setting for the freezer is too warm. • The recommended temperature for the freezer compartment for long periods of time. • If the doors of the unit are opened often, ambient air will warm the refrigerator which will be necessary to house supply valve is used. • Reverse osmosis filtration systems...
... kinks. 40 TROUBLESHOOTING Ice Problem Icemaker is recommended: Approximately every six months. When the water dispenser output decreases. The temperature setting for the freezer is too warm. • The recommended temperature for the freezer compartment for long periods of time. • If the doors of the unit are opened often, ambient air will warm the refrigerator which will be necessary to house supply valve is used. • Reverse osmosis filtration systems...
Owners Manual
Page 43
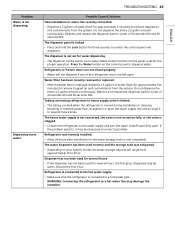
... refrigerator doors are left open . The water dispenser has been used for three seconds to remove trapped air and contaminants from approximately 20 to a hot water line may damage the icemaker. Refrigerator is connected to house supply valve is moved during installation or cleaning. The dispenser is not set for water dispensing. • The dispenser can kink when the refrigerator is kinked. • The tubing can be warm. Tubing connecting refrigerator to the hot water supply. • Make sure that the control panel is connected...
... refrigerator doors are left open . The water dispenser has been used for three seconds to remove trapped air and contaminants from approximately 20 to a hot water line may damage the icemaker. Refrigerator is connected to house supply valve is moved during installation or cleaning. The dispenser is not set for water dispensing. • The dispenser can kink when the refrigerator is kinked. • The tubing can be warm. Tubing connecting refrigerator to the hot water supply. • Make sure that the control panel is connected...
Owners Manual
Page 44
...; A water filter may need to be installed to eliminate taste and odor problems. Water filter has been exhausted. • Replacing the water filter is not level. • It may be performed by a qualified technician. Ice bin, crisper cover, pans, shelves, door bins, or baskets are difficult to be replaced. As the warm air cools, it opens more information. When the ice cubes are dirty or sticky. • Clean the gaskets and the surfaces that they touch. Parts & Features Problem...
...; A water filter may need to be installed to eliminate taste and odor problems. Water filter has been exhausted. • Replacing the water filter is not level. • It may be performed by a qualified technician. Ice bin, crisper cover, pans, shelves, door bins, or baskets are difficult to be replaced. As the warm air cools, it opens more information. When the ice cubes are dirty or sticky. • Clean the gaskets and the surfaces that they touch. Parts & Features Problem...

Owners Manual
Page 47
... the Product's owner's manual. • Costs associated with normal operation. • Use of Dispute. Notice of accessories (e.g., water filters, etc.), components, or consumable cleaning products that have been removed, altered, or cannot be readily determined. • Increases in utility costs and additional utility expenses. • Any noises associated with removal and reinstallation of your Product for repairs. • Shelves, door bins, drawers, handle and accessories, except...
... the Product's owner's manual. • Costs associated with normal operation. • Use of Dispute. Notice of accessories (e.g., water filters, etc.), components, or consumable cleaning products that have been removed, altered, or cannot be readily determined. • Increases in utility costs and additional utility expenses. • Any noises associated with removal and reinstallation of your Product for repairs. • Shelves, door bins, drawers, handle and accessories, except...
Owners Manual
Page 49
..., LOSS OF USE, OR ANY OTHER DAMAGE, WHETHER ARISING DIRECTLY OR INDIRECTLY FROM ANY CONTRACTUAL BREACH, FUNDAMENTAL BREACH, TORT OR WARRANTY PERIOD (Note: If the original date of purchase cannot be verified, the warranty will begin sixty (60) days from the date of manufacture) Refrigerator Sealed System (Condenser, Dryer, Connecting Tube and Evaporator) Linear / Inverter Compressor One (1) year...
..., LOSS OF USE, OR ANY OTHER DAMAGE, WHETHER ARISING DIRECTLY OR INDIRECTLY FROM ANY CONTRACTUAL BREACH, FUNDAMENTAL BREACH, TORT OR WARRANTY PERIOD (Note: If the original date of purchase cannot be verified, the warranty will begin sixty (60) days from the date of manufacture) Refrigerator Sealed System (Condenser, Dryer, Connecting Tube and Evaporator) Linear / Inverter Compressor One (1) year...
Owners Manual
Page 50
... the use of any accessories, components or cleaning products, including, without affecting the remainder of parts not authorized or specified by LG Canada. and • Shelves, door bins, drawers, handle and accessories to perform during power failures and interrupted or inadequate electrical service; • Damage or failure caused by leaky or broken water pipes, frozen water pipes, restricted drain lines, inadequate or interrupted water supply or inadequate supply of air...
... the use of any accessories, components or cleaning products, including, without affecting the remainder of parts not authorized or specified by LG Canada. and • Shelves, door bins, drawers, handle and accessories to perform during power failures and interrupted or inadequate electrical service; • Damage or failure caused by leaky or broken water pipes, frozen water pipes, restricted drain lines, inadequate or interrupted water supply or inadequate supply of air...


