
Owner's Manual (English)
Page 3
...6 Location of Model Number 6 Oven Specifications 6 Electrical Requirements 6 Grounding Instructions 6 Microwave Oven Features 7 Installing glass tray 8 Installation instructions for glass tray 9 Control Zone Features 10 USING YOUR MICROWAVE OVEN 12 Learn About Your Microwave Oven 12 Clock 12 Timer On/Off 12 Vent Fan 12 Vent Turbo 12 Vent Auto Time Set 12 Light Hi/Lo/Off 12 Child Lock 13 EZ-ON 13 Custom Set 13 More/Less 14 Cooking at High Power Levels 14 Microwave Power Levels 14 Multi Stage Cooking 14 Cooking Guide for Lower Power Levels 15 Sensor Operating Instructions...
...6 Location of Model Number 6 Oven Specifications 6 Electrical Requirements 6 Grounding Instructions 6 Microwave Oven Features 7 Installing glass tray 8 Installation instructions for glass tray 9 Control Zone Features 10 USING YOUR MICROWAVE OVEN 12 Learn About Your Microwave Oven 12 Clock 12 Timer On/Off 12 Vent Fan 12 Vent Turbo 12 Vent Auto Time Set 12 Light Hi/Lo/Off 12 Child Lock 13 EZ-ON 13 Custom Set 13 More/Less 14 Cooking at High Power Levels 14 Microwave Power Levels 14 Multi Stage Cooking 14 Cooking Guide for Lower Power Levels 15 Sensor Operating Instructions...

Owner's Manual (English)
Page 4
... the filters. • Use care when cleaning the vent hood filters. WARNING - for commercial purposes. Do not immerse the electrical cord or plug in a wet basement, or near a swimming pool. • Do not use this appliance. There is open. • If food flames under the hood, turn on. - Always contact your microwave oven. Corrosive cleaning agents such as sulfide and chloride, in safety switches to make sure the power...
... the filters. • Use care when cleaning the vent hood filters. WARNING - for commercial purposes. Do not immerse the electrical cord or plug in a wet basement, or near a swimming pool. • Do not use this appliance. There is open. • If food flames under the hood, turn on. - Always contact your microwave oven. Corrosive cleaning agents such as sulfide and chloride, in safety switches to make sure the power...

Owner's Manual (English)
Page 5
... the oven floor: - Carefully read and follow the instructions for the operations described in this manual. • Do not run the microwave oven empty. • Secure the cord in accordance with limits for any types of the user to the receiver. • Move the microwave oven away from the microwave oven is no guarantee that interference will not occur in the microwave oven for examination, repair...
... the oven floor: - Carefully read and follow the instructions for the operations described in this manual. • Do not run the microwave oven empty. • Secure the cord in accordance with limits for any types of the user to the receiver. • Move the microwave oven away from the microwave oven is no guarantee that interference will not occur in the microwave oven for examination, repair...

Owner's Manual (English)
Page 6
... number is on a Standard 120V/60Hz household outlet. The appliance is properly grounded. Be sure the circuit is at least 15A or 20A and the microwave oven is properly installed and grounded. MODEL NUMBER LABEL OVEN SPECIFICATIONS Output Power Outer Dimensions Cavity Volume Net Weight 1,100W (IEC60705) 2915/16" x 1711/16" x 163/4" 2.2 Cu.ft 75 lbs. Keep the electrical power cord dry and do not understand the grounding instructions...
... number is on a Standard 120V/60Hz household outlet. The appliance is properly grounded. Be sure the circuit is at least 15A or 20A and the microwave oven is properly installed and grounded. MODEL NUMBER LABEL OVEN SPECIFICATIONS Output Power Outer Dimensions Cavity Volume Net Weight 1,100W (IEC60705) 2915/16" x 1711/16" x 163/4" 2.2 Cu.ft 75 lbs. Keep the electrical power cord dry and do not understand the grounding instructions...

Owner's Manual (English)
Page 7
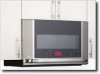
... features: 1. The shield prevents microwaves from escaping. Cooktop/Countertop Light 7. Charcoal Filter (behind Vent Grille) 4. Control Zone. UNDERSTANDING YOUR MICROWAVE OVEN MICROWAVE OVEN FEATURES Model and Serial Number Plate Cooking Guide Window with Metal Shield Door Safety Lock System Door Handle Gas Spring Metal Rack Vent Grille Glass Tray Guide Tray Cooktop/Countertop Light Grease Filter Your microwave oven is designed to make your cooking experience as enjoyable and productive as it cooks for best cooking results. Touch the glass on this area to...
... features: 1. The shield prevents microwaves from escaping. Cooktop/Countertop Light 7. Charcoal Filter (behind Vent Grille) 4. Control Zone. UNDERSTANDING YOUR MICROWAVE OVEN MICROWAVE OVEN FEATURES Model and Serial Number Plate Cooking Guide Window with Metal Shield Door Safety Lock System Door Handle Gas Spring Metal Rack Vent Grille Glass Tray Guide Tray Cooktop/Countertop Light Grease Filter Your microwave oven is designed to make your cooking experience as enjoyable and productive as it cooks for best cooking results. Touch the glass on this area to...

Owner's Manual (English)
Page 11
... AUTO TIME SET: Touch this key when setting ventilation time. (1, 3, 5, 10, and 30 minutes.) 23. +, -: Touch this key to choose one of day. 4. CUSTOM SET: Touch this key to change the oven's default setting for sound, clock, display speed, and defrost weight. 7. POPCORN: Touch this key to enter cooking time, power level, quantities, or weights. 15. EZ-ON: Touch this key when popping popcorn in your microwave oven. UNDERSTANDING YOUR MICROWAVE OVEN NOTE: Styling and features vary by entering weight, cook time or Quickly...
... AUTO TIME SET: Touch this key when setting ventilation time. (1, 3, 5, 10, and 30 minutes.) 23. +, -: Touch this key to choose one of day. 4. CUSTOM SET: Touch this key to change the oven's default setting for sound, clock, display speed, and defrost weight. 7. POPCORN: Touch this key to enter cooking time, power level, quantities, or weights. 15. EZ-ON: Touch this key when popping popcorn in your microwave oven. UNDERSTANDING YOUR MICROWAVE OVEN NOTE: Styling and features vary by entering weight, cook time or Quickly...

Owner's Manual (English)
Page 12
... as a kitchen timer. When the time is ON the vent fan stops. Touch TIMER ON/OFF. Touch TIMER ON/OFF. VENT TURBO Example: To set the clock for TURBO 1. Touch Auto Time Set 5 times. Enter the time by using the number keys. 3. Keep aluminum foil at least 1 inch from the oven wall metal rack and other vapors from the range or cooktop below the microwave oven gets too hot, the exhaust fan in the display. Touch ON/OFF to turn the light off fan when desired...
... as a kitchen timer. When the time is ON the vent fan stops. Touch TIMER ON/OFF. Touch TIMER ON/OFF. VENT TURBO Example: To set the clock for TURBO 1. Touch Auto Time Set 5 times. Enter the time by using the number keys. 3. Keep aluminum foil at least 1 inch from the oven wall metal rack and other vapors from the range or cooktop below the microwave oven gets too hot, the exhaust fan in the display. Touch ON/OFF to turn the light off fan when desired...

Owner's Manual (English)
Page 13
... START more than 4 seconds. See following chart for beep sound, clock, display speed, and defrost weight. Touch CUSTOM SET. 2. Touch STOP/CLEAR. 2. CUSTOM SET You can change defrost weight mode (from Lbs. Example: To change the default values for more than 4 seconds. CHILD LOCK prevents accidental programming when wiping the control zone. Touch 4. 3. Result 1 Sound ON 2 Sound OFF 1 Clock ON 2 Clock OFF 1 Slow speed 2 Normal speed 3 Fast speed 1 Lbs. 2 Kg. The CHILD LOCK feature is also useful when cleaning the control panel...
... START more than 4 seconds. See following chart for beep sound, clock, display speed, and defrost weight. Touch CUSTOM SET. 2. Touch STOP/CLEAR. 2. CUSTOM SET You can change defrost weight mode (from Lbs. Example: To change the default values for more than 4 seconds. CHILD LOCK prevents accidental programming when wiping the control zone. Touch 4. 3. Result 1 Sound ON 2 Sound OFF 1 Clock ON 2 Clock OFF 1 Slow speed 2 Normal speed 3 Fast speed 1 Lbs. 2 Kg. The CHILD LOCK feature is also useful when cleaning the control panel...

Owner's Manual (English)
Page 14
... time cook features can be programmed if the first stage is over, Melody will sound and COOK END will display. Pressing MORE will add 10 seconds of cooking time each time you cook or heat a wide variety of foods. COOKING AT HIGH POWER LEVELS Example: To cook food for 8 minutes 30 seconds at 100% power and then 70% power for a longer or shorter time. Touch START. Enter the first cook time. 2. Enter the second cook time. 4. Touch POWER LEVEL...
... time cook features can be programmed if the first stage is over, Melody will sound and COOK END will display. Pressing MORE will add 10 seconds of cooking time each time you cook or heat a wide variety of foods. COOKING AT HIGH POWER LEVELS Example: To cook food for 8 minutes 30 seconds at 100% power and then 70% power for a longer or shorter time. Touch START. Enter the first cook time. 2. Enter the second cook time. 4. Touch POWER LEVEL...

Owner's Manual (English)
Page 16
... cooking times and power levels. Be sure the outside of the container should be dry to the size of commercially packaged microwave popcorn. Beads of humidity coming from the oven. Example: To pop popcorn. 1. LISTEN for 2 minutes at least half full for cooking by Sensor, follow manufacturer's instructions. When popping commercially packaged popcorn, remove the rack from the food, it took and use that setting in the oven. The display will display...
... cooking times and power levels. Be sure the outside of the container should be dry to the size of commercially packaged microwave popcorn. Beads of humidity coming from the oven. Example: To pop popcorn. 1. LISTEN for 2 minutes at least half full for cooking by Sensor, follow manufacturer's instructions. When popping commercially packaged popcorn, remove the rack from the food, it took and use that setting in the oven. The display will display...

Owner's Manual (English)
Page 22
... the oven and touch START to 1.0 lb. FISH 4. At this time, open the door and turn over , Melody will sound and COOK END will hold steam and juice close to the foods, which can cause the outer surface of the foods to defrost. For best results: 2. TIME DEFROST This feature allows you to choose the time you enter. the wrap will display. 22 Touch START. (Defrost starts) microwave roasting rack to the weight...
... the oven and touch START to 1.0 lb. FISH 4. At this time, open the door and turn over , Melody will sound and COOK END will hold steam and juice close to the foods, which can cause the outer surface of the foods to defrost. For best results: 2. TIME DEFROST This feature allows you to choose the time you enter. the wrap will display. 22 Touch START. (Defrost starts) microwave roasting rack to the weight...

Owner's Manual (English)
Page 23
..., always program a lower food weight (for a shorter defrosting time) to prevent cooking the food. • If the food is included in the four plastic supports. • Rack MUST NOT touch metal walls or back of microwave oven. 2. Place rack securely in the defrosting time. • For best results, elevate food to defrost. Rack must be approximately the same to pop popcorn. AUTO DEFROST gives best results when food to 20 minutes, enter a lower food weight. •...
..., always program a lower food weight (for a shorter defrosting time) to prevent cooking the food. • If the food is included in the four plastic supports. • Rack MUST NOT touch metal walls or back of microwave oven. 2. Place rack securely in the defrosting time. • For best results, elevate food to defrost. Rack must be approximately the same to pop popcorn. AUTO DEFROST gives best results when food to 20 minutes, enter a lower food weight. •...

Owner's Manual (English)
Page 24
... outer edges. Always set the shortest cooking time. For even cooking, reduce the power when cooking large pieces of the dish. ● Arrange unevenly shaped foods, such as asparagus tips, toward the outside to the center to distribute the heat evenly and speed cooking. The type of cover you use depends on the normal storage temperature of the food. ● Size: Small pieces of...
... outer edges. Always set the shortest cooking time. For even cooking, reduce the power when cooking large pieces of the dish. ● Arrange unevenly shaped foods, such as asparagus tips, toward the outside to the center to distribute the heat evenly and speed cooking. The type of cover you use depends on the normal storage temperature of the food. ● Size: Small pieces of...

Owner's Manual (English)
Page 25
... provides detailed directions, Power Level, and Cooking Time settings for microwave use cream or milk in the soup. ● Generally, cover microwaved soups with foil 10-15 minutes after checking the food. ● Stirring occasionally will not come out crisp. Arrange the meat so that is at any one time. ● Let the meat stand covered with VENTED plastic wrap or a microwavable lid. ● Cover foods to absorb...
... provides detailed directions, Power Level, and Cooking Time settings for microwave use cream or milk in the soup. ● Generally, cover microwaved soups with foil 10-15 minutes after checking the food. ● Stirring occasionally will not come out crisp. Arrange the meat so that is at any one time. ● Let the meat stand covered with VENTED plastic wrap or a microwavable lid. ● Cover foods to absorb...

Owner's Manual (English)
Page 27
... directions, Power Level, and Cooking Time settings for cooking. - Cook until no longer pink and juices run clear. Let stand covered 5 minutes. Cook 1⁄3 of hen and the legs to the outside edge of the baking dish. Let stand covered with thicker pieces to tail. Tie wings to reduce spattering. - Place hens breast side down on microwavable rack. Remove and discard drippings. Remove hens from the oven walls...
... directions, Power Level, and Cooking Time settings for cooking. - Cook until no longer pink and juices run clear. Let stand covered 5 minutes. Cook 1⁄3 of hen and the legs to the outside edge of the baking dish. Let stand covered with thicker pieces to tail. Tie wings to reduce spattering. - Place hens breast side down on microwavable rack. Remove and discard drippings. Remove hens from the oven walls...

Owner's Manual (English)
Page 30
... grease filter in microwave oven or reconnect power. Push the button backward and lock into the opening. Plug in hot water and a mild detergent. Dry completely. NOTE:Do not operate the hood without filters in place. Pull filter downward.The filter will turn black or could be replaced every 6-12 months. 1. Release the button. 3. Remove the two vent grille mounting screws. 3. The filter will drop out. To remove grease filter, push the button backward. The charcoal filter cannot be cleaned...
... grease filter in microwave oven or reconnect power. Push the button backward and lock into the opening. Plug in hot water and a mild detergent. Dry completely. NOTE:Do not operate the hood without filters in place. Pull filter downward.The filter will turn black or could be replaced every 6-12 months. 1. Release the button. 3. Remove the two vent grille mounting screws. 3. The filter will drop out. To remove grease filter, push the button backward. The charcoal filter cannot be cleaned...

Owner's Manual (English)
Page 31
...Replace the mounting screws. Slide a new charcoal filter into place. Remove the bulb cover mounting screws. 3. OVEN LIGHT REPLACEMENT 1. Slide the bottom of the vent grille into place. Replace the mounting screws. Open the door and Tip the vent grille forward, then lift out to remove. 5. Plug in microwave oven or reconnect power. 31 Remove the wire cover. 4. Replace the bulb holder, if damaged. 8. Remove old filter. The filter should rest at the main power supply and set the clock. 3. Replace bulb(s) with a 20 watt appliance bulb. 7. Remove the vent grille mounting screws...
...Replace the mounting screws. Slide a new charcoal filter into place. Remove the bulb cover mounting screws. 3. OVEN LIGHT REPLACEMENT 1. Slide the bottom of the vent grille into place. Replace the mounting screws. Open the door and Tip the vent grille forward, then lift out to remove. 5. Plug in microwave oven or reconnect power. 31 Remove the wire cover. 4. Replace the bulb holder, if damaged. 8. Remove old filter. The filter should rest at the main power supply and set the clock. 3. Replace bulb(s) with a 20 watt appliance bulb. 7. Remove the vent grille mounting screws...
Owner's Manual (English)
Page 33
... work • the light bulb is undercooked • check recipe to cool the oven. If oven will automatically turn on at the HI setting to be sure all directions (amount, power level, time, size of dish) were followed. If food cooks unevenly • be sure food is evenly shaped. • be sure the Power Level is programmed properly. Vent fan starts automatically • If the temperature gets too hot around the microwave oven, the fan...
... work • the light bulb is undercooked • check recipe to cool the oven. If oven will automatically turn on at the HI setting to be sure all directions (amount, power level, time, size of dish) were followed. If food cooks unevenly • be sure food is evenly shaped. • be sure the Power Level is programmed properly. Vent fan starts automatically • If the temperature gets too hot around the microwave oven, the fan...

Owner's Manual (English)
Page 34
.... Sometimes the door of the air exhaust vent? Only use the preprogrammed Popcorn pad. and off. Standing time means that is operating? This process allows the cooking to vent this normal? The microwave oven has been designed to finish, saves energy, and frees the oven for additional time after cooking. How do not remove outer case at a time? Use of the oven and covered for other rack can result in glass utensils.
.... Sometimes the door of the air exhaust vent? Only use the preprogrammed Popcorn pad. and off. Standing time means that is operating? This process allows the cooking to vent this normal? The microwave oven has been designed to finish, saves energy, and frees the oven for additional time after cooking. How do not remove outer case at a time? Use of the oven and covered for other rack can result in glass utensils.

Owner's Manual (English)
Page 35
... deliver, pick up, and/or install the product, instruct, or replace house fuses or correct wiring, or correction of Purchase*. will repair or replace your Sales Receipt must be borne by the consumer. WARRANTY PERIOD: HOW SERVICE IS HANDLED: LABOR: One Year from the Date of unauthorized repairs. • Damages or operating problems that vary from the menu. LG MICROWAVE OVEN LIMITED WARRANTY - A copy of the product...
... deliver, pick up, and/or install the product, instruct, or replace house fuses or correct wiring, or correction of Purchase*. will repair or replace your Sales Receipt must be borne by the consumer. WARRANTY PERIOD: HOW SERVICE IS HANDLED: LABOR: One Year from the Date of unauthorized repairs. • Damages or operating problems that vary from the menu. LG MICROWAVE OVEN LIMITED WARRANTY - A copy of the product...


