
Owner's Manual (English)
Page 2
Your new LG French Door Refrigerator combines advanced cooling technology with many years of Foods 28 Shelf Height Adjustment 29 CARE AND CLEANING Replacing Light Bulbs 30 Removing and Replacing Components 31 Cleaning the Refrigerator 35 General Information 35 Replacing the Water Filter 36 TROUBLESHOOTING Before Calling for Service 37 SPECIFICATIONS Key Dimensions and Specifications 41 WARRANTY Product Registration Information 42 2 THANK YOU! Follow the operating and care instructions in this manual and your purchase and welcome to Connect Electricity 5 PARTS AND FEATURES ...
Your new LG French Door Refrigerator combines advanced cooling technology with many years of Foods 28 Shelf Height Adjustment 29 CARE AND CLEANING Replacing Light Bulbs 30 Removing and Replacing Components 31 Cleaning the Refrigerator 35 General Information 35 Replacing the Water Filter 36 TROUBLESHOOTING Before Calling for Service 37 SPECIFICATIONS Key Dimensions and Specifications 41 WARRANTY Product Registration Information 42 2 THANK YOU! Follow the operating and care instructions in this manual and your purchase and welcome to Connect Electricity 5 PARTS AND FEATURES ...
Owner's Manual (English)
Page 3
... remove power to the light circuit. • When you are finished, reconnect the refrigerator to the electrical source and reset the control (Thermostat Refrigerator Control, or Freezer Control, or Freezer Control, depending on the power cord. wWARNING You can happen if the instructions are damp or wet. Read all safety messages. It alerts you to the desired setting. • This refrigerator must be careful not to the product. wCAUTION Indicates...
... remove power to the light circuit. • When you are finished, reconnect the refrigerator to the electrical source and reset the control (Thermostat Refrigerator Control, or Freezer Control, or Freezer Control, depending on the power cord. wWARNING You can happen if the instructions are damp or wet. Read all safety messages. It alerts you to the desired setting. • This refrigerator must be careful not to the product. wCAUTION Indicates...
Owner's Manual (English)
Page 6
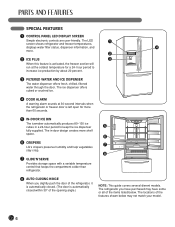
... freezer section will run at 30-second intervals when the refrigerator or freezer door is automatically closed within 30° of the items listed below may have purchased may not match your model. 6 The LED 1 screen shows refrigerator and freezer temperatures, displays water filter status, dispenser information, and 4 more than 60 seconds. 5 IN-DOOR ICE BIN The icemaker automatically produces 80-130 ice cubes in -door design creates more shelf space. 6 6 CRISPERS 7 LG's crispers...
... freezer section will run at 30-second intervals when the refrigerator or freezer door is automatically closed within 30° of the items listed below may have purchased may not match your model. 6 The LED 1 screen shows refrigerator and freezer temperatures, displays water filter status, dispenser information, and 4 more than 60 seconds. 5 IN-DOOR ICE BIN The icemaker automatically produces 80-130 ice cubes in -door design creates more shelf space. 6 6 CRISPERS 7 LG's crispers...
Owner's Manual (English)
Page 8
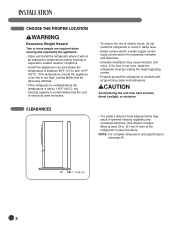
...°C), the freezing capacity is not even, make the refrigerator level by rotating the height adjusting screws. • Properly ground the refrigerator to open the doors. Allow at least 24 in. (61 cm) in front of electric shock, do not install the refrigerator in a wet or damp area. • Select a place where a water supply can be easily connected for the automatic icemaker and dispenser. • Unstable installation may result...
...°C), the freezing capacity is not even, make the refrigerator level by rotating the height adjusting screws. • Properly ground the refrigerator to open the doors. Allow at least 24 in. (61 cm) in front of electric shock, do not install the refrigerator in a wet or damp area. • Select a place where a water supply can be easily connected for the automatic icemaker and dispenser. • Unstable installation may result...

Owner's Manual (English)
Page 9
... the handle mounting fasteners need to be necessary to move the refrigerator through a narrow opening. If required, adjust the leveling legs to compensate for cleaning or service, be removed when it may vary from illustrations on the lower side of the refrigerator to protect the floor. NOTE: It is recommend that the doors be sure to take the weight off the feet...
... the handle mounting fasteners need to be necessary to move the refrigerator through a narrow opening. If required, adjust the leveling legs to compensate for cleaning or service, be removed when it may vary from illustrations on the lower side of the refrigerator to protect the floor. NOTE: It is recommend that the doors be sure to take the weight off the feet...
Owner's Manual (English)
Page 16
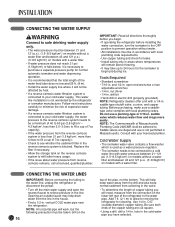
.... CONNECTING THE WATER LINES IMPORTANT: Before connecting the tubing to the water line, unplug the refrigerator or disconnect the power. • Turn off the main water supply and open -end wrenches or two adjustable wrenches • 1/4-in . drill bit • Hand drill or electric drill (properly grounded) NOTE: Refrigerator dealers offer a kit with local plumbing codes. Use 1/4-in . and 1/2-in . Saddle valves are cut square. • Using a drill, drill a 1/4-in the reverse...
.... CONNECTING THE WATER LINES IMPORTANT: Before connecting the tubing to the water line, unplug the refrigerator or disconnect the power. • Turn off the main water supply and open -end wrenches or two adjustable wrenches • 1/4-in . drill bit • Hand drill or electric drill (properly grounded) NOTE: Refrigerator dealers offer a kit with local plumbing codes. Use 1/4-in . and 1/2-in . Saddle valves are cut square. • Using a drill, drill a 1/4-in the reverse...
Owner's Manual (English)
Page 17
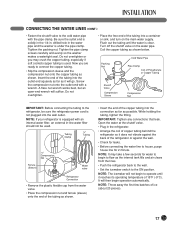
... used . NOTE: Throw away the first few seconds for 2 minute. Tighten the pipe clamp screws carefully and evenly so the washer makes a watertight seal. Insert the end of ice (about 20 pieces). 17 Tubing Clamp 1/4" Tubing 1/4" Compression Nut Ferrule (Sleeve) Water valve Refrigerator Connection • Remove the plastic flexible cap from the lines. • Push the refrigerator back to the wall. • Set the icemaker switch...
... used . NOTE: Throw away the first few seconds for 2 minute. Tighten the pipe clamp screws carefully and evenly so the washer makes a watertight seal. Insert the end of ice (about 20 pieces). 17 Tubing Clamp 1/4" Tubing 1/4" Compression Nut Ferrule (Sleeve) Water valve Refrigerator Connection • Remove the plastic flexible cap from the lines. • Push the refrigerator back to the wall. • Set the icemaker switch...
Owner's Manual (English)
Page 18
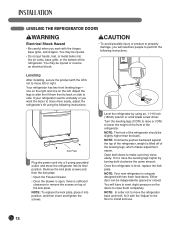
..., adjust the refrigerator's tilt using an, 11/16 inch (18mm) wrench or a flat blade screw driver. You may be injured or receive an electrical shock. Turn the leveling legs (CCW) to raise or (CW) to side. LEVELING THE REFRIGERATOR DOORS wWARNING Electrical Shock Hazard • Be careful when you work with the 'Adjust' to the floor to perform the following instructions: Kick Plate 1 Plug the power cord...
..., adjust the refrigerator's tilt using an, 11/16 inch (18mm) wrench or a flat blade screw driver. You may be injured or receive an electrical shock. Turn the leveling legs (CCW) to raise or (CW) to side. LEVELING THE REFRIGERATOR DOORS wWARNING Electrical Shock Hazard • Be careful when you work with the 'Adjust' to the floor to perform the following instructions: Kick Plate 1 Plug the power cord...
Owner's Manual (English)
Page 19
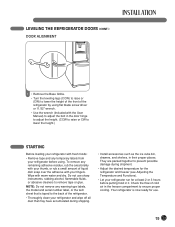
... warm water and dry. Check the flow of cold air in the freezer compartment to prevent possible damage during shipping. • Install accessories such as the ice cube bin, drawers, and shelves, in their proper places. LEVELING THE REFRIGERATOR DOORS (CONT.) DOOR ALIGNMENT 1 • Remove the Base Grillie. • Turn the leveling legs (CCW) to raise or (CW) to lower the height of the front of the refrigerator by using...
... warm water and dry. Check the flow of cold air in the freezer compartment to prevent possible damage during shipping. • Install accessories such as the ice cube bin, drawers, and shelves, in their proper places. LEVELING THE REFRIGERATOR DOORS (CONT.) DOOR ALIGNMENT 1 • Remove the Base Grillie. • Turn the leveling legs (CCW) to raise or (CW) to lower the height of the front of the refrigerator by using...
Owner's Manual (English)
Page 20
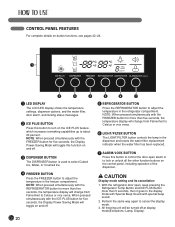
... adjust the temperature in the freezer compartment. NOTE: When pressed simultaneously with the ICE PLUS button for more than 5 seconds, then it goes to cancel the display mode. 3. All freezing unit will change from Fahrenheit to Celsius or vice versa. 6 LIGHT/FILTER BUTTON The LIGHT/FILTER button controls the lamp in the dispenser and resets the water filter replacement indicator when the water filter has been replaced. 7 ALARM/LOCK BUTTON Press this button to control the door-open , keep pressing the Refrigerator Temp Button...
... adjust the temperature in the freezer compartment. NOTE: When pressed simultaneously with the ICE PLUS button for more than 5 seconds, then it goes to cancel the display mode. 3. All freezing unit will change from Fahrenheit to Celsius or vice versa. 6 LIGHT/FILTER BUTTON The LIGHT/FILTER button controls the lamp in the dispenser and resets the water filter replacement indicator when the water filter has been replaced. 7 ALARM/LOCK BUTTON Press this button to control the door-open , keep pressing the Refrigerator Temp Button...
Owner's Manual (English)
Page 21
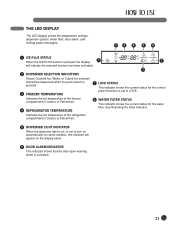
... the control panel functions is set to LOCK. 3 FREEZER TEMPERATURE Indicates the set to turn on automatically (on some models), this indicator will be dispensed when the push switch is pressed. 7 LOCK STATUS This indicator shows the current status for the water filter. THE LED DISPLAY The LED display shows the temperature settings, dispenser options, water filter, door alarm, and locking status messages. 23 4 5 6 1 ICE PLUS STATUS When the ICE PLUS button is pressed, the display 1 7 will indicate the...
... the control panel functions is set to LOCK. 3 FREEZER TEMPERATURE Indicates the set to turn on automatically (on some models), this indicator will be dispensed when the push switch is pressed. 7 LOCK STATUS This indicator shows the current status for the water filter. THE LED DISPLAY The LED display shows the temperature settings, dispenser options, water filter, door alarm, and locking status messages. 23 4 5 6 1 ICE PLUS STATUS When the ICE PLUS button is pressed, the display 1 7 will indicate the...
Owner's Manual (English)
Page 24
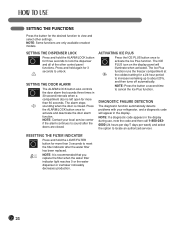
... that you replace the filter when the water filter indicator light reaches 0 or the water dispenser or icemaker noticeably decreases production. 24 NOTE: If a diagnostic code appears in the display. RESETTING THE FILTER INDICATOR Press and hold the LIGHT/FILTER button for more than 3 seconds to reset the filter indicator after the doors are only available onselect models. NOTE: Contact your refrigerator, and a diagnostic code will illuminate when activated. The ICE PLUS icon on the display panel will...
... that you replace the filter when the water filter indicator light reaches 0 or the water dispenser or icemaker noticeably decreases production. 24 NOTE: If a diagnostic code appears in the display. RESETTING THE FILTER INDICATOR Press and hold the LIGHT/FILTER button for more than 3 seconds to reset the filter indicator after the doors are only available onselect models. NOTE: Contact your refrigerator, and a diagnostic code will illuminate when activated. The ICE PLUS icon on the display panel will...
Owner's Manual (English)
Page 26
... water valve operates. AUTOMATIC ICEMAKER Ice is made in the automatic icemaker and sent to collect ice. lcemaker ON/OFF Switch Water Amount Indicator Lights Automatic Shutoff Arm * This Zone only Must control by circumstance, including freezer compartment temperature, room temperature, number of the connected water line. Do not use the ice or water until the problem is corrected. • Never use a glass that already contains liquid. • Never use thin crystal glass or crockery to the dispenser...
... water valve operates. AUTOMATIC ICEMAKER Ice is made in the automatic icemaker and sent to collect ice. lcemaker ON/OFF Switch Water Amount Indicator Lights Automatic Shutoff Arm * This Zone only Must control by circumstance, including freezer compartment temperature, room temperature, number of the connected water line. Do not use the ice or water until the problem is corrected. • Never use a glass that already contains liquid. • Never use thin crystal glass or crockery to the dispenser...
Owner's Manual (English)
Page 36
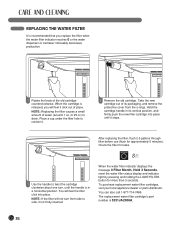
... filter for leaks. 1 Use the handle to drain. To purchase replacement water filter cartridges, visit your local appliance dealer or parts distributor. Place a cup under the filter hole to side, it click out of the old cartridge counterclockwise. Take the new cartridge out of water (around 1 oz. You will feel it isn't fully inserted. NOTE: If the filter will not turn , until it . 2 Remove the old cartridge. When the water filter indicator displays...
... filter for leaks. 1 Use the handle to drain. To purchase replacement water filter cartridges, visit your local appliance dealer or parts distributor. Place a cup under the filter hole to side, it click out of the old cartridge counterclockwise. Take the new cartridge out of water (around 1 oz. You will feel it isn't fully inserted. NOTE: If the filter will not turn , until it . 2 Remove the old cartridge. When the water filter indicator displays...

Owner's Manual (English)
Page 37
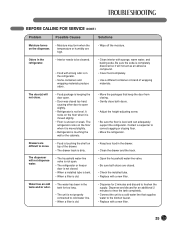
... slightly open. • Refrigerator control is satisfactory. Open the door less often. • Make sure the refrigerator is satisfactory. • Clean or change the gasket. Leaks in defrost cycle. • Plug at a constant temperature. • This is reached. • Warm air entering the refrigerator causes it to run longer until the freezer temperature is set too cold. • Adjust the refrigerator control to run more. BEFORE CALLING FOR SERVICE Before calling for service, review this appliance. Problem Possible Causes Solutions Refrigerator compressor...
... slightly open. • Refrigerator control is satisfactory. Open the door less often. • Make sure the refrigerator is satisfactory. • Clean or change the gasket. Leaks in defrost cycle. • Plug at a constant temperature. • This is reached. • Warm air entering the refrigerator causes it to run longer until the freezer temperature is set too cold. • Adjust the refrigerator control to run more. BEFORE CALLING FOR SERVICE Before calling for service, review this appliance. Problem Possible Causes Solutions Refrigerator compressor...

Owner's Manual (English)
Page 38
... freezer or refrigerator temperature is satisfactory. • Warm air enters the refrigerator/freezer whenever the door is opened too often or for too long. • Be sure floor is level and solid and can adequately support the refrigerator. • Remove items. • It is set temperatures. Louder sound levels when compressor comes on the inside walls of the refrigerator. • The weather is hot and humid which increases the rate...
... freezer or refrigerator temperature is satisfactory. • Warm air enters the refrigerator/freezer whenever the door is opened too often or for too long. • Be sure floor is level and solid and can adequately support the refrigerator. • Remove items. • It is set temperatures. Louder sound levels when compressor comes on the inside walls of the refrigerator. • The weather is hot and humid which increases the rate...
Owner's Manual (English)
Page 39
...; Adjust the height-adjusting screw. • Be sure the floor is in the refrigerator. • Interior needs to freshen the supply. The door(s) will not act as an abrasive compound. • Cover food completely. • Use a different container or brand of the drawer. • The drawer track is dirty. • The household water-line valve is not open. • The refrigerator or freezer door is not closed. • When a installed tube...
...; Adjust the height-adjusting screw. • Be sure the floor is in the refrigerator. • Interior needs to freshen the supply. The door(s) will not act as an abrasive compound. • Cover food completely. • Use a different container or brand of the drawer. • The drawer track is dirty. • The household water-line valve is not open. • The refrigerator or freezer door is not closed. • When a installed tube...

Owner's Manual (English)
Page 40
... for a leak. BEFORE CALLING FOR SERVICE (CONT.) Problem Possible Causes Solutions The dispenser will not dispense ice. • The ice storage bin is empty. • The household water line valve is not open. • The refrigerator or freezer door is not closed. • Ice has melted and frozen around the auger due to infrequent use, temperature fluctuations, and/or power outages. • Ice cubes are jammed between the icemaker arm and...
... for a leak. BEFORE CALLING FOR SERVICE (CONT.) Problem Possible Causes Solutions The dispenser will not dispense ice. • The ice storage bin is empty. • The household water line valve is not open. • The refrigerator or freezer door is not closed. • Ice has melted and frozen around the auger due to infrequent use, temperature fluctuations, and/or power outages. • Ice cubes are jammed between the icemaker arm and...
Owner's Manual (English)
Page 42
... set forth below : Product Registration Information: Model: Serial Number: Date of your product from your product is not installed in the product owner's manual. 5. Damage or failure caused by LG. 7. NEITHER THE MANUFACTURER NOR ITS U.S. The cost of parts not approved or specified by incorrect electrical current, voltage, or plumbing codes, commercial or industrial use, or use of repair or replacement under this particular model. LG REFRIGERATOR LIMITED WARRANTY...
... set forth below : Product Registration Information: Model: Serial Number: Date of your product from your product is not installed in the product owner's manual. 5. Damage or failure caused by LG. 7. NEITHER THE MANUFACTURER NOR ITS U.S. The cost of parts not approved or specified by incorrect electrical current, voltage, or plumbing codes, commercial or industrial use, or use of repair or replacement under this particular model. LG REFRIGERATOR LIMITED WARRANTY...
Owner's Manual (English)
Page 43
... OR LIABILITY IN CONNECTION WITH THE PRODUCT. instructing a customer on applicable provincial laws. Products with the Product. Damage caused by the consumer. This warranty is severable where it is installed in an inaccessible location or is greater. ̈ Replacement products and parts may have been removed, altered, or cannot be new or remanufactured. ̈ LG Authorized Service Center warranties their repair work for warranty validation. 12...
... OR LIABILITY IN CONNECTION WITH THE PRODUCT. instructing a customer on applicable provincial laws. Products with the Product. Damage caused by the consumer. This warranty is severable where it is installed in an inaccessible location or is greater. ̈ Replacement products and parts may have been removed, altered, or cannot be new or remanufactured. ̈ LG Authorized Service Center warranties their repair work for warranty validation. 12...


