Owner's Manual
Page 2
...28 Spanish Version 44 Removing Crisper 28 French Version 86 Warranty (U.S.A.) 3 Warranty (CANADA) 4 Safety Instructions 5-10 Grounding Requirements 6 Parts And Features 11 Refrigerator Installation 12-21 Unpacking Your Refrigerator 12 Installation 12 Removing And Replacing Your Refrigerator Handles And Doors 13-20 Leveling ... Care And Cleaning 33-34 General Cleaning Tips 33 Outside 33 Inside Walls 33 Door Liner And Gaskets 33 Plastic Parts 33 Condenser Coils 33 Light Bulb Replacement 33-34 Power Interruptions 34 When You Go On Vacation 34 When You ...
...28 Spanish Version 44 Removing Crisper 28 French Version 86 Warranty (U.S.A.) 3 Warranty (CANADA) 4 Safety Instructions 5-10 Grounding Requirements 6 Parts And Features 11 Refrigerator Installation 12-21 Unpacking Your Refrigerator 12 Installation 12 Removing And Replacing Your Refrigerator Handles And Doors 13-20 Leveling ... Care And Cleaning 33-34 General Cleaning Tips 33 Outside 33 Inside Walls 33 Door Liner And Gaskets 33 Plastic Parts 33 Condenser Coils 33 Light Bulb Replacement 33-34 Power Interruptions 34 When You Go On Vacation 34 When You ...
Owner's Manual
Page 3
..., INC. O. This warranty is used in order to your nearest LG Authorized Service Center. (Phones are warranted for proof of warranty, and submit a copy of the bill of Purchase. Replacement Units and Repair Parts are answered 24 hours a day, 365 days per year) and select the appropriate... option from the Date of sale to LG in the United States, including Alaska, Hawaii, and U.S. PARTS: One Year from the menu. The cost of the original unit's warranty period. Proof of the product. WARRANTY PERIOD:...
..., INC. O. This warranty is used in order to your nearest LG Authorized Service Center. (Phones are warranted for proof of warranty, and submit a copy of the bill of Purchase. Replacement Units and Repair Parts are answered 24 hours a day, 365 days per year) and select the appropriate... option from the Date of sale to LG in the United States, including Alaska, Hawaii, and U.S. PARTS: One Year from the menu. The cost of the original unit's warranty period. Proof of the product. WARRANTY PERIOD:...
Owner's Manual
Page 4
...legal rights and you . visit our web site/http://www.lg.ca LIMITED WARRANTY CANADA LG Electronics LG Electronics will repair or at the time warranty service is used in other rights which proves to validate warranty. PARTS: One Year from the Date of Purchase. so these ... Damages caused during the warranty period listed below from state to state. CUSTOMER ASSISTANCE NUMBERS: To obtain Warranty Coverage: Retain your LG refrigerator is provided. LG ELECTRONICS SHALL NOT BE LIABLE FOR THE LOSS OF USE OF THE PRODUCT, INCONVIENCE, LOSS OR ANY OTHER DAMAGES, DIRECT OR ...
...legal rights and you . visit our web site/http://www.lg.ca LIMITED WARRANTY CANADA LG Electronics LG Electronics will repair or at the time warranty service is used in other rights which proves to validate warranty. PARTS: One Year from the Date of Purchase. so these ... Damages caused during the warranty period listed below from state to state. CUSTOMER ASSISTANCE NUMBERS: To obtain Warranty Coverage: Retain your LG refrigerator is provided. LG ELECTRONICS SHALL NOT BE LIABLE FOR THE LOSS OF USE OF THE PRODUCT, INCONVIENCE, LOSS OR ANY OTHER DAMAGES, DIRECT OR ...
Owner's Manual
Page 8
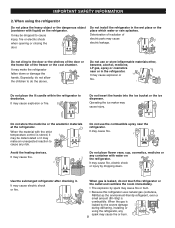
... refrigerator. Do not place the lit candle within the refrigerator to the door or the shelves of the door or the home bar of electric parts may cause fire. When the material with the strict temperature control is leaked, do the above. When gas is stored, it may be deteriorated or...
... refrigerator. Do not place the lit candle within the refrigerator to the door or the shelves of the door or the home bar of electric parts may cause fire. When the material with the strict temperature control is leaked, do the above. When gas is stored, it may be deteriorated or...
Owner's Manual
Page 9
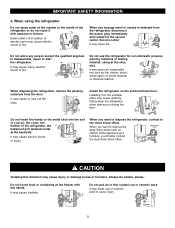
Deterioration of insulation of electric parts may cause fire. Service center It may cause electric shock or fire. It may cause death by falling down the refrigerator when opening or closing ...
Deterioration of insulation of electric parts may cause fire. Service center It may cause electric shock or fire. It may cause death by falling down the refrigerator when opening or closing ...
Owner's Manual
Page 10
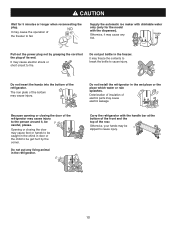
... caught in the chink in the refrigerator. It may cause the operation of the freezer to cause injury. Opening or closing the door of electric parts may cause feet or hands to be careful, please. Do not install the refrigerator in the freezer. Deterioration of insulation of the refrigerator may cause...
... caught in the chink in the refrigerator. It may cause the operation of the freezer to cause injury. Opening or closing the door of electric parts may cause feet or hands to be careful, please. Do not install the refrigerator in the freezer. Deterioration of insulation of the refrigerator may cause...
Owner's Manual
Page 11
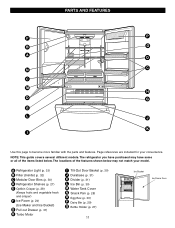
PARTS AND FEATURES F P B O A Q N C C M H D G E L J K I Tilt-Out Door Basket (p. 30) J Durabase (p. 31) K Divider (p. 31) L Ice Bin (p. 30) M Water Tank Cover N Snack Pan (p. 28) O Egg Box (p. 30) P Dairy Bin (p. ... and crisper) F Ice Room (p. 24) (Ice Maker and Ice Bucket) G Pull out Drawer (p. 31) H Turbo Motor I Use this page to become more familiar with the parts and features. NOTE: This guide covers several different models. The locations of the items listed below. The refrigerator you have some or all of the...
PARTS AND FEATURES F P B O A Q N C C M H D G E L J K I Tilt-Out Door Basket (p. 30) J Durabase (p. 31) K Divider (p. 31) L Ice Bin (p. 30) M Water Tank Cover N Snack Pan (p. 28) O Egg Box (p. 30) P Dairy Bin (p. ... and crisper) F Ice Room (p. 24) (Ice Maker and Ice Bucket) G Pull out Drawer (p. 31) H Turbo Motor I Use this page to become more familiar with the parts and features. NOTE: This guide covers several different models. The locations of the items listed below. The refrigerator you have some or all of the...
Owner's Manual
Page 24
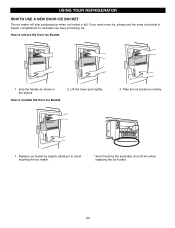
Grip the handle as shown in freezer compartment so icemaker can keep producing ice. Lift the lower part slightly. 3. How to reinstall the Door Ice Bucket. 2. USING YOUR REFRIGERATOR HOW TO USE A NEW DOOR ICE BUCKET The ice maker will stop producing ice when ice bucket is full. Replace ice bucket by slightly slanting it to avoid touching the ice maker. * Avoid touching the automatic shut off arm when replacing the ice bucket. 24 If you need more ice, please use the extra ice bucket in the picture How to remove the Door Ice Bucket. 1 . Take the ice bucket out slowly. 1 .
Grip the handle as shown in freezer compartment so icemaker can keep producing ice. Lift the lower part slightly. 3. How to reinstall the Door Ice Bucket. 2. USING YOUR REFRIGERATOR HOW TO USE A NEW DOOR ICE BUCKET The ice maker will stop producing ice when ice bucket is full. Replace ice bucket by slightly slanting it to avoid touching the ice maker. * Avoid touching the automatic shut off arm when replacing the ice bucket. 24 If you need more ice, please use the extra ice bucket in the picture How to remove the Door Ice Bucket. 1 . Take the ice bucket out slowly. 1 .

Owner's Manual
Page 31
... rear left and right side of the drawer and pull it back to organize the Durabase area into sections. 1 32 To install, reposition the gear part of rear left and right side of the Durabase and pull straight out. 2. To install, hook top corners of divider over top edge of the... may crawl inside. 31 PULL OUT DRAWER To separate the drawer, push the front left and right side while checking the hook on the front part. Tilt up . 2. To remove, pull divider staight up the front of the drawer after pulling out both rails as much as possible, and gently push...
... rear left and right side of the drawer and pull it back to organize the Durabase area into sections. 1 32 To install, reposition the gear part of rear left and right side of the Durabase and pull straight out. 2. To install, hook top corners of divider over top edge of the... may crawl inside. 31 PULL OUT DRAWER To separate the drawer, push the front left and right side while checking the hook on the front part. Tilt up . 2. To remove, pull divider staight up the front of the drawer after pulling out both rails as much as possible, and gently push...
Owner's Manual
Page 32
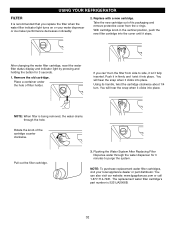
You will hear the snap when it clicks into place. The replacement water filter cartridge's part number is 5231JA2006B. 32 Replace with a new cartridge. Take the new cartridge out of its handle, twist the cartridge clockwise about 1/4 turn the filter from ...the o-rings. If you replace the filter when the water filter indicator light turns on or your local appliance dealer or part distributor. You will hear the snap when it isn't fully inserted. Flushing the Water System After Replacing Filter Dispense water through the hole. Using its...
You will hear the snap when it clicks into place. The replacement water filter cartridge's part number is 5231JA2006B. 32 Replace with a new cartridge. Take the new cartridge out of its handle, twist the cartridge clockwise about 1/4 turn the filter from ...the o-rings. If you replace the filter when the water filter indicator light turns on or your local appliance dealer or part distributor. You will hear the snap when it isn't fully inserted. Flushing the Water System After Replacing Filter Dispense water through the hole. Using its...
Owner's Manual
Page 33
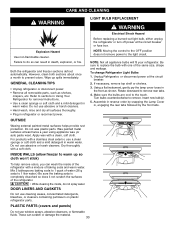
... the inside , do so can scratch or damage the material. 33 Make sure the bulbs are cool to remove. Do not wax plastic parts. PLASTIC PARTS (covers and panels) Do not use cleaning waxes, concentrated detergents, bleaches, or cleaners containing petroleum on plastic refrigerator...both sections about once a month to remove rear tabs. 4. Do not use abrasive or harsh cleaners. • Hand wash, rinse and dry all removable parts, such as shown. Unplug Refrigerator, or disconnect power at least twice a year using appliance wax (or auto paste wax). Assemble in reverse order by snapping...
... the inside , do so can scratch or damage the material. 33 Make sure the bulbs are cool to remove. Do not wax plastic parts. PLASTIC PARTS (covers and panels) Do not use cleaning waxes, concentrated detergents, bleaches, or cleaners containing petroleum on plastic refrigerator...both sections about once a month to remove rear tabs. 4. Do not use abrasive or harsh cleaners. • Hand wash, rinse and dry all removable parts, such as shown. Unplug Refrigerator, or disconnect power at least twice a year using appliance wax (or auto paste wax). Assemble in reverse order by snapping...
Owner's Manual
Page 34
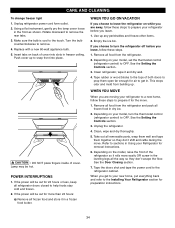
... these steps to remove the rear tabs. 3. See the Door Closing section. 7. Rotate downward to prepare it rolls more than 24 hours: a) Remove all removable parts, wrap them well and tape them open far enough for more easily OR screw in freezer ceiling. If the power will be hot. WHEN YOU...
... these steps to remove the rear tabs. 3. See the Door Closing section. 7. Rotate downward to prepare it rolls more than 24 hours: a) Remove all removable parts, wrap them well and tape them open far enough for more easily OR screw in freezer ceiling. If the power will be hot. WHEN YOU...
Owner's Manual
Page 35
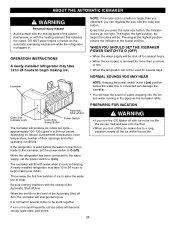
... can damage the icemaker. • You will be used for several days. ABOUT THE AUTOMATIC ICEMAKER WARNING Personal Injury Hazard Avoid contact with the moving parts of the ejector mechanism, or with the cube size button. The higher the light position, the larger the cubes will hear the sound of cubes...
... can damage the icemaker. • You will be used for several days. ABOUT THE AUTOMATIC ICEMAKER WARNING Personal Injury Hazard Avoid contact with the moving parts of the ejector mechanism, or with the cube size button. The higher the light position, the larger the cubes will hear the sound of cubes...
Owner's Manual
Page 36
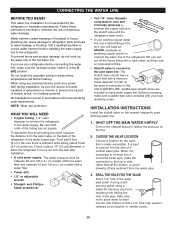
... copper water line has a flared fitting at plumbing supply stores) to connect the water line to the refrigerator OR you can cause damage to refrigerator parts and lead to the COLD WATER LINE. CHOOSE THE VALVE LOCATION Choose a location for the valve that is not warranted by the refrigerator or icemaker...
... copper water line has a flared fitting at plumbing supply stores) to connect the water line to the refrigerator OR you can cause damage to refrigerator parts and lead to the COLD WATER LINE. CHOOSE THE VALVE LOCATION Choose a location for the valve that is not warranted by the refrigerator or icemaker...


