Owner's Manual
Page 2
...Warranty (U.S.A.) 3 Warranty (CANADA) 4 Safety Instructions 5-10 Grounding Requirements 6 Parts And Features 11 Refrigerator Installation 12-21 Unpacking Your Refrigerator 12 Installation 12 Removing And Replacing Your Refrigerator Handles And Doors 13-20 Leveling And Door Alignment 21 Base Cover 21 Using... Door Ice Bucket 24 Adjusting Control Settings 25 Food Storage Guide 25 Storing Frozen Food 26 u Refrigerator Section Water Dispenser 26 Refrigerator Shelves 27 Bottle Holder 27 Snack Pan 28 Optibin Crisper 28 Crisper Cover With Lattice On Inner Surface...
...Warranty (U.S.A.) 3 Warranty (CANADA) 4 Safety Instructions 5-10 Grounding Requirements 6 Parts And Features 11 Refrigerator Installation 12-21 Unpacking Your Refrigerator 12 Installation 12 Removing And Replacing Your Refrigerator Handles And Doors 13-20 Leveling And Door Alignment 21 Base Cover 21 Using... Door Ice Bucket 24 Adjusting Control Settings 25 Food Storage Guide 25 Storing Frozen Food 26 u Refrigerator Section Water Dispenser 26 Refrigerator Shelves 27 Bottle Holder 27 Snack Pan 28 Optibin Crisper 28 Crisper Cover With Lattice On Inner Surface...
Owner's Manual
Page 3
...PURPOSE. Or visit our website at : http://us .lgservice.com TO CONTACT LG ELECTRONICS BY MAIL: LG Customer Interactive Center P. USA Your LG Refrigerator will be provided to LG in other rights that result from the menu. PARTS: Seven years from the Date of Purchase. NEITHER THE MANUFACTURER NOR ITS ... when used in order to state. This warranty gives you specific legal rights and you . The cost of Purchase. LG ELECTRONICS, INC. LG REFRIGERATOR LIMITED WARRANTY - This warranty is required and must be repaired or replaced, at the time warranty service is used in...
...PURPOSE. Or visit our website at : http://us .lgservice.com TO CONTACT LG ELECTRONICS BY MAIL: LG Customer Interactive Center P. USA Your LG Refrigerator will be provided to LG in other rights that result from the menu. PARTS: Seven years from the Date of Purchase. NEITHER THE MANUFACTURER NOR ITS ... when used in order to state. This warranty gives you specific legal rights and you . The cost of Purchase. LG ELECTRONICS, INC. LG REFRIGERATOR LIMITED WARRANTY - This warranty is required and must be repaired or replaced, at the time warranty service is used in...
Owner's Manual
Page 4
Replacement Units and Repair Parts are warranted for other than intended purpose. • Repairs when your LG refrigerator is in Canada. so these excluded circumstances shall be borne by the consumer. Proof of purchase. To obtain the nearest Authorized ...Call 1-888-542-2623 Press the appropriate option, and have your product type (Refrigerator), model number, serial number, and ZIP/Postal Code ready. WARRANTY PERIOD: REFRIGERATOR/FREEZER LABOR: One Year from the Date of Purchase. PARTS: Seven years from the Date of Purchase. This warranty gives you specific legal...
Replacement Units and Repair Parts are warranted for other than intended purpose. • Repairs when your LG refrigerator is in Canada. so these excluded circumstances shall be borne by the consumer. Proof of purchase. To obtain the nearest Authorized ...Call 1-888-542-2623 Press the appropriate option, and have your product type (Refrigerator), model number, serial number, and ZIP/Postal Code ready. WARRANTY PERIOD: REFRIGERATOR/FREEZER LABOR: One Year from the Date of Purchase. PARTS: Seven years from the Date of Purchase. This warranty gives you specific legal...
Owner's Manual
Page 8
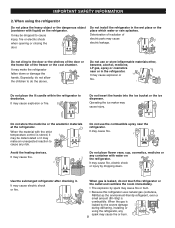
...or the academic materials at the refrigerator. When the material with water on the refrigerator. It may cause explosion or fire. Do not place the lit candle within the refrigerator to the door or the shelves of the door or the home bar of electric parts may cause fire. It may cause... explosion or fire. Use the submerged refrigerator after checking it may cause fire or burn. 8 Avoid the heating devices. IMPORTANT SAFETY INFORMATION 2. Do not place flower vase, cup, cosmetics,...
...or the academic materials at the refrigerator. When the material with water on the refrigerator. It may cause explosion or fire. Do not place the lit candle within the refrigerator to the door or the shelves of the door or the home bar of electric parts may cause fire. It may cause... explosion or fire. Use the submerged refrigerator after checking it may cause fire or burn. 8 Avoid the heating devices. IMPORTANT SAFETY INFORMATION 2. Do not place flower vase, cup, cosmetics,...
Owner's Manual
Page 9
... It may cause fire. Service center It may break cup or ceramic ware to the service center. When disposing the refrigerator, remove the packing materials from the refrigerator, disconnect the power plug immediately and contact to cause injury. 9 Do not allow any strange smell or smoke is ...detected from the door. Do not insert the hands or the metal stick into the exit of cool air, the cover, the bottom of electric parts may...
... It may cause fire. Service center It may break cup or ceramic ware to the service center. When disposing the refrigerator, remove the packing materials from the refrigerator, disconnect the power plug immediately and contact to cause injury. 9 Do not allow any strange smell or smoke is ...detected from the door. Do not insert the hands or the metal stick into the exit of cool air, the cover, the bottom of electric parts may...
Owner's Manual
Page 10
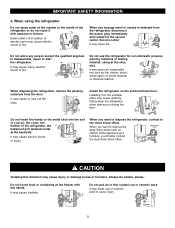
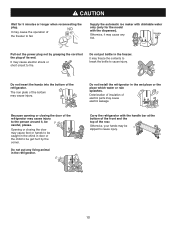
...any Drinkable water risk. Do not insert the hands into the bottom of electric parts may freeze the contents to break the bottle to cause injury. 10 Otherwise,...It may cause any living animal in door or the child to be slipped to cause injury. Carry the refrigerator with the dispenser). Otherwise, it , be careful, please. The iron plate of the bottom may cause ...the plug. It may cause injury. It may cause electric leakage. Opening or closing the door of the refrigerator may cause feet or hands to the person around it may cause the operation of the freezer to fire...
...any Drinkable water risk. Do not insert the hands into the bottom of electric parts may freeze the contents to break the bottle to cause injury. 10 Otherwise,...It may cause any living animal in door or the child to be slipped to cause injury. Carry the refrigerator with the dispenser). Otherwise, it , be careful, please. The iron plate of the bottom may cause ...the plug. It may cause injury. It may cause electric leakage. Opening or closing the door of the refrigerator may cause feet or hands to the person around it may cause the operation of the freezer to fire...
Owner's Manual
Page 11
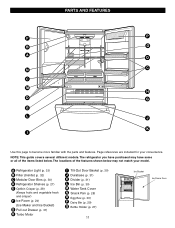
... of the items listed below may have some or all of the features shown below . A Refrigerator Light (p. 33) B Filter (Inside) (p. 32) C Modular Door Bins (p. 30) D Refrigerator Shelves (p. 27) E Optibin Crisper (p. 28) (Keeps fruits and vegetable fresh and crisper) ... Bucket) G Pull out Drawer (p. 31) H Turbo Motor I Use this page to become more familiar with the parts and features. The refrigerator you have purchased may not match your convenience. NOTE: This guide covers several different models. PARTS AND FEATURES F P B O A Q N C C M H D G E L J K I Tilt-Out Door...
... of the items listed below may have some or all of the features shown below . A Refrigerator Light (p. 33) B Filter (Inside) (p. 32) C Modular Door Bins (p. 30) D Refrigerator Shelves (p. 27) E Optibin Crisper (p. 28) (Keeps fruits and vegetable fresh and crisper) ... Bucket) G Pull out Drawer (p. 31) H Turbo Motor I Use this page to become more familiar with the parts and features. The refrigerator you have purchased may not match your convenience. NOTE: This guide covers several different models. PARTS AND FEATURES F P B O A Q N C C M H D G E L J K I Tilt-Out Door...
Owner's Manual
Page 24
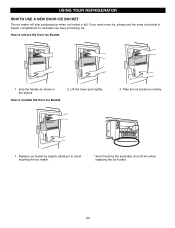
Grip the handle as shown in freezer compartment so icemaker can keep producing ice. Take the ice bucket out slowly. 1 . Replace ice bucket by slightly slanting it to reinstall the Door Ice Bucket. 2. Lift the lower part slightly. 3. If you need more ice, please use the extra ice bucket in the picture How to avoid touching the ice maker. * Avoid touching the automatic shut off arm when replacing the ice bucket. 24 How to remove the Door Ice Bucket. 1 . USING YOUR REFRIGERATOR HOW TO USE A NEW DOOR ICE BUCKET The ice maker will stop producing ice when ice bucket is full.
Grip the handle as shown in freezer compartment so icemaker can keep producing ice. Take the ice bucket out slowly. 1 . Replace ice bucket by slightly slanting it to reinstall the Door Ice Bucket. 2. Lift the lower part slightly. 3. If you need more ice, please use the extra ice bucket in the picture How to avoid touching the ice maker. * Avoid touching the automatic shut off arm when replacing the ice bucket. 24 How to remove the Door Ice Bucket. 1 . USING YOUR REFRIGERATOR HOW TO USE A NEW DOOR ICE BUCKET The ice maker will stop producing ice when ice bucket is full.

Owner's Manual
Page 31
...out in direction. 12 DURABASE DIVIDER The Durabase divider allows you to organize the Durabase area into sections. 1 32 To install, reposition the gear part of rear left and right hooks in rail assembly. To install, insert the Durabase in direction to the end as much as possible, and ...gently push down both rails as much as possible. USING YOUR REFRIGERATOR DURABASE 1. PULL OUT DRAWER To separate the drawer, push the front left and right side of durabase. w WARNING : When the divider of the ...
...out in direction. 12 DURABASE DIVIDER The Durabase divider allows you to organize the Durabase area into sections. 1 32 To install, reposition the gear part of rear left and right hooks in rail assembly. To install, insert the Durabase in direction to the end as much as possible, and ...gently push down both rails as much as possible. USING YOUR REFRIGERATOR DURABASE 1. PULL OUT DRAWER To separate the drawer, push the front left and right side of durabase. w WARNING : When the divider of the ...
Owner's Manual
Page 32
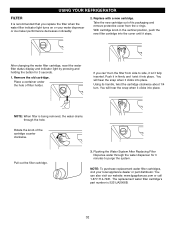
...twist it into place. If you replace the filter when the water filter indicator light turns on or your local appliance dealer or part distributor. Rotate the knob of filter holder. NOTE: To purchase replacement water filter cartridges, visit your water dispenser or ice maker .... Remove the old cartridge. You can 't turn . Flushing the Water System After Replacing Filter Dispense water through the hole. USING YOUR REFRIGERATOR FILTER It is recommended that you can also visit our website: www.lgappliances.com or call 1-877-714-7481. NOTE: When filter is...
...twist it into place. If you replace the filter when the water filter indicator light turns on or your local appliance dealer or part distributor. Rotate the knob of filter holder. NOTE: To purchase replacement water filter cartridges, visit your water dispenser or ice maker .... Remove the old cartridge. You can 't turn . Flushing the Water System After Replacing Filter Dispense water through the hole. USING YOUR REFRIGERATOR FILTER It is recommended that you can also visit our website: www.lgappliances.com or call 1-877-714-7481. NOTE: When filter is...
Owner's Manual
Page 33
...) Do not use cleaning waxes, concentrated detergents, bleaches, or cleaners containing petroleum on plastic refrigerator parts. w CAUTION : While cleaning the inside of the refrigerator. GENERAL CLEANING TIPS • Unplug refrigerator or disconnect power. • Remove all appliance bulbs will fit your refrigerator. Be sure to 1 liter water.) Be sure the baking soda is completely dissolved...
...) Do not use cleaning waxes, concentrated detergents, bleaches, or cleaners containing petroleum on plastic refrigerator parts. w CAUTION : While cleaning the inside of the refrigerator. GENERAL CLEANING TIPS • Unplug refrigerator or disconnect power. • Remove all appliance bulbs will fit your refrigerator. Be sure to 1 liter water.) Be sure the baking soda is completely dissolved...
Owner's Manual
Page 34
... food from building up to snap front into slots in Using your model, set the thermostat control (refrigerator control) to your model, turn the refrigerator off before you get in the leveling legs all removable parts, wrap them well and tape them open far enough for preparation instructions. 34 Clean, wipe and dry...
... food from building up to snap front into slots in Using your model, set the thermostat control (refrigerator control) to your model, turn the refrigerator off before you get in the leveling legs all removable parts, wrap them well and tape them open far enough for preparation instructions. 34 Clean, wipe and dry...
Owner's Manual
Page 35
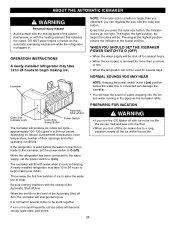
...that releases the cubes. NORMAL SOUNDS YOU MAY HEAR Icemaker NOTE: Keeping the power switch in the pipes as the icemaker refills. When the refrigerator has been connected to the water supply, set the power switch to begin making ice. WARNING • If you turn off ). The ...within the ice bin. 35 ABOUT THE AUTOMATIC ICEMAKER WARNING Personal Injury Hazard Avoid contact with the moving parts of the ejector mechanism, or with the cube size button. OPERATION INSTRUCTIONS A newly-installed refrigerator may take 12 to 24 hours to O (off the ice maker due to I (on ). approximately...
...that releases the cubes. NORMAL SOUNDS YOU MAY HEAR Icemaker NOTE: Keeping the power switch in the pipes as the icemaker refills. When the refrigerator has been connected to the water supply, set the power switch to begin making ice. WARNING • If you turn off ). The ...within the ice bin. 35 ABOUT THE AUTOMATIC ICEMAKER WARNING Personal Injury Hazard Avoid contact with the moving parts of the ejector mechanism, or with the cube size button. OPERATION INSTRUCTIONS A newly-installed refrigerator may take 12 to 24 hours to O (off the ice maker due to I (on ). approximately...
Owner's Manual
Page 36
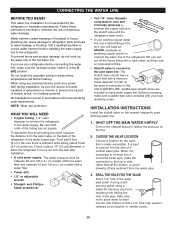
... line. To determine how much tubing you need an adapter (available at plumbing supply stores) to connect the water line to the refrigerator OR you can cause damage to refrigerator parts and lead to the COLD WATER LINE. INSTALLATION INSTRUCTIONS Install the shutoff valve on models without a water filter and between 20 and...
... line. To determine how much tubing you need an adapter (available at plumbing supply stores) to connect the water line to the refrigerator OR you can cause damage to refrigerator parts and lead to the COLD WATER LINE. INSTALLATION INSTRUCTIONS Install the shutoff valve on models without a water filter and between 20 and...


