User Guide
Page 2
...Version 70 Warranty (U.S.A.) 3 Warranty (CANADA) 4 Safety Instructions 5-6 Grounding Requirements 6 Parts And Features 7 Refrigerator Installation 8-15 Unpacking Your Refrigerator 8 Installation 8 Removing And Replacing Your Refrigerator Handles And Doors 9-14 Crisper Cover With Lattice On Inner Surface 21 Glide'N'Serve 22 Modular Door Bin... 24 Leveling And Door Alignment 15 Filter 25 Base Cover 15 Care And Cleaning 26-27 Using Your Refrigerator 16-25 General Cleaning Tips 26 Ensuring Proper Air Circulation 16 Outside 26 Multi-Flow 16 Inside Walls ...
...Version 70 Warranty (U.S.A.) 3 Warranty (CANADA) 4 Safety Instructions 5-6 Grounding Requirements 6 Parts And Features 7 Refrigerator Installation 8-15 Unpacking Your Refrigerator 8 Installation 8 Removing And Replacing Your Refrigerator Handles And Doors 9-14 Crisper Cover With Lattice On Inner Surface 21 Glide'N'Serve 22 Modular Door Bin... 24 Leveling And Door Alignment 15 Filter 25 Base Cover 15 Care And Cleaning 26-27 Using Your Refrigerator 16-25 General Cleaning Tips 26 Ensuring Proper Air Circulation 16 Outside 26 Multi-Flow 16 Inside Walls ...
User Guide
Page 3
..., or correction of unauthorized repairs. • Damages or operating problems that vary from the Date of sale to locate your LG refrigerator is used in other rights that result from the date ("Date of Purchase") of original consumer purchase of Purchase. O. TO... from misuse, abuse, operation outside environmental specifications or contrary to state. USA Your LG Refrigerator will be will repaired or replaced, at : http://www.lgservice.com TO CONTACT LG ELECTRONICS BY MAIL: LG Customer Interactive Center P. Box 240007 201 James Record Road Huntsville, Alabama 35824 ATTN:...
..., or correction of unauthorized repairs. • Damages or operating problems that vary from the Date of sale to locate your LG refrigerator is used in other rights that result from the date ("Date of Purchase") of original consumer purchase of Purchase. O. TO... from misuse, abuse, operation outside environmental specifications or contrary to state. USA Your LG Refrigerator will be will repaired or replaced, at : http://www.lgservice.com TO CONTACT LG ELECTRONICS BY MAIL: LG Customer Interactive Center P. Box 240007 201 James Record Road Huntsville, Alabama 35824 ATTN:...
User Guide
Page 4
..., or Service Assistance by phone: Call 1-888-542-2623 (1-888-LG-CANADA) and choose the appropriate prompt. Please have product type (refrigerator) and ZIP Code ready. Please have your product type (refrigerator) and ZIP Code ready. THE DURATION OF ANY IMPLIED WARRANTIES, INCLUDING...of unauthorized repairs. 2. Therefore, these limitations or exclusions may also have other than the intended purpose. LIMITED WARRANTY (CANADA) LG REFRIGERATOR LG Electronics will repair or at its option replace, without charge, your product which vary from the date of original purchase. ...
..., or Service Assistance by phone: Call 1-888-542-2623 (1-888-LG-CANADA) and choose the appropriate prompt. Please have product type (refrigerator) and ZIP Code ready. Please have your product type (refrigerator) and ZIP Code ready. THE DURATION OF ANY IMPLIED WARRANTIES, INCLUDING...of unauthorized repairs. 2. Therefore, these limitations or exclusions may also have other than the intended purpose. LIMITED WARRANTY (CANADA) LG REFRIGERATOR LG Electronics will repair or at its option replace, without charge, your product which vary from the date of original purchase. ...
User Guide
Page 5
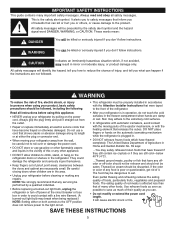
...thawed completely. CAUTION Indicates an imminently hazardous situation which have any other flammable vapors and liquids in the vicinity of the refrigerator. • After your refrigerator by the safety alert symbol and the hazard signal word DANGER, WARNING, or CAUTION. WARNING To reduce the risk of...if not avoided, may result in Home and Garden Bulletin No. 69 says: ...You may adhere to the light circuit. • This refrigerator must be eaten. These words mean: DANGER You will cause electric shock or fire. It will be followed, including the following Read all ...
...thawed completely. CAUTION Indicates an imminently hazardous situation which have any other flammable vapors and liquids in the vicinity of the refrigerator. • After your refrigerator by the safety alert symbol and the hazard signal word DANGER, WARNING, or CAUTION. WARNING To reduce the risk of...if not avoided, may result in Home and Garden Bulletin No. 69 says: ...You may adhere to the light circuit. • This refrigerator must be eaten. These words mean: DANGER You will cause electric shock or fire. It will be followed, including the following Read all ...
User Guide
Page 6
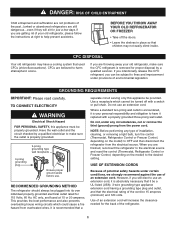
... grounding type appliance extension cord having a grounding type plug and outlet, and that used CFCs (chlorofluorocarbons). Do not use of the refrigerator. 6 Where a standard two-prong wall outlet is encountered, it is properly grounded. 3-prong grounding type wall receptacle 3-prong grounding plug... still elect to harm stratospheric ozone. Have the wall outlet and the circuit checked by a qualified servicer. Junked or abandoned refrigerators are believed to use . Do not, under certain conditions, we strongly recommend against the use an extension cord. GROUNDING REQUIREMENTS...
... grounding type appliance extension cord having a grounding type plug and outlet, and that used CFCs (chlorofluorocarbons). Do not use of the refrigerator. 6 Where a standard two-prong wall outlet is encountered, it is properly grounded. 3-prong grounding type wall receptacle 3-prong grounding plug... still elect to harm stratospheric ozone. Have the wall outlet and the circuit checked by a qualified servicer. Junked or abandoned refrigerators are believed to use . Do not, under certain conditions, we strongly recommend against the use an extension cord. GROUNDING REQUIREMENTS...
User Guide
Page 7
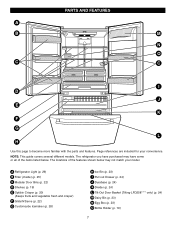
...listed below may have purchased may not match your convenience. Page references are included for your model. NOTE: This guide covers several different models. A Refrigerator Light (p. 26) B Filter (Inside) (p. 25) C Modular Door Bins (p. 22) D Shelves (p. 19) E Optibin Crisper (p. 20) ...G Customcube Icemaker (p. 28) H Ice Bin (p. 23) I D J E K F G L H Use this page to become more familiar with the parts and features. The refrigerator you have some or all of the features shown below . PARTS AND FEATURES A B M N O C C I Pull out Drawer (p. 24) J Durabase (p. 24) K Divider...
...listed below may have purchased may not match your convenience. Page references are included for your model. NOTE: This guide covers several different models. A Refrigerator Light (p. 26) B Filter (Inside) (p. 25) C Modular Door Bins (p. 22) D Shelves (p. 19) E Optibin Crisper (p. 20) ...G Customcube Icemaker (p. 28) H Ice Bin (p. 23) I D J E K F G L H Use this page to become more familiar with the parts and features. The refrigerator you have some or all of the features shown below . PARTS AND FEATURES A B M N O C C I Pull out Drawer (p. 24) J Durabase (p. 24) K Divider...
User Guide
Page 8
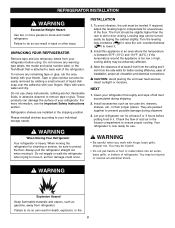
... of at least 2 or 3 hours before using. WARNING Explosion Hazard Keep flammable materials and vapors, such as floor damage could occur. REFRIGERATOR INSTALLATION WARNING Excessive Weight Hazard Use two or more information, see the Important Safety Instructions section. To remove any remaining tape or glue, rub..., or the TechSheet that is now ready for use sharp instruments, rubbing alcohol, flammable fluids, or abrasive cleaners to back wall of refrigerator. Do not remove any temporary labels from the side walls for unevenness of the floor. Do not use . You may be sure ...
... of at least 2 or 3 hours before using. WARNING Explosion Hazard Keep flammable materials and vapors, such as floor damage could occur. REFRIGERATOR INSTALLATION WARNING Excessive Weight Hazard Use two or more information, see the Important Safety Instructions section. To remove any remaining tape or glue, rub..., or the TechSheet that is now ready for use sharp instruments, rubbing alcohol, flammable fluids, or abrasive cleaners to back wall of refrigerator. Do not remove any temporary labels from the side walls for unevenness of the floor. Do not use . You may be sure ...
User Guide
Page 9
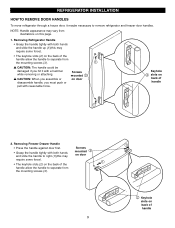
... to separate from the mounting screws (3). NOTE: Handle appearance may require some force). • The keyhole slots (2) on back of handle 2. Removing Refrigerator Handle • Grasp the handle tightly with a hammer while removing or attaching. w CAUTION: The handle could be damaged if you must push or...• The keyhole slots (2) on the back of the handle allow the handle to separate from illustrations on back of handle REFRIGERATOR INSTALLATION HOW TO REMOVE DOOR HANDLES To move refrigerator through a house door, it with both hands and slide the handle to remove...
... to separate from the mounting screws (3). NOTE: Handle appearance may require some force). • The keyhole slots (2) on back of handle 2. Removing Refrigerator Handle • Grasp the handle tightly with a hammer while removing or attaching. w CAUTION: The handle could be damaged if you must push or...• The keyhole slots (2) on the back of the handle allow the handle to separate from illustrations on back of handle REFRIGERATOR INSTALLATION HOW TO REMOVE DOOR HANDLES To move refrigerator through a house door, it with both hands and slide the handle to remove...
User Guide
Page 10
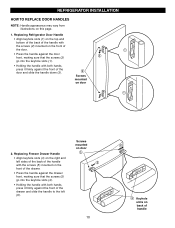
Screws mounted on door 10 Keyhole slots on door 2. Replacing Refrigerator Door Handle • Align keyhole slots (1) on the top and bottom of the back of the handle with the screws (2) mounted on the front of ... Drawer Handle • Align keyhole slots (4) on the right and left sides of the back of the handle with the screws (5) mounted on this page. 1. REFRIGERATOR INSTALLATION HOW TO REPLACE DOOR HANDLES NOTE: Handle appearance may vary from illustrations on the front of the drawer. • Press the handle against the...
Screws mounted on door 10 Keyhole slots on door 2. Replacing Refrigerator Door Handle • Align keyhole slots (1) on the top and bottom of the back of the handle with the screws (2) mounted on the front of ... Drawer Handle • Align keyhole slots (4) on the right and left sides of the back of the handle with the screws (5) mounted on this page. 1. REFRIGERATOR INSTALLATION HOW TO REPLACE DOOR HANDLES NOTE: Handle appearance may vary from illustrations on the front of the drawer. • Press the handle against the...
User Guide
Page 11
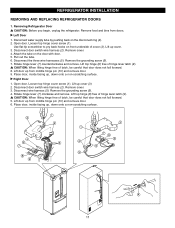
... Rotate hinge lever (7) counterclockwise and remove. Lift door up , down onto a non-scratching surface. 11 Removing Refrigerator Door w CAUTION: Before you begin, unplug the refrigerator. Loosen top hinge cover screw (1). Use flat tip screwdriver to pry back hooks on the disconnect ring (4). ...lever latch (9). Open door. Disconnect wire harness (5). Remove food and bins from doors. Loosen top hinge cover screw (1). REFRIGERATOR INSTALLATION REMOVING AND REPLACING REFRIGERATOR DOORS 1. Attach the tube on the door with door. 5. Remove cover. 3. w CAUTION: When lifting hinge free ...
... Rotate hinge lever (7) counterclockwise and remove. Lift door up , down onto a non-scratching surface. 11 Removing Refrigerator Door w CAUTION: Before you begin, unplug the refrigerator. Loosen top hinge cover screw (1). Use flat tip screwdriver to pry back hooks on the disconnect ring (4). ...lever latch (9). Open door. Disconnect wire harness (5). Remove food and bins from doors. Loosen top hinge cover screw (1). REFRIGERATOR INSTALLATION REMOVING AND REPLACING REFRIGERATOR DOORS 1. Attach the tube on the door with door. 5. Remove cover. 3. w CAUTION: When lifting hinge free ...
User Guide
Page 12
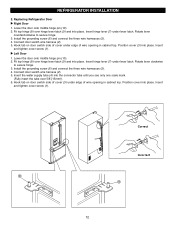
Replacing Refrigerator Door u Right Door 1. Fit top hinge (8) over 5/8"(15mm)). 6. Install the grounding screw (6) and connect the three wire harnesses (5). 4. Connect door switch wire harness (2). 5. u Left Door 1. ... latch. Hook tab on door switch side of cover under edge of wire opening in cabinet top. Lower the door onto middle hinge pin (10). 2. REFRIGERATOR INSTALLATION 2.
Replacing Refrigerator Door u Right Door 1. Fit top hinge (8) over 5/8"(15mm)). 6. Install the grounding screw (6) and connect the three wire harnesses (5). 4. Connect door switch wire harness (2). 5. u Left Door 1. ... latch. Hook tab on door switch side of cover under edge of wire opening in cabinet top. Lower the door onto middle hinge pin (10). 2. REFRIGERATOR INSTALLATION 2.
User Guide
Page 13
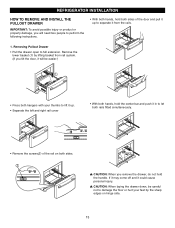
REFRIGERATOR INSTALLATION HOW TO REMOVE AND INSTALL THE PULLOUT DRAWER IMPORTANT: To avoid possible injury or product or property damage, you will be careful not to ...
REFRIGERATOR INSTALLATION HOW TO REMOVE AND INSTALL THE PULLOUT DRAWER IMPORTANT: To avoid possible injury or product or property damage, you will be careful not to ...
User Guide
Page 14
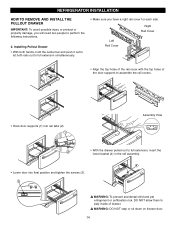
... allow them to play inside of the door supports to perform the following instructions. 2. w WARNING: DO NOT step or sit down on freezer door. 14 REFRIGERATOR INSTALLATION HOW TO REMOVE AND INSTALL THE PULLOUT DRAWER IMPORTANT: To avoid possible injury or product or property damage, you have a right rail cover for...
... allow them to play inside of the door supports to perform the following instructions. 2. w WARNING: DO NOT step or sit down on freezer door. 14 REFRIGERATOR INSTALLATION HOW TO REMOVE AND INSTALL THE PULLOUT DRAWER IMPORTANT: To avoid possible injury or product or property damage, you have a right rail cover for...
User Guide
Page 15
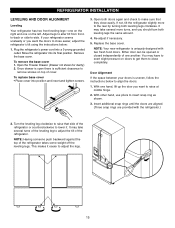
...1. Replace the base cover. You may take several turns of the leveling leg to adjust the tilt of the refrigerator. Door Alignment If the space between your refrigerator seems unsteady or you want to raise at middle hinge. 2. Insert additional snap rings until the doors are aligned..., lift up the door you should turn both leveling legs clockwise. Open the Freezer Drawer. (Drawer not shown for clarity.) 2. Move the refrigerator into a 3-prong grounded outlet. To replace base cover • Place cover into position and insert and tighten screws. 3. It may take several...
...1. Replace the base cover. You may take several turns of the leveling leg to adjust the tilt of the refrigerator. Door Alignment If the space between your refrigerator seems unsteady or you want to raise at middle hinge. 2. Insert additional snap rings until the doors are aligned..., lift up the door you should turn both leveling legs clockwise. Open the Freezer Drawer. (Drawer not shown for clarity.) 2. Move the refrigerator into a 3-prong grounded outlet. To replace base cover • Place cover into position and insert and tighten screws. 3. It may take several...
User Guide
Page 16
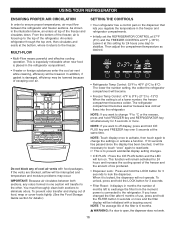
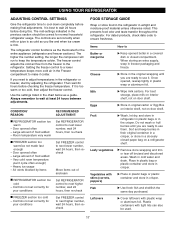
...touched, it is locked, the dispenser will be lowered because of ice produced. • Dispenser Lock : Press and hold FREEZER key and REFRIGERATOR key simultaneously for 24 hours and increase the cooling speed of the freezer and the amount of escaping cool air. If you want to ...as desired. • Multi-Flow means powerful and effective cooling operation. NOTE: If you regulate the temperature in the freezer and refrigerator compartments. • Initially set the REFRIGERATOR CONTROL at 37°F (3°C) and the FREEZER CONTROL at the bottom, where it at the same time. NOTE: The...
...touched, it is locked, the dispenser will be lowered because of ice produced. • Dispenser Lock : Press and hold FREEZER key and REFRIGERATOR key simultaneously for 24 hours and increase the cooling speed of the freezer and the amount of escaping cool air. If you want to ...as desired. • Multi-Flow means powerful and effective cooling operation. NOTE: If you regulate the temperature in the freezer and refrigerator compartments. • Initially set the REFRIGERATOR CONTROL at 37°F (3°C) and the FREEZER CONTROL at the bottom, where it at the same time. NOTE: The...
User Guide
Page 17
...it is firm. Then wait 24 hours before making final adjustments. Large amount of food added - Controls not set correctly for the entire appliance (refrigerator and freezer sections). Items How to Butter or margarine u Keep opened , rewrap tightly in the chart below as a guide. Cheese u Store ...until you need to adjust temperatures in airtight and moisture-proof material unless otherwise noted. Fruit u Wash, let dry, and store in refrigerator in plastic bags or in cold water and drain. Wash in the crisper. Place in plastic bag or plastic container and store in...
...it is firm. Then wait 24 hours before making final adjustments. Large amount of food added - Controls not set correctly for the entire appliance (refrigerator and freezer sections). Items How to Butter or margarine u Keep opened , rewrap tightly in the chart below as a guide. Cheese u Store ...until you need to adjust temperatures in airtight and moisture-proof material unless otherwise noted. Fruit u Wash, let dry, and store in refrigerator in plastic bags or in cold water and drain. Wash in the crisper. Place in plastic bag or plastic container and store in...
User Guide
Page 18
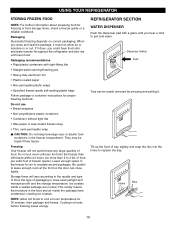
... depends on correct packaging. Packaging recommendations • Rigid plastic containers with a glass until you hear a click to replace the tray. REFRIGERATOR SECTION WATER DISPENSER Push the dispenser pad with tight-fitting lids • Straight-sided canning/freezing jars • Heavy-duty aluminum foil ... condensed, creating ice crystals. They may be easily removed by pressing and pulling it does, you close tightly. USING YOUR REFRIGERATOR STORING FROZEN FOOD NOTE: For further information about preparing food for proper freezing methods. Do not put more unfrozen food into ...
... depends on correct packaging. Packaging recommendations • Rigid plastic containers with a glass until you hear a click to replace the tray. REFRIGERATOR SECTION WATER DISPENSER Push the dispenser pad with tight-fitting lids • Straight-sided canning/freezing jars • Heavy-duty aluminum foil ... condensed, creating ice crystals. They may be easily removed by pressing and pulling it does, you close tightly. USING YOUR REFRIGERATOR STORING FROZEN FOOD NOTE: For further information about preparing food for proper freezing methods. Do not put more unfrozen food into ...
User Guide
Page 19
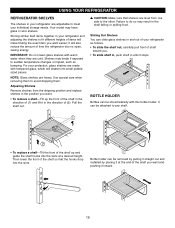
...removing them . Bottle holder can be removed by pulling it straight out and installed by placing it stops. Storing similar food items together in your refrigerator and adjusting the shelves to sudden temperature changes or impact, such as follows. • To slide the shelf out, carefully pull front of ...the front of the shelf in the direction of (1) and lift it in until it at a desired height. It can slide glass shelves in your refrigerator are level from the shipping position and replace shelves in the position you . • To slide shelf in, push shelf in the direction of ...
...removing them . Bottle holder can be removed by pulling it straight out and installed by placing it stops. Storing similar food items together in your refrigerator and adjusting the shelves to sudden temperature changes or impact, such as follows. • To slide the shelf out, carefully pull front of ...the front of the shelf in the direction of (1) and lift it in until it at a desired height. It can slide glass shelves in your refrigerator are level from the shipping position and replace shelves in the position you . • To slide shelf in, push shelf in the direction of ...
User Guide
Page 20
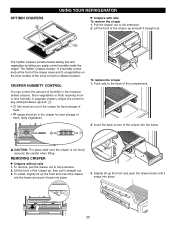
OPTIBIN CRISPERS 2 USING YOUR REFRIGERATOR u Crispers with rails To remove the crisper 1. To replace the crisper 1. REMOVING CRISPER u Crispers without rails 1. Slightly tilt up and pull it straight out. 3. Adjust ...
OPTIBIN CRISPERS 2 USING YOUR REFRIGERATOR u Crispers with rails To remove the crisper 1. To replace the crisper 1. REMOVING CRISPER u Crispers without rails 1. Slightly tilt up and pull it straight out. 3. Adjust ...
User Guide
Page 21
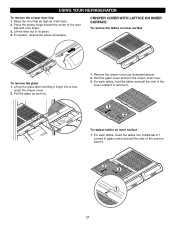
... outward to insert it. 2 3 1 21 For each lattice, hold the lattice and pull the side of the cover to remove it will open. 2. USING YOUR REFRIGERATOR To remove the crisper door flap 1. To replace, reverse the above ). 2. Hold the glass cover and turn the crisper cover over. 3. Lift up and out...
... outward to insert it. 2 3 1 21 For each lattice, hold the lattice and pull the side of the cover to remove it will open. 2. USING YOUR REFRIGERATOR To remove the crisper door flap 1. To replace, reverse the above ). 2. Hold the glass cover and turn the crisper cover over. 3. Lift up and out...


