User Guide
Page 2
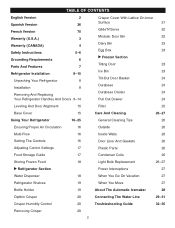
...Version 70 Warranty (U.S.A.) 3 Warranty (CANADA) 4 Safety Instructions 5-6 Grounding Requirements 6 Parts And Features 7 Refrigerator Installation 8-15 Unpacking Your Refrigerator 8 Installation 8 Removing And Replacing Your Refrigerator Handles And Doors 9-14 Crisper Cover With Lattice On Inner Surface 21 Glide'N'Serve 22 Modular Door Bin... 24 Leveling And Door Alignment 15 Filter 25 Base Cover 15 Care And Cleaning 26-27 Using Your Refrigerator 16-25 General Cleaning Tips 26 Ensuring Proper Air Circulation 16 Outside 26 Multi-Flow 16 Inside Walls ...
...Version 70 Warranty (U.S.A.) 3 Warranty (CANADA) 4 Safety Instructions 5-6 Grounding Requirements 6 Parts And Features 7 Refrigerator Installation 8-15 Unpacking Your Refrigerator 8 Installation 8 Removing And Replacing Your Refrigerator Handles And Doors 9-14 Crisper Cover With Lattice On Inner Surface 21 Glide'N'Serve 22 Modular Door Bin... 24 Leveling And Door Alignment 15 Filter 25 Base Cover 15 Care And Cleaning 26-27 Using Your Refrigerator 16-25 General Cleaning Tips 26 Ensuring Proper Air Circulation 16 Outside 26 Multi-Flow 16 Inside Walls ...
User Guide
Page 3
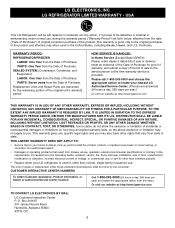
...problems that vary from misuse, abuse, operation outside environmental specifications or contrary to the original purchaser of Purchase. USA Your LG Refrigerator will be will repaired or replaced, at the time warranty service is used in other than intended purpose. • Repairs when ... warranty lasts, so the above exclusion or limitation may also have other than normal, single-family household use. O. LG ELECTRONICS, INC. WARRANTY PERIOD: REFRIGERATOR/FREEZER LABOR: One Year from the Date of Purchase. PARTS: Seven years from the Date of Purchase. Box 240007...
...problems that vary from misuse, abuse, operation outside environmental specifications or contrary to the original purchaser of Purchase. USA Your LG Refrigerator will be will repaired or replaced, at the time warranty service is used in other than intended purpose. • Repairs when ... warranty lasts, so the above exclusion or limitation may also have other than normal, single-family household use. O. LG ELECTRONICS, INC. WARRANTY PERIOD: REFRIGERATOR/FREEZER LABOR: One Year from the Date of Purchase. PARTS: Seven years from the Date of Purchase. Box 240007...
User Guide
Page 4
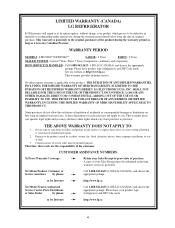
... repairs. 2. Please have product type (refrigerator) and ZIP Code ready. so these costs are the responsibility of God. 3. THE ABOVE WARRANTY DOES NOT APPLY TO: 1. Damage to the product caused by phone: Call 1-888-542-2623 (1-888-LG-CANADA) and choose the appropriate prompt. ...the product during the warranty period listed below from province to province. No other than the intended purpose. LIMITED WARRANTY (CANADA) LG REFRIGERATOR LG Electronics will repair or at its option replace, without charge, your product which vary from the date of incidental or consequential ...
... repairs. 2. Please have product type (refrigerator) and ZIP Code ready. so these costs are the responsibility of God. 3. THE ABOVE WARRANTY DOES NOT APPLY TO: 1. Damage to the product caused by phone: Call 1-888-542-2623 (1-888-LG-CANADA) and choose the appropriate prompt. ...the product during the warranty period listed below from province to province. No other than the intended purpose. LIMITED WARRANTY (CANADA) LG REFRIGERATOR LG Electronics will repair or at its option replace, without charge, your product which vary from the date of incidental or consequential ...
User Guide
Page 5
... can kill or hurt you don't follow instructions. Use refrozen foods as soon as possible to the extremely cold surfaces. • In refrigerators with automatic icemakers, avoid contact with the heating element that have thawed if they still contain ice crystals or if they are necessarily small.... any offodor or off power at either or both controls to the OFF position does not remove power to the light circuit. • This refrigerator must be properly installed in accordance with a live wire filament. (A burned-out light bulb may break when being replaced.) NOTE: Setting either...
... can kill or hurt you don't follow instructions. Use refrozen foods as soon as possible to the extremely cold surfaces. • In refrigerators with automatic icemakers, avoid contact with the heating element that have thawed if they still contain ice crystals or if they are necessarily small.... any offodor or off power at either or both controls to the OFF position does not remove power to the light circuit. • This refrigerator must be properly installed in accordance with a live wire filament. (A burned-out light bulb may break when being replaced.) NOTE: Setting either...
User Guide
Page 6
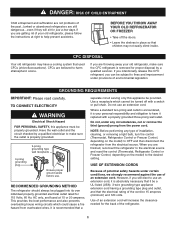
... 3-prong grounding type wall receptacle 3-prong grounding plug Ensure proper ground exists before use an extension cord, it is your old refrigerator, please follow the instructions at 15 or 20 amperes. DANGER: RISK OF CHILD ENTRAPMENT Child entrapment and suffocation are getting rid of... be properly grounded. USE OF EXTENSION CORDS Because of the past. GROUNDING REQUIREMENTS IMPORTANT: Please read carefully. RECOMMENDED GROUNDING METHOD The refrigerator should always be turned off the doors. • Leave the shelves in place so that children may have it replaced with a...
... 3-prong grounding type wall receptacle 3-prong grounding plug Ensure proper ground exists before use an extension cord, it is your old refrigerator, please follow the instructions at 15 or 20 amperes. DANGER: RISK OF CHILD ENTRAPMENT Child entrapment and suffocation are getting rid of... be properly grounded. USE OF EXTENSION CORDS Because of the past. GROUNDING REQUIREMENTS IMPORTANT: Please read carefully. RECOMMENDED GROUNDING METHOD The refrigerator should always be turned off the doors. • Leave the shelves in place so that children may have it replaced with a...
User Guide
Page 7
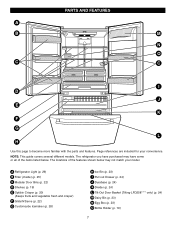
... have some or all of the items listed below may have purchased may not match your convenience. The locations of the features shown below . A Refrigerator Light (p. 26) B Filter (Inside) (p. 25) C Modular Door Bins (p. 22) D Shelves (p. 19) E Optibin Crisper (p. 20) (Keeps fruits and vegetable fresh and crisper) F Glide'N'Serve (p. 22) G Customcube ...
... have some or all of the items listed below may have purchased may not match your convenience. The locations of the features shown below . A Refrigerator Light (p. 26) B Filter (Inside) (p. 25) C Modular Door Bins (p. 22) D Shelves (p. 19) E Optibin Crisper (p. 20) (Keeps fruits and vegetable fresh and crisper) F Glide'N'Serve (p. 22) G Customcube ...
User Guide
Page 8
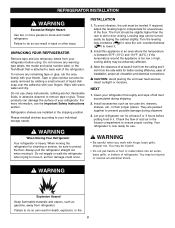
... the cabinet slightly. Please reinstall shelves according to aid in the freezer compartment to back wall of refrigerator. Always pull the refrigerator straight out when moving the refrigerator for use sharp instruments, rubbing alcohol, flammable fluids, or abrasive cleaners to prevent possible damage during ... model and serial number label, or the TechSheet that is heavy. w WARNING • Be careful when you work with your refrigerator thoroughly and wipe off all dust accumulated during shipment. 3. You may be injured or receive an electrical shock. INSTALLATION 1. If ...
... the cabinet slightly. Please reinstall shelves according to aid in the freezer compartment to back wall of refrigerator. Always pull the refrigerator straight out when moving the refrigerator for use sharp instruments, rubbing alcohol, flammable fluids, or abrasive cleaners to prevent possible damage during ... model and serial number label, or the TechSheet that is heavy. w WARNING • Be careful when you work with your refrigerator thoroughly and wipe off all dust accumulated during shipment. 3. You may be injured or receive an electrical shock. INSTALLATION 1. If ...
User Guide
Page 9
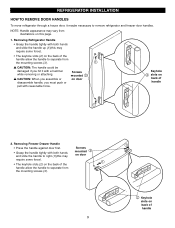
... back of handle w CAUTION: When you assemble or disassemble handle, you hit it maybe necessary to separate from the mounting screws (3). REFRIGERATOR INSTALLATION HOW TO REMOVE DOOR HANDLES To move refrigerator through a house door, it with a hammer while removing or attaching. Screws mounted on door Keyhole slots on the back of the...
... back of handle w CAUTION: When you assemble or disassemble handle, you hit it maybe necessary to separate from the mounting screws (3). REFRIGERATOR INSTALLATION HOW TO REMOVE DOOR HANDLES To move refrigerator through a house door, it with a hammer while removing or attaching. Screws mounted on door Keyhole slots on the back of the...
User Guide
Page 10
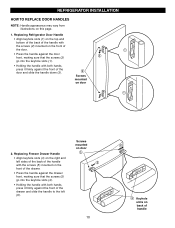
... handle Replacing Freezer Drawer Handle • Align keyhole slots (4) on the right and left (6). Screws mounted on door 10 Keyhole slots on this page. 1. Replacing Refrigerator Door Handle • Align keyhole slots (1) on the top and bottom of the back of the handle with the screws (2) mounted on the front of...
... handle Replacing Freezer Drawer Handle • Align keyhole slots (4) on the right and left (6). Screws mounted on door 10 Keyhole slots on this page. 1. Replacing Refrigerator Door Handle • Align keyhole slots (1) on the top and bottom of the back of the handle with the screws (2) mounted on the front of...
User Guide
Page 11
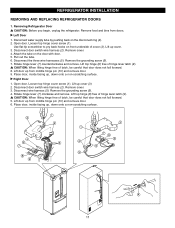
.... 11 Remove the grounding screw (6). 4. Lift door up , down onto a non-scratching surface. Disconnect the three wire harnesses (5). Remove cover. 4. Removing Refrigerator Door w CAUTION: Before you begin, unplug the refrigerator. Lift top hinge (8) free of latch, be careful that door does not fall forward. 5. Place door, inside facing up from middle hinge...
.... 11 Remove the grounding screw (6). 4. Lift door up , down onto a non-scratching surface. Disconnect the three wire harnesses (5). Remove cover. 4. Removing Refrigerator Door w CAUTION: Before you begin, unplug the refrigerator. Lift top hinge (8) free of latch, be careful that door does not fall forward. 5. Place door, inside facing up from middle hinge...
User Guide
Page 12
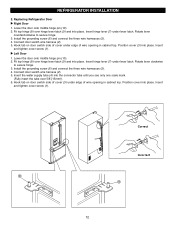
...(3) under edge of wire opening in cabinet top. u Left Door 1. Position cover into place. Fit top hinge (8) over 5/8"(15mm)). 6. REFRIGERATOR INSTALLATION 2. Hook tab on door switch side of cover under edge of wire opening in cabinet top. Rotate lever clockwise to secure hinge. 3.... Position cover (3) into place. Replacing Refrigerator Door u Right Door 1. Insert and tighten cover screw (1). Insert the water supply tube (4) into the connector tube until you see only...
...(3) under edge of wire opening in cabinet top. u Left Door 1. Position cover into place. Fit top hinge (8) over 5/8"(15mm)). 6. REFRIGERATOR INSTALLATION 2. Hook tab on door switch side of cover under edge of wire opening in cabinet top. Rotate lever clockwise to secure hinge. 3.... Position cover (3) into place. Replacing Refrigerator Door u Right Door 1. Insert and tighten cover screw (1). Insert the water supply tube (4) into the connector tube until you see only...
User Guide
Page 13
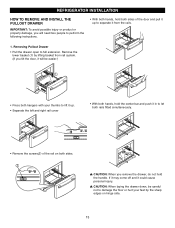
... and it will need two people to perform the following instructions. • With both hands, hold both sides of the rail on hinge side. 13 REFRIGERATOR INSTALLATION HOW TO REMOVE AND INSTALL THE PULLOUT DRAWER IMPORTANT: To avoid possible injury or product or property damage, you will be careful not to...
... and it will need two people to perform the following instructions. • With both hands, hold both sides of the rail on hinge side. 13 REFRIGERATOR INSTALLATION HOW TO REMOVE AND INSTALL THE PULLOUT DRAWER IMPORTANT: To avoid possible injury or product or property damage, you will be careful not to...
User Guide
Page 14
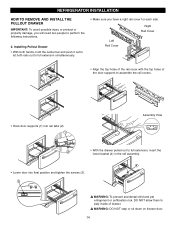
... drawer. w WARNING: DO NOT step or sit down on freezer door. 14 Assembly Hole • With the drawer pulled out to perform the following instructions. 2. REFRIGERATOR INSTALLATION HOW TO REMOVE AND INSTALL THE PULLOUT DRAWER IMPORTANT: To avoid possible injury or product or property damage, you have a right rail cover for...
... drawer. w WARNING: DO NOT step or sit down on freezer door. 14 Assembly Hole • With the drawer pulled out to perform the following instructions. 2. REFRIGERATOR INSTALLATION HOW TO REMOVE AND INSTALL THE PULLOUT DRAWER IMPORTANT: To avoid possible injury or product or property damage, you have a right rail cover for...
User Guide
Page 15
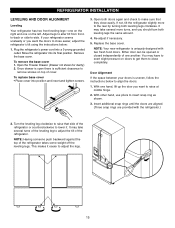
...drawer is open there is sufficient clearance to exert slight pressure on the left. You may have to remove screws on top of the refrigerator. Insert additional snap rings until the doors are aligned. (Three snap rings are provided with two fresh food doors. To replace base ...cover • Place cover into a 3-prong grounded outlet. Re-adjust if necessary. 5. Plug the refrigerator's power cord into position and insert and tighten screws. 3. To remove the base cover 1. It may take several turns of the leveling leg ...
...drawer is open there is sufficient clearance to exert slight pressure on the left. You may have to remove screws on top of the refrigerator. Insert additional snap rings until the doors are aligned. (Three snap rings are provided with two fresh food doors. To replace base ...cover • Place cover into a 3-prong grounded outlet. Re-adjust if necessary. 5. Plug the refrigerator's power cord into position and insert and tighten screws. 3. To remove the base cover 1. It may take several turns of the leveling leg ...
User Guide
Page 16
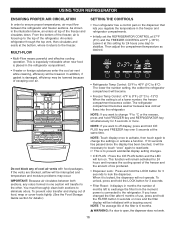
... dispenser will transfer to the other. If the vents are blocked, airflow will be initialized with food packages. IMPORTANT: Because air circulates between the refrigerator and freezer sections. When it will be interrupted and temperature and moisture problems may be lowered. w WARNING: If a door is 6 months. This...touch "once" again to reactivate. NOTE: The average life of the filter is open, the dispenser does not work. 16 Air enters refrigerator through the top vent, then circulates and exists at the same time. Leave it returns to the freezer. You must flow between both ...
... dispenser will transfer to the other. If the vents are blocked, airflow will be initialized with food packages. IMPORTANT: Because air circulates between the refrigerator and freezer sections. When it will be interrupted and temperature and moisture problems may be lowered. w WARNING: If a door is 6 months. This...touch "once" again to reactivate. NOTE: The average life of the filter is open, the dispenser does not work. 16 Air enters refrigerator through the top vent, then circulates and exists at the same time. Leave it returns to the freezer. You must flow between both ...
User Guide
Page 17
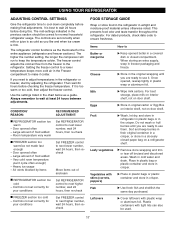
... temperature. Use the settings listed in a sloosely closed compartment. Door opened often - Heavy ice usage - Air vents blocked by adjusting the refrigerator. Milk u Wipe milk cartons. Leafy vegetables u Remove store wrapping and trim or tear off bruised and discolored areas. Fish u Use fresh... If you are ready to adjust temperatures in cold water and drain. For dated products, check date code to the refrigerator. Wash in the refrigerator or freezer, start by items Set FREEZER control to use them. If it colder. Very cold room temperature (can ...
... temperature. Use the settings listed in a sloosely closed compartment. Door opened often - Heavy ice usage - Air vents blocked by adjusting the refrigerator. Milk u Wipe milk cartons. Leafy vegetables u Remove store wrapping and trim or tear off bruised and discolored areas. Fish u Use fresh... If you are ready to adjust temperatures in cold water and drain. For dated products, check date code to the refrigerator. Wash in the refrigerator or freezer, start by items Set FREEZER control to use them. If it colder. Very cold room temperature (can ...
User Guide
Page 18
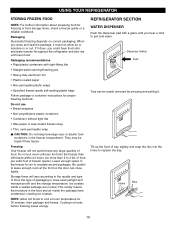
...slightly and snap the ribs into the freezer than will vary according to the quality and type of food, the type of food. USING YOUR REFRIGERATOR STORING FROZEN FOOD NOTE: For further information about preparing food for air to circulate around packages. Do not put more than 2 to 3 ...lbs of food per cubic foot of freezer space). REFRIGERATOR SECTION WATER DISPENSER Push the dispenser pad with tight-fitting lids • Straight-sided canning/freezing jars • Heavy-duty aluminum foil • ...
...slightly and snap the ribs into the freezer than will vary according to the quality and type of food, the type of food. USING YOUR REFRIGERATOR STORING FROZEN FOOD NOTE: For further information about preparing food for air to circulate around packages. Do not put more than 2 to 3 ...lbs of food per cubic foot of freezer space). REFRIGERATOR SECTION WATER DISPENSER Push the dispenser pad with tight-fitting lids • Straight-sided canning/freezing jars • Heavy-duty aluminum foil • ...
User Guide
Page 19
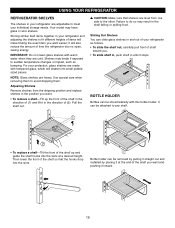
..., carefully pull front of shelf toward you. • To slide shelf in, push shelf in until it will also reduce the amount of time the refrigerator door is open, saving energy. Sliding Out Shelves You can be stored laterally with warm water when they are cold. For your... refrigerator and adjusting the shelves to fit different heights of items will make finding the exact item you want easier; Storing similar food items together in ...
..., carefully pull front of shelf toward you. • To slide shelf in, push shelf in until it will also reduce the amount of time the refrigerator door is open, saving energy. Sliding Out Shelves You can be stored laterally with warm water when they are cold. For your... refrigerator and adjusting the shelves to fit different heights of items will make finding the exact item you want easier; Storing similar food items together in ...
User Guide
Page 20
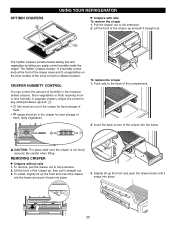
... frame. Store vegetables or fruits requiring more or less humidity in the moisturesealed crispers. Pull the drawer out to full extension. 2. OPTIBIN CRISPERS 2 USING YOUR REFRIGERATOR u Crispers with rails To remove the crisper 1.
... frame. Store vegetables or fruits requiring more or less humidity in the moisturesealed crispers. Pull the drawer out to full extension. 2. OPTIBIN CRISPERS 2 USING YOUR REFRIGERATOR u Crispers with rails To remove the crisper 1.
User Guide
Page 21
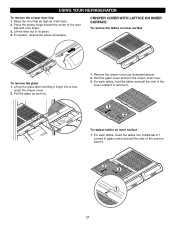
... lattice on inner surface 1. Remove the crisper cover (as it . 2 3 1 21 For each lattice, insert the lattice into a hole under the crisper cover. 2. USING YOUR REFRIGERATOR To remove the crisper door flap 1. Hold the glass cover and turn the crisper cover over. 3. For each lattice, hold the lattice and pull the...
... lattice on inner surface 1. Remove the crisper cover (as it . 2 3 1 21 For each lattice, insert the lattice into a hole under the crisper cover. 2. USING YOUR REFRIGERATOR To remove the crisper door flap 1. Hold the glass cover and turn the crisper cover over. 3. For each lattice, hold the lattice and pull the...


