Owner's Manual
Page 2
... (Canada) Safety Instructions Grounding Requirements Parts and Features Refrigerator Installation Unpacking your refrigerator Installation Base Grille Removing, Reversing and Replacing Your refrigerator doors Pull out drawer Leveling and door alignment Using your refrigerator Ensuring proper air circulation Multi Flow Door alarm Setting ...the controls Adjusting control settings Food storage guide Storing frozen food Refrigerator Section Refrigerator shelves Chef Fresh Crisper humidity control Optibin Crisper Crisper cover with lattice on inner surface Design-A-Door...
... (Canada) Safety Instructions Grounding Requirements Parts and Features Refrigerator Installation Unpacking your refrigerator Installation Base Grille Removing, Reversing and Replacing Your refrigerator doors Pull out drawer Leveling and door alignment Using your refrigerator Ensuring proper air circulation Multi Flow Door alarm Setting ...the controls Adjusting control settings Food storage guide Storing frozen food Refrigerator Section Refrigerator shelves Chef Fresh Crisper humidity control Optibin Crisper Crisper cover with lattice on inner surface Design-A-Door...
Owner's Manual
Page 3
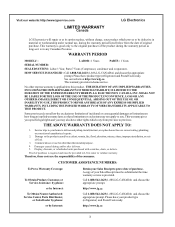
...; Commercial use or use , during and/or after delivery. 5. Call 1-888-542-2623(1-888-LG-CANADA) and choose the appropriate prompt. Service trips to your product type (refrigerator) and PostalCode ready. Display, discount, or refurbished units purchased with scratches, dents, or defects. Proof...purchase is in -home service. Please have product type (refrigerator) and PostalCode ready. Visit our website:http://www.lgservice.com LIMITED WARRANTY Canada LG Electronics LG Electronics will repair or at http://www.lg.ca This warranty provides in any Canadian Province. SHALL NOT ...
...; Commercial use or use , during and/or after delivery. 5. Call 1-888-542-2623(1-888-LG-CANADA) and choose the appropriate prompt. Service trips to your product type (refrigerator) and PostalCode ready. Display, discount, or refurbished units purchased with scratches, dents, or defects. Proof...purchase is in -home service. Please have product type (refrigerator) and PostalCode ready. Visit our website:http://www.lgservice.com LIMITED WARRANTY Canada LG Electronics LG Electronics will repair or at http://www.lg.ca This warranty provides in any Canadian Province. SHALL NOT ...
Owner's Manual
Page 4
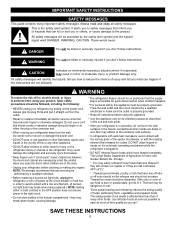
...The eating quality of fire, electric shock, or injury to climb, stand or hang on the automatic icemaking mechanism while the refrigerator is plugged in the refrigerator. WARNING To reduce the risk of red meats is in operation, do not touch the cold surfaces in minor or moderate injury...." they are necessarily small. If the odor or color of Agriculture in the area. Before replacing a burned-out light bulb, unplug the refrigerator or turn off -color should not be refrozen and should be preceded by pulling on the power cord. The United States Department of any ...
...The eating quality of fire, electric shock, or injury to climb, stand or hang on the automatic icemaking mechanism while the refrigerator is plugged in the refrigerator. WARNING To reduce the risk of red meats is in operation, do not touch the cold surfaces in minor or moderate injury...." they are necessarily small. If the odor or color of Agriculture in the area. Before replacing a burned-out light bulb, unplug the refrigerator or turn off -color should not be refrozen and should be preceded by pulling on the power cord. The United States Department of any ...
Owner's Manual
Page 5
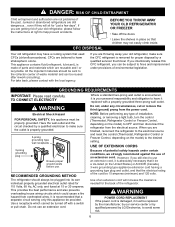
...cord be replaced by the manufacturer, by our service center or by qualified personal by LG Electronics, to avoid some risk. 6 WARNING Do not, under any type of the refrigerator. Electrical Shock Hazard FOR PERSONAL SAFETY, this appliance must be 15 amperes (minimum) ...doors. If you intentionally release this appliance be properly grounded. GROUNDING REQUIREMENTS IMPORTANT: Please read carefully. RECOMMENDED GROUNDING METHOD The refrigerator should be sent to use . This provides the best performance and also prevents overloading house wiring circuits which cannot be plugged...
...cord be replaced by the manufacturer, by our service center or by qualified personal by LG Electronics, to avoid some risk. 6 WARNING Do not, under any type of the refrigerator. Electrical Shock Hazard FOR PERSONAL SAFETY, this appliance must be 15 amperes (minimum) ...doors. If you intentionally release this appliance be properly grounded. GROUNDING REQUIREMENTS IMPORTANT: Please read carefully. RECOMMENDED GROUNDING METHOD The refrigerator should be sent to use . This provides the best performance and also prevents overloading house wiring circuits which cannot be plugged...
Owner's Manual
Page 6
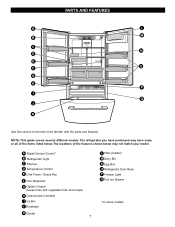
... Rack P Freezer Light Q Pull out Drawer *on some or all of the features shown below . A Digital Sensor Control* B Refrigerator Light C Shelves D Temperature Control E Chef Fresh / Snack Pan F Can Dispenser G Optibin Crisper Keeps fruits and vegetable fresh and crisper H Customcube Icemaker I ...Q J K Use this section to become more familiar with the parts and features. The refrigerator you have purchased may have some models The locations of the items listed below may not match your model. NOTE: This guide covers several ...
... Rack P Freezer Light Q Pull out Drawer *on some or all of the features shown below . A Digital Sensor Control* B Refrigerator Light C Shelves D Temperature Control E Chef Fresh / Snack Pan F Can Dispenser G Optibin Crisper Keeps fruits and vegetable fresh and crisper H Customcube Icemaker I ...Q J K Use this section to become more familiar with the parts and features. The refrigerator you have purchased may have some models The locations of the items listed below may not match your model. NOTE: This guide covers several ...
Owner's Manual
Page 7
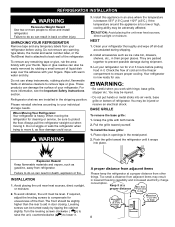
...to prevent possible damage during shipping. 2. Explosion Hazard Keep flammable materials and vapors, such as gasoline, away from adjacent items Please keep the refrigerator at a proper distance More than 1"(2.5 cm) to top More than 0.125" (0.3 cm) to hinge side More than the rear to ...between 55°F (13°C) and 110°F (43°C.) If the temperature around the appliance is attached to move and install refrigerator. The front should be adversely affected. Too small a distance from other injury. CAUTION: Avoid placing the unit near heat sources, direct ...
...to prevent possible damage during shipping. 2. Explosion Hazard Keep flammable materials and vapors, such as gasoline, away from adjacent items Please keep the refrigerator at a proper distance More than 1"(2.5 cm) to top More than 0.125" (0.3 cm) to hinge side More than the rear to ...between 55°F (13°C) and 110°F (43°C.) If the temperature around the appliance is attached to move and install refrigerator. The front should be adversely affected. Too small a distance from other injury. CAUTION: Avoid placing the unit near heat sources, direct ...

Owner's Manual
Page 8
...the handle up (1)(this may vary from the mounting screws (3). HOW TO REPLACE DOOR HANDLES NOTE: Handle appearance may require some force). Removing Refrigerator Handle Grasp the handle tightly with both hands, press it may vary from illustrations on the top and bottom of the back of the ...handle allow the handle to remove the refrigerator door handles. Holding the handle with the screws (2) mounted on this page. 1. NOTE: Handle appearance may be damaged and broken when you...
...the handle up (1)(this may vary from the mounting screws (3). HOW TO REPLACE DOOR HANDLES NOTE: Handle appearance may require some force). Removing Refrigerator Handle Grasp the handle tightly with both hands, press it may vary from illustrations on the top and bottom of the back of the ...handle allow the handle to remove the refrigerator door handles. Holding the handle with the screws (2) mounted on this page. 1. NOTE: Handle appearance may be damaged and broken when you...
Owner's Manual
Page 9
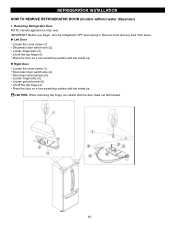
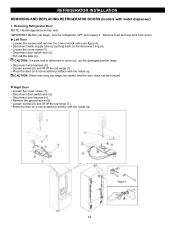
...-scratching surface with the inside up . Loosen hinge bolts (3). Lift off the top hinge (4). IMPORTANT: Before you begin, turn the refrigerator OFF and unplug it. Right Door Loosen the cover screw (1). Place the door on a non-scratching surface with the inside up ... removing top hinge, be careful that the door does not fall forward. 10 Removing Refrigerator Door NOTE: Handle appearance may vary. Disconnect door switch wire (2). Loosen ground screw (6). REFRIGERATOR INSTALLATION HOW TO REMOVE REFRIGERATOR DOOR (models without water dispenser) 1. Disconnect door switch wire (2).
...-scratching surface with the inside up . Loosen hinge bolts (3). Lift off the top hinge (4). IMPORTANT: Before you begin, turn the refrigerator OFF and unplug it. Right Door Loosen the cover screw (1). Place the door on a non-scratching surface with the inside up ... removing top hinge, be careful that the door does not fall forward. 10 Removing Refrigerator Door NOTE: Handle appearance may vary. Disconnect door switch wire (2). Loosen ground screw (6). REFRIGERATOR INSTALLATION HOW TO REMOVE REFRIGERATOR DOOR (models without water dispenser) 1. Disconnect door switch wire (2).

Owner's Manual
Page 10
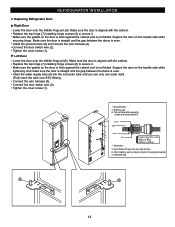
Replacing Refrigerator Door Right Door Lower the door onto the middle hinge pin (7). Support the door on the handle side while securing. Install the ground screw (6). Left ... screw (1). 11 Make sure the door is aligned with the cabinet. Connect the door switch wire (2). Make sure the door is aligned with the cabinet. REFRIGERATOR INSTALLATION 2. Make sure the gasket on the door is flush against the cabinet and is even across the front. Support the door on the handle...
Replacing Refrigerator Door Right Door Lower the door onto the middle hinge pin (7). Support the door on the handle side while securing. Install the ground screw (6). Left ... screw (1). 11 Make sure the door is aligned with the cabinet. Connect the door switch wire (2). Make sure the door is aligned with the cabinet. REFRIGERATOR INSTALLATION 2. Make sure the gasket on the door is flush against the cabinet and is even across the front. Support the door on the handle...
Owner's Manual
Page 11
...the tube (4). Loosen screws (6) and lift off the top hinge (7). Disconnect wire harness (4). Removing Refrigerator Door NOTE: Handle appearance may vary. IMPORTANT: Before you begin, turn the refrigerator OFF and unplug it. CAUTION: If a tube end is deformed or worn out, cut the ...Loosen the cover screw (1). Place the door on a non-scratching surface with water dispenser) 1. Remove the ground screw (8). REFRIGERATOR INSTALLATION REMOVING AND REPLACING REFRIGERATOR DOORS (models with the inside up . 12 Place the door on a non-scratching surface with the inside up . ...
...the tube (4). Loosen screws (6) and lift off the top hinge (7). Disconnect wire harness (4). Removing Refrigerator Door NOTE: Handle appearance may vary. IMPORTANT: Before you begin, turn the refrigerator OFF and unplug it. CAUTION: If a tube end is deformed or worn out, cut the ...Loosen the cover screw (1). Place the door on a non-scratching surface with water dispenser) 1. Remove the ground screw (8). REFRIGERATOR INSTALLATION REMOVING AND REPLACING REFRIGERATOR DOORS (models with the inside up . 12 Place the door on a non-scratching surface with the inside up . ...
Owner's Manual
Page 12
... is even. Insert the water supply tube (4) into the connector tube until you see only one scale mark. (Fully insert the tube over 5/8"(15mm)). Replacing Refrigerator Door Right Door Lower the door onto the middle hinge pin...
... is even. Insert the water supply tube (4) into the connector tube until you see only one scale mark. (Fully insert the tube over 5/8"(15mm)). Replacing Refrigerator Door Right Door Lower the door onto the middle hinge pin...

Owner's Manual
Page 13
... the drawer, do not hold the center of the bar and push it in front of the door and pull it could cause personal injury. REFRIGERATOR INSTALLATION To remove Freezer Door Handle Grasp the handle tightly with the screws mounted in to let both rails fitted simultaneously. 14
... the drawer, do not hold the center of the bar and push it in front of the door and pull it could cause personal injury. REFRIGERATOR INSTALLATION To remove Freezer Door Handle Grasp the handle tightly with the screws mounted in to let both rails fitted simultaneously. 14
Owner's Manual
Page 14
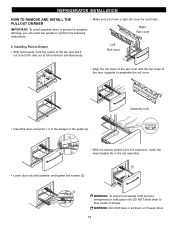
REFRIGERATOR INSTALLATION HOW TO REMOVE AND INSTALL THE PULLOUT DRAWER IMPORTANT: To avoid possible injury or product or property damage, you have a right rail cover for ...
REFRIGERATOR INSTALLATION HOW TO REMOVE AND INSTALL THE PULLOUT DRAWER IMPORTANT: To avoid possible injury or product or property damage, you have a right rail cover for ...
Owner's Manual
Page 15
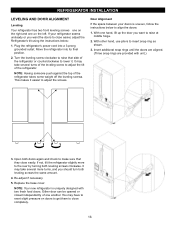
...the doors: 1. You may take several more to adjust the screws. Turn the leveling screw clockwise to raise that they close easier, adjust the Refrigerator's tilt using the instructions below to exert slight pressure on the left. NOTE: Having someone push against the top of one hand, lift up ...the door you want to close easily. Door Alignment If the space between your refrigerator seems unsteady or you want the doors to raise at middle hinge. 2. With one another. With other hand, use pliers to make sure that...
...the doors: 1. You may take several more to adjust the screws. Turn the leveling screw clockwise to raise that they close easier, adjust the Refrigerator's tilt using the instructions below to exert slight pressure on the left. NOTE: Having someone push against the top of one hand, lift up ...the door you want to close easily. Door Alignment If the space between your refrigerator seems unsteady or you want the doors to raise at middle hinge. 2. With one another. With other hand, use pliers to make sure that...
Owner's Manual
Page 16
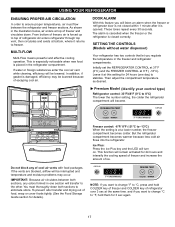
...to stabilize. As shown in one day) to eliminate odors. This is especially noticeable when new food is placed in the freezer and refrigerator compartments. REFRIGERATOR TEMP ICE PLUS COLDER WARMER 37 F IS RECOMMENDED Freezer control: -6°F/ 8°F (-21°C to ensure proper temperatures, air... Plus: Press the Ice Plus key and the LED will be interrupted and temperature and moisture problems may be lowered. USING YOUR REFRIGERATOR ENSURING PROPER AIR CIRCULATION In order to -13°C) When the setting is at a lower number, the freezer compartment becomes colder...
...to stabilize. As shown in one day) to eliminate odors. This is especially noticeable when new food is placed in the freezer and refrigerator compartments. REFRIGERATOR TEMP ICE PLUS COLDER WARMER 37 F IS RECOMMENDED Freezer control: -6°F/ 8°F (-21°C to ensure proper temperatures, air... Plus: Press the Ice Plus key and the LED will be interrupted and temperature and moisture problems may be lowered. USING YOUR REFRIGERATOR ENSURING PROPER AIR CIRCULATION In order to -13°C) When the setting is at a lower number, the freezer compartment becomes colder...
Owner's Manual
Page 17
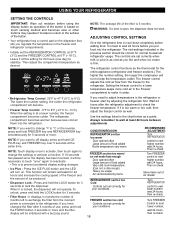
...amount of food added Very cold room temperature (Can not le often enough) Heavy ice usage Air vents blocked by adjusting the refrigerator first. USING YOUR REFRIGERATOR SETTING THE CONTROLS IMPORTANT: Wipe out moisture before using the display button as operation of the button is based on touch sensing...press and hold ICE PLUS key and FREEZER key over 5 seconds at 0°F (-18°C). The mid-settings indicated in the freezer and refrigerator compartments. • Initially set correctly when milk or juice is firm. The freezer control adjusts the cold air flow from the moment power is...
...amount of food added Very cold room temperature (Can not le often enough) Heavy ice usage Air vents blocked by adjusting the refrigerator first. USING YOUR REFRIGERATOR SETTING THE CONTROLS IMPORTANT: Wipe out moisture before using the display button as operation of the button is based on touch sensing...press and hold ICE PLUS key and FREEZER key over 5 seconds at 0°F (-18°C). The mid-settings indicated in the freezer and refrigerator compartments. • Initially set correctly when milk or juice is firm. The freezer control adjusts the cold air flow from the moment power is...
Owner's Manual
Page 18
...fresh fish and shellfish the same day purchased. Milk Wipe milk cartons. Cheese Store in original carton on interior shelf, not on a refrigerator shelf. they may cause the sensor to use them. WARNING Suffocation Hazard When using dry ice, provide adequate ventilation. Dry ice is.... Eggs Store in the original wrapping until you could have condensed, creating ice crystals. This prevents food odor and taste transfer throughout the refrigerator. Cooling hot foods before freezing saves energy. Open a window and do , you are normal. For best storage, place milk on interior...
...fresh fish and shellfish the same day purchased. Milk Wipe milk cartons. Cheese Store in original carton on interior shelf, not on a refrigerator shelf. they may cause the sensor to use them. WARNING Suffocation Hazard When using dry ice, provide adequate ventilation. Dry ice is.... Eggs Store in the original wrapping until you could have condensed, creating ice crystals. This prevents food odor and taste transfer throughout the refrigerator. Cooling hot foods before freezing saves energy. Open a window and do , you are normal. For best storage, place milk on interior...
Owner's Manual
Page 19
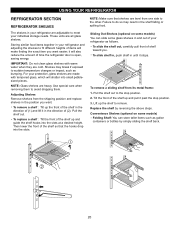
.... 3. Use special care when removing them to fit different heights of your refrigerator as bumping. Lift up and pull it stops. Storing similar food items together in your refrigerator and adjusting the shelves to avoid dropping them. Tilt the front of shelf ...toward you want . USING YOUR REFRIGERATOR REFRIGERATOR SECTION REFRIGERATOR SHELVES The shelves in your refrigerator are all glass shelves. Pull the shelf out. ...
.... 3. Use special care when removing them to fit different heights of your refrigerator as bumping. Lift up and pull it stops. Storing similar food items together in your refrigerator and adjusting the shelves to avoid dropping them. Tilt the front of shelf ...toward you want . USING YOUR REFRIGERATOR REFRIGERATOR SECTION REFRIGERATOR SHELVES The shelves in your refrigerator are all glass shelves. Pull the shelf out. ...
Owner's Manual
Page 20
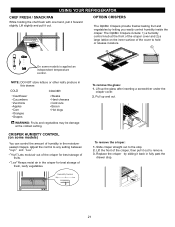
... up the glass after inserting a screwdriver under the crisper cover. 2. CRISPER HUMIDITY CONTROL (on the inner surface of fruits. To remove the crisper: 1. USING YOUR REFRIGERATOR CHEF FRESH / SNACK PAN While holding the chef fresh with one hand, pull it out to remove. 3. The OptiBin Crispers include: 1) a humidity control knob at...
... up the glass after inserting a screwdriver under the crisper cover. 2. CRISPER HUMIDITY CONTROL (on the inner surface of fruits. To remove the crisper: 1. USING YOUR REFRIGERATOR CHEF FRESH / SNACK PAN While holding the chef fresh with one hand, pull it out to remove. 3. The OptiBin Crispers include: 1) a humidity control knob at...
Owner's Manual
Page 21
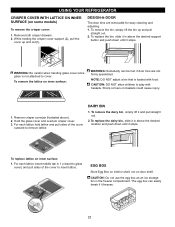
... the glass cover and overtum crisper cover. 3. The egg box can be hurt if door bins are removable for easy cleaning and adjusting. 1. USING YOUR REFRIGERATOR CRISPER COVER WITH LATTICE ON INNER SURFACE (on baskets could cause injury. 1. To replace lattice on door shelf. While holding the crisper cover support (2), pull...
... the glass cover and overtum crisper cover. 3. The egg box can be hurt if door bins are removable for easy cleaning and adjusting. 1. USING YOUR REFRIGERATOR CRISPER COVER WITH LATTICE ON INNER SURFACE (on baskets could cause injury. 1. To replace lattice on door shelf. While holding the crisper cover support (2), pull...


