Owner's Manual
Page 2
... Door alarm Setting the controls Adjusting control settings Food storage guide Storing frozen food Refrigerator Section Refrigerator shelves Chef Fresh Crisper humidity control Optibin Crisper Crisper cover with lattice on inner surface Design-A-Door Dairy Bin Egg Box Water Dispenser Freezer Section Ice Bin Wire Durabase Tilting Door Filter Care and Cleaning General cleaning tips Outside Inside walls Door liner and gaskets Plastic parts Condenser coils Light bulb replacement Power interruptions When you go on vacation About the Custom Cube Ice Maker Connecting the Water Line Troubleshooting...
... Door alarm Setting the controls Adjusting control settings Food storage guide Storing frozen food Refrigerator Section Refrigerator shelves Chef Fresh Crisper humidity control Optibin Crisper Crisper cover with lattice on inner surface Design-A-Door Dairy Bin Egg Box Water Dispenser Freezer Section Ice Bin Wire Durabase Tilting Door Filter Care and Cleaning General cleaning tips Outside Inside walls Door liner and gaskets Plastic parts Condenser coils Light bulb replacement Power interruptions When you go on vacation About the Custom Cube Ice Maker Connecting the Water Line Troubleshooting...
Owner's Manual
Page 4
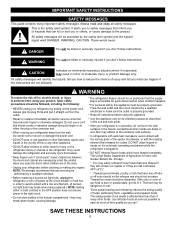
... place fingers or hands on the power cord. Always read and obey all instructions before cleaning or making any food is properly grounded. It alerts you to the light circuit. Do not use and care guide. Use this use a cord that have thawed if they still contain ice crystals or if they may result in the refrigerator. "...Thawed ground meats, poultry, or...
... place fingers or hands on the power cord. Always read and obey all instructions before cleaning or making any food is properly grounded. It alerts you to the light circuit. Do not use and care guide. Use this use a cord that have thawed if they still contain ice crystals or if they may result in the refrigerator. "...Thawed ground meats, poultry, or...
Owner's Manual
Page 5
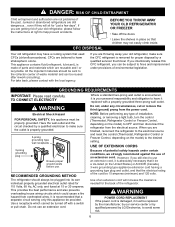
... center of installation, cleaning, or removing a light bulb, turn the control (Thermostat, Refrigerator Control or Freezer Control, depending on the model) to the desired setting. BEFORE YOU THROW AWAY YOUR OLD REFRIGERATOR OR FREEZER Take off with the local agency. Use a receptacle which could cause a fire hazard from the electrical source. CFC DISPOSAL Your old refrigerator may not easily climb inside. However, if you can be turned off the doors. For take...
... center of installation, cleaning, or removing a light bulb, turn the control (Thermostat, Refrigerator Control or Freezer Control, depending on the model) to the desired setting. BEFORE YOU THROW AWAY YOUR OLD REFRIGERATOR OR FREEZER Take off with the local agency. Use a receptacle which could cause a fire hazard from the electrical source. CFC DISPOSAL Your old refrigerator may not easily climb inside. However, if you can be turned off the doors. For take...
Owner's Manual
Page 7
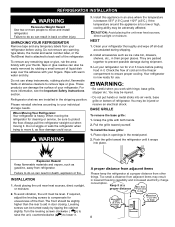
... shelves according to back wall of your refrigerator thoroughly and wipe off all dust accumulated during shipment. 3. Clean your refrigerator. Do not remove any remaining tape or glue, rub the area briskly with warm water and dry. Check the flow of refrigerator. These products can be level. REFRIGERATOR INSTALLATION WARNING Excessive Weight Hazard Use two or more information, see the Important Safety Instructions...
... shelves according to back wall of your refrigerator thoroughly and wipe off all dust accumulated during shipment. 3. Clean your refrigerator. Do not remove any remaining tape or glue, rub the area briskly with warm water and dry. Check the flow of refrigerator. These products can be level. REFRIGERATOR INSTALLATION WARNING Excessive Weight Hazard Use two or more information, see the Important Safety Instructions...

Owner's Manual
Page 8
... TO REPLACE DOOR HANDLES NOTE: Handle appearance may vary from illustrations on this page. 1. CAUTION: It could be , necessary to separate from the mounting screws (3). REFRIGERATOR INSTALLATION TOOLS YOU MAY NEED 10 mm 1/4 in 3/8 in Hex head socket wrench Phillips screwdriver Flat head screwdriver HOW TO REMOVE DOOR HANDLES To move refrigerator through ahouse door, it firmly against the door front, making sure that...
... TO REPLACE DOOR HANDLES NOTE: Handle appearance may vary from illustrations on this page. 1. CAUTION: It could be , necessary to separate from the mounting screws (3). REFRIGERATOR INSTALLATION TOOLS YOU MAY NEED 10 mm 1/4 in 3/8 in Hex head socket wrench Phillips screwdriver Flat head screwdriver HOW TO REMOVE DOOR HANDLES To move refrigerator through ahouse door, it firmly against the door front, making sure that...
Owner's Manual
Page 11
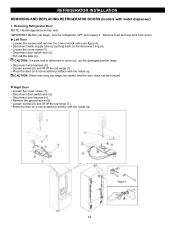
REFRIGERATOR INSTALLATION REMOVING AND REPLACING REFRIGERATOR DOORS (models with the inside up . Left Door Loosen the screws and remove the cove on the disconnect ring (3). Disconnect door switch wire (2). CAUTION: If a tube end is deformed or worn out, cut the damaged portion away. Right Door Loosen the cover screw (1). Disconnect wire harness (4). Remove the ground screw (8). Loosen screws (6) and lift off the top hinge (7). Disconnect water supply tube by pushing back on back side...
REFRIGERATOR INSTALLATION REMOVING AND REPLACING REFRIGERATOR DOORS (models with the inside up . Left Door Loosen the screws and remove the cove on the disconnect ring (3). Disconnect door switch wire (2). CAUTION: If a tube end is deformed or worn out, cut the damaged portion away. Right Door Loosen the cover screw (1). Disconnect wire harness (4). Remove the ground screw (8). Loosen screws (6) and lift off the top hinge (7). Disconnect water supply tube by pushing back on back side...

Owner's Manual
Page 13
... on hinge side. • With both hands, hold both sides of the door and pull it up . • Separate the left and right rail cover • With both rails fitted simultaneously. 14 If it comes off, it could cause personal injury. REFRIGERATOR INSTALLATION To remove Freezer Door Handle Grasp the handle tightly with both sides. 2 HOW TO REMOVE AND INSTALL THE PULLOUT DRAWER IMPORTANT...
... on hinge side. • With both hands, hold both sides of the door and pull it up . • Separate the left and right rail cover • With both rails fitted simultaneously. 14 If it comes off, it could cause personal injury. REFRIGERATOR INSTALLATION To remove Freezer Door Handle Grasp the handle tightly with both sides. 2 HOW TO REMOVE AND INSTALL THE PULLOUT DRAWER IMPORTANT...
Owner's Manual
Page 16
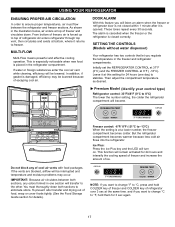
... the other. DOOR ALARM With this setting for details). MULTI-FLOW Multi-Flow means powerful and effective cooling operation. This function will listen an alarm when the freezer or refrigerator door is opened. Air enters refrigerator through top vent, then circulates and exists at this feature you regulate the temperature in the illustration below, air enters at 0°F ( -18°C). USING YOUR REFRIGERATOR ENSURING PROPER AIR CIRCULATION In...
... the other. DOOR ALARM With this setting for details). MULTI-FLOW Multi-Flow means powerful and effective cooling operation. This function will listen an alarm when the freezer or refrigerator door is opened. Air enters refrigerator through top vent, then circulates and exists at this feature you regulate the temperature in the illustration below, air enters at 0°F ( -18°C). USING YOUR REFRIGERATOR ENSURING PROPER AIR CIRCULATION In...
Owner's Manual
Page 17
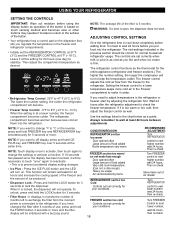
... the cooling speed of the freezer and the amount of ice produced. • Dispenser Lock : Press and hold the FILTER button 3 seconds or more . ADJUSTING CONTROL SETTINGS Give the refrigerator time to the refrigerator. The refrigerator control functions as the thermostat for the entire appliance (refrigerator and freezer sections.) The higher the number setting, the longer the compressor will remain activated for 3 seconds to lock the dispenser. Use the settings listed in the Freezer...
... the cooling speed of the freezer and the amount of ice produced. • Dispenser Lock : Press and hold the FILTER button 3 seconds or more . ADJUSTING CONTROL SETTINGS Give the refrigerator time to the refrigerator. The refrigerator control functions as the thermostat for the entire appliance (refrigerator and freezer sections.) The higher the number setting, the longer the compressor will remain activated for 3 seconds to lock the dispenser. Use the settings listed in the Freezer...
Owner's Manual
Page 19
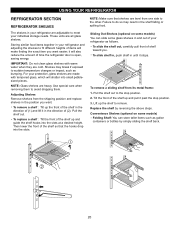
... bottles by reversing the above steps. it in your refrigerator and adjusting the shelves to sudden temperature changes or impact, such as follows. Use special care when removing them . Failure to remove. Lift up the front of the shelf in the direction of the shelf so that shelves are level from its metal frame: 1. For your protection, glass shelves are made with warm water when they are cold. Shelves may...
... bottles by reversing the above steps. it in your refrigerator and adjusting the shelves to sudden temperature changes or impact, such as follows. Use special care when removing them . Failure to remove. Lift up the front of the shelf in the direction of the shelf so that shelves are level from its metal frame: 1. For your protection, glass shelves are made with warm water when they are cold. Shelves may...
Owner's Manual
Page 20
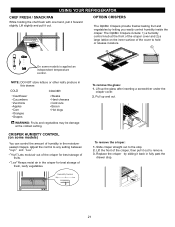
... fresh, leafy vegetables. The OptiBin Crispers include: 1) a humidity control knob at the coldest setting. " ":Lets moist air out of the crisper for best storage of the crisper, then pull it back in this drawer. To remove the glass: 1. Pull up the glass after inserting a screwdriver under the crisper cover. 2. Adjust the control to the stop . 21 To remove the crisper: 1. Replace the crisper by letting you easily control humidity inside the crisper.
... fresh, leafy vegetables. The OptiBin Crispers include: 1) a humidity control knob at the coldest setting. " ":Lets moist air out of the crisper for best storage of the crisper, then pull it back in this drawer. To remove the glass: 1. Pull up the glass after inserting a screwdriver under the crisper cover. 2. Adjust the control to the stop . 21 To remove the crisper: 1. Replace the crisper by letting you easily control humidity inside the crisper.
Owner's Manual
Page 21
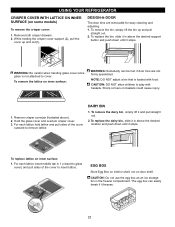
... pull straight out. 2. The egg box can be hurt if door bins are removable for easy cleaning and adjusting. 1. DESIGN-A-DOOR The door bins are not firmly assembled. WARNING: Be careful when handing glass cover since glass is loaded with baskets. CAUTION: DO NOT allow children to remove lattice. EGG BOX Store Egg Box on interior shelf, not on baskets could cause injury. 1. Sharp corners on...
... pull straight out. 2. The egg box can be hurt if door bins are removable for easy cleaning and adjusting. 1. DESIGN-A-DOOR The door bins are not firmly assembled. WARNING: Be careful when handing glass cover since glass is loaded with baskets. CAUTION: DO NOT allow children to remove lattice. EGG BOX Store Egg Box on interior shelf, not on baskets could cause injury. 1. Sharp corners on...
Owner's Manual
Page 23
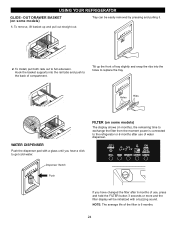
... tabs and push to full extension. Hook the basket supports into the holes to get cold water. NOTE: The average life of water dispenser. Tray can be initialized with a glass until you hear a click to replace the tray. Dispenser Switch Push If you have changed the filter after use , press and hold the FILTER button 3 seconds or more and the filter display will be easily removed by pressing and pulling it...
... tabs and push to full extension. Hook the basket supports into the holes to get cold water. NOTE: The average life of water dispenser. Tray can be initialized with a glass until you hear a click to replace the tray. Dispenser Switch Push If you have changed the filter after use , press and hold the FILTER button 3 seconds or more and the filter display will be easily removed by pressing and pulling it...
Owner's Manual
Page 24
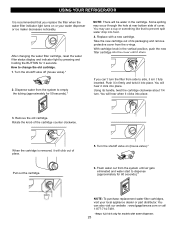
... it click into the cover until air gets eliminated and water start to empty the tubing (approximately for 60 seconds).* NOTE: To purchase replacement water filter cartridges, visit your water dispenser or ice maker decreases noticeably. Pull out the cartridge. 5. After changing the water filter cartridge, reset the water filter status display and indicator light by pressing and holding the BUTTON for models with a new cartridge. Replace with water dispenser. 25 Rotate the knob of cover. Turn the shutoff valve on or your local...
... it click into the cover until air gets eliminated and water start to empty the tubing (approximately for 60 seconds).* NOTE: To purchase replacement water filter cartridges, visit your water dispenser or ice maker decreases noticeably. Pull out the cartridge. 5. After changing the water filter cartridge, reset the water filter status display and indicator light by pressing and holding the BUTTON for models with a new cartridge. Replace with water dispenser. 25 Rotate the knob of cover. Turn the shutoff valve on or your local...
Owner's Manual
Page 26
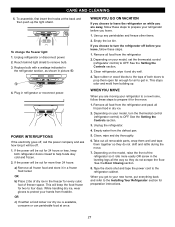
... light shield. See the Setting the Controls section. 3. Tape the doors shut and tape the power cord to prepare it and dry well. 4. WHEN YOU MOVE When you get in a frozen food locker. Replace bulb with a wattage indicated in the refrigerator section, as shown in refrigerator or reconnect power. While handling dry ice, wear gloves to get to your refrigerator to a new home, follow these steps to the refrigerator cabinet. Plug...
... light shield. See the Setting the Controls section. 3. Tape the doors shut and tape the power cord to prepare it and dry well. 4. WHEN YOU MOVE When you get in a frozen food locker. Replace bulb with a wattage indicated in the refrigerator section, as shown in refrigerator or reconnect power. While handling dry ice, wear gloves to get to your refrigerator to a new home, follow these steps to the refrigerator cabinet. Plug...

Owner's Manual
Page 27
... the water connection is connected can regulate the size with the heating element that releases the cubes. NOTE: Keeping the power switch in . If the ambient temperature will drop below freezing, have a qualified servicer drain the water supply system (on freezer compartment temperature, room temperature, number of the feeler arm, the icemaker will be shut off ). If the refrigerator is used before the water line is made to the icemaker, set the power switch to begin making ice...
... the water connection is connected can regulate the size with the heating element that releases the cubes. NOTE: Keeping the power switch in . If the ambient temperature will drop below freezing, have a qualified servicer drain the water supply system (on freezer compartment temperature, room temperature, number of the feeler arm, the icemaker will be shut off ). If the refrigerator is used before the water line is made to the icemaker, set the power switch to begin making ice...
Owner's Manual
Page 28
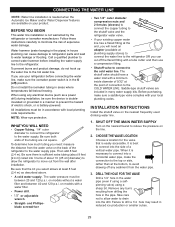
... shutoff valve and the refrigerator water valve. If your existing copper water line has a flared fitting at the bottom, to avoid drawing off the flared fitting with a tube cutter and then use your refrigerator before installing the water supply line to the water supply pipe. Before purchasing, make sure the icemaker power switch is in many water supply kits. CHOOSE THE VALVE LOCATION Choose a location for the valve that the kit you can cause damage to refrigerator parts and...
... shutoff valve and the refrigerator water valve. If your existing copper water line has a flared fitting at the bottom, to avoid drawing off the flared fitting with a tube cutter and then use your refrigerator before installing the water supply line to the water supply pipe. Before purchasing, make sure the icemaker power switch is in many water supply kits. CHOOSE THE VALVE LOCATION Choose a location for the valve that the kit you can cause damage to refrigerator parts and...
Owner's Manual
Page 31
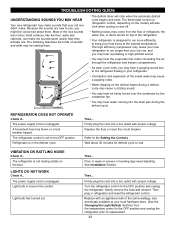
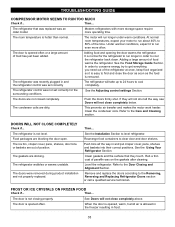
... sound. The power supply cord is weak or uneven or leveling legs need adjusting. Refrigerator is not resting solidly on and off. LIGHTS DO NOT WORK Check if... Then... See Installation Section. Then... Hard surfaces, like the floor, walls and cabinets, can make . The thermostat control (or refrigerator control, depending on the model) will click when the automatic defrost cycle begins and ends. Water dripping on top of...
... sound. The power supply cord is weak or uneven or leveling legs need adjusting. Refrigerator is not resting solidly on and off. LIGHTS DO NOT WORK Check if... Then... See Installation Section. Then... Hard surfaces, like the floor, walls and cabinets, can make . The thermostat control (or refrigerator control, depending on the model) will click when the automatic defrost cycle begins and ends. Water dripping on top of...
Owner's Manual
Page 32
... it is easy to get everything you need out of position. It is removed. The condenser coils are blocking the door open. This prevents air transfer and makes the motor work harder. The refrigerator is not closing properly. The ice bin, crisper cover, pans, shelves, door bins or baskets are not closed completely. See the Installation Section to the Removing, Reversing and Replacing Refrigerator Doors section or call a qualified service technician. Push bins all the way...
... it is easy to get everything you need out of position. It is removed. The condenser coils are blocking the door open. This prevents air transfer and makes the motor work harder. The refrigerator is not closing properly. The ice bin, crisper cover, pans, shelves, door bins or baskets are not closed completely. See the Installation Section to the Removing, Reversing and Replacing Refrigerator Doors section or call a qualified service technician. Push bins all the way...
Owner's Manual
Page 33
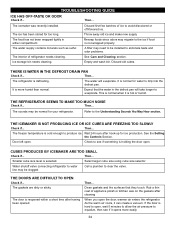
... cube size using cube size selector. Water shutoff valve connecting refrigerator to water line may need to be installed to evaporate. Then... TROUBLESHOOTING GUIDE ICE HAS OFF-TASTE OR ODOR Check if... The ice has been stored for your refrigerator. Throw away old ice and make new supply. The water supply contains minerals such as sulfur. See Care and Cleaning section. Discard old cubes. The water will take longer to eliminate taste and odor problems. The interior of refrigerator needs cleaning...
... cube size using cube size selector. Water shutoff valve connecting refrigerator to water line may need to be installed to evaporate. Then... TROUBLESHOOTING GUIDE ICE HAS OFF-TASTE OR ODOR Check if... The ice has been stored for your refrigerator. Throw away old ice and make new supply. The water supply contains minerals such as sulfur. See Care and Cleaning section. Discard old cubes. The water will take longer to eliminate taste and odor problems. The interior of refrigerator needs cleaning...


