Owners Manual
Page 2
... Installation Overview 14 Unpacking the Refrigerator 14 Choosing the Proper Location 16 Removing/Assembling Handles 17 Removing/Assembling the Doors and Drawers 22 Connecting the Water Line 25 Leveling and Door Alignment 27 Turning on the Power 28 OPERATION 28 Before Use 29 Control Panel 30 Sabbath Mode 30 Automatic Icemaker 31 Storing Food 32 Humidity Controlled Crispers 32 Durabase® 33 Glide'N'Serve 33 Detaching/Assembling the Storage Bins 34 Adjusting the Refrigerator Shelves 35 InstaView Door-in-Door (On Some Models...
... Installation Overview 14 Unpacking the Refrigerator 14 Choosing the Proper Location 16 Removing/Assembling Handles 17 Removing/Assembling the Doors and Drawers 22 Connecting the Water Line 25 Leveling and Door Alignment 27 Turning on the Power 28 OPERATION 28 Before Use 29 Control Panel 30 Sabbath Mode 30 Automatic Icemaker 31 Storing Food 32 Humidity Controlled Crispers 32 Durabase® 33 Glide'N'Serve 33 Detaching/Assembling the Storage Bins 34 Adjusting the Refrigerator Shelves 35 InstaView Door-in-Door (On Some Models...
Owners Manual
Page 6
... supervision. ••Unplug the power plug before cleaning or repairing the refrigerator. ••The refrigerator and freezer compartment lights are of a blackout or thunderstorm. ••Turn the power off if water or dust penetrates into the refrigerator. Cleaning and user maintenance shall not be used in this appliance. ••Do not use a hair dryer to dry the inside the refrigerator. When disposing, please consult...
... supervision. ••Unplug the power plug before cleaning or repairing the refrigerator. ••The refrigerator and freezer compartment lights are of a blackout or thunderstorm. ••Turn the power off if water or dust penetrates into the refrigerator. Cleaning and user maintenance shall not be used in this appliance. ••Do not use a hair dryer to dry the inside the refrigerator. When disposing, please consult...
Owners Manual
Page 7
... in accordance with warm water when they are cold. GROUNDING INSTRUCTIONS ••Improper connection of the refrigerator. ••Do not clean glass shelves or covers with the Installation Instructions. Always grip the plug firmly and pull straight out from the door or take off the prongs of electric shock. Failure to do so may cause damage to sudden temperature changes. Do not touch glass surfaces if...
... in accordance with warm water when they are cold. GROUNDING INSTRUCTIONS ••Improper connection of the refrigerator. ••Do not clean glass shelves or covers with the Installation Instructions. Always grip the plug firmly and pull straight out from the door or take off the prongs of electric shock. Failure to do so may cause damage to sudden temperature changes. Do not touch glass surfaces if...
Owners Manual
Page 12
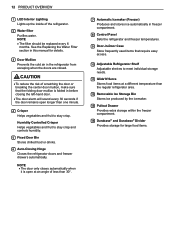
... Adjustable Refrigerator Shelf Adjustable shelves to stay crisp and controls humidity. 5 Fixed Door Bin Stores chilled food or drinks. 6 Auto-Closing Hinge Closes the refrigerator doors and freezer drawers automatically. See the Replacing the Water Filter section in this manual for large food items. 12 PRODUCT OVERVIEW 1 LED Interior Lighting Lights up the inside of less than 30°. 7 Automatic Icemaker (Freezer) Produces and stores ice automatically in freezer compartment. 8 Control Panel Sets the refrigerator and freezer temperatures. 9 Door-in before closing the left...
... Adjustable Refrigerator Shelf Adjustable shelves to stay crisp and controls humidity. 5 Fixed Door Bin Stores chilled food or drinks. 6 Auto-Closing Hinge Closes the refrigerator doors and freezer drawers automatically. See the Replacing the Water Filter section in this manual for large food items. 12 PRODUCT OVERVIEW 1 LED Interior Lighting Lights up the inside of less than 30°. 7 Automatic Icemaker (Freezer) Produces and stores ice automatically in freezer compartment. 8 Control Panel Sets the refrigerator and freezer temperatures. 9 Door-in before closing the left...
Owners Manual
Page 14
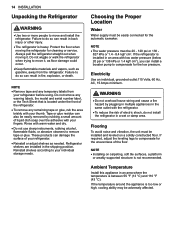
.... Electricity Use an individual, grounded outlet:115 Volts, 60 Hz, AC, 15 Amps minimum. Choosing the Proper Location Water Water supply must be installed and leveled on carpeting, soft tile surfaces, a platform or weakly supported structure is installed in an area where the temperature is heavy. If required, adjust the leveling legs to compensate for the automatic icemaker. Do not wiggle or walk the refrigerator when...
.... Electricity Use an individual, grounded outlet:115 Volts, 60 Hz, AC, 15 Amps minimum. Choosing the Proper Location Water Water supply must be installed and leveled on carpeting, soft tile surfaces, a platform or weakly supported structure is installed in an area where the temperature is heavy. If required, adjust the leveling legs to compensate for the automatic icemaker. Do not wiggle or walk the refrigerator when...
Owners Manual
Page 17
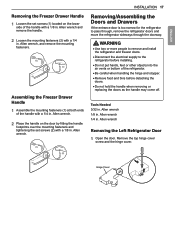
... handle with a 1/4 in . Tools Needed 3/32 in . Remove the top hinge cover screw and the hinge cover. WARNING ••Use two or more people to remove and install the refrigerator and freezer doors. ••Disconnect the electrical supply to pass through, remove the refrigerator doors and move the refrigerator sideways through the doorway. Allen wrench 1/4 in . Allen wrench, and remove the mounting fasteners. ENGLISH Removing the Freezer Drawer Handle 1 Loosen the set screws (1) located...
... handle with a 1/4 in . Tools Needed 3/32 in . Remove the top hinge cover screw and the hinge cover. WARNING ••Use two or more people to remove and install the refrigerator and freezer doors. ••Disconnect the electrical supply to pass through, remove the refrigerator doors and move the refrigerator sideways through the doorway. Allen wrench 1/4 in . Allen wrench, and remove the mounting fasteners. ENGLISH Removing the Freezer Drawer Handle 1 Loosen the set screws (1) located...
Owners Manual
Page 20
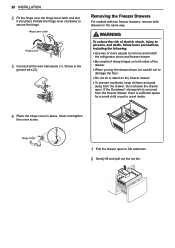
... place. Hinge Cover 1 Pull the drawer open . WARNING To reduce the risk of electric shock, injury to persons, and death, follow basic precautions, including the following: ••Use two or more people to remove and install the refrigerator doors and freezer drawer. ••Be careful of sharp hinges on both drawers in the ground wire (2). If the Durabase® storage bin is removed from the freezer drawer, there...
... place. Hinge Cover 1 Pull the drawer open . WARNING To reduce the risk of electric shock, injury to persons, and death, follow basic precautions, including the following: ••Use two or more people to remove and install the refrigerator doors and freezer drawer. ••Be careful of sharp hinges on both drawers in the ground wire (2). If the Durabase® storage bin is removed from the freezer drawer, there...
Owners Manual
Page 22
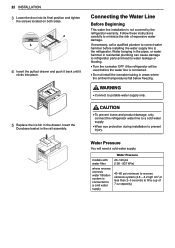
... INSTALLATION 3 Lower the door into its final position and tighten the screws located on both sides. 4 Insert the pullout drawer and push it back until it clicks into place. Water Pressure You will be used before installing the water supply line to prevent injury. WARNING ••Connect to water leakage or flooding. ••Turn the icemaker OFF if the refrigerator will need a cold water supply. models with water filter where reverse...
... INSTALLATION 3 Lower the door into its final position and tighten the screws located on both sides. 4 Insert the pullout drawer and push it back until it clicks into place. Water Pressure You will be used before installing the water supply line to prevent injury. WARNING ••Connect to water leakage or flooding. ••Turn the icemaker OFF if the refrigerator will need a cold water supply. models with water filter where reverse...
Owners Manual
Page 23
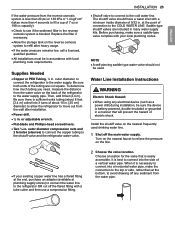
..., add 8 feet (2.4 m). Water Line Installation Instructions WARNING Electric Shock Hazard: ••When using any sediment from the water pipe. or adjustable wrench. ••Flat-blade and Phillips-head screwdrivers. ••Two ¼ in . Saddle-type shutoff valves are cut off the flared fitting with a tube cutter and then use a compression fitting. 2 Choose the valve location. ENGLISH If the water pressure from the reverse osmosis...
..., add 8 feet (2.4 m). Water Line Installation Instructions WARNING Electric Shock Hazard: ••When using any sediment from the water pipe. or adjustable wrench. ••Flat-blade and Phillips-head screwdrivers. ••Two ¼ in . Saddle-type shutoff valves are cut off the flared fitting with a tube cutter and then use a compression fitting. 2 Choose the valve location. ENGLISH If the water pressure from the reverse osmosis...
Owners Manual
Page 29
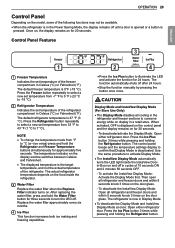
... the Refrigerator button. Use the same procedure to activate Display Mode. ••The InstaView Display Mode automatically turns the LED light inside the refrigerator. 3 Water Filter Replace the water filter when the Replace Filter indicator turns on. After replacing the water filter, press and hold the Refrigerator and Freezer Temperature buttons simultaneously for approximately five seconds. Press the Freezer button repeatedly to select a new set temperature from -7 °F to 5 °F (-23 °C to turn the LED off after 24 hours. ••Stop...
... the Refrigerator button. Use the same procedure to activate Display Mode. ••The InstaView Display Mode automatically turns the LED light inside the refrigerator. 3 Water Filter Replace the water filter when the Replace Filter indicator turns on. After replacing the water filter, press and hold the Refrigerator and Freezer Temperature buttons simultaneously for approximately five seconds. Press the Freezer button repeatedly to select a new set temperature from -7 °F to 5 °F (-23 °C to turn the LED off after 24 hours. ••Stop...
Owners Manual
Page 30
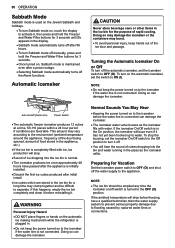
... fingers or hands on the automatic ice making mechanism while the refrigerator is connected can damage the icemaker. ••The icemaker water valve buzzes as the icemaker refills. If this happens, empty the ice bin completely and clean it before the water line is plugged in the pipes as the icemaker fills with ice, ice production will stop the buzzing, set the icemaker On/Off switch to the Off position to...
... fingers or hands on the automatic ice making mechanism while the refrigerator is connected can damage the icemaker. ••The icemaker water valve buzzes as the icemaker refills. If this happens, empty the ice bin completely and clean it before the water line is plugged in the pipes as the icemaker fills with ice, ice production will stop the buzzing, set the icemaker On/Off switch to the Off position to...
Owners Manual
Page 38
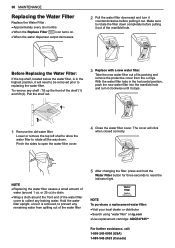
... Replace Filter icon turns on lg.com ••Use replacement cartridge: ADQ747935** For further assistance, call: 1-800-243-0000 (USA) 1-888-542-2623 (Canada) The cover will need to be removed prior to open the water filter cover. 4 Close the water filter cover. Before Replacing the Water Filter: If the top shelf, located below the water filter, is removed, to drain. ••Wrap a cloth around 1 oz. Pull the shelf out. 3 Replace with a new water filter. Pinch the sides to replacing...
... Replace Filter icon turns on lg.com ••Use replacement cartridge: ADQ747935** For further assistance, call: 1-800-243-0000 (USA) 1-888-542-2623 (Canada) The cover will need to be removed prior to open the water filter cover. 4 Close the water filter cover. Before Replacing the Water Filter: If the top shelf, located below the water filter, is removed, to drain. ••Wrap a cloth around 1 oz. Pull the shelf out. 3 Replace with a new water filter. Pinch the sides to replacing...
Owners Manual
Page 41
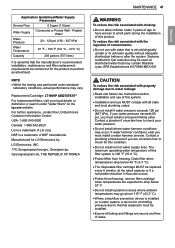
..., contact the LG Electronics Customer Information Center. USA: 1-800-243-0000 Canada: 1-888-542-2623 LG is installed on the lg.com website. If your water pressure. ••Do not install where water hammer conditions may be used on hot water supply lines. Drain filter when temperatures drop below 40 °F (4.4 °C). ••The disposable filter cartridge MUST be replaced every 6 months, at the rated capacity or...
..., contact the LG Electronics Customer Information Center. USA: 1-800-243-0000 Canada: 1-888-542-2623 LG is installed on the lg.com website. If your water pressure. ••Do not install where water hammer conditions may be used on hot water supply lines. Drain filter when temperatures drop below 40 °F (4.4 °C). ••The disposable filter cartridge MUST be replaced every 6 months, at the rated capacity or...
Owners Manual
Page 42
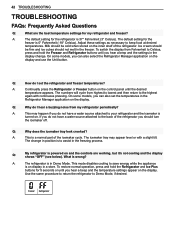
... restore normal operation, press and hold the Freezer and Refrigerator buttons until you can also select the Refrigerator Manager application on the display. Adjust these settings as necessary to Demo Mode, if desired. Q: Why do not have a water source attached to your refrigerator and the icemaker is powered on the inner shelf of the refrigerator. Q: My refrigerator is turned on the control panel until you can also set the refrigerator and freezer temperatures? Use the...
... restore normal operation, press and hold the Freezer and Refrigerator buttons until you can also select the Refrigerator Manager application on the display. Adjust these settings as necessary to Demo Mode, if desired. Q: Why do not have a water source attached to your refrigerator and the icemaker is powered on the inner shelf of the refrigerator. Q: My refrigerator is turned on the control panel until you can also set the refrigerator and freezer temperatures? Use the...
Owners Manual
Page 43
... older model. ••Modern refrigerators require more efficient technology. In order to conserve energy, try to the Food Storage Guide.) Doors are not cooling. The refrigerator control is clogged. ••Use a vacuum cleaner with an attachment to more operating time but use less energy due to clean the condenser cover and vents. Condenser / back cover is set to Demo Mode. ••Demo Mode allows the lights and control display to work...
... older model. ••Modern refrigerators require more efficient technology. In order to conserve energy, try to the Food Storage Guide.) Doors are not cooling. The refrigerator control is clogged. ••Use a vacuum cleaner with an attachment to more operating time but use less energy due to clean the condenser cover and vents. Condenser / back cover is set to Demo Mode. ••Demo Mode allows the lights and control display to work...
Owners Manual
Page 45
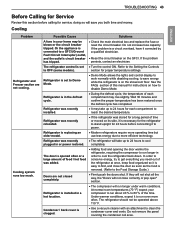
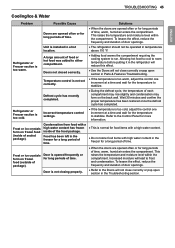
... food (inside of door openings. This raises the temperature and moisture level within the compartment. Wait 30 minutes and confirm the proper temperature has been restored once the defrost cycle has completed. Unit is too warm. Frost or ice crystals form on the back wall. Increased moisture will not close correctly or pop open section in Parts & Features Troubleshooting. TROUBLESHOOTING 45 ENGLISH Cooling/Ice & Water Problem Possible...
... food (inside of door openings. This raises the temperature and moisture level within the compartment. Wait 30 minutes and confirm the proper temperature has been restored once the defrost cycle has completed. Unit is too warm. Frost or ice crystals form on the back wall. Increased moisture will not close correctly or pop open section in Parts & Features Troubleshooting. TROUBLESHOOTING 45 ENGLISH Cooling/Ice & Water Problem Possible...

Owners Manual
Page 46
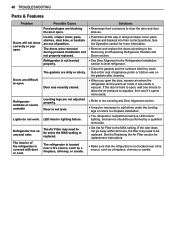
... months. ••When the water filter indicator turns on . Water filter has been exhausted. Icemaker is too warm. Doors are opened often or for the freezer is not making ice Refrigerator was recently installed or icemaker recently connected. The temperature setting for long periods of time. Icemaker not turned on fully, or valve is used. Straighten or repair the water supply line and arrange it to begin making ice. ••Locate the icemaker ON/OFF and confirm that it...
... months. ••When the water filter indicator turns on . Water filter has been exhausted. Icemaker is too warm. Doors are opened often or for the freezer is not making ice Refrigerator was recently installed or icemaker recently connected. The temperature setting for long periods of time. Icemaker not turned on fully, or valve is used. Straighten or repair the water supply line and arrange it to begin making ice. ••Locate the icemaker ON/OFF and confirm that it...
Owners Manual
Page 48
... work. 48 TROUBLESHOOTING Parts & Features Problem Doors will not close correctly or pop open the door, warmer air enters the refrigerator. The interior of appliance polish or kitchen wax on the gaskets after cleaning. ••When you open . Ice bin, crisper cover, pans, shelves, door bins, or baskets are out of position. The doors were removed during product installation and not properly replaced. The refrigerator is LED interior lighting, and service should be performed by a qualified technician. ••Set...
... work. 48 TROUBLESHOOTING Parts & Features Problem Doors will not close correctly or pop open the door, warmer air enters the refrigerator. The interior of appliance polish or kitchen wax on the gaskets after cleaning. ••When you open . Ice bin, crisper cover, pans, shelves, door bins, or baskets are out of position. The doors were removed during product installation and not properly replaced. The refrigerator is LED interior lighting, and service should be performed by a qualified technician. ••Set...
Owners Manual
Page 51
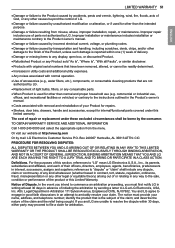
...'s owner's manual. ••Costs associated with normal operation. ••Use of accessories (e.g., water filters, etc.), components, or consumable cleaning products that are not authorized by unauthorized modification or alteration, or if used for other than the intended purpose. ••Damage or failure resulting from the menu. commercial or industrial use of parts not authorized by mail: LG Electronics Customer Service...
...'s owner's manual. ••Costs associated with normal operation. ••Use of accessories (e.g., water filters, etc.), components, or consumable cleaning products that are not authorized by unauthorized modification or alteration, or if used for other than the intended purpose. ••Damage or failure resulting from the menu. commercial or industrial use of parts not authorized by mail: LG Electronics Customer Service...
Owners Manual
Page 54
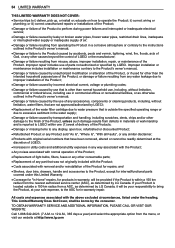
... ••Shelves, door bins, drawers, handle and accessories to improper installation of the Product; ••Damage or failure caused by incorrect electrical current, voltage or plumbing codes; ••Damage or failure caused by use that have been removed, altered or cannot be borne by LGECI. Improper repair includes use of any accessories, components or cleaning products, including, without limitation, water filters, that...
... ••Shelves, door bins, drawers, handle and accessories to improper installation of the Product; ••Damage or failure caused by incorrect electrical current, voltage or plumbing codes; ••Damage or failure caused by use that have been removed, altered or cannot be borne by LGECI. Improper repair includes use of any accessories, components or cleaning products, including, without limitation, water filters, that...


