
Owners Manual
Page 1
OWNER'S MANUAL FRENCH DOOR REFRIGERATOR Please read this guide thoroughly before operating and keep it handy for reference at all times. LFC28768** P/No.: MFL63264274 www.lg.com ENGLISH FRANÇAIS ESPAÑOL
OWNER'S MANUAL FRENCH DOOR REFRIGERATOR Please read this guide thoroughly before operating and keep it handy for reference at all times. LFC28768** P/No.: MFL63264274 www.lg.com ENGLISH FRANÇAIS ESPAÑOL
Owners Manual
Page 2
... Safety Precautions 3 CFC Disposal 4 How to the LG family. Follow the operating and care instructions in this manual and your purchase and welcome to Connect Electricity 5 PARTS AND FEATURES Special Features 6 Key Parts and Components 7 INSTALLATION Choose the Proper Location 8 Clearances 8 Flooring 9 Handle Removal 9 Refrigerator Door and Freezer Drawer Removal ..10 Light...
... Safety Precautions 3 CFC Disposal 4 How to the LG family. Follow the operating and care instructions in this manual and your purchase and welcome to Connect Electricity 5 PARTS AND FEATURES Special Features 6 Key Parts and Components 7 INSTALLATION Choose the Proper Location 8 Clearances 8 Flooring 9 Handle Removal 9 Refrigerator Door and Freezer Drawer Removal ..10 Light...
Owners Manual
Page 5
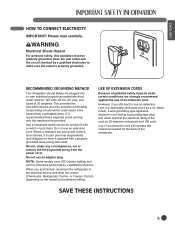
... Some models have it be 20 amperes (minimum) and 120 volts. Do not use an adapter plug. RECOMMENDED GROUNDING METHOD The refrigerator should be properly grounded. SAVE THESE INSTRUCTIONS 5 This provides the best performance and also prevents overloading house wiring circuits which cannot be... OF EXTENSION CORDS Because of an extension cord. However, if you are finished, reconnect the refrigerator to the electrical source and reset the control (Thermostat, Refrigerator Control, or Freezer Control, depending on the model) to make sure the outlet is recommended that a separate ...
... Some models have it be 20 amperes (minimum) and 120 volts. Do not use an adapter plug. RECOMMENDED GROUNDING METHOD The refrigerator should be properly grounded. SAVE THESE INSTRUCTIONS 5 This provides the best performance and also prevents overloading house wiring circuits which cannot be... OF EXTENSION CORDS Because of an extension cord. However, if you are finished, reconnect the refrigerator to the electrical source and reset the control (Thermostat, Refrigerator Control, or Freezer Control, depending on the model) to make sure the outlet is recommended that a separate ...
Owners Manual
Page 6
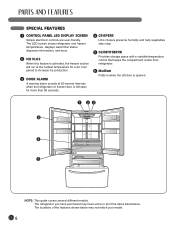
...sounds at the coldest temperature for more than 60 seconds. 4 CRISPERS LG's crispers preserve humidity and help vegetables stay crisp. 5 GLIDE'N'SERVE Provides storage space with a variable temperature control that keeps the compartment colder than refrigerator. 6 Mullion Folds in when the left door is opened. 1... several different models. The locations of the items listed below may have some or all of the features shown below . The refrigerator you have purchased may not match your model. 6 SPECIAL FEATURES 1 CONTROL PANEL LED DISPLAY SCREEN Simple electronic controls are user-...
...sounds at the coldest temperature for more than 60 seconds. 4 CRISPERS LG's crispers preserve humidity and help vegetables stay crisp. 5 GLIDE'N'SERVE Provides storage space with a variable temperature control that keeps the compartment colder than refrigerator. 6 Mullion Folds in when the left door is opened. 1... several different models. The locations of the items listed below may have some or all of the features shown below . The refrigerator you have purchased may not match your model. 6 SPECIAL FEATURES 1 CONTROL PANEL LED DISPLAY SCREEN Simple electronic controls are user-...
Owners Manual
Page 7
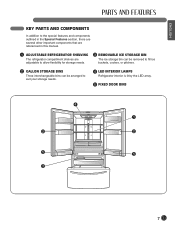
...special features and components outlined in the Special Features section, there are several other important components that are referenced in this manual. 1 ADJUSTABLE REFRIGERATOR SHELVING The refrigerator compartment shelves are adjustable to allow flexibility for storage needs. 3 REMOVABLE ICE STORAGE BIN The ice storage bin can be removed to fill ...ice buckets, coolers, or pitchers. 2 GALLON STORAGE BINS Three interchangeable bins can be arranged to suit your storage needs. 4 LED INTERIOR LAMPS Refrigerator interior is lit by the LED array. 5 FIXED DOOR BINS 4 1 2 2 5 5 3 7
...special features and components outlined in the Special Features section, there are several other important components that are referenced in this manual. 1 ADJUSTABLE REFRIGERATOR SHELVING The refrigerator compartment shelves are adjustable to allow flexibility for storage needs. 3 REMOVABLE ICE STORAGE BIN The ice storage bin can be removed to fill ...ice buckets, coolers, or pitchers. 2 GALLON STORAGE BINS Three interchangeable bins can be arranged to suit your storage needs. 4 LED INTERIOR LAMPS Refrigerator interior is lit by the LED array. 5 FIXED DOOR BINS 4 1 2 2 5 5 3 7
Owners Manual
Page 8
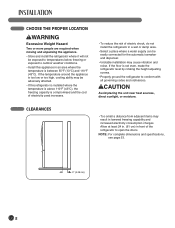
... freezing capability and increased electricity consumption charges. If the floor is not even, make the refrigerator level by rotating the height adjusting screws. • Properly ground the refrigerator to open the doors. CHOOSE THE PROPER LOCATION wWARNING Excessive Weight Hazard Two or more people... (43°C), the freezing capacity is compromised and the cost of electricity used increases. • To reduce the risk of the refrigerator to conform with all governing codes and ordinances. wCAUTION Avoid placing the unit near heat sources, direct sunlight, or moisture. NOTE: For...
... freezing capability and increased electricity consumption charges. If the floor is not even, make the refrigerator level by rotating the height adjusting screws. • Properly ground the refrigerator to open the doors. CHOOSE THE PROPER LOCATION wWARNING Excessive Weight Hazard Two or more people... (43°C), the freezing capacity is compromised and the cost of electricity used increases. • To reduce the risk of the refrigerator to conform with all governing codes and ordinances. wCAUTION Avoid placing the unit near heat sources, direct sunlight, or moisture. NOTE: For...
Owners Manual
Page 9
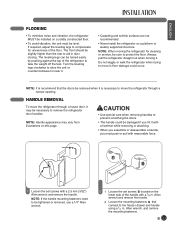
...and handle using a 1/4 in. Mounting Fasteners Set Screw Allen Wrench 1 Loosen the set screws located on the lower side of the refrigerator to move the refrigerator through a house door, it is necessary to protect the floor. Allen wrench and remove the handle. 2 Loosen the mounting fasteners ...wrench and remove the handle. If required, adjust the leveling legs to aid in . ENGLISH FLOORING • To minimize noise and vibration, the refrigerator MUST be installed on a solidly constructed floor. • To avoid vibration, the unit must push or pull with reasonable force. The front ...
...and handle using a 1/4 in. Mounting Fasteners Set Screw Allen Wrench 1 Loosen the set screws located on the lower side of the refrigerator to move the refrigerator through a house door, it is necessary to protect the floor. Allen wrench and remove the handle. 2 Loosen the mounting fasteners ...wrench and remove the handle. If required, adjust the leveling legs to aid in . ENGLISH FLOORING • To minimize noise and vibration, the refrigerator MUST be installed on a solidly constructed floor. • To avoid vibration, the unit must push or pull with reasonable force. The front ...
Owners Manual
Page 10
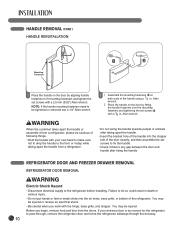
... takes apart the handle or assemble it from a refrigerator, please be injured or receive an electrical shock. • Be careful when you begin, remove food and bins from a refrigerator. 2 1 Assemble the mounting fasteners at both ends of the refrigerator. You may be injured. Before you work with... your entrance door is too narrow for the refrigerator to pass through, remove the refrigerator door and move the refrigerator sideways through the doorway. 10 Allen wrench. • Do not swing the handle towards people or animals after taking apart...
... takes apart the handle or assemble it from a refrigerator, please be injured or receive an electrical shock. • Be careful when you begin, remove food and bins from a refrigerator. 2 1 Assemble the mounting fasteners at both ends of the refrigerator. You may be injured. Before you work with... your entrance door is too narrow for the refrigerator to pass through, remove the refrigerator door and move the refrigerator sideways through the doorway. 10 Allen wrench. • Do not swing the handle towards people or animals after taking apart...
Owners Manual
Page 11
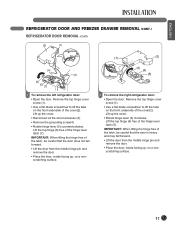
...the door. • Place the door, inside facing up , on a nonscratching surface. (1) (2) (3) (4) (5) 2 To remove the right refrigerator door: • Open the door. IMPORTANT: When lifting the hinge free of the latch, be careful that the door does not fall forward.... flat blade screwdriver to lift the tabs on the front underside of the cover(2). ENGLISH REFRIGERATOR DOOR AND FREEZER DRAWER REMOVAL (CONT.) REFRIGERATOR DOOR REMOVAL (CONT.) (2) (1) (4) (3) (5) (6) (7) 1 To remove the left refrigerator door: • Open the door. Lift the top hinge (4) free of the hinge...
...the door. • Place the door, inside facing up , on a nonscratching surface. (1) (2) (3) (4) (5) 2 To remove the right refrigerator door: • Open the door. IMPORTANT: When lifting the hinge free of the latch, be careful that the door does not fall forward.... flat blade screwdriver to lift the tabs on the front underside of the cover(2). ENGLISH REFRIGERATOR DOOR AND FREEZER DRAWER REMOVAL (CONT.) REFRIGERATOR DOOR REMOVAL (CONT.) (2) (1) (4) (3) (5) (6) (7) 1 To remove the left refrigerator door: • Open the door. Lift the top hinge (4) free of the hinge...

Owners Manual
Page 12
... door. • Lower the door onto middle hinge pin. (2) (4) (1) (5) (3) 4 • Fit the top hinge (1) over the hinge lever latch (2) and into place. REFRIGERATOR DOOR AND FREEZER DRAWER REMOVAL (CONT.) REFRIGERATOR DOOR REINSTALLATION (4) (1) (2) (3) 1 Install the right-side door first. • Lower the door onto the middle hinge pin as shown. • Make sure...
... door. • Lower the door onto middle hinge pin. (2) (4) (1) (5) (3) 4 • Fit the top hinge (1) over the hinge lever latch (2) and into place. REFRIGERATOR DOOR AND FREEZER DRAWER REMOVAL (CONT.) REFRIGERATOR DOOR REINSTALLATION (4) (1) (2) (3) 1 Install the right-side door first. • Lower the door onto the middle hinge pin as shown. • Make sure...
Owners Manual
Page 13
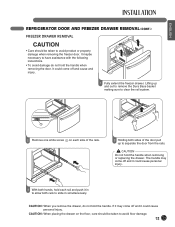
CAUTION: When placing the drawer on each rail and push it in to allow both rails to slide in simultaneously. ENGLISH REFRIGERATOR DOOR AND FREEZER DRAWER REMOVAL (CONT.) FREEZER DRAWER REMOVAL CAUTION • Care should be taken to avoid product or property damage when removing the freezer ...
CAUTION: When placing the drawer on each rail and push it in to allow both rails to slide in simultaneously. ENGLISH REFRIGERATOR DOOR AND FREEZER DRAWER REMOVAL (CONT.) FREEZER DRAWER REMOVAL CAUTION • Care should be taken to avoid product or property damage when removing the freezer ...

Owners Manual
Page 14
... (2). 3 Lower door into final position and tighten the screws. 4 With the drawer pulled out to full extension, insert the lower basket in the rail assembly. REFRIGERATOR DOOR AND FREEZER DRAWER REMOVAL (CONT.) FREEZER DRAWER REINSTALLATION CAUTION • To avoid possible injury or product or property damage, you will need two people...
... (2). 3 Lower door into final position and tighten the screws. 4 With the drawer pulled out to full extension, insert the lower basket in the rail assembly. REFRIGERATOR DOOR AND FREEZER DRAWER REMOVAL (CONT.) FREEZER DRAWER REINSTALLATION CAUTION • To avoid possible injury or product or property damage, you will need two people...
Owners Manual
Page 15
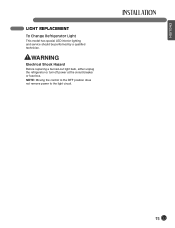
NOTE: Moving the control to the OFF position does not remove power to the light circuit. 15 WARNING Electrical Shock Hazard Before replacing a burned-out light bulb, either unplug the refrigerator or turn off power at the circuit breaker or fuse box. ENGLISH LIGHT REPLACEMENT To Change Refrigerator Light This model has special LED interior lighting and service should be performed by a qualified technician.
NOTE: Moving the control to the OFF position does not remove power to the light circuit. 15 WARNING Electrical Shock Hazard Before replacing a burned-out light bulb, either unplug the refrigerator or turn off power at the circuit breaker or fuse box. ENGLISH LIGHT REPLACEMENT To Change Refrigerator Light This model has special LED interior lighting and service should be performed by a qualified technician.
Owners Manual
Page 16
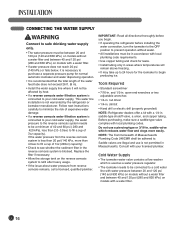
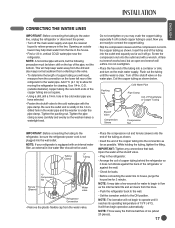
... purchasing, make sure a saddle-type valve complies with local plumbing codes. drill bit • Hand drill or electric drill (properly grounded) NOTE: Refrigerator dealers offer a kit with a 1/4-in . saddle valve which is used as a water pressure regulator. • The icemaker needs to be affected... with local plumbing code requirements. • Use copper tubing and check for the icemaker to begin . • If operating the refrigerator before you begin producing ice. open-end wrenches or two adjustable wrenches • 1/4-in Massachusetts. saddle-type shutoff valve, a union...
... purchasing, make sure a saddle-type valve complies with local plumbing codes. drill bit • Hand drill or electric drill (properly grounded) NOTE: Refrigerator dealers offer a kit with a 1/4-in . saddle valve which is used as a water pressure regulator. • The icemaker needs to be affected... with local plumbing code requirements. • Use copper tubing and check for the icemaker to begin . • If operating the refrigerator before you begin producing ice. open-end wrenches or two adjustable wrenches • 1/4-in Massachusetts. saddle-type shutoff valve, a union...
Owners Manual
Page 17
...A flare nut wrench works best, but the following precaution must be used . Tubing Clamp 1/4" Tubing 1/4" Compression Nut Ferrule (Sleeve) Water valve Refrigerator Connection • Remove the plastic flexible cap from the water valve. • Place the compression nut and ferrule (sleeve) onto the end of... copper tubing. Screw the compression nut onto the outlet end with an internal water filter, an external in . NOTE: If your refrigerator is not plugged into the outlet end squarely as far as shown. Flush out the tubing until it will suffice. NOTE: The ...
...A flare nut wrench works best, but the following precaution must be used . Tubing Clamp 1/4" Tubing 1/4" Compression Nut Ferrule (Sleeve) Water valve Refrigerator Connection • Remove the plastic flexible cap from the water valve. • Place the compression nut and ferrule (sleeve) onto the end of... copper tubing. Screw the compression nut onto the outlet end with an internal water filter, an external in . NOTE: If your refrigerator is not plugged into the outlet end squarely as far as shown. Flush out the tubing until it will suffice. NOTE: The ...

Owners Manual
Page 18
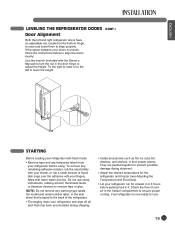
.... 18 Open both clockwise the same amount. one on the right and one on the doors to make sure they close more easily, adjust the refrigerator's tilt using an 11/32 inch (8mm), 11/16 inch (18mm) wrench or a flat blade screw driver. NOTE: To replace the kick plate, place it... wWARNING Electrical Shock Hazard • Be careful when you work with two fresh food doors. You may be independently opened or closed. Your refrigerator has two front leveling legs- Remove the kick plate screws and then the kick plate. • Open the Freezer Drawer. • Once the drawer is ...
.... 18 Open both clockwise the same amount. one on the right and one on the doors to make sure they close more easily, adjust the refrigerator's tilt using an 11/32 inch (8mm), 11/16 inch (18mm) wrench or a flat blade screw driver. NOTE: To replace the kick plate, place it... wWARNING Electrical Shock Hazard • Be careful when you work with two fresh food doors. You may be independently opened or closed. Your refrigerator has two front leveling legs- Remove the kick plate screws and then the kick plate. • Open the Freezer Drawer. • Once the drawer is ...
Owners Manual
Page 19
...small amount of cold air in their proper places. If the space between your doors is taped to the back of the refrigerator. • Thoroughly clean your refrigerator before putting food in the door hinge to adjust the height. Wipe with fresh foods: • Remove tape and any remaining...for use sharp instruments, rubbing alcohol, flammable fluids, or abrasive cleaners to remove tape or glue. To remove any temporary labels from your refrigerator and wipe off all dust that is uneven, follow the instructions below to align the doors evenly: Use the wrench (included with the ...
...small amount of cold air in their proper places. If the space between your doors is taped to the back of the refrigerator. • Thoroughly clean your refrigerator before putting food in the door hinge to adjust the height. Wipe with fresh foods: • Remove tape and any remaining...for use sharp instruments, rubbing alcohol, flammable fluids, or abrasive cleaners to remove tape or glue. To remove any temporary labels from your refrigerator and wipe off all dust that is uneven, follow the instructions below to align the doors evenly: Use the wrench (included with the ...
Owners Manual
Page 20
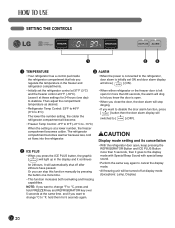
... 2 ICE PLUS • When you press the ICE PLUS button, the graphic [ ] will light up in the freezer and refrigerator compartments. • When the power is connected to °C, press and hold them for 5 seconds again. 20 NOTE: If you ...; This function increases both icemaking and freezing capabilities. SETTING THE CONTROLS 1 2 3 1 TEMPERATURE 3 ALARM • Your refrigerator has a control pad inside the refrigerator compartment that lets you regulate the temperature in the display and it continues for 24hours. Then adjust the compartment temperature as desired...
... 2 ICE PLUS • When you press the ICE PLUS button, the graphic [ ] will light up in the freezer and refrigerator compartments. • When the power is connected to °C, press and hold them for 5 seconds again. 20 NOTE: If you ...; This function increases both icemaking and freezing capabilities. SETTING THE CONTROLS 1 2 3 1 TEMPERATURE 3 ALARM • Your refrigerator has a control pad inside the refrigerator compartment that lets you regulate the temperature in the display and it continues for 24hours. Then adjust the compartment temperature as desired...
Owners Manual
Page 21
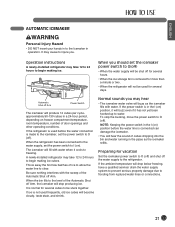
...Icemaker in operation. If the ambient temperature will hear the sound of ice to allow the water line to water. Automatic Shut off ). If the refrigerator is made to the icemaker, set the power switch to O (off Arm Power Switch The icemaker will produce 12 cubes per cycleapproximately 90-130 ...hands in to flooding from ruptured water lines or connections. 21 When the bin fills to the level of the Automatic Shut off ). When the refrigerator has been connected to the water supply, set the icemaker power switch to begin making ice cubes. It is removed for more than a minute ...
...Icemaker in operation. If the ambient temperature will hear the sound of ice to allow the water line to water. Automatic Shut off ). If the refrigerator is made to the icemaker, set the power switch to O (off Arm Power Switch The icemaker will produce 12 cubes per cycleapproximately 90-130 ...hands in to flooding from ruptured water lines or connections. 21 When the bin fills to the level of the Automatic Shut off ). When the refrigerator has been connected to the water supply, set the icemaker power switch to begin making ice cubes. It is removed for more than a minute ...
Owners Manual
Page 22
...compartment. • Do not use the egg box as bananas and melons, at low temperatures. • Allow hot food to cool prior to refrigeration. Vegetables and fruits should be washed and wiped and packed food should be wiped to rise. • Never overload the door racks; NOTE: If...push against the inner racks and prevent the doors from direct contact with a clean cloth or a paper towel. 22 Refrigerator compartment • Avoid placing moist food on the top refrigerator shelves; Wipe the condensation with chilled air. • Always clean food prior to storing; placing hot food in the...
...compartment. • Do not use the egg box as bananas and melons, at low temperatures. • Allow hot food to cool prior to refrigeration. Vegetables and fruits should be washed and wiped and packed food should be wiped to rise. • Never overload the door racks; NOTE: If...push against the inner racks and prevent the doors from direct contact with a clean cloth or a paper towel. 22 Refrigerator compartment • Avoid placing moist food on the top refrigerator shelves; Wipe the condensation with chilled air. • Always clean food prior to storing; placing hot food in the...


