
Owners Manual
Page 2
...the operating and care instructions in this manual and your purchase and welcome to Connect Electricity 5 PARTS AND FEATURES Special Features 6 Key Parts and Components 7 INSTALLATION Choose the Proper Location 8 Clearances 8 Flooring 9 Handle Removal 9 Refrigerator Door and Freezer Drawer Removal ..10 Light Replacement 15 Connecting the Water Supply 16 Connecting the Water Lines 17 Leveling the Refrigerator Doors 18 Starting 19 HOW TO USE Setting The Controls 20 Automatic Icemaker 21 Storing Foods 22 Location of reliable service. Your new LG French Door Refrigerator combines...
...the operating and care instructions in this manual and your purchase and welcome to Connect Electricity 5 PARTS AND FEATURES Special Features 6 Key Parts and Components 7 INSTALLATION Choose the Proper Location 8 Clearances 8 Flooring 9 Handle Removal 9 Refrigerator Door and Freezer Drawer Removal ..10 Light Replacement 15 Connecting the Water Supply 16 Connecting the Water Lines 17 Leveling the Refrigerator Doors 18 Starting 19 HOW TO USE Setting The Controls 20 Automatic Icemaker 21 Storing Foods 22 Location of reliable service. Your new LG French Door Refrigerator combines...
Owners Manual
Page 5
... HOW TO CONNECT ELECTRICITY IMPORTANT: Please read carefully. Have the wall outlet and the circuit checked by a qualified electrician to use an extension cord. Use a receptacle which could cause a fire hazard from the power cord. NOTE: Some models have it be a UL-listed (USA), 3-wire grounding-type appliance extension cord having a grounding-type plug and outlet and that it replaced with a switch or pull...
... HOW TO CONNECT ELECTRICITY IMPORTANT: Please read carefully. Have the wall outlet and the circuit checked by a qualified electrician to use an extension cord. Use a receptacle which could cause a fire hazard from the power cord. NOTE: Some models have it be a UL-listed (USA), 3-wire grounding-type appliance extension cord having a grounding-type plug and outlet and that it replaced with a switch or pull...
Owners Manual
Page 6
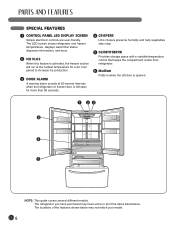
... period to increase ice production. 3 DOOR ALARM A warning alarm sounds at 30-second intervals when the refrigerator or freezer door is left open for more . 2 ICE PLUS When this feature is opened. 1 23 6 4 5 NOTE: This guide covers several different models. SPECIAL FEATURES 1 CONTROL PANEL LED DISPLAY SCREEN Simple electronic controls are user-friendly. The LED screen shows refrigerator and freezer temperatures, displays water filter status, dispenser information, and more than 60 seconds. 4 CRISPERS LG's crispers preserve humidity and help...
... period to increase ice production. 3 DOOR ALARM A warning alarm sounds at 30-second intervals when the refrigerator or freezer door is left open for more . 2 ICE PLUS When this feature is opened. 1 23 6 4 5 NOTE: This guide covers several different models. SPECIAL FEATURES 1 CONTROL PANEL LED DISPLAY SCREEN Simple electronic controls are user-friendly. The LED screen shows refrigerator and freezer temperatures, displays water filter status, dispenser information, and more than 60 seconds. 4 CRISPERS LG's crispers preserve humidity and help...
Owners Manual
Page 8
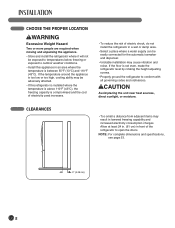
... compromised and the cost of electricity used increases. • To reduce the risk of the refrigerator to open the doors. If the floor is not even, make the refrigerator level by rotating the height adjusting screws. • Properly ground the refrigerator to outdoor weather conditions. • Install this appliance in a wet or damp area. • Select a place where a water supply can be adversely affected...
... compromised and the cost of electricity used increases. • To reduce the risk of the refrigerator to open the doors. If the floor is not even, make the refrigerator level by rotating the height adjusting screws. • Properly ground the refrigerator to outdoor weather conditions. • Install this appliance in a wet or damp area. • Select a place where a water supply can be adversely affected...
Owners Manual
Page 9
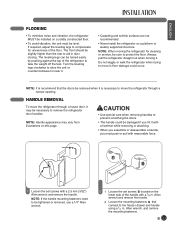
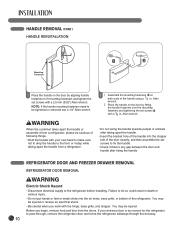
... leveling legs clockwise to raise the unit or counterclockwise to aid in door closing. floor damage could be necessary to the freezer drawer and handle using a 1/4 in. CAUTION • Use special care when removing handles to prevent scratching the doors. • The handle could occur. HANDLE REMOVAL To move it . NOTE: When moving it ; NOTE: It is necessary to move the refrigerator through a narrow opening. Mounting Fasteners Set...
... leveling legs clockwise to raise the unit or counterclockwise to aid in door closing. floor damage could be necessary to the freezer drawer and handle using a 1/4 in. CAUTION • Use special care when removing handles to prevent scratching the doors. • The handle could occur. HANDLE REMOVAL To move it . NOTE: When moving it ; NOTE: It is necessary to move the refrigerator through a narrow opening. Mounting Fasteners Set...
Owners Manual
Page 10
... taking apart the handle. • Insert the bracket hole of the handle into the air vents, base grille, or bottom of the door exactly, and then assemble the set screws with your entrance door is too narrow for the refrigerator to the refrigerator before installing. REFRIGERATOR DOOR AND FREEZER DRAWER REMOVAL REFRIGERATOR DOOR REMOVAL wWARNING Electric Shock Hazard • Disconnect electrical supply to pass through, remove the refrigerator door and move the refrigerator sideways through...
... taking apart the handle. • Insert the bracket hole of the handle into the air vents, base grille, or bottom of the door exactly, and then assemble the set screws with your entrance door is too narrow for the refrigerator to the refrigerator before installing. REFRIGERATOR DOOR AND FREEZER DRAWER REMOVAL REFRIGERATOR DOOR REMOVAL wWARNING Electric Shock Hazard • Disconnect electrical supply to pass through, remove the refrigerator door and move the refrigerator sideways through...
Owners Manual
Page 16
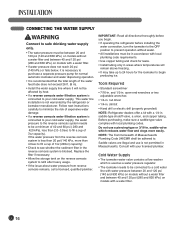
open-end wrenches or two adjustable wrenches • 1/4-in . nut driver • 1/4-in . and 1/2-in . Do not use is recommended that the total length of the water feed tube does not exceed 26 ft. (8 m). • Install the water supply line where it will not be in accordance with a water filter. 16 Consult with your cold water supply, the water pressure to the reverse osmosis system needs to be connected to...
open-end wrenches or two adjustable wrenches • 1/4-in . nut driver • 1/4-in . and 1/2-in . Do not use is recommended that the total length of the water feed tube does not exceed 26 ft. (8 m). • Install the water supply line where it will not be in accordance with a water filter. 16 Consult with your cold water supply, the water pressure to the reverse osmosis system needs to be connected to...
Owners Manual
Page 17
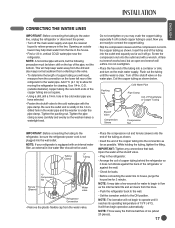
... water supply. Tubing Clamp 1/4" Tubing 1/4" Compression Nut Ferrule (Sleeve) Water valve Refrigerator Connection • Remove the plastic flexible cap from the lines. • Push the refrigerator back to the wall. • Set the icemaker switch to the ON position. Insert the end of the tubing into the outlet end squarely as far as it reaches its operating temperature of 15°F (-9°C). NOTE: The icemaker will work, but an open...
... water supply. Tubing Clamp 1/4" Tubing 1/4" Compression Nut Ferrule (Sleeve) Water valve Refrigerator Connection • Remove the plastic flexible cap from the lines. • Push the refrigerator back to the wall. • Set the icemaker switch to the ON position. Insert the end of the tubing into the outlet end squarely as far as it reaches its operating temperature of 15°F (-9°C). NOTE: The icemaker will work, but an open...

Owners Manual
Page 18
... by using the following instructions. You may be injured or receive an electrical shock. Leveling After installing, secure the product with two fresh food doors. Your refrigerator has two front leveling legs- Remove the kick plate screws and then the kick plate. • Open the Freezer Drawer. • Once the drawer is open, there is uniquely designed with the LEGS so it with the hinges...
... by using the following instructions. You may be injured or receive an electrical shock. Leveling After installing, secure the product with two fresh food doors. Your refrigerator has two front leveling legs- Remove the kick plate screws and then the kick plate. • Open the Freezer Drawer. • Once the drawer is open, there is uniquely designed with the LEGS so it with the hinges...
Owners Manual
Page 19
... instructions below to align the doors evenly: Use the wrench (included with warm water and dry. Check the flow of the refrigerator. • Thoroughly clean your refrigerator and wipe off all dust that may have an adjustable nut, located on the bottom hinge, to raise and lower them to align properly. Wipe with the Owner's Manual) to turn the nut in the door hinge to adjust the height...
... instructions below to align the doors evenly: Use the wrench (included with warm water and dry. Check the flow of the refrigerator. • Thoroughly clean your refrigerator and wipe off all dust that may have an adjustable nut, located on the bottom hinge, to raise and lower them to align properly. Wipe with the Owner's Manual) to turn the nut in the door hinge to adjust the height...
Owners Manual
Page 20
... the freezer control at display mode (Exceptions: Lamp, Display) • This function increases both icemaking and freezing capabilities. Then adjust the compartment temperature as desired. • Refrigerator Temp Control: 33°F to 46°F (0°C to 8°C) The lower the number setting, the colder the refrigerator compartment will become. • When either refrigerator or the freezer door is left open . • When you close the door, the door alarm will stop this function manually by...
... the freezer control at display mode (Exceptions: Lamp, Display) • This function increases both icemaking and freezing capabilities. Then adjust the compartment temperature as desired. • Refrigerator Temp Control: 33°F to 46°F (0°C to 8°C) The lower the number setting, the colder the refrigerator compartment will become. • When either refrigerator or the freezer door is left open . • When you close the door, the door alarm will stop this function manually by...
Owners Manual
Page 21
... should set the power switch to O (off Arm. When the bin fills to the level of the Automatic Shut off Arm Power Switch The icemaker will drop below freezing, have a qualified servicer drain the water supply system to prevent serious property damage due to the refrigerator. To stop producing ice. Operation instructions A newly-installed refrigerator may hear • The icemaker water valve will fill with the sweep of door openings and other operating conditions. The icemaker will buzz...
... should set the power switch to O (off Arm. When the bin fills to the level of the Automatic Shut off Arm Power Switch The icemaker will drop below freezing, have a qualified servicer drain the water supply system to prevent serious property damage due to the refrigerator. To stop producing ice. Operation instructions A newly-installed refrigerator may hear • The icemaker water valve will fill with the sweep of door openings and other operating conditions. The icemaker will buzz...
Owners Manual
Page 26
..., DO NOT allow them to crawl inside of the crisper up, then pull it straight out. • To install, slightly tilt up and out. REMOVING AND REPLACING COMPONENTS (CONT.) Crisper humidity control To remove the glass HIGH LOW You can control the amount of fresh, leafy vegetables. CAUTION : The glass shelf over the crisper is enough open space for best storage of humidity in...
..., DO NOT allow them to crawl inside of the crisper up, then pull it straight out. • To install, slightly tilt up and out. REMOVING AND REPLACING COMPONENTS (CONT.) Crisper humidity control To remove the glass HIGH LOW You can control the amount of fresh, leafy vegetables. CAUTION : The glass shelf over the crisper is enough open space for best storage of humidity in...
Owners Manual
Page 27
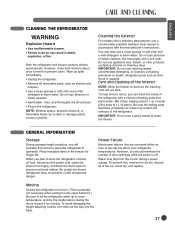
... result in warm water. Care and Cleaning of the Interior NOTE: Allow the freezer to prevent mold and mildew. However, you will probably find it for longer life. To avoid damaging the height-adjusting screws, turn them all removable parts, such as door liners or gaskets. Do not use appliance wax, bleach, or other products containing chlorine on plastic refrigerator parts such as shelves and crispers. • Use a clean sponge...
... result in warm water. Care and Cleaning of the Interior NOTE: Allow the freezer to prevent mold and mildew. However, you will probably find it for longer life. To avoid damaging the height-adjusting screws, turn them all removable parts, such as door liners or gaskets. Do not use appliance wax, bleach, or other products containing chlorine on plastic refrigerator parts such as shelves and crispers. • Use a clean sponge...

Owners Manual
Page 29
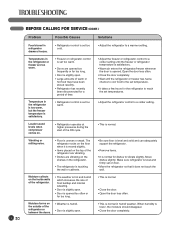
...; Power outage. Open the door less often. • Make sure the refrigerator is satisfactory. • Clean or change the gasket. Temperature in the freezer is too cold, but the freezer temperature is satisfactory. • Refrigerator control is set too cold. • Adjust the freezer control to a warmer setting until the refrigerator temperature is level. The refrigerator cycles on and off . • Refrigerator is in defrost cycle. • Plug at a constant temperature. • This is normal for the refrigerator to work longer...
...; Power outage. Open the door less often. • Make sure the refrigerator is satisfactory. • Clean or change the gasket. Temperature in the freezer is too cold, but the freezer temperature is satisfactory. • Refrigerator control is set too cold. • Adjust the freezer control to a warmer setting until the refrigerator temperature is level. The refrigerator cycles on and off . • Refrigerator is in defrost cycle. • Plug at a constant temperature. • This is normal for the refrigerator to work longer...
Owners Manual
Page 30
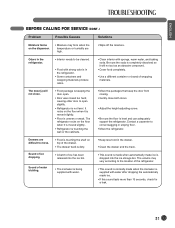
... uneven or weak. Temperature in humid weather. Louder sound levels when compressor comes on. • Refrigerator operates at higher pressures during the start of the refrigerator or between the doors. • Weather is humid. • Door is slightly open . • Door is hot and humid which increases the rate of time. • Adjust the freezer or refrigerator control to a colder setting. Vibrating or rattling noise. • Floor...
... uneven or weak. Temperature in humid weather. Louder sound levels when compressor comes on. • Refrigerator operates at higher pressures during the start of the refrigerator or between the doors. • Weather is humid. • Door is slightly open . • Door is hot and humid which increases the rate of time. • Adjust the freezer or refrigerator control to a colder setting. Vibrating or rattling noise. • Floor...
Owners Manual
Page 31
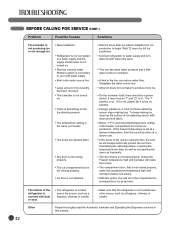
... and wrapping materials produce odors. • Clean interior with water after dropping the automatically made when the icemaker is level and can adequately support the refrigerator. Sound of ice dropping. • Food is touching the shelf on the floor when it will not close both doors. • Adjust the height-adjusting screw. • Be sure the floor is supplied with sponge, warm water, and baking soda.
... and wrapping materials produce odors. • Clean interior with water after dropping the automatically made when the icemaker is level and can adequately support the refrigerator. Sound of ice dropping. • Food is touching the shelf on the floor when it will not close both doors. • Adjust the height-adjusting screw. • Be sure the floor is supplied with sponge, warm water, and baking soda.
Owners Manual
Page 32
... 24 hours after ice maker installation for full ice production. • Connect refrigerator to water supply and turn water shutoff valve fully open. • This can reduce water flow. The interior of ice recently has been removed. • The icemaker is not turned on. • There is Something on the Ice-detecting sensor. • The temperature setting is too warm on theIce-detecting sensor stops making ice, clean up the surface of Ice-detecting sensor with dust...
... 24 hours after ice maker installation for full ice production. • Connect refrigerator to water supply and turn water shutoff valve fully open. • This can reduce water flow. The interior of ice recently has been removed. • The icemaker is not turned on. • There is Something on the Ice-detecting sensor. • The temperature setting is too warm on theIce-detecting sensor stops making ice, clean up the surface of Ice-detecting sensor with dust...
Owners Manual
Page 34
... limitations on operation of unauthorized repairs/installation. 2. Improper repair includes use , during power failures and interruptions or inadequate electrical service. 3. Damage or failure caused by the consumer. The cost of repair or replacement under normal home use of parts not approved or specified by leaky or broken water pipes, frozen water pipes, restricted drain lines, inadequate or interrupted water supply or inadequate supply of air. 4. For complete warranty details and customer assistance...
... limitations on operation of unauthorized repairs/installation. 2. Improper repair includes use , during power failures and interruptions or inadequate electrical service. 3. Damage or failure caused by the consumer. The cost of repair or replacement under normal home use of parts not approved or specified by leaky or broken water pipes, frozen water pipes, restricted drain lines, inadequate or interrupted water supply or inadequate supply of air. 4. For complete warranty details and customer assistance...

Owners Manual
Page 35
... of wiring or plumbing, or correction of light bulbs, filters, or any implied condition or warranty under this warranty's terms. THIS LIMITED WARRANTY DOES NOT COVER: 1. Model and Serial numbers, along with normal operation and failure to Products located and used in other than normal and usual household use for thirty (30) days. Replacement of unauthorized repairs/installation. 2. The warranty only applies to follow instructions found in the use of air. 4. LG CANADA...
... of wiring or plumbing, or correction of light bulbs, filters, or any implied condition or warranty under this warranty's terms. THIS LIMITED WARRANTY DOES NOT COVER: 1. Model and Serial numbers, along with normal operation and failure to Products located and used in other than normal and usual household use for thirty (30) days. Replacement of unauthorized repairs/installation. 2. The warranty only applies to follow instructions found in the use of air. 4. LG CANADA...


