User Guide
Page 2
... French Version 70 Warranty (U.S.A.) 3 Warranty (CANADA) 4 Safety Instructions 5-6 Grounding Requirements 6 Parts And Features 7 Refrigerator Installation 8-15 Unpacking Your Refrigerator 8 Installation 8 Base Cover 8 Removing And Replacing Your Refrigerator Handles And Doors 9-14 Crisper Cover With Lattice On Inner Surface 21 Glide'N'Serve 22 Modular Door Bin 22 Dairy Bin 23 Egg Box 23 u Freezer section Ice Bin 23 Tilt-Out Door Basket 24 Durabase 24 Durabase Divider 24 Pull out Drawer 24 Care And Cleaning 25-26 Leveling And Door...
... French Version 70 Warranty (U.S.A.) 3 Warranty (CANADA) 4 Safety Instructions 5-6 Grounding Requirements 6 Parts And Features 7 Refrigerator Installation 8-15 Unpacking Your Refrigerator 8 Installation 8 Base Cover 8 Removing And Replacing Your Refrigerator Handles And Doors 9-14 Crisper Cover With Lattice On Inner Surface 21 Glide'N'Serve 22 Modular Door Bin 22 Dairy Bin 23 Egg Box 23 u Freezer section Ice Bin 23 Tilt-Out Door Basket 24 Durabase 24 Durabase Divider 24 Pull out Drawer 24 Care And Cleaning 25-26 Leveling And Door...
User Guide
Page 3
... Date of the original unit's warranty period. USA Your LG Refrigerator will be will repaired or replaced, at the time warranty service is used in other than intended purpose. • Repairs when your home to deliver, pick up, and/or install the product, instruct, or replace house fuses or correct wiring, or correction of unauthorized repairs. • Damages or operating problems that vary from the Date...
... Date of the original unit's warranty period. USA Your LG Refrigerator will be will repaired or replaced, at the time warranty service is used in other than intended purpose. • Repairs when your home to deliver, pick up, and/or install the product, instruct, or replace house fuses or correct wiring, or correction of unauthorized repairs. • Damages or operating problems that vary from the Date...
User Guide
Page 5
... refrigerator must be properly installed in the freezer compartment when hands are not followed. DO NOT place fingers or hands on the power cord. Always read and obey all electric service cords that releases the cubes. WARNING To reduce the risk of the ejector mechanism, or with a live wire filament. (A burned-out light bulb may break when being replaced.) NOTE: Setting...
... refrigerator must be properly installed in the freezer compartment when hands are not followed. DO NOT place fingers or hands on the power cord. Always read and obey all electric service cords that releases the cubes. WARNING To reduce the risk of the ejector mechanism, or with a live wire filament. (A burned-out light bulb may break when being replaced.) NOTE: Setting...
User Guide
Page 6
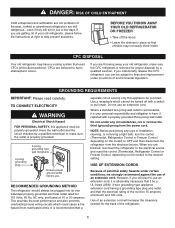
... suffocation are not problems of installation, cleaning, or removing a light bulb, turn the control (Thermostat, Refrigerator Control or Freezer Control, depending on the model) to the desired setting. Junked or abandoned refrigerators are still dangerous...even if they will increase the clearance needed for proper disposal by a qualified electrician to harm stratospheric ozone. CFCs are finished, reconnect the refrigerator to the electrical source and reset the control (Thermostat, Refrigerator Control or Freezer Control, depending on the...
... suffocation are not problems of installation, cleaning, or removing a light bulb, turn the control (Thermostat, Refrigerator Control or Freezer Control, depending on the model) to the desired setting. Junked or abandoned refrigerators are still dangerous...even if they will increase the clearance needed for proper disposal by a qualified electrician to harm stratospheric ozone. CFCs are finished, reconnect the refrigerator to the electrical source and reset the control (Thermostat, Refrigerator Control or Freezer Control, depending on the...
User Guide
Page 8
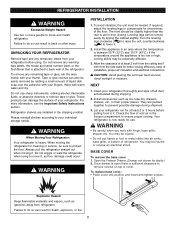
... the temperature around the appliance is too low or high, cooling ability may be leveled. To replace base cover: • Place cover into air vents, base grille, or bottom of refrigerator. When moving it . 2. Clean your thumb. w WARNING • Be careful when you work with warm water and dry. You may be turned easily by rubbing a small amount of the floor. Open the Freezer Drawer. (Drawer not shown...
... the temperature around the appliance is too low or high, cooling ability may be leveled. To replace base cover: • Place cover into air vents, base grille, or bottom of refrigerator. When moving it . 2. Clean your thumb. w WARNING • Be careful when you work with warm water and dry. You may be turned easily by rubbing a small amount of the floor. Open the Freezer Drawer. (Drawer not shown...
User Guide
Page 10
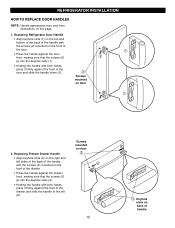
.... 1. Replacing Freezer Drawer Handle Screws mounted on door # • Align keyhole slots (4) on the right and left (6). 10 $ " Keyhole slots on the $ front of the drawer. • Press the handle against the drawer front, making sure that the screws (5) go into the keyhole slots (4). • Holding the handle with the screws (5) mounted on back of the door and slide the handle down (3). REFRIGERATOR INSTALLATION HOW...
.... 1. Replacing Freezer Drawer Handle Screws mounted on door # • Align keyhole slots (4) on the right and left (6). 10 $ " Keyhole slots on the $ front of the drawer. • Press the handle against the drawer front, making sure that the screws (5) go into the keyhole slots (4). • Holding the handle with the screws (5) mounted on back of the door and slide the handle down (3). REFRIGERATOR INSTALLATION HOW...
User Guide
Page 13
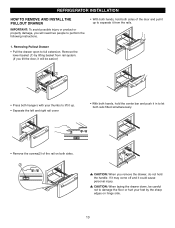
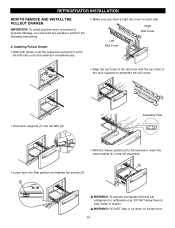
... the drawer open to separate it from rail system. (If you tilt the door, it will need two people to perform the following instructions. • With both hands, hold both sides of the rail on hinge side. 13 REFRIGERATOR INSTALLATION HOW TO REMOVE AND INSTALL THE PULLOUT DRAWER IMPORTANT: To avoid possible injury or product or property damage, you will be careful...
... the drawer open to separate it from rail system. (If you tilt the door, it will need two people to perform the following instructions. • With both hands, hold both sides of the rail on hinge side. 13 REFRIGERATOR INSTALLATION HOW TO REMOVE AND INSTALL THE PULLOUT DRAWER IMPORTANT: To avoid possible injury or product or property damage, you will be careful...
User Guide
Page 14
...; With the drawer pulled out to assemble the rail covers. • Hook door supports (1) into final position and tighten the screws (3). ! DO NOT allow them to play inside of the door supports to full extension, insert the lower basket (4) in the rail assembly. w WARNING: To prevent accidental child and pet entrapment or suffocation risk. REFRIGERATOR INSTALLATION HOW TO REMOVE AND INSTALL THE PULLOUT DRAWER IMPORTANT...
...; With the drawer pulled out to assemble the rail covers. • Hook door supports (1) into final position and tighten the screws (3). ! DO NOT allow them to play inside of the door supports to full extension, insert the lower basket (4) in the rail assembly. w WARNING: To prevent accidental child and pet entrapment or suffocation risk. REFRIGERATOR INSTALLATION HOW TO REMOVE AND INSTALL THE PULLOUT DRAWER IMPORTANT...
User Guide
Page 16
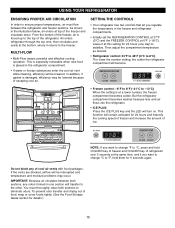
... refrigerator. SETTING THE CONTROLS • Your refrigerator has two controls that let you want to change °C to °F, hold COLDER key of freezer and COLDER key of refrigerator over 5 seconds at this setting for 5 seconds again. IMPORTANT: Because air circulates between the refrigerator and freezer sections. USING YOUR REFRIGERATOR ENSURING PROPER AIR CIRCULATION In order to ensure proper temperatures, air must thoroughly clean both sections, any of cool air...
... refrigerator. SETTING THE CONTROLS • Your refrigerator has two controls that let you want to change °C to °F, hold COLDER key of freezer and COLDER key of refrigerator over 5 seconds at this setting for 5 seconds again. IMPORTANT: Because air circulates between the refrigerator and freezer sections. USING YOUR REFRIGERATOR ENSURING PROPER AIR CIRCULATION In order to ensure proper temperatures, air must thoroughly clean both sections, any of cool air...

User Guide
Page 17
... number setting, the longer the compressor will run to the refrigerator. The freezer control adjusts the cold air flow from the freezer to keep berries in their original container in a crisper, or store in the previous section should be used. 17 If it colder. Use the settings listed in the chart below as the thermostat for normal household refrigerator usage. Door opened often - Large amount of food added - Very cold room temperature...
... number setting, the longer the compressor will run to the refrigerator. The freezer control adjusts the cold air flow from the freezer to keep berries in their original container in a crisper, or store in the previous section should be used. 17 If it colder. Use the settings listed in the chart below as the thermostat for normal household refrigerator usage. Door opened often - Large amount of food added - Very cold room temperature...

User Guide
Page 19
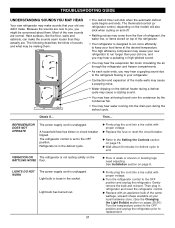
..., glass shelves are made with this bottle holder. Pull the shelf out. NOTE: Glass shelves are cold. w CAUTION: Make sure that the hooks drop into small pebblesized pieces. Your model may have glass or wire shelves. it inward. 19 Bottle holder can be removed by pulling it straight out and installed by placing it at a desired height. USING YOUR REFRIGERATOR REFRIGERATOR SHELVES The shelves in your refrigerator are adjustable to meet your refrigerator...
..., glass shelves are made with this bottle holder. Pull the shelf out. NOTE: Glass shelves are cold. w CAUTION: Make sure that the hooks drop into small pebblesized pieces. Your model may have glass or wire shelves. it inward. 19 Bottle holder can be removed by pulling it straight out and installed by placing it at a desired height. USING YOUR REFRIGERATOR REFRIGERATOR SHELVES The shelves in your refrigerator are adjustable to meet your refrigerator...

User Guide
Page 22
.... Set control level to Cold (print on surface) setting for easy cleaning and adjusting. 1. The drawer also features a self-opening lid that keeps the compartment colder than refrigerator. MODULAR DOOR BIN The door bins are not firmly assembled. To remove the bin, simply lift the bin up the front on baskets could cause injury. 22 USING YOUR REFRIGERATOR GLIDE'N'SERVE The Glide'N'Serve provides storage space with a variable temperature control that opens whenever...
.... Set control level to Cold (print on surface) setting for easy cleaning and adjusting. 1. The drawer also features a self-opening lid that keeps the compartment colder than refrigerator. MODULAR DOOR BIN The door bins are not firmly assembled. To remove the bin, simply lift the bin up the front on baskets could cause injury. 22 USING YOUR REFRIGERATOR GLIDE'N'SERVE The Glide'N'Serve provides storage space with a variable temperature control that opens whenever...

User Guide
Page 23
... out the ice bin. 3. To remove the dairy bin, simply lift it freezes. FREEZER SECTION ICE BIN 1. ICE BIN DRAWER 23 USING YOUR REFRIGERATOR DAIRY BIN 1. w CAUTION: Do not use the egg box as possible and set the ice bin in its correct position, then push in the drawer. EGG BOX Store Egg Box on interior shelf, not on door shelf. To separate the ice bin, pull out the drawer as much as an ice storage bin in...
... out the ice bin. 3. To remove the dairy bin, simply lift it freezes. FREEZER SECTION ICE BIN 1. ICE BIN DRAWER 23 USING YOUR REFRIGERATOR DAIRY BIN 1. w CAUTION: Do not use the egg box as possible and set the ice bin in its correct position, then push in the drawer. EGG BOX Store Egg Box on interior shelf, not on door shelf. To separate the ice bin, pull out the drawer as much as an ice storage bin in...
User Guide
Page 25
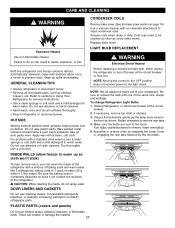
... all removable parts, such as shelves, crispers, etc. Do not use window sprays, abrasive cleansers, or flammable fluids. NOTE: Moving the control to the OFF position does not remove power to the touch. Using a flat instrument, gently pry the lamp cover loose in refrigerator or reconnect power. Assemble in reverse order by snapping the Lamp Cover in warm water. INSIDE WALLS (allow freezer to be cleaned as often as shown. DOOR...
... all removable parts, such as shelves, crispers, etc. Do not use window sprays, abrasive cleansers, or flammable fluids. NOTE: Moving the control to the OFF position does not remove power to the touch. Using a flat instrument, gently pry the lamp cover loose in refrigerator or reconnect power. Assemble in reverse order by snapping the Lamp Cover in warm water. INSIDE WALLS (allow freezer to be cleaned as often as shown. DOOR...
User Guide
Page 26
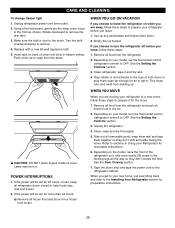
... Door Closing section. 7. CARE AND CLEANING To change freezer light 1. Lamp may be out for preparation instructions. 26 WHEN YOU GO ON VACATION If you choose to leave the refrigerator on your model, turn the refrigerator off before you get in freezer ceiling. Remove all removable parts, wrap them well and tape them open far enough for more easily OR screw in dry ice. 2. See the Setting the Controls section. 3. Use...
... Door Closing section. 7. CARE AND CLEANING To change freezer light 1. Lamp may be out for preparation instructions. 26 WHEN YOU GO ON VACATION If you choose to leave the refrigerator on your model, turn the refrigerator off before you get in freezer ceiling. Remove all removable parts, wrap them well and tape them open far enough for more easily OR screw in dry ice. 2. See the Setting the Controls section. 3. Use...
User Guide
Page 27
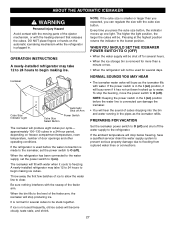
... ). PREPARING FOR VACATION Set the icemaker power switch to the level of door openings and other operating conditions. approximately 100-130 cubes in a 24-hour period, depending on freezer compartment temperature, room temperature, number of the feeler arm, the icemaker will stop the buzzing, move the power switch to O (off the water supply to freezing. A newly-installed refrigerator may take 12 to 24 hours to begin making ice. OPERATION INSTRUCTIONS A newly-installed refrigerator may take 12 to...
... ). PREPARING FOR VACATION Set the icemaker power switch to the level of door openings and other operating conditions. approximately 100-130 cubes in a 24-hour period, depending on freezer compartment temperature, room temperature, number of the feeler arm, the icemaker will stop the buzzing, move the power switch to O (off the water supply to freezing. A newly-installed refrigerator may take 12 to 24 hours to begin making ice. OPERATION INSTRUCTIONS A newly-installed refrigerator may take 12 to...

User Guide
Page 28
... a location for the valve that is best to water leakage or flooding. Remove any burrs resulting from the wall after installation. • A cold water supply. Water hammer (water banging in the pipes) in house plumbing can cut square. Call a qualified plumber to correct water hammer before connecting the water line, make sure the icemaker power switch is sufficient extra tubing (about 8 feet [2.4 m] coiled into the drill. Then add 8 feet (2.4 m). Follow these instructions carefully...
... a location for the valve that is best to water leakage or flooding. Remove any burrs resulting from the wall after installation. • A cold water supply. Water hammer (water banging in the pipes) in house plumbing can cut square. Call a qualified plumber to correct water hammer before connecting the water line, make sure the icemaker power switch is sufficient extra tubing (about 8 feet [2.4 m] coiled into the drill. Then add 8 feet (2.4 m). Follow these instructions carefully...
User Guide
Page 31
... the refrigerator prior to keep your food items at your local hardware store. (See the Changing the Light Bulb(s) section on top of the new sounds are . See Installation section on the RATTLING NOISE floor. LIGHTS DO NOT WORK The power supply cord is weak or uneven or leveling legs need adjusting. Hard surfaces, like the floor, walls and cabinets, can make . u Replace the fuse or reset...
... the refrigerator prior to keep your food items at your local hardware store. (See the Changing the Light Bulb(s) section on top of the new sounds are . See Installation section on the RATTLING NOISE floor. LIGHTS DO NOT WORK The power supply cord is weak or uneven or leveling legs need adjusting. Hard surfaces, like the floor, walls and cabinets, can make . u Replace the fuse or reset...
User Guide
Page 32
... room temperatures, expect your motor to the Removing and Replacing Refrigerator handles and doors section on page 15. Clean the condenser coils. u See Leveling and Door Alignment on pages 9-14, or call a qualified service technician. u Push bins all the way, see Doors will run longer in and the refrigerator control was an older model. u Remove and replace the doors according to run even more operating time. u When the door is opened, warm, humid air is removed. The refrigerator...
... room temperatures, expect your motor to the Removing and Replacing Refrigerator handles and doors section on page 15. Clean the condenser coils. u See Leveling and Door Alignment on pages 9-14, or call a qualified service technician. u Push bins all the way, see Doors will run longer in and the refrigerator control was an older model. u Remove and replace the doors according to run even more operating time. u When the door is opened, warm, humid air is removed. The refrigerator...
User Guide
Page 33
... make new supply. u Rewrap foods since odors may need to be normal for water to see if it can create a vacuum. u Empty and wash bin. It is reopened within a short time after cleaning. See the Setting the Controls section on the gaskets after having been opened. u Select larger cube size using cube size selector. The door is more easily. 33 u A filter may migrate to evaporate. As the warm air cools...
... make new supply. u Rewrap foods since odors may need to be normal for water to see if it can create a vacuum. u Empty and wash bin. It is reopened within a short time after cleaning. See the Setting the Controls section on the gaskets after having been opened. u Select larger cube size using cube size selector. The door is more easily. 33 u A filter may migrate to evaporate. As the warm air cools...


