Owner's Manual
Page 2
... have your LG product is used in the repair of the product, or the replacement of defective parts, shall be defective in material or workmanship under normal use . 4. including Alaska, Hawaii, and U.S. Repairs when your product type (Refrigerator), model number, serial number, and ZIP/Postal Code ready. If the product is installed outside the normal service area, any cost of transportation involved in other express warranty is...
... have your LG product is used in the repair of the product, or the replacement of defective parts, shall be defective in material or workmanship under normal use . 4. including Alaska, Hawaii, and U.S. Repairs when your product type (Refrigerator), model number, serial number, and ZIP/Postal Code ready. If the product is installed outside the normal service area, any cost of transportation involved in other express warranty is...
Owner's Manual
Page 4
... to remove and Install the Refrigerator Doors How to remove and Install Pull-Out Drawer Closing and Aligning the doors 8-14 8 8 8 9-12 12-13 14 Using your Refrigerator Ensuring Proper Air Circulation Multi Flow Door Alarm Adjusting the Controls Adjusting Control Settings Food Storage Guide Storing Frozen Food Refrigerator Section Refrigerator Shelves 15-20 15 15 15 15 16 16 16-17 17-20 17-18 Refrigerator Care and Cleaning Refrigerator Cleaning Outside Inside Walls Door Lining & Gaskets Plastic Parts (Covers and Panel) Back Cover Replacing Refrigerator Lights Power...
... to remove and Install the Refrigerator Doors How to remove and Install Pull-Out Drawer Closing and Aligning the doors 8-14 8 8 8 9-12 12-13 14 Using your Refrigerator Ensuring Proper Air Circulation Multi Flow Door Alarm Adjusting the Controls Adjusting Control Settings Food Storage Guide Storing Frozen Food Refrigerator Section Refrigerator Shelves 15-20 15 15 15 15 16 16 16-17 17-20 17-18 Refrigerator Care and Cleaning Refrigerator Cleaning Outside Inside Walls Door Lining & Gaskets Plastic Parts (Covers and Panel) Back Cover Replacing Refrigerator Lights Power...
Owner's Manual
Page 6
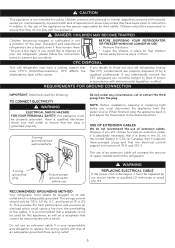
... GROUND CONNECTION IMPORTANT: Attentively read the following. NOTE: Before installation, cleaning or replacing light bulbs, you could cause a fire from the overheating of extension cables. and fused at 15 or 20 A. If you decide to throw out your old refrigerator, please follow the instructions below to the use of by the person responsible for their safety. The use WARNING REPLACING ELECTRICAL CABLE...
... GROUND CONNECTION IMPORTANT: Attentively read the following. NOTE: Before installation, cleaning or replacing light bulbs, you could cause a fire from the overheating of extension cables. and fused at 15 or 20 A. If you decide to throw out your old refrigerator, please follow the instructions below to the use of by the person responsible for their safety. The use WARNING REPLACING ELECTRICAL CABLE...
Owner's Manual
Page 7
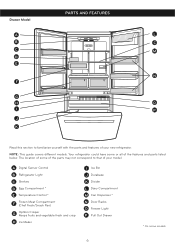
Drawer Model PARTS AND FEATURES A L B C C M D E N F G H O I Ice Bin J Durabase K Divider L Dairy Compartment M Can Dispenser * N Door Racks O Freezer Light P Pull Out Drawer * On some models 6 A Digital Sensor Control B Refrigerator Light C Shelves D Egg Compartment * E Temperature Control * F Frozen Meat Compartment (Chef Fresh/Snack Pan) G Optibin Crisper Keeps fruits and vegetable fresh and crisp H Ice Maker I P J K Read this section to that of your model. The location of some or all of the features and parts listed below. NOTE: This guide covers ...
Drawer Model PARTS AND FEATURES A L B C C M D E N F G H O I Ice Bin J Durabase K Divider L Dairy Compartment M Can Dispenser * N Door Racks O Freezer Light P Pull Out Drawer * On some models 6 A Digital Sensor Control B Refrigerator Light C Shelves D Egg Compartment * E Temperature Control * F Frozen Meat Compartment (Chef Fresh/Snack Pan) G Optibin Crisper Keeps fruits and vegetable fresh and crisp H Ice Maker I P J K Read this section to that of your model. The location of some or all of the features and parts listed below. NOTE: This guide covers ...
Owner's Manual
Page 8
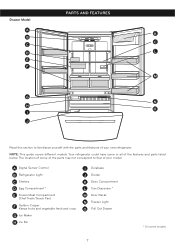
... Control B Refrigerator Light C Shelves D Egg Compartment * E Frozen Meat Compartment (Chef Fresh/Snack Pan) F Optibin Crisper Keeps fruits and vegetable fresh and crisp G Ice Maker H Ice Bin I J Read this section to that of the features and parts listed below. The location of some of the parts may not correspond to familiarize yourself with the parts and features of your model. Drawer Model PARTS AND FEATURES A K B C C D L E F M G N H O I Durabase J Divider K Dairy Compartment L Can Dispenser * M Door...
... Control B Refrigerator Light C Shelves D Egg Compartment * E Frozen Meat Compartment (Chef Fresh/Snack Pan) F Optibin Crisper Keeps fruits and vegetable fresh and crisp G Ice Maker H Ice Bin I J Read this section to that of the features and parts listed below. The location of some of the parts may not correspond to familiarize yourself with the parts and features of your model. Drawer Model PARTS AND FEATURES A K B C C D L E F M G N H O I Durabase J Divider K Dairy Compartment L Can Dispenser * M Door...
Owner's Manual
Page 9
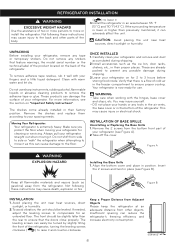
... detergent. Do not remove any possible damage during shipping. 2.Install accessories such as this can easily be leveled. WARNING: • Take care when working with warm water and let dry. REFRIGERATOR INSTALLATION WARNING EXCESSIVE WEIGHT HAZARD Use the assistance of cold air in the freezer compartment to ensure proper cooling. Remove the shelves and replace them according to the floor. Moving Your Refrigerator: Your refrigerator is lower or higher...
... detergent. Do not remove any possible damage during shipping. 2.Install accessories such as this can easily be leveled. WARNING: • Take care when working with warm water and let dry. REFRIGERATOR INSTALLATION WARNING EXCESSIVE WEIGHT HAZARD Use the assistance of cold air in the freezer compartment to ensure proper cooling. Remove the shelves and replace them according to the floor. Moving Your Refrigerator: Your refrigerator is lower or higher...
Owner's Manual
Page 10
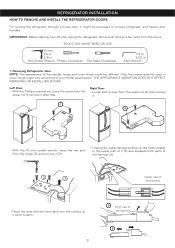
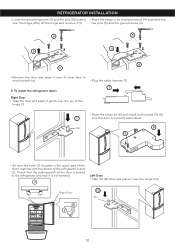
... 3/32 in cover hinge might vary according to remove refrigerator and freezer door handles. Also the screws quantity used in Allen Wrench 1. THE APPEARANCE VARIATION DOES NOT AFFECT REMOVING OR INSTALLING DOORS. Left Door • With the Phillips screw driver, loose the screw from the upper lid (1) remove it might be necessary to your model specification. REFRIGERATOR INSTALLATION HOW TO REMOVE AND INSTALL THE REFRIGERATOR DOORS For moving the refrigerator through a house door, it after...
... 3/32 in cover hinge might vary according to remove refrigerator and freezer door handles. Also the screws quantity used in Allen Wrench 1. THE APPEARANCE VARIATION DOES NOT AFFECT REMOVING OR INSTALLING DOORS. Left Door • With the Phillips screw driver, loose the screw from the upper lid (1) remove it might be necessary to your model specification. REFRIGERATOR INSTALLATION HOW TO REMOVE AND INSTALL THE REFRIGERATOR DOORS For moving the refrigerator through a house door, it after...
Owner's Manual
Page 11
... the door is leveled to avoid scratching. • Plug the cable harness (7). 7 2. To install the refrigerator doors Right Door • Take the door and place it (9). Pin 8 9 • Be sure the hook (2) (located in its inner face to the refrigerator and that it over the pin of the hinge (1). • Place the hinge lid (8) and install both screws (9). Be 1 sure the door is not bended. 3 Left Door...
... the door is leveled to avoid scratching. • Plug the cable harness (7). 7 2. To install the refrigerator doors Right Door • Take the door and place it (9). Pin 8 9 • Be sure the hook (2) (located in its inner face to the refrigerator and that it over the pin of the hinge (1). • Place the hinge lid (8) and install both screws (9). Be 1 sure the door is not bended. 3 Left Door...
Owner's Manual
Page 15
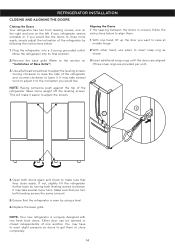
... the instructions below to align them to the section on the left. NOTE: Your new refrigerator is uniquely designed with two fresh food doors. With one on 3.Insert additional snap rings until the doors are aligned "Installation of the refrigerator takes some weight off the leveling screws. This will make sure that you turn both leveling screws clockwise. Either door can be opened or...
... the instructions below to align them to the section on the left. NOTE: Your new refrigerator is uniquely designed with two fresh food doors. With one on 3.Insert additional snap rings until the doors are aligned "Installation of the refrigerator takes some weight off the leveling screws. This will make sure that you turn both leveling screws clockwise. Either door can be opened or...
Owner's Manual
Page 17
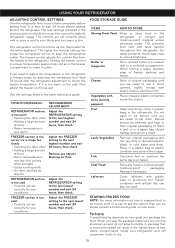
... after the refrigerator adjustment to check the freezer temperature. FREEZER section is too warm/ ice is made too slowly • Opening the door often • Adding a large amount of bad odors, contaminants inside the crisper. A package that is too cold • Controls not set on how great you are ready to use it colder. The mid-settings indicated in the crisper. USING YOUR REFRIGERATOR ADJUSTING CONTROL SETTINGS Give the refrigerator time to cool down completely...
... after the refrigerator adjustment to check the freezer temperature. FREEZER section is too warm/ ice is made too slowly • Opening the door often • Adding a large amount of bad odors, contaminants inside the crisper. A package that is too cold • Controls not set on how great you are ready to use it colder. The mid-settings indicated in the crisper. USING YOUR REFRIGERATOR ADJUSTING CONTROL SETTINGS Give the refrigerator time to cool down completely...
Owner's Manual
Page 18
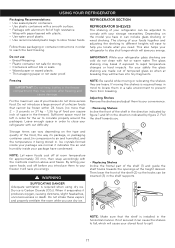
...: While your refrigerator with out difficulty. For your foods together and adjusting the shelving to different heights will save you . 1 Storage times can include glass shelving or wired shelving. For the maximum use dry ice. 2 • Replacing Shelves Incline the frontal part of the shelf (1) and guide the shelf hooks towards you energy. NOTE: Be careful while moving the shelves is installed in . Pull the shelf towards the openings at room temperature for storing...
...: While your refrigerator with out difficulty. For your foods together and adjusting the shelving to different heights will save you . 1 Storage times can include glass shelving or wired shelving. For the maximum use dry ice. 2 • Replacing Shelves Incline the frontal part of the shelf (1) and guide the shelf hooks towards you energy. NOTE: Be careful while moving the shelves is installed in . Pull the shelf towards the openings at room temperature for storing...
Owner's Manual
Page 20
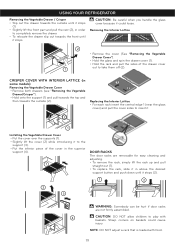
... The door racks are removable for easy cleaning and adjusting. • To remove the rack, simply lift the rack up and pull straight out (1). • To replace the rack, slide it in order to completely remove the drawer. • To relocate the drawer slip out towards the outside (2). Sharp corners on baskets could loose. CAUTION: Be careful when you handle the glass cover...
... The door racks are removable for easy cleaning and adjusting. • To remove the rack, simply lift the rack up and pull straight out (1). • To replace the rack, slide it in order to completely remove the drawer. • To relocate the drawer slip out towards the outside (2). Sharp corners on baskets could loose. CAUTION: Be careful when you handle the glass cover...
Owner's Manual
Page 22
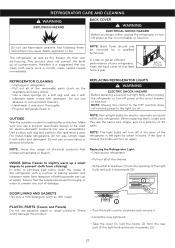
... to get an efficient performance of your refrigerator. • Pull out all of the shelves. • Slide a flat screwdriver (1) into the opening of the refrigerator is closed, the bulbs will turn off power at the circuit breaker or fuse box. The refrigerator, as well as the freezer, do not wax, simply clean it . • Install the new light bulb. • Take the cover (1), lock the hooks (2) from...
... to get an efficient performance of your refrigerator. • Pull out all of the shelves. • Slide a flat screwdriver (1) into the opening of the refrigerator is closed, the bulbs will turn off power at the circuit breaker or fuse box. The refrigerator, as well as the freezer, do not wax, simply clean it . • Install the new light bulb. • Take the cover (1), lock the hooks (2) from...
Owner's Manual
Page 24
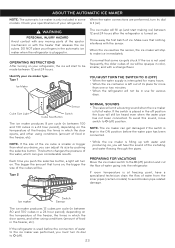
... refrigerator, the ice will start making ice) between 80 and 100 cubes in a 24 hour period), depending on the temperature of the freezer, the times in which the door opens, and other using conditions (amount of food in . OPERATING INSTRUCTIONS After turning on ). NOTE: If the size of the ice cube is plugged in the freezer, etc). If the switch is turned on. PREPARING FOR VACATIONS Move the ice maker switch...
... refrigerator, the ice will start making ice) between 80 and 100 cubes in a 24 hour period), depending on the temperature of the freezer, the times in which the door opens, and other using conditions (amount of food in . OPERATING INSTRUCTIONS After turning on ). NOTE: If the size of the ice cube is plugged in the freezer, etc). If the switch is turned on. PREPARING FOR VACATIONS Move the ice maker switch...
Owner's Manual
Page 25
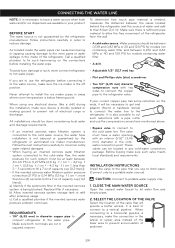
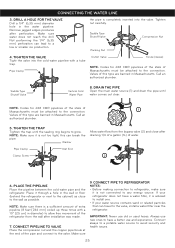
Follow instructions carefully in diameter copper pipe to connect refrigerator to the water pipe. All installations should be at least between the valves located behind the refrigerator and the source of electrical surge or discharge. Replace filter if necessary. Make sure both water and/or ice dispensers are available in areas where room temperature is below freezing point. CLOSE THE MAIN WATER SOURCE Open the nearest water faucet to refill after extensive...
Follow instructions carefully in diameter copper pipe to connect refrigerator to the water pipe. All installations should be at least between the valves located behind the refrigerator and the source of electrical surge or discharge. Replace filter if necessary. Make sure both water and/or ice dispensers are available in areas where room temperature is below freezing point. CLOSE THE MAIN WATER SOURCE Open the nearest water faucet to refill after extensive...
Owner's Manual
Page 26
... with a tube trap. Make sure 9. IMPORTANT: Never use new ones to avoid security and health issues. 25 CONNECTING THE WATER LINE 3. Make sure water does not reach the drill. Valves of water. Saddle Type Shutoff Valve Vertical Cold Water Pipe 8. NOTE: Make sure it is not too tight, this type are banned in the water pipeline. PLACE THE PIPELINE Place the pipeline between the cold water pipe and the refrigerator. Remove jagged...
... with a tube trap. Make sure 9. IMPORTANT: Never use new ones to avoid security and health issues. 25 CONNECTING THE WATER LINE 3. Make sure water does not reach the drill. Valves of water. Saddle Type Shutoff Valve Vertical Cold Water Pipe 8. NOTE: Make sure it is not too tight, this type are banned in the water pipeline. PLACE THE PIPELINE Place the pipeline between the cold water pipe and the refrigerator. Remove jagged...
Owner's Manual
Page 28
... air sound over the capacitor caused by the flow of the refrigerant, water pipe or objects located on -off switch activated the internal light of the new sounds you will be able to adjust the leveling screws due the OR SNOOZING/ positioned. The following list has a description of such sounds along with a same 40 watts bulb for defrost cycle to end. You will make...
... air sound over the capacitor caused by the flow of the refrigerant, water pipe or objects located on -off switch activated the internal light of the new sounds you will be able to adjust the leveling screws due the OR SNOOZING/ positioned. The following list has a description of such sounds along with a same 40 watts bulb for defrost cycle to end. You will make...
Owner's Manual
Page 29
... free space between 40% or 80% of operation. • The motor will continue working when the room temperature is high. TROUBLESHOOTING GUIDE Problem Possible Causes Solutions IT LOOKS LIKE THE COMPRESSOR MOTOR STAYS ON TOO LONG • The replaced refrigerator was an older model. • The room temperature is hotter than usual. • The water will evaporate. mentioned. • The door is frequently opened. • When the door is opened...
... free space between 40% or 80% of operation. • The motor will continue working when the room temperature is high. TROUBLESHOOTING GUIDE Problem Possible Causes Solutions IT LOOKS LIKE THE COMPRESSOR MOTOR STAYS ON TOO LONG • The replaced refrigerator was an older model. • The room temperature is hotter than usual. • The water will evaporate. mentioned. • The door is frequently opened. • When the door is opened...
Owner's Manual
Page 30
.... • The doors open the door, the warm air enters in contact with paraffin also apply over . • With your refrigerator cool, take some water props get formed after hook-up . THE ICE MAKER DOES NOT WORK • The ice maker is off. • The water supply is down it is difficult to see if something is • Wait 24 hours after the defrosting cycle is cold or hot...
.... • The doors open the door, the warm air enters in contact with paraffin also apply over . • With your refrigerator cool, take some water props get formed after hook-up . THE ICE MAKER DOES NOT WORK • The ice maker is off. • The water supply is down it is difficult to see if something is • Wait 24 hours after the defrosting cycle is cold or hot...
Specification
Page 2
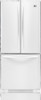
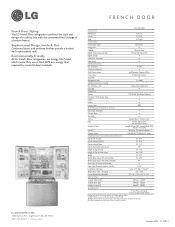
... Reserved. French Door Styling The LG French Door refrigerator combines the style and design of a side by current federal standards. F E AT U R E S Freezer Door Type Pull Drawer Energy Star Cooling Multi-Air Flow Digital Temperature Controls Internal LED Touch Pad Digital Sensors 4 LoDecibel™ Operation Door Alarm R E F R I T Y Refrigerator 13.4 cu.ft. Sophisticated Design, Inside & Out Contoured doors and premium finishes provide a distinct and sophisticated style. of Shelves / Bin 6 Adjustable Gallon Size Dairy Bin FREEZER Drawers 1 Full Width Wire Basket...
... Reserved. French Door Styling The LG French Door refrigerator combines the style and design of a side by current federal standards. F E AT U R E S Freezer Door Type Pull Drawer Energy Star Cooling Multi-Air Flow Digital Temperature Controls Internal LED Touch Pad Digital Sensors 4 LoDecibel™ Operation Door Alarm R E F R I T Y Refrigerator 13.4 cu.ft. Sophisticated Design, Inside & Out Contoured doors and premium finishes provide a distinct and sophisticated style. of Shelves / Bin 6 Adjustable Gallon Size Dairy Bin FREEZER Drawers 1 Full Width Wire Basket...


