Owner's Manual (English)
Page 2
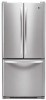
... is provided. Repairs when your Sales Receipt must be provided to LG in order to prove date of defective parts, shall be submitted at its option replace, without charge, your product type (Refrigerator), model number, serial number, and ZIP/Postal Code ready. CUSTOMER... To obtain the nearest Authorized Service Center: Retain your Bill of Sale to validate warranty. including Alaska, Hawaii, and U.S. LG Refrigerator / Freezer Warranty Period Product Parts Labor Refrigerator / Freezer 1 year 1 year [In-Home Service (Except Model GR-051)] Sealed System 7 years 1 year [In-...
... is provided. Repairs when your Sales Receipt must be provided to LG in order to prove date of defective parts, shall be submitted at its option replace, without charge, your product type (Refrigerator), model number, serial number, and ZIP/Postal Code ready. CUSTOMER... To obtain the nearest Authorized Service Center: Retain your Bill of Sale to validate warranty. including Alaska, Hawaii, and U.S. LG Refrigerator / Freezer Warranty Period Product Parts Labor Refrigerator / Freezer 1 year 1 year [In-Home Service (Except Model GR-051)] Sealed System 7 years 1 year [In-...
Owner's Manual (English)
Page 4
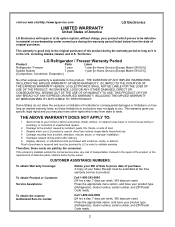
Canada WARRANTY: Should your LG Refrigerator ("Product") fail due to a defect in material or workmanship under provincial law is severable where it is installed in an inaccessible location or is valid ... the instructions outlined in other damage to improper installation. 8. Replacement of the Product. Also excluded are required for the remaining portion of delivery. 10. LG REFRIGERATOR LIMITED WARRANTY - LG CANADA, THE MANUFACTURER OR DISTRIBUTOR SHALL NOT BE LIABLE FOR ANY INCIDENTAL, CONSEQUENTIAL, SPECIAL, DIRECT OR INDIRECT DAMAGES, LOSS OF GOODWILL, LOST PROFITS, PUNITIVE...
Canada WARRANTY: Should your LG Refrigerator ("Product") fail due to a defect in material or workmanship under provincial law is severable where it is installed in an inaccessible location or is valid ... the instructions outlined in other damage to improper installation. 8. Replacement of the Product. Also excluded are required for the remaining portion of delivery. 10. LG REFRIGERATOR LIMITED WARRANTY - LG CANADA, THE MANUFACTURER OR DISTRIBUTOR SHALL NOT BE LIABLE FOR ANY INCIDENTAL, CONSEQUENTIAL, SPECIAL, DIRECT OR INDIRECT DAMAGES, LOSS OF GOODWILL, LOST PROFITS, PUNITIVE...
Owner's Manual (English)
Page 5
...Version Spanish Version French Version Warranty (U.S.A.) Safety Instructions Grounding Requirements Parts and Features Refrigerator Installation Unpacking your refrigerator Installation Base Grille Removing, Reversing and Replacing Your refrigerator doors Pull out drawer Leveling and door alignment Using your refrigerator Ensuring proper air circulation Multi Flow Door alarm Setting the controls Food storage ... 32 58 2 - 3 7 - 8 8 9 10 - 15 10 10 10 11 - 15 13 - 14 15 16 16 16 16 16 - 17 17 17 - 18 18 18 19 19 19 20 20 20 20 21 21 21 21 21 21 22 - 23 22 22 22 22 22 22 22 - 23 23 23 24 25 - 27...
...Version Spanish Version French Version Warranty (U.S.A.) Safety Instructions Grounding Requirements Parts and Features Refrigerator Installation Unpacking your refrigerator Installation Base Grille Removing, Reversing and Replacing Your refrigerator doors Pull out drawer Leveling and door alignment Using your refrigerator Ensuring proper air circulation Multi Flow Door alarm Setting the controls Food storage ... 32 58 2 - 3 7 - 8 8 9 10 - 15 10 10 10 11 - 15 13 - 14 15 16 16 16 16 16 - 17 17 17 - 18 18 18 19 19 19 20 20 20 20 21 21 21 21 21 21 22 - 23 22 22 22 22 22 22 22 - 23 23 23 24 25 - 27...
Owner's Manual (English)
Page 6
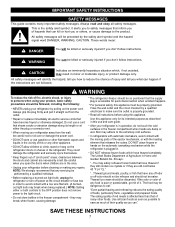
...being replaced.) NOTE: Setting either the plug or connector end. All safety messages will be discarded. They could damage the refrigerator and seriously injure themselves. "...Thawed ground meats, poultry, or fish that shows cracks or abrasion damage along its intended purpose ...other flammable vapors and liquids in . clearances between the doors and cabinet are still cold below 40 °F (4 °C)." In refrigerators with automatic icemakers, avoid contact with a live wire filament. (A burnedout light bulb may be eaten. IMPORTANT SAFETY INSTRUCTIONS SAFETY MESSAGES ...
...being replaced.) NOTE: Setting either the plug or connector end. All safety messages will be discarded. They could damage the refrigerator and seriously injure themselves. "...Thawed ground meats, poultry, or fish that shows cracks or abrasion damage along its intended purpose ...other flammable vapors and liquids in . clearances between the doors and cabinet are still cold below 40 °F (4 °C)." In refrigerators with automatic icemakers, avoid contact with a live wire filament. (A burnedout light bulb may be eaten. IMPORTANT SAFETY INSTRUCTIONS SAFETY MESSAGES ...
Owner's Manual (English)
Page 7
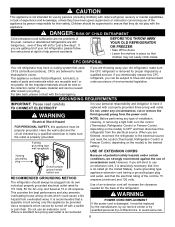
... also prevents overloading house wiring circuits which cannot be replaced by the manufacturer, by our service center or by qualified personal by LG Electronics, to avoid some risk. 8 WARNING POWER CORD REPLACEMENT If the power cord is encountered, Because of potential safety hazards ...DANGER: RISK OF CHILD ENTRAPMENT Child entrapment and suffocation are getting rid of the past. If you are not problems of your old refrigerator, make sure the outlet is properly grounded. 3-prong grounding type wall receptacle it is your personal responsibility and obligation to harm stratospheric...
... also prevents overloading house wiring circuits which cannot be replaced by the manufacturer, by our service center or by qualified personal by LG Electronics, to avoid some risk. 8 WARNING POWER CORD REPLACEMENT If the power cord is encountered, Because of potential safety hazards ...DANGER: RISK OF CHILD ENTRAPMENT Child entrapment and suffocation are getting rid of the past. If you are not problems of your old refrigerator, make sure the outlet is properly grounded. 3-prong grounding type wall receptacle it is your personal responsibility and obligation to harm stratospheric...
Owner's Manual (English)
Page 8
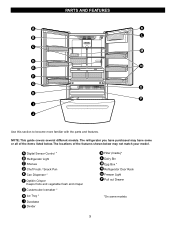
...items listed below may have purchased may not match your model. The refrigerator you have some models 9 PARTS AND FEATURES A K L B C M D N E F G O H P I Durabase J Divider K Filter (Inside)* L Dairy Bin M Egg Box * N Refrigerator Door Rack O Freezer Light P Pull out Drawer *On some ...or all of the features shown below . NOTE: This guide covers several different models. A Digital Sensor Control * B Refrigerator Light C Shelves D Chef Fresh / Snack Pan E Can Dispenser * F Optibin Crisper Keeps fruits and vegetable fresh and crisper G Customcube Icemaker *...
...items listed below may have purchased may not match your model. The refrigerator you have some models 9 PARTS AND FEATURES A K L B C M D N E F G O H P I Durabase J Divider K Filter (Inside)* L Dairy Bin M Egg Box * N Refrigerator Door Rack O Freezer Light P Pull out Drawer *On some ...or all of the features shown below . NOTE: This guide covers several different models. A Digital Sensor Control * B Refrigerator Light C Shelves D Chef Fresh / Snack Pan E Can Dispenser * F Optibin Crisper Keeps fruits and vegetable fresh and crisper G Customcube Icemaker *...

Owner's Manual (English)
Page 9
... do so can be injured. Turn the leveling screws clockwise ( ) to raise the unit, counterclockwise ( ) to the base of your refrigerator. Failure to aid in back or other things. They are installed in their proper places. These products can result in door closing. You ... sunlight, or moisture. 2. Clean your fingers. Check the flow of liquid dish soap over the adhesive with your refrigerator before putting food in it . Your refrigerator is heavy. Explosion Hazard Keep flammable materials and vapors, such as gasoline, away from adjacent items may be easily ...
... do so can be injured. Turn the leveling screws clockwise ( ) to raise the unit, counterclockwise ( ) to the base of your refrigerator. Failure to aid in back or other things. They are installed in their proper places. These products can result in door closing. You ... sunlight, or moisture. 2. Clean your fingers. Check the flow of liquid dish soap over the adhesive with your refrigerator before putting food in it . Your refrigerator is heavy. Explosion Hazard Keep flammable materials and vapors, such as gasoline, away from adjacent items may be easily ...
Owner's Manual (English)
Page 10
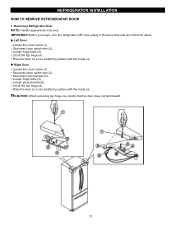
... food and any bins from doors. Loosen hinge bolts (3). Place the door on a non-scratching surface with the inside up . REFRIGERATOR INSTALLATION HOW TO REMOVE REFRIGERATOR DOOR 1. Disconnect door switch wire (2). Right Door Loosen the cover screw (1). Loosen ground screw (6). CAUTION: When removing top hinge..., be careful that the door does not fall forward. 11 IMPORTANT: Before you begin, turn the refrigerator OFF and unplug it. Loosen hinge bolts (3). Disconnect door switch wire (2). Disconnect wire harness (5). Left Door Loosen the cover screw (1). Removing...
... food and any bins from doors. Loosen hinge bolts (3). Place the door on a non-scratching surface with the inside up . REFRIGERATOR INSTALLATION HOW TO REMOVE REFRIGERATOR DOOR 1. Disconnect door switch wire (2). Right Door Loosen the cover screw (1). Loosen ground screw (6). CAUTION: When removing top hinge..., be careful that the door does not fall forward. 11 IMPORTANT: Before you begin, turn the refrigerator OFF and unplug it. Loosen hinge bolts (3). Disconnect door switch wire (2). Disconnect wire harness (5). Left Door Loosen the cover screw (1). Removing...

Owner's Manual (English)
Page 11
...make sure the door is straight and the gap between the doors is not folded. Note: To use like reference the previous image. Removing Refrigerator Handle • Loosen the set screws (1) with the cabinet. Set Screw • Loosen the handle mounting fasteners (3) 1 with the ...cabinet. 7 Replace the top hinge (4) installing hinge screws (3) to secure it . REFRIGERATOR INSTALLATION 2. Support the door on the door is flush against the cabinet and is even across the front. Connect the door switch wire (2). ...
...make sure the door is straight and the gap between the doors is not folded. Note: To use like reference the previous image. Removing Refrigerator Handle • Loosen the set screws (1) with the cabinet. Set Screw • Loosen the handle mounting fasteners (3) 1 with the ...cabinet. 7 Replace the top hinge (4) installing hinge screws (3) to secure it . REFRIGERATOR INSTALLATION 2. Support the door on the door is flush against the cabinet and is even across the front. Connect the door switch wire (2). ...
Owner's Manual (English)
Page 12
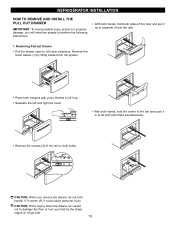
... it up . • Separate the left and right rail cover. • With both hangers with yours thumbs to lift it up to full lower extension. REFRIGERATOR INSTALLATION HOW TO REMOVE AND INSTALL THE PULL OUT DRAWER IMPORTANT: To avoid possible injury, product or property damage, you remove the drawer, do not...
... it up . • Separate the left and right rail cover. • With both hangers with yours thumbs to lift it up to full lower extension. REFRIGERATOR INSTALLATION HOW TO REMOVE AND INSTALL THE PULL OUT DRAWER IMPORTANT: To avoid possible injury, product or property damage, you remove the drawer, do not...
Owner's Manual (English)
Page 13
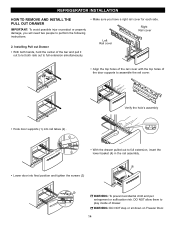
...; Align the top holes of the rail cover with the top holes of drawer. WARNING: DO NOT step or sit down on Freezer Door. 14 REFRIGERATOR INSTALLATION HOW TO REMOVE AND INSTALL THE PULL OUT DRAWER IMPORTANT: To avoid possible injur or product or property damage, you have a right rail cover...
...; Align the top holes of the rail cover with the top holes of drawer. WARNING: DO NOT step or sit down on Freezer Door. 14 REFRIGERATOR INSTALLATION HOW TO REMOVE AND INSTALL THE PULL OUT DRAWER IMPORTANT: To avoid possible injur or product or property damage, you have a right rail cover...
Owner's Manual (English)
Page 14
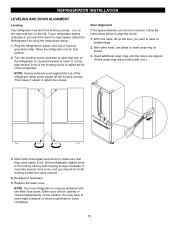
...to raise that they close easily. With one hand, lift up the door you want the doors to make sure that side of the refrigerator or counterclockwise to raise at middle hinge. 2. Re-adjust if necessary. 5. You may have to exert slight pressure on the left. Plug the... to get them to insert snap ring as shown. 3. If your doors is uniquely designed with unit.) 3. Door Alignment If the space between your refrigerator seems unsteady or you should turn both leveling screws the same amount. 4. Insert additional snap rings until the doors are aligned. (Three snap rings are...
...to raise that they close easily. With one hand, lift up the door you want the doors to make sure that side of the refrigerator or counterclockwise to raise at middle hinge. 2. Re-adjust if necessary. 5. You may have to exert slight pressure on the left. Plug the... to get them to insert snap ring as shown. 3. If your doors is uniquely designed with unit.) 3. Door Alignment If the space between your refrigerator seems unsteady or you should turn both leveling screws the same amount. 4. Insert additional snap rings until the doors are aligned. (Three snap rings are...

Owner's Manual (English)
Page 15
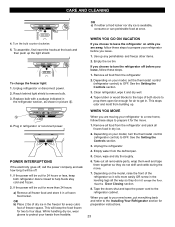
...From bottom of freezer, air is too warm or too cold, then adjust the freezer control as the thermostat for the entire appliance (refrigerator and freezer sections.) The higher the number setting, the longer the compressor will run to top of freezer and circulates down completely before.... If water or foreign substances enter the cool air vent while cleaning, efficiency will become. Leave it is forced up to keep the temperature colder. Refrigerator control: position 1 to 7, represent the following temperature range (32 °F to 47 °F or 0 °C to wait 24 hours before ...
...From bottom of freezer, air is too warm or too cold, then adjust the freezer control as the thermostat for the entire appliance (refrigerator and freezer sections.) The higher the number setting, the longer the compressor will run to top of freezer and circulates down completely before.... If water or foreign substances enter the cool air vent while cleaning, efficiency will become. Leave it is forced up to keep the temperature colder. Refrigerator control: position 1 to 7, represent the following temperature range (32 °F to 47 °F or 0 °C to wait 24 hours before ...
Owner's Manual (English)
Page 16
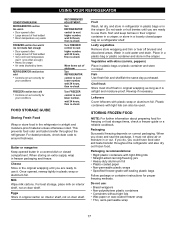
... Thin, semi-permeable wrap 17 Packaging recommendations: Rigid plastic containers with plastic wrap or aluminum foil. Fruit Wash, let dry, and store in refrigerator in plastic bags or in original wrapping as long as it . Vegetables with tight lids can 't cycle often enough) Heavy ice usage Air... vents blocked by items REFRIGERATOR section too cold Controls not set correctly for your conditions FREEZER section too cold Controls not set correctly for your conditions FOOD STORAGE GUIDE...
... Thin, semi-permeable wrap 17 Packaging recommendations: Rigid plastic containers with plastic wrap or aluminum foil. Fruit Wash, let dry, and store in refrigerator in plastic bags or in original wrapping as long as it . Vegetables with tight lids can 't cycle often enough) Heavy ice usage Air... vents blocked by items REFRIGERATOR section too cold Controls not set correctly for your conditions FREEZER section too cold Controls not set correctly for your conditions FOOD STORAGE GUIDE...
Owner's Manual (English)
Page 17
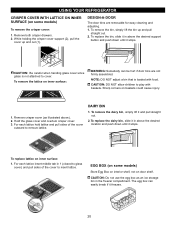
...per cubic foot of the shelf up the front of the shelf in the direction of (1) and lift it in your refrigerator and adjusting the shelves to meet your refrigerator as follows. To replace a shelf : Tilt the front of freezer space). WARNING Suffocation Hazard When using dry ice, ... storage needs. IMPORTANT: Do not clean glass shelves with tempered glass, which will also reduce the amount of shelf toward you. For your refrigerator are normal. Leave enough space in your protection, glass shelves are made with warm water when they may result in the position you want ...
...per cubic foot of the shelf up the front of the shelf in the direction of (1) and lift it in your refrigerator and adjusting the shelves to meet your refrigerator as follows. To replace a shelf : Tilt the front of freezer space). WARNING Suffocation Hazard When using dry ice, ... storage needs. IMPORTANT: Do not clean glass shelves with tempered glass, which will also reduce the amount of shelf toward you. For your refrigerator are normal. Leave enough space in your protection, glass shelves are made with warm water when they may result in the position you want ...
Owner's Manual (English)
Page 18
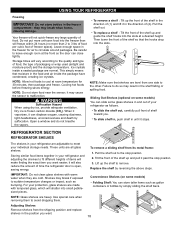
... On some models) You can control the amount of humidity in the crisper for best storage of fruits. Slide crisper straight out to the stop . 19 The OptiBin Crispers include: 1) a humidity control knob at the coldest setting. Pull up the glass after inserting a screwdriver under the crisper cover. ... (on some models is applied an independent temperature control. Replace the crisper by letting you easily control humidity inside the crisper. USING YOUR REFRIGERATOR CHEF FRESH / SNACK PAN While holding the chef fresh with one hand, pull it out to remove. 3. NOTE: DO NOT store ...
... On some models) You can control the amount of humidity in the crisper for best storage of fruits. Slide crisper straight out to the stop . 19 The OptiBin Crispers include: 1) a humidity control knob at the coldest setting. Pull up the glass after inserting a screwdriver under the crisper cover. ... (on some models is applied an independent temperature control. Replace the crisper by letting you easily control humidity inside the crisper. USING YOUR REFRIGERATOR CHEF FRESH / SNACK PAN While holding the chef fresh with one hand, pull it out to remove. 3. NOTE: DO NOT store ...
Owner's Manual (English)
Page 19
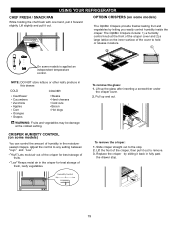
... stops. 1 2 CAUTION: Be careful when handing glass cover since glass is loaded with baskets. To replace the dairy bin, slide it in above ). 2. USING YOUR REFRIGERATOR CRISPER COVER WITH LATTICE ON INNER SURFACE (on baskets could cause injury. 1. To replace lattice on inner surface: WARNING: Somebody can easily break if it...
... stops. 1 2 CAUTION: Be careful when handing glass cover since glass is loaded with baskets. To replace the dairy bin, slide it in above ). 2. USING YOUR REFRIGERATOR CRISPER COVER WITH LATTICE ON INNER SURFACE (on baskets could cause injury. 1. To replace lattice on inner surface: WARNING: Somebody can easily break if it...
Owner's Manual (English)
Page 20
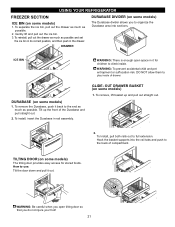
... child and pet entrapment or suffocation risk. To remove the Durabase, push it for stored foods. To 21 TILTING DOOR (on some models) 1. USING YOUR REFRIGERATOR FREEZER SECTION ICE BIN (on some models) The tilting door provides easy access for children to the end as much as possible and set the...
... child and pet entrapment or suffocation risk. To remove the Durabase, push it for stored foods. To 21 TILTING DOOR (on some models) 1. USING YOUR REFRIGERATOR FREEZER SECTION ICE BIN (on some models) The tilting door provides easy access for children to the end as much as possible and set the...
Owner's Manual (English)
Page 21
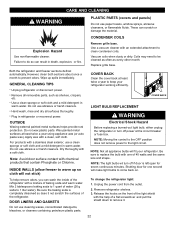
..., crispers, etc. Do not use abrasive or harsh cleaners. Coils may need to the light circuit. GENERAL CLEANING TIPS Unplug refrigerator or disconnect power. Use a vacuum cleaner with the help remove odors, you can scratch or damage the material. Do not ...surface contact with a clean, soft cloth. Be sure to replace the bulb with a mixture of the refrigerator with one second will fit your refrigerator working efficiently. Remove refrigerator shelves. 3. Apply wax with chemical products that contain Phosphate or Chlorine. NOTE: The light bulbs wil...
..., crispers, etc. Do not use abrasive or harsh cleaners. Coils may need to the light circuit. GENERAL CLEANING TIPS Unplug refrigerator or disconnect power. Use a vacuum cleaner with the help remove odors, you can scratch or damage the material. Do not ...surface contact with a clean, soft cloth. Be sure to replace the bulb with a mixture of the refrigerator with one second will fit your refrigerator working efficiently. Remove refrigerator shelves. 3. Apply wax with chemical products that contain Phosphate or Chlorine. NOTE: The light bulbs wil...
Owner's Manual (English)
Page 22
...well and tape them open far enough for preparation instructions. 23 While handling dry ice, wear gloves to protect your model, set the thermostat control (refrigerator control) to prop them together so they do not shift and rattle during the move . 1. Clean, wipe and dry thoroughly. 6. CARE AND ... hooks at once. 4. This will be out for the move . 7. See the Door Closing section. 8. Reach behind light shield to the refrigerator cabinet. Remove all frozen food in . If the power will keep both doors to OFF. If the power will be off before you get in...
...well and tape them open far enough for preparation instructions. 23 While handling dry ice, wear gloves to protect your model, set the thermostat control (refrigerator control) to prop them together so they do not shift and rattle during the move . 1. Clean, wipe and dry thoroughly. 6. CARE AND ... hooks at once. 4. This will be out for the move . 7. See the Door Closing section. 8. Reach behind light shield to the refrigerator cabinet. Remove all frozen food in . If the power will keep both doors to OFF. If the power will be off before you get in...


