
Owners Manual
Page 3
... Dishwasher into Cabinet Opening 19 Connecting Water Supply Line and Power 21 Connecting Drain Hose 23 Leveling Dishwasher 25 Securing Dishwasher to Cabinet Opening 26 Final Installation Check 27 OPERATION 27 Using the Appliance 28 Control Panel 30 Cycles 31 Options 32 Cycle/Option Guide 33 Loading the Dishwasher 33 Loading the Lower Rack 35 Loading the Silverware Basket 36 Loading the Upper Rack 39 Loading the Cutlery Rack (On Some Models) 41 Adding Cleaning Agents 43 SMART FUNCTIONS 43 LG ThinQ Application 45 Smart Diagnosis™ Function 46 MAINTENANCE 46 Cleaning...
... Dishwasher into Cabinet Opening 19 Connecting Water Supply Line and Power 21 Connecting Drain Hose 23 Leveling Dishwasher 25 Securing Dishwasher to Cabinet Opening 26 Final Installation Check 27 OPERATION 27 Using the Appliance 28 Control Panel 30 Cycles 31 Options 32 Cycle/Option Guide 33 Loading the Dishwasher 33 Loading the Lower Rack 35 Loading the Silverware Basket 36 Loading the Upper Rack 39 Loading the Cutlery Rack (On Some Models) 41 Adding Cleaning Agents 43 SMART FUNCTIONS 43 LG ThinQ Application 45 Smart Diagnosis™ Function 46 MAINTENANCE 46 Cleaning...

Owners Manual
Page 6
... to an electrical power supply. ••Do not, under any circumstances, cut or remove the ground from the power supply line. ••When installing or moving the appliance, be replaced by the manufacturer or its service agent or a similar qualified person in the vicinity of this appliance only for its length or at the time of installation. ••Use new hoses when connecting the appliance...
... to an electrical power supply. ••Do not, under any circumstances, cut or remove the ground from the power supply line. ••When installing or moving the appliance, be replaced by the manufacturer or its service agent or a similar qualified person in the vicinity of this appliance only for its length or at the time of installation. ••Use new hoses when connecting the appliance...

Owners Manual
Page 7
... into contact with the appliance. Turn on the door or dish rack of the product. ••Do not plug the dishwasher into a damaged outlet. ••Do not install or keep them out of the reach of water supply hose before using the appliance turn off the faucet. Keep out of reach of cuts. ••Do not wash plastic items unless they are...
... into contact with the appliance. Turn on the door or dish rack of the product. ••Do not plug the dishwasher into a damaged outlet. ••Do not install or keep them out of the reach of water supply hose before using the appliance turn off the faucet. Keep out of reach of cuts. ••Do not wash plastic items unless they are...
Owners Manual
Page 11
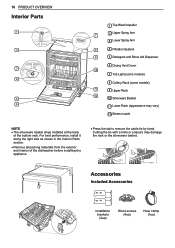
... 23 Installation brackets (2ea) Wood screws (4ea) Hose clamp (1ea) For best performance, install it along the right side as shown in the Interior Parts section. ••Remove all packing materials from the exterior and interior of the bottom rack. 10 PRODUCT OVERVIEW Interior Parts 1 2 3 4 5 6 1 Top Wash Impeller 7 2 Upper Spray Arm 3 Lower Spray Arm 8 4 Filtration System 9 5 Detergent and Rinse Aid Dispenser 6 Drying Vent Cover 10 7 Tub Light (some models) 8 Cutlery Rack (some models) 11 9 Upper Rack 12 10 Silverware Basket 11 Lower Rack...
... 23 Installation brackets (2ea) Wood screws (4ea) Hose clamp (1ea) For best performance, install it along the right side as shown in the Interior Parts section. ••Remove all packing materials from the exterior and interior of the bottom rack. 10 PRODUCT OVERVIEW Interior Parts 1 2 3 4 5 6 1 Top Wash Impeller 7 2 Upper Spray Arm 3 Lower Spray Arm 8 4 Filtration System 9 5 Detergent and Rinse Aid Dispenser 6 Drying Vent Cover 10 7 Tub Light (some models) 8 Cutlery Rack (some models) 11 9 Upper Rack 12 10 Silverware Basket 11 Lower Rack...
Owners Manual
Page 15
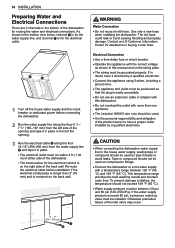
... connecting the dishwasher. 2 Run the water supply line along the floor 6 1/2 - 7 3/4" (165-197 mm) from the left side of the opening and tape it in place in front of the opening. 3 Run the electrical cable along the floor 14-16" (356-406 mm) from the water supply line and tape it checked by a qualified electrician. Electrical Connection ••Use a time-delay fuse or circuit breaker. ••Operate this manual...
... connecting the dishwasher. 2 Run the water supply line along the floor 6 1/2 - 7 3/4" (165-197 mm) from the left side of the opening and tape it in place in front of the opening. 3 Run the electrical cable along the floor 14-16" (356-406 mm) from the water supply line and tape it checked by a qualified electrician. Electrical Connection ••Use a time-delay fuse or circuit breaker. ••Operate this manual...
Owners Manual
Page 27
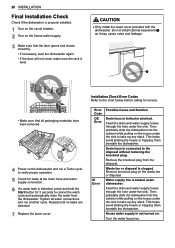
... the door will not close, make sure the rack is kinked under dishwasher. Repeat until no leaks are detected. 7 Replace the lower cover. Waste tee or disposal is detected, press and hold the Start button for service. Then gradually slide the dishwasher into the cabinet while pulling on the hoses under the sink to cancel the wash cycle and automatically drain the water from the disposal. Installation Check Error Codes Refer...
... the door will not close, make sure the rack is kinked under dishwasher. Repeat until no leaks are detected. 7 Replace the lower cover. Waste tee or disposal is detected, press and hold the Start button for service. Then gradually slide the dishwasher into the cabinet while pulling on the hoses under the sink to cancel the wash cycle and automatically drain the water from the disposal. Installation Check Error Codes Refer...

Owners Manual
Page 28
... the lower rack. If the door is not closed without pressing the Start button, the white LED with time flashes, an audible tone is opened during operation or immediately after four minutes of the dry cycle. Add rinse aid if the level is started. Auto-Off The dishwasher automatically turns off and speed the drying process. When Loading the dishwasher 1 Only load items that are not heat-resistant or have decorative metal trim. Quick Start 1 Load the dishes...
... the lower rack. If the door is not closed without pressing the Start button, the white LED with time flashes, an audible tone is opened during operation or immediately after four minutes of the dry cycle. Add rinse aid if the level is started. Auto-Off The dishwasher automatically turns off and speed the drying process. When Loading the dishwasher 1 Only load items that are not heat-resistant or have decorative metal trim. Quick Start 1 Load the dishes...

Owners Manual
Page 29
... the rinse aid level is connected to a cycle, this feature locks all of the dishwasher. b Sanitized (on the control panel shows the ESTIMATED cycle time. When the cycle and options are selected, the display shows the total estimated time to activate or deactivate Control Lock. ••To start a new cycle, deactivate Control Lock. 4 3 •• : Rinse Aid Icon - If the Steam option is for cleaning the inside of the buttons, except for heating water, etc. ••If Delay Start...
... the rinse aid level is connected to a cycle, this feature locks all of the dishwasher. b Sanitized (on the control panel shows the ESTIMATED cycle time. When the cycle and options are selected, the display shows the total estimated time to activate or deactivate Control Lock. ••To start a new cycle, deactivate Control Lock. 4 3 •• : Rinse Aid Icon - If the Steam option is for cleaning the inside of the buttons, except for heating water, etc. ••If Delay Start...

Owners Manual
Page 32
... lower rack and lightly soiled dishes like cups and small plates in the steam inside the tub condensing on dishes, leaving them wet. Energy Saver This option saves energy by selecting the upper or lower racks. Open and close the door or press POWER to improve cleaning. Night Dry Dishes are not intended for use in the dishwasher overnight after the cycle ends. Certified residential dishwashers are often left in licensed food establishments. Wash time...
... lower rack and lightly soiled dishes like cups and small plates in the steam inside the tub condensing on dishes, leaving them wet. Energy Saver This option saves energy by selecting the upper or lower racks. Open and close the door or press POWER to improve cleaning. Night Dry Dishes are not intended for use in the dishwasher overnight after the cycle ends. Certified residential dishwashers are often left in licensed food establishments. Wash time...

Owners Manual
Page 40
... in the middle rack or spoon basket for best performance. Repeat to the dishwasher. 1 Pull the upper rack out until it stops. Heavily soiled utensils or items with baked on the cutlery racks help keep flatware separated to snap the supports into the front hooks. ENGLISH Removing the Snap-In Gliding Upper Rack (On Some Models) These instructions are for models with snap-in...
... in the middle rack or spoon basket for best performance. Repeat to the dishwasher. 1 Pull the upper rack out until it stops. Heavily soiled utensils or items with baked on the cutlery racks help keep flatware separated to snap the supports into the front hooks. ENGLISH Removing the Snap-In Gliding Upper Rack (On Some Models) These instructions are for models with snap-in...

Owners Manual
Page 51
... a rinse aid. First, be certain not to use detergent. Q: How do I take to improve drying results? A: Drying performance is opened in the middle of the dry cycle, the heat that remains in the drying process. LG dishwashers are designed to be used and the performance still needs a boost, adjust the amount of hot water from your home's hot water heater, it may remain on the dishes and the tub. If the door...
... a rinse aid. First, be certain not to use detergent. Q: How do I take to improve drying results? A: Drying performance is opened in the middle of the dry cycle, the heat that remains in the drying process. LG dishwashers are designed to be used and the performance still needs a boost, adjust the amount of hot water from your home's hot water heater, it may remain on the dishes and the tub. If the door...

Owners Manual
Page 54
... dishwasher empty. Water jet holes on dishes. ••Use recommended detergent. Food soil remains on spray arms blocked. ••Clean the spray arms. Improper loading of the owner's manual. Fuse is completely closed . Improper cycle selection. ••Select correct cycle based on soil level and type of cycle. ••Adjust hose or clear blockage. Water temperature is not completely closed and latched. Door is too low. ••Check water supply connection or water heater setting. Filters...
... dishwasher empty. Water jet holes on dishes. ••Use recommended detergent. Food soil remains on spray arms blocked. ••Clean the spray arms. Improper loading of the owner's manual. Fuse is completely closed . Improper cycle selection. ••Select correct cycle based on soil level and type of cycle. ••Adjust hose or clear blockage. Water temperature is not completely closed and latched. Door is too low. ••Check water supply connection or water heater setting. Filters...

Owners Manual
Page 55
... the dishwasher. Insufficient water pressure. ••Water pressure should be at the beginning of drain cycle. See the Operation section. Rinse aid dispenser is normal during cycle. Some level of noise is empty. ••Refill rinse aid dispenser. The dishwasher is crooked. Rinse agent dispenser empty. ••Check and refill the rinse agent dispenser if empty. Holes of spray arms are blocked by using a stain removal product. Door does not close the door properly until the dishwasher and dishes have...
... the dishwasher. Insufficient water pressure. ••Water pressure should be at the beginning of drain cycle. See the Operation section. Rinse aid dispenser is normal during cycle. Some level of noise is empty. ••Refill rinse aid dispenser. The dishwasher is crooked. Rinse agent dispenser empty. ••Check and refill the rinse agent dispenser if empty. Holes of spray arms are blocked by using a stain removal product. Door does not close the door properly until the dishwasher and dishes have...

Owners Manual
Page 56
... appears in display. This code indicates the current Download cycle. This code is touched during operation. ENGLISH TROUBLESHOOTING 55 Problem Dishwasher chimes if panel is used . ••If excessive sudsing is opened during cycle. ••If the door is causing the leak, allow the foam to your smartphone and remove it is supported. Dishwasher did not finish cycle. Door was opened during a cycle, the Start key must be weak and the connection may...
... appears in display. This code indicates the current Download cycle. This code is touched during operation. ENGLISH TROUBLESHOOTING 55 Problem Dishwasher chimes if panel is used . ••If excessive sudsing is opened during cycle. ••If the door is causing the leak, allow the foam to your smartphone and remove it is supported. Dishwasher did not finish cycle. Door was opened during a cycle, the Start key must be weak and the connection may...

Owners Manual
Page 57
... for use detergents which are clogged. ••Clean Filters. Air gap or disposal is properly leveled. Heater circuit failure. ••Please call an LG Electronics Customer Information Center at 1-800-243-0000 (U.S.A.) 1-888-542-2623 (Canada). Motor trouble ••Please call an LG Electronics Customer Information Center at 1-800-243-0000 (U.S.A.) 1-888-542-2623 (Canada). 56 TROUBLESHOOTING Error Codes Problem Possible Cause & Solution Water inlet problem. •...
... for use detergents which are clogged. ••Clean Filters. Air gap or disposal is properly leveled. Heater circuit failure. ••Please call an LG Electronics Customer Information Center at 1-800-243-0000 (U.S.A.) 1-888-542-2623 (Canada). Motor trouble ••Please call an LG Electronics Customer Information Center at 1-800-243-0000 (U.S.A.) 1-888-542-2623 (Canada). 56 TROUBLESHOOTING Error Codes Problem Possible Cause & Solution Water inlet problem. •...

Owners Manual
Page 62
... date of original retail purchase Labor / Parts (internal/functional parts only) Main control board1, Rack, Stainless Steel Door Liner, Tub DD Motor 1 Main control board is valid only to perform during the warranty period set forth below, LG Canada will be new or remanufactured. ••LG Authorized Service Center warranties their repair work for the remaining portion of original retail purchase. LG CANADA, THE MANUFACTURER OR DISTRIBUTOR SHALL...
... date of original retail purchase Labor / Parts (internal/functional parts only) Main control board1, Rack, Stainless Steel Door Liner, Tub DD Motor 1 Main control board is valid only to perform during the warranty period set forth below, LG Canada will be new or remanufactured. ••LG Authorized Service Center warranties their repair work for the remaining portion of original retail purchase. LG CANADA, THE MANUFACTURER OR DISTRIBUTOR SHALL...

Owners Manual
Page 63
... the Product if it is installed in accordance with published installation instructions, including the Product owner's and installation manuals. ••Accessories to the Product such as door bins, drawers, handles, shelves, etc.. All costs associated with the Product. ••Damage resulting from the misuse, abuse, improper installation, repair, or maintenance of light bulbs, filters, or any display, open box, discounted, or refurbished Product. ••Products with original serial numbers that...
... the Product if it is installed in accordance with published installation instructions, including the Product owner's and installation manuals. ••Accessories to the Product such as door bins, drawers, handles, shelves, etc.. All costs associated with the Product. ••Damage resulting from the misuse, abuse, improper installation, repair, or maintenance of light bulbs, filters, or any display, open box, discounted, or refurbished Product. ••Products with original serial numbers that...

Owners Manual
Page 66
... hose. ••Adjust the lower front leveling legs to loose connection of power supply line or electrical outlet problem. IE error Water is not supplied because the inlet hose is kinked. OE error The disposal or air gap is blocked by improper loading or over stacking: wash arm won't rotate or soap dispenser is not removed. OE error The knockout plug in the path of the spray arms. ••Do not place one dish on top of rinse aid...
... hose. ••Adjust the lower front leveling legs to loose connection of power supply line or electrical outlet problem. IE error Water is not supplied because the inlet hose is kinked. OE error The disposal or air gap is blocked by improper loading or over stacking: wash arm won't rotate or soap dispenser is not removed. OE error The knockout plug in the path of the spray arms. ••Do not place one dish on top of rinse aid...

Specification
Page 1
... Control Fully Integrated Control Panel 3 Yes (LED) NeveRust™ Stainless Steel Yes Bar Handle Stainless Steel, Black Stainless Steel, Matte Black Stainless Steel, PrintProof™ Stainless Steel Yes (only LDT7808BM, LDT7808BD, & LDT7808SS) Yes Yes Yes 42 dBA 10 (Auto, Heavy, Delicate, Refresh, Normal, Turbo, Download Cycle, Machine Clean, Rinse, Express) 9 (Dual Zone, Half Load, Energy Saver, Steam, High Temp, Extra Dry, Delay Start, Control Lock, Night Dry) 3 (Top, Upper, Lower) Yes Yes Yes Hybrid Condensing Drying System End of LG Corp. NeveRust™ Stainless Steel Enjoy new...
... Control Fully Integrated Control Panel 3 Yes (LED) NeveRust™ Stainless Steel Yes Bar Handle Stainless Steel, Black Stainless Steel, Matte Black Stainless Steel, PrintProof™ Stainless Steel Yes (only LDT7808BM, LDT7808BD, & LDT7808SS) Yes Yes Yes 42 dBA 10 (Auto, Heavy, Delicate, Refresh, Normal, Turbo, Download Cycle, Machine Clean, Rinse, Express) 9 (Dual Zone, Half Load, Energy Saver, Steam, High Temp, Extra Dry, Delay Start, Control Lock, Night Dry) 3 (Top, Upper, Lower) Yes Yes Yes Hybrid Condensing Drying System End of LG Corp. NeveRust™ Stainless Steel Enjoy new...

Specification
Page 2
... dishwasher water line, sealing tape or compound should be needed on pipe threads to the corresponding User Manual and Installation Guide. Design, features and specifications are approximate. IMPORTANT HOME APPLIANCES LG DISHWASHERS LDT7808_ Top Control wi-fi Enabled Dishwasher with QuadWash™ and TrueSteam® QUICK INSTALL & CLEARANCES For full installation directions/clearances please refer to avoid leaks. Electrical cable 4 1/2" - 6" ▲! Non-metric weights and measurements are subject to properly locate...
... dishwasher water line, sealing tape or compound should be needed on pipe threads to the corresponding User Manual and Installation Guide. Design, features and specifications are approximate. IMPORTANT HOME APPLIANCES LG DISHWASHERS LDT7808_ Top Control wi-fi Enabled Dishwasher with QuadWash™ and TrueSteam® QUICK INSTALL & CLEARANCES For full installation directions/clearances please refer to avoid leaks. Electrical cable 4 1/2" - 6" ▲! Non-metric weights and measurements are subject to properly locate...


