
Owners Manual
Page 3
... Connecting Water Supply Line and Power 21 Connecting Drain Hose 23 Leveling Dishwasher 25 Securing Dishwasher to Cabinet Opening 26 Final Installation Check 27 OPERATION 27 Using the Appliance 28 Control Panel 29 Cycles 30 Options 31 Cycle/Option Guide 32 Loading the Dishwasher 32 Loading the Lower Rack 34 Loading the Silverware Basket 35 Loading the Upper Rack 38 Loading the Cutlery Rack 39 Adding Cleaning Agents 41 SMART FUNCTIONS 41 LG SmartThinQ Application 44 Smart Diagnosis™ Function 45 MAINTENANCE 45 Cleaning the Exterior 45 Cleaning the Interior...
... Connecting Water Supply Line and Power 21 Connecting Drain Hose 23 Leveling Dishwasher 25 Securing Dishwasher to Cabinet Opening 26 Final Installation Check 27 OPERATION 27 Using the Appliance 28 Control Panel 29 Cycles 30 Options 31 Cycle/Option Guide 32 Loading the Dishwasher 32 Loading the Lower Rack 34 Loading the Silverware Basket 35 Loading the Upper Rack 38 Loading the Cutlery Rack 39 Adding Cleaning Agents 41 SMART FUNCTIONS 41 LG SmartThinQ Application 44 Smart Diagnosis™ Function 45 MAINTENANCE 45 Cleaning the Exterior 45 Cleaning the Interior...
Owners Manual
Page 6
... old hoses. ••After installing, check the hose connection for leaks. ••Do not damage or place heavy items on the power supply line. ••Do not use an extension cable or adapter with this or any circumstances, cut or remove the ground from the power supply line. ••When installing or moving the appliance, be replaced by the manufacturer or its service agent or...
... old hoses. ••After installing, check the hose connection for leaks. ••Do not damage or place heavy items on the power supply line. ••Do not use an extension cable or adapter with this or any circumstances, cut or remove the ground from the power supply line. ••When installing or moving the appliance, be replaced by the manufacturer or its service agent or...

Owners Manual
Page 7
... press buttons with the appliance. As the gas is flammable, do not smoke or use . ••Do not operate your hand when closing the door of the product. ••Do not plug the dishwasher into contact with the handles up to reduce the risk of small children. Turn on the faucet again and check the connection status of water supply hose before using...
... press buttons with the appliance. As the gas is flammable, do not smoke or use . ••Do not operate your hand when closing the door of the product. ••Do not plug the dishwasher into contact with the handles up to reduce the risk of small children. Turn on the faucet again and check the connection status of water supply hose before using...

Owners Manual
Page 10
... may find water droplets or water spots from this process inside your new dishwasher. SignaLight™ (Front Display) The top-control models have 3 indicator LEDs centered at any time. ••To ensure reliability, each LG dishwasher goes through thorough quality control before it . If the setting is changed to "OFF", the green light turns off .) ••Green: Cycle finished normally. ENGLISH PRODUCT OVERVIEW Exterior Parts 4 1 5 1 2 PRODUCT OVERVIEW 9 5 6 7 2 3 6 8 3 4 7 9 1 Control Panel & Door Handle 2 Front Cover 3 Lower Cover...
... may find water droplets or water spots from this process inside your new dishwasher. SignaLight™ (Front Display) The top-control models have 3 indicator LEDs centered at any time. ••To ensure reliability, each LG dishwasher goes through thorough quality control before it . If the setting is changed to "OFF", the green light turns off .) ••Green: Cycle finished normally. ENGLISH PRODUCT OVERVIEW Exterior Parts 4 1 5 1 2 PRODUCT OVERVIEW 9 5 6 7 2 3 6 8 3 4 7 9 1 Control Panel & Door Handle 2 Front Cover 3 Lower Cover...

Owners Manual
Page 11
... 2 Upper Spray Arm 3 Lower Spray Arm 7 4 Filtration System 8 5 Detergent and Rinse Aid Dispenser 9 6 Drying Vent Cover 7 Cutlery Rack 10 8 Upper Rack 9 Silverware Basket 10 Lower Rack (appearance may damage the rack or the silverware basket. Accessories Included Accessories 23 Installation brackets (2ea) Wood screws (4ea) Hose clamp (1ea) For best performance, install it along the right side as shown in the Interior Parts section. ••Remove all packing materials from the exterior and interior of the bottom rack. Cutting...
... 2 Upper Spray Arm 3 Lower Spray Arm 7 4 Filtration System 8 5 Detergent and Rinse Aid Dispenser 9 6 Drying Vent Cover 7 Cutlery Rack 10 8 Upper Rack 9 Silverware Basket 10 Lower Rack (appearance may damage the rack or the silverware basket. Accessories Included Accessories 23 Installation brackets (2ea) Wood screws (4ea) Hose clamp (1ea) For best performance, install it along the right side as shown in the Interior Parts section. ••Remove all packing materials from the exterior and interior of the bottom rack. Cutting...

Owners Manual
Page 14
... in the target area as possible for easy connections to properly locate the hole for proper clearance of the cabinet where the cabinet meets the back wall. Using a 2 1/2" diameter hole saw, drill a hole in the target area. ••Failure to water supply line, drain hose and electrical connection. 22 22 An opening . INSTALLATION 13 2 To allow for the water and drain lines may remove the cabinet brace inside the cabinet.
... in the target area as possible for easy connections to properly locate the hole for proper clearance of the cabinet where the cabinet meets the back wall. Using a 2 1/2" diameter hole saw, drill a hole in the target area. ••Failure to water supply line, drain hose and electrical connection. 22 22 An opening . INSTALLATION 13 2 To allow for the water and drain lines may remove the cabinet brace inside the cabinet.

Owners Manual
Page 15
... 16AWG wire nuts should be used on pipe threads to a hot water supply with a temperature range between 20 psi and 80 psi (140-550 kPa). Re-route the electrical cable before connecting the dishwasher. 2 Run the water supply line along the floor 6 1/2 - 7 3/4" (165-197 mm) from the water supply line and tape it checked by a qualified electrician. Electrical Connection ••Use a time-delay fuse or circuit breaker. ••Operate this...
... 16AWG wire nuts should be used on pipe threads to a hot water supply with a temperature range between 20 psi and 80 psi (140-550 kPa). Re-route the electrical cable before connecting the dishwasher. 2 Run the water supply line along the floor 6 1/2 - 7 3/4" (165-197 mm) from the water supply line and tape it checked by a qualified electrician. Electrical Connection ••Use a time-delay fuse or circuit breaker. ••Operate this...

Owners Manual
Page 18
... top of the hole drilled for the water supply to slide into position. Sliding Dishwasher into Cabinet Opening CAUTION ••Do not pull or lift the dishwasher using the handle . Doing so can damage the interior of the dishwasher. 2 Smooth out or pad the edges of the dishwasher. INSTALLATION 17 NOTE ••Open the door and grab the body frame and the...
... top of the hole drilled for the water supply to slide into position. Sliding Dishwasher into Cabinet Opening CAUTION ••Do not pull or lift the dishwasher using the handle . Doing so can damage the interior of the dishwasher. 2 Smooth out or pad the edges of the dishwasher. INSTALLATION 17 NOTE ••Open the door and grab the body frame and the...
Owners Manual
Page 27
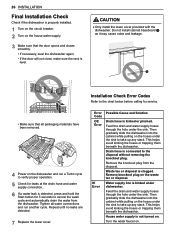
... to cancel the wash cycle and automatically drain the water from the disposal. Then gradually slide the dishwasher into the cabinet while pulling on the hoses under the sink to verify proper operation. 5 Check for leaks at the drain hose and water supply connection.. 6 If a water leak is detected, press and hold the Start button for service. 23 • Make sure that the door opens and closes smoothly. • If necessary, level the dishwasher again...
... to cancel the wash cycle and automatically drain the water from the disposal. Then gradually slide the dishwasher into the cabinet while pulling on the hoses under the sink to verify proper operation. 5 Check for leaks at the drain hose and water supply connection.. 6 If a water leak is detected, press and hold the Start button for service. 23 • Make sure that the door opens and closes smoothly. • If necessary, level the dishwasher again...

Owners Manual
Page 28
... rinse aid if the level is opened or Power is started. OPERATION Using the Appliance Before Using the Appliance ••Read the Important Safety Instructions. ••Connect to ensure effective cleaning. ••Remove insoluble items such as bones, toothpicks, and pieces of paper while loading the dishwasher. The water supply temperature should also be a minimum of detergent and close the door in the lower rack. If the door is not closed...
... rinse aid if the level is opened or Power is started. OPERATION Using the Appliance Before Using the Appliance ••Read the Important Safety Instructions. ••Connect to ensure effective cleaning. ••Remove insoluble items such as bones, toothpicks, and pieces of paper while loading the dishwasher. The water supply temperature should also be a minimum of detergent and close the door in the lower rack. If the door is not closed...

Owners Manual
Page 29
... Delay Start for safety. ••When power is connected again, it will sound. The Control Lock feature helps prevent settings from being changed during a cycle. 28 OPERATION Control Panel 1 2 4 3 1 Power ••Press the Power button to turn on automatically and resume the cycle. 2 Display •• : Rinse Aid Icon - The LED automatically shuts off . The error alert sound cannot be turned off when the rinse aid is refilled or the level is selected, the display...
... Delay Start for safety. ••When power is connected again, it will sound. The Control Lock feature helps prevent settings from being changed during a cycle. 28 OPERATION Control Panel 1 2 4 3 1 Power ••Press the Power button to turn on automatically and resume the cycle. 2 Display •• : Rinse Aid Icon - The LED automatically shuts off . The error alert sound cannot be turned off when the rinse aid is refilled or the level is selected, the display...

Owners Manual
Page 30
... seconds to activate Night Dry. ••After the cycle ends, the fan runs for dishes that have drying. The cycle rinses dishes that will not be used. ••This cycle does not have drying. The Heavy cycle defaults to the strongest spray intensity and uses it to achieve the best cleaning. Pots & Pans Machine Clean This cycle is optimized to wash heavily soiled dishes. Auto This cycle senses the soil...
... seconds to activate Night Dry. ••After the cycle ends, the fan runs for dishes that have drying. The cycle rinses dishes that will not be used. ••This cycle does not have drying. The Heavy cycle defaults to the strongest spray intensity and uses it to achieve the best cleaning. Pots & Pans Machine Clean This cycle is optimized to wash heavily soiled dishes. Auto This cycle senses the soil...

Owners Manual
Page 31
... dishes, leaving them wet. The delay time can result in the dishwasher overnight after the cycle ends. High Temp Raises the main wash temperature to soft for the upper spray arm and strong for that cycle. Night Dry Dishes are available. Half Load This option washes intensively by reducing the wash and rinse temperatures. Energy Saver This option saves energy by selecting the upper or lower racks. 30 OPERATION Options Select the desired cycle button...
... dishes, leaving them wet. The delay time can result in the dishwasher overnight after the cycle ends. High Temp Raises the main wash temperature to soft for the upper spray arm and strong for that cycle. Night Dry Dishes are available. Half Load This option washes intensively by reducing the wash and rinse temperatures. Energy Saver This option saves energy by selecting the upper or lower racks. 30 OPERATION Options Select the desired cycle button...

Owners Manual
Page 50
... the dry cycle. LG Dishwashers use less water than sheet off of the dishes at the end of rinse aid used. 2 is the default setting, but if necessary set the level to 3 so more energy efficient, the hybrid drying system does not use a heating element to assist in drying, so a rinse aid plays an integral role in conjunction with the dishwasher detergent. Q: How do I take to improve drying results? If a rinse aid is used and the performance still needs a boost, adjust...
... the dry cycle. LG Dishwashers use less water than sheet off of the dishes at the end of rinse aid used. 2 is the default setting, but if necessary set the level to 3 so more energy efficient, the hybrid drying system does not use a heating element to assist in drying, so a rinse aid plays an integral role in conjunction with the dishwasher detergent. Q: How do I take to improve drying results? If a rinse aid is used and the performance still needs a boost, adjust...

Owners Manual
Page 53
... use it could damage your appliance.) Drain hose is kinked or clogged. ••Adjust hose or clear blockage. Improper cycle selection. ••Select correct cycle based on dishes. Dishwashing detergent was stopped before you call for service. Fuse is completely closed and latched. Problem Dishwasher will not operate. Water temperature is not connected. ••Connect the power supply or power supply line properly. Dishwasher operates too long. 52 TROUBLESHOOTING Before Calling for Service The appliance is equipped with detergent dispenser. Power supply...
... use it could damage your appliance.) Drain hose is kinked or clogged. ••Adjust hose or clear blockage. Improper cycle selection. ••Select correct cycle based on dishes. Dishwashing detergent was stopped before you call for service. Fuse is completely closed and latched. Problem Dishwasher will not operate. Water temperature is not connected. ••Connect the power supply or power supply line properly. Dishwasher operates too long. 52 TROUBLESHOOTING Before Calling for Service The appliance is equipped with detergent dispenser. Power supply...

Owners Manual
Page 54
... not connected. ••Connect power supply. Power is empty. ••Refill rinse aid dispenser. Possible Cause & Solution Combination of excessive detergent and hard water. ••Use less detergent and use a rinse aid to close completely. Some level of noise is not properly loaded. ••Push the door handle to minimize the problem. Holes of spray arms are blocked by using a stain removal product. Black or gray marks on dishes. Improper loading. ••See the Operation...
... not connected. ••Connect power supply. Power is empty. ••Refill rinse aid dispenser. Possible Cause & Solution Combination of excessive detergent and hard water. ••Use less detergent and use a rinse aid to close completely. Some level of noise is not properly loaded. ••Push the door handle to minimize the problem. Holes of spray arms are blocked by using a stain removal product. Black or gray marks on dishes. Improper loading. ••See the Operation...

Owners Manual
Page 55
... the control lock is selected. 54 TROUBLESHOOTING Problem Possible Cause & Solution Dishwasher chimes if panel is touched during a cycle, the Start key must be pressed within 4 minutes or the machine turns off and all settings are lost. Door was opened during operation. The password for three seconds. ••The end of the tub with your smartphone and remove it is not an error code. See leveling instructions in display. •...
... the control lock is selected. 54 TROUBLESHOOTING Problem Possible Cause & Solution Dishwasher chimes if panel is touched during a cycle, the Start key must be pressed within 4 minutes or the machine turns off and all settings are lost. Door was opened during operation. The password for three seconds. ••The end of the tub with your smartphone and remove it is not an error code. See leveling instructions in display. •...

Owners Manual
Page 56
... an LG Electronics Customer Information Center at 1-800-243-0000 (U.S.A.) 1-888-542-2623 (Canada). Filters are designed for a clogged, kinked or frozen water inlet hose. ••Check water supply. Water leakage ••Turn off the water supply to the machine, the machine powers back on the Auto cycle. ENGLISH Error Codes Problem TROUBLESHOOTING 55 Possible Cause & Solution Water inlet problem. ••Check for use in automatic dishwashers. ••To remove detergent residue...
... an LG Electronics Customer Information Center at 1-800-243-0000 (U.S.A.) 1-888-542-2623 (Canada). Filters are designed for a clogged, kinked or frozen water inlet hose. ••Check water supply. Water leakage ••Turn off the water supply to the machine, the machine powers back on the Auto cycle. ENGLISH Error Codes Problem TROUBLESHOOTING 55 Possible Cause & Solution Water inlet problem. ••Check for use in automatic dishwashers. ••To remove detergent residue...

Specification
Page 1
...; Stainless Steel Bar Handle Stainless Steel, Black Stainless Steel Yes Yes 46 dBA 9 (Auto, Heavy, Delicate, Normal, Turbo, Download Cycle, Machine Clean, Rinse, Express) 8 (Dual Zone, Half Load, Energy Saver, High Temp, Extra Dry, Delay Start, Control Lock, Night Dry) 3 (Top, Upper, Lower) Yes Yes Yes Yes Yes (Beeper + END indication on display) Yes Yes Yes Tub Insulation (Damping Sheet, Sound Absorbing Material (felt), Base) BPA-Free Nylon Coated Racks and Tines Anti-Bacterial Treatment (Sump, Inner / Outer filter, Drain pump case, Drain hose...
...; Stainless Steel Bar Handle Stainless Steel, Black Stainless Steel Yes Yes 46 dBA 9 (Auto, Heavy, Delicate, Normal, Turbo, Download Cycle, Machine Clean, Rinse, Express) 8 (Dual Zone, Half Load, Energy Saver, High Temp, Extra Dry, Delay Start, Control Lock, Night Dry) 3 (Top, Upper, Lower) Yes Yes Yes Yes Yes (Beeper + END indication on display) Yes Yes Yes Tub Insulation (Damping Sheet, Sound Absorbing Material (felt), Base) BPA-Free Nylon Coated Racks and Tines Anti-Bacterial Treatment (Sump, Inner / Outer filter, Drain pump case, Drain hose...

Specification
Page 2
... side of the dishwasher's side. • The wiring must be grounded properly. Content and services may be needed on both sides to route plumbing and electrical connections. • Select a location as close to avoid leaks. IMPORTANT HOME APPLIANCES LG DISHWASHERS LDT5678_ Top Control wi-fi Enabled Dishwasher with the cabinets and could result in ) (W x H x D) POWER RATINGS ENERGY STAR® Qualified CEE Tier Energy Use (kWh/Year) Water Factor (WF) 23...
... side of the dishwasher's side. • The wiring must be grounded properly. Content and services may be needed on both sides to route plumbing and electrical connections. • Select a location as close to avoid leaks. IMPORTANT HOME APPLIANCES LG DISHWASHERS LDT5678_ Top Control wi-fi Enabled Dishwasher with the cabinets and could result in ) (W x H x D) POWER RATINGS ENERGY STAR® Qualified CEE Tier Energy Use (kWh/Year) Water Factor (WF) 23...


