
Owners Manual
Page 2
... the dehumidifier. • When the power cord is to be replaced, replacement work shall be performed by authorized personnel only using only genuine replacement parts. 2 Dehumidifier If you review our chart of Troubleshooting Tips first, you need to call for warranty issues. Dehumidifier Owner's Manual TABLE OF CONTENTS Safety Precautions 3 Prior to Operation 7 Instruction 8 Electrical Safety 9 Operating Instructions 11 Installation 13 Maintenance and Service...........14 FOR YOUR RECORDS Write the model and serial numbers here: Model # Serial...
... the dehumidifier. • When the power cord is to be replaced, replacement work shall be performed by authorized personnel only using only genuine replacement parts. 2 Dehumidifier If you review our chart of Troubleshooting Tips first, you need to call for warranty issues. Dehumidifier Owner's Manual TABLE OF CONTENTS Safety Precautions 3 Prior to Operation 7 Instruction 8 Electrical Safety 9 Operating Instructions 11 Installation 13 Maintenance and Service...........14 FOR YOUR RECORDS Write the model and serial numbers here: Model # Serial...
Owners Manual
Page 3
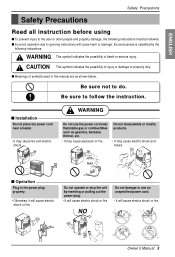
... or damage to property only. NO Owner's Manual 3 ENGLISH Safety Precautions Safety Precautions Read all instruction before using s To prevent injury to the user or other people and property damage, the following indications. Gasolin Do not operate or stop the unit by the following instructions must be followed. Do not damage or use the power cord near a heater. • It may...
... or damage to property only. NO Owner's Manual 3 ENGLISH Safety Precautions Safety Precautions Read all instruction before using s To prevent injury to the user or other people and property damage, the following indications. Gasolin Do not operate or stop the unit by the following instructions must be followed. Do not damage or use the power cord near a heater. • It may...
Owners Manual
Page 4
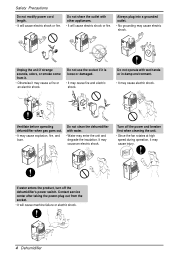
.... If water enters the product, turn off the power and breaker first when cleaning the unit. • Since the fan rotates at high speed during operation, it may cause a fire or an electric shock. Do not clean the dehumidifier with wet hands or in damp environment. • It may cause explosion, fire, and burn. Safety Precautions Do not modify power cord length. •...
.... If water enters the product, turn off the power and breaker first when cleaning the unit. • Since the fan rotates at high speed during operation, it may cause a fire or an electric shock. Do not clean the dehumidifier with wet hands or in damp environment. • It may cause explosion, fire, and burn. Safety Precautions Do not modify power cord length. •...
Owners Manual
Page 5
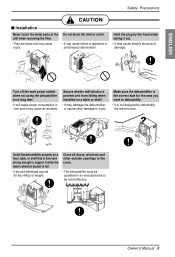
... deterioration. ENGLISH Safety Precautions CAUTION s Installation Never touch the metal parts of the unit when removing the filter. • They are sharp and may cause electric shock and damage. Close all doors, windows and other damage or injury. Owner's Manual 5 Turn off the main power switch when not using the dehumidifier for the area you want to dehumidify. • It is the correct...
... deterioration. ENGLISH Safety Precautions CAUTION s Installation Never touch the metal parts of the unit when removing the filter. • They are sharp and may cause electric shock and damage. Close all doors, windows and other damage or injury. Owner's Manual 5 Turn off the main power switch when not using the dehumidifier for the area you want to dehumidify. • It is the correct...

Owners Manual
Page 6
... to replace the bucket properly after emptying to direct air flow. • This could injure the pet or plant. Always insert the filter securely. Do not operate satisfactorily if the room temperature is not sanitary and could cause coils to clean. Wax Thinner Do not put a pet or house plant where it will be exposed to prevent water from collecting on...
... to replace the bucket properly after emptying to direct air flow. • This could injure the pet or plant. Always insert the filter securely. Do not operate satisfactorily if the room temperature is not sanitary and could cause coils to clean. Wax Thinner Do not put a pet or house plant where it will be exposed to prevent water from collecting on...
Owners Manual
Page 7
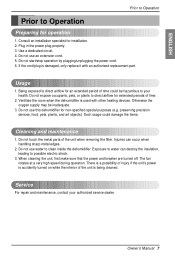
... an authorized replacement part. Do not start/stop operation by plugging/unplugging the power cord. 6. Do not touch the metal parts of the unit when removing the filter. Owner's Manual 7 Do not use an extension cord. 5. Use a dedicated circuit. 4. Otherwise the oxygen supply may be hazardous to clean inside the dehumidifier. Being exposed to direct airflow for an extended period of time could damage the items. Cleaning and maintenance 1. ENGLISH Prior...
... an authorized replacement part. Do not start/stop operation by plugging/unplugging the power cord. 6. Do not touch the metal parts of the unit when removing the filter. Owner's Manual 7 Do not use an extension cord. 5. Use a dedicated circuit. 4. Otherwise the oxygen supply may be hazardous to clean inside the dehumidifier. Being exposed to direct airflow for an extended period of time could damage the items. Cleaning and maintenance 1. ENGLISH Prior...
Owners Manual
Page 8
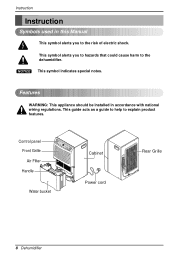
... electric shock. TIMER High Low SPFEAEND SEHTUTMINIDGITY CHOUNMTRIDOITLY PAOUWTOERRESTABRFUUTCLLKET ENERGY STAR Water bucket Cabinet Power cord Rear Grille 8 Dehumidifier NOTICE This symbol indicates special notes. This guide acts as a guide to help to the dehumidifier. Control panel Front Grille Air Filter Handle 2hr4.hOrC.noO/Onnsf/fOtafnftly On. Instruction Instruction Symbols used in accordance with national wiring regulations. Features WARNING: This appliance should be installed in this Manual This symbol...
... electric shock. TIMER High Low SPFEAEND SEHTUTMINIDGITY CHOUNMTRIDOITLY PAOUWTOERRESTABRFUUTCLLKET ENERGY STAR Water bucket Cabinet Power cord Rear Grille 8 Dehumidifier NOTICE This symbol indicates special notes. This guide acts as a guide to help to the dehumidifier. Control panel Front Grille Air Filter Handle 2hr4.hOrC.noO/Onnsf/fOtafnftly On. Instruction Instruction Symbols used in accordance with national wiring regulations. Features WARNING: This appliance should be installed in this Manual This symbol...
Owners Manual
Page 9
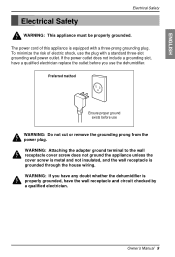
... the cover screw is metal and not insulated, and the wall receptacle is properly grounded, have a qualified electrician replace the outlet before use WARNING: Do not cut or remove the grounding prong from the power plug. Preferred method Ensure proper ground exists before you have any doubt whether the dehumidifier is grounded through the house wiring. The power cord...
... the cover screw is metal and not insulated, and the wall receptacle is properly grounded, have a qualified electrician replace the outlet before use WARNING: Do not cut or remove the grounding prong from the power plug. Preferred method Ensure proper ground exists before you have any doubt whether the dehumidifier is grounded through the house wiring. The power cord...
Owners Manual
Page 10
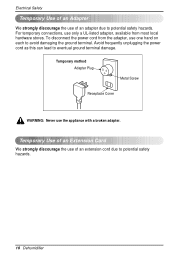
Temporary method Adapter Plug Metal Screw Receptacle Cover WARNING: Never use of an adapter due to eventual ground terminal damage. Electrical Safety Temporary Use of an Adapter We strongly discourage the use of an extension cord due to potential safety hazards. 10 Dehumidifier To disconnect the power cord from most local hardware stores. For temporary connections, use only a UL-listed adapter, available from the adapter, use one hand...
Temporary method Adapter Plug Metal Screw Receptacle Cover WARNING: Never use of an adapter due to eventual ground terminal damage. Electrical Safety Temporary Use of an Adapter We strongly discourage the use of an extension cord due to potential safety hazards. 10 Dehumidifier To disconnect the power cord from most local hardware stores. For temporary connections, use only a UL-listed adapter, available from the adapter, use one hand...
Owners Manual
Page 11
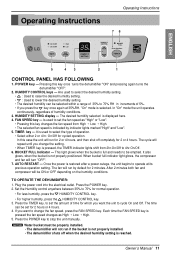
... bucket full indicator light glows, the compressor and fan will run if the bucket is not properly installed. • The dehumidifier shuts off completely for 2 or 4 hours, and then shut off when the desired humidity setting is full and needs to be properly installed. • The dehumidifier will repeat until you want the unit to 70% for cycled operation. AUTO RESTART --- TO OPERATE THE DEHUMIDIFIER: 1. Set the Humidity control anywhere between 35% to cycle...
... bucket full indicator light glows, the compressor and fan will run if the bucket is not properly installed. • The dehumidifier shuts off completely for 2 or 4 hours, and then shut off when the desired humidity setting is full and needs to be properly installed. • The dehumidifier will repeat until you want the unit to 70% for cycled operation. AUTO RESTART --- TO OPERATE THE DEHUMIDIFIER: 1. Set the Humidity control anywhere between 35% to cycle...
Owners Manual
Page 12
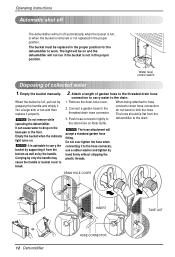
... work. When being attached to drop on and the dehumidifier will not run if the bucket is not in the proper position. NOTICE Do not remove while operating the dehumidifier. Attach a length of collected water 1. NOTICE The hose attachment will be replaced in the proper position. Push hose connector tightly to dehumidifier to the drain. 1. Operating Instructions Automatic shut off The dehumidifier will turn off automatically when the bucket is full, or when the bucket is removed or not replaced...
... work. When being attached to drop on and the dehumidifier will not run if the bucket is not in the proper position. NOTICE Do not remove while operating the dehumidifier. Attach a length of collected water 1. NOTICE The hose attachment will be replaced in the proper position. Push hose connector tightly to dehumidifier to the drain. 1. Operating Instructions Automatic shut off The dehumidifier will turn off automatically when the bucket is full, or when the bucket is removed or not replaced...
Owners Manual
Page 13
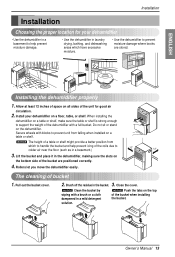
... the bucket when installing the bucket. Lift the bucket and place it in the dehumidifier, making sure the slots on a floor, table, or shelf. Pull out the bucket cover. 2. NOTICE Clean the bucket by wiping with a full bucket. TIMER High Low SPFEAEND SEHTUTMINIDGITY CHOUNMTRIDOITLY PAOUWTOERRESTABRFUUTCLLKET ENERGY STAR 12" The cleaning of bucket 1. Install your dehumidifier • Use the dehumidifier in a basement to help prevent icing of the coils due to support...
... the bucket when installing the bucket. Lift the bucket and place it in the dehumidifier, making sure the slots on a floor, table, or shelf. Pull out the bucket cover. 2. NOTICE Clean the bucket by wiping with a full bucket. TIMER High Low SPFEAEND SEHTUTMINIDGITY CHOUNMTRIDOITLY PAOUWTOERRESTABRFUUTCLLKET ENERGY STAR 12" The cleaning of bucket 1. Install your dehumidifier • Use the dehumidifier in a basement to help prevent icing of the coils due to support...
Owners Manual
Page 14
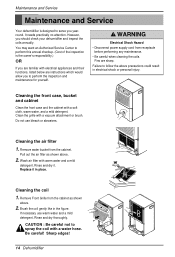
.... Cleaning the coil 1. It needs practically no attention. However, you should check your dehumidifier and inspect the coils annually. Electrical Shock Hazard • Disconnect power supply cord from the cabinet. Failure to spray the coil with a soft cloth, warm water, and a mild detergent. TIMER High Low SPFEAEND SEHTUTMINIGDITY CHOUNMTRIDOITLY PAOUWTOERRESTABRFUUTCLLKET ENERGY STAR Cleaning the air filter 1. Remove water bucket from receptacle before performing any maintenance. • Be careful when cleaning the coils...
.... Cleaning the coil 1. It needs practically no attention. However, you should check your dehumidifier and inspect the coils annually. Electrical Shock Hazard • Disconnect power supply cord from the cabinet. Failure to spray the coil with a soft cloth, warm water, and a mild detergent. TIMER High Low SPFEAEND SEHTUTMINIGDITY CHOUNMTRIDOITLY PAOUWTOERRESTABRFUUTCLLKET ENERGY STAR Cleaning the air filter 1. Remove water bucket from receptacle before performing any maintenance. • Be careful when cleaning the coils...
Owners Manual
Page 15
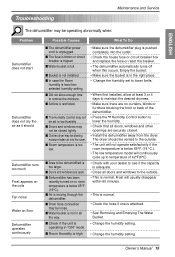
... Room humidity is too low. s Room temperature is less than selected humidity setting. s Check if the unit is not installed. s Bucket is operating in the right place. • Change the humidity set to be dehumidified is unplugged. s Doors and windows are securely closed tightly. s Drain hose connection may be blowing moisture-laden air into the outlet. • Check the house fuse or circuit breaker box and replace the fuse or reset the breaker. • The dehumidifier automatically turns off...
... Room humidity is too low. s Room temperature is less than selected humidity setting. s Check if the unit is not installed. s Bucket is operating in the right place. • Change the humidity set to be dehumidified is unplugged. s Doors and windows are securely closed tightly. s Drain hose connection may be blowing moisture-laden air into the outlet. • Check the house fuse or circuit breaker box and replace the fuse or reset the breaker. • The dehumidifier automatically turns off...
Owners Manual
Page 31
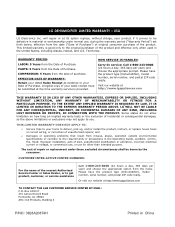
... use, or use , during the warranty period ("Warranty Period") set forth below, effective from the date ("Date of Purchase") of original consumer purchase of Purchase. Please have the product type (Dehumidifier), model number, serial number, and postal ZIP code ready. USA LG Electronics Inc. Territories. Visit our website at http://www.lgappliances.com TO CONTACT THE LGE CUSTOMER SERVICE CENTER BY MAIL: P.O. CUSTOMER INTER-ACTIVE CENTER NUMBERS...
... use, or use , during the warranty period ("Warranty Period") set forth below, effective from the date ("Date of Purchase") of original consumer purchase of Purchase. Please have the product type (Dehumidifier), model number, serial number, and postal ZIP code ready. USA LG Electronics Inc. Territories. Visit our website at http://www.lgappliances.com TO CONTACT THE LGE CUSTOMER SERVICE CENTER BY MAIL: P.O. CUSTOMER INTER-ACTIVE CENTER NUMBERS...


