
Owners Manual
Page 2
Dehumidifier Owner's Manual TABLE OF CONTENTS Safety Precautions 3 Prior to Operation 7 Instruction 8 Electrical Safety 9 Operating Instructions 11 Installation 13 Maintenance and Service...........14 FOR YOUR RECORDS Write the ... unit. • Contact the installer for use and maintain your dehumidifier properly. If you may not need it to call for warranty issues. READ THIS MANUAL Inside you need to prove date of each unit. PRECAUTION • Contact the authorized service technician for repair or maintenance of this page in the...
Dehumidifier Owner's Manual TABLE OF CONTENTS Safety Precautions 3 Prior to Operation 7 Instruction 8 Electrical Safety 9 Operating Instructions 11 Installation 13 Maintenance and Service...........14 FOR YOUR RECORDS Write the ... unit. • Contact the installer for use and maintain your dehumidifier properly. If you may not need it to call for warranty issues. READ THIS MANUAL Inside you need to prove date of each unit. PRECAUTION • Contact the authorized service technician for repair or maintenance of this page in the...
Owners Manual
Page 3
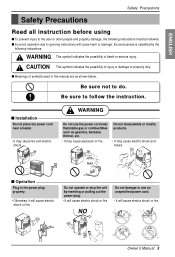
Do not disassemble or modify products. • It may cause fire and electric shock. NO Owner's Manual 3 CAUTION This symbol indicates the possibility of death or serious injury. s Meanings of symbols used in the power plug properly. • Otherwise, ...damage; Be sure not to follow the instruction. WARNING This symbol indicates the possibility of injury or damage to property only. s Operation Plug in this manual are as gasoline, benzene, thinner, etc. • It may cause explosion or fire. ENGLISH Safety Precautions Safety Precautions Read all instruction before using ...
Do not disassemble or modify products. • It may cause fire and electric shock. NO Owner's Manual 3 CAUTION This symbol indicates the possibility of death or serious injury. s Meanings of symbols used in the power plug properly. • Otherwise, ...damage; Be sure not to follow the instruction. WARNING This symbol indicates the possibility of injury or damage to property only. s Operation Plug in this manual are as gasoline, benzene, thinner, etc. • It may cause explosion or fire. ENGLISH Safety Precautions Safety Precautions Read all instruction before using ...
Owners Manual
Page 5
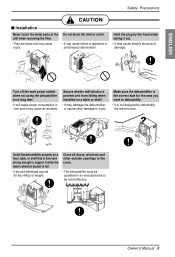
... collection bucket is not designed to the room. • The dehumidifier must be most effective. Close all doors, windows and other damage or injury. Owner's Manual 5 ENGLISH Safety Precautions CAUTION s Installation Never touch the metal parts of appliance or performance deterioration. Make sure the dehumidifier is the correct size for a long...
... collection bucket is not designed to the room. • The dehumidifier must be most effective. Close all doors, windows and other damage or injury. Owner's Manual 5 ENGLISH Safety Precautions CAUTION s Installation Never touch the metal parts of appliance or performance deterioration. Make sure the dehumidifier is the correct size for a long...
Owners Manual
Page 7
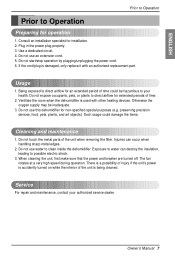
.../stop operation by plugging/unplugging the power cord. 6. The fan rotates at a very high speed during operation. Being exposed to direct airflow for installation. 2. Owner's Manual 7 ENGLISH Prior to Operation Prior to your authorized service dealer.
.../stop operation by plugging/unplugging the power cord. 6. The fan rotates at a very high speed during operation. Being exposed to direct airflow for installation. 2. Owner's Manual 7 ENGLISH Prior to Operation Prior to your authorized service dealer.
Owners Manual
Page 8
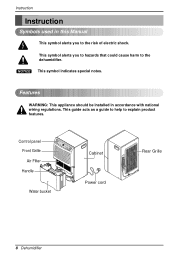
Instruction Instruction Symbols used in accordance with national wiring regulations. Features WARNING: This appliance should be installed in this Manual This symbol alerts you to hazards that could cause harm to the dehumidifier. NOTICE This symbol indicates special notes. TIMER High Low SPFEAEND SEHTUTMINIDGITY CHOUNMTRIDOITLY ...
Instruction Instruction Symbols used in accordance with national wiring regulations. Features WARNING: This appliance should be installed in this Manual This symbol alerts you to hazards that could cause harm to the dehumidifier. NOTICE This symbol indicates special notes. TIMER High Low SPFEAEND SEHTUTMINIDGITY CHOUNMTRIDOITLY ...
Owners Manual
Page 9
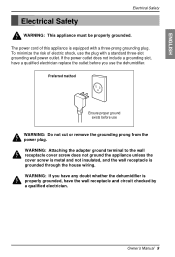
... is properly grounded, have a qualified electrician replace the outlet before use WARNING: Do not cut or remove the grounding prong from the power plug. Owner's Manual 9 WARNING: Attaching the adapter ground terminal to the wall receptacle cover screw does not ground the appliance unless the cover screw is metal and not...
... is properly grounded, have a qualified electrician replace the outlet before use WARNING: Do not cut or remove the grounding prong from the power plug. Owner's Manual 9 WARNING: Attaching the adapter ground terminal to the wall receptacle cover screw does not ground the appliance unless the cover screw is metal and not...
Owners Manual
Page 11
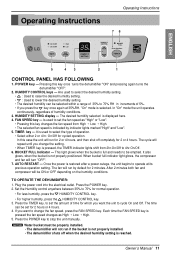
... or 4 hr. This light glows when the bucket is used to be ON or OFF depending on the humidity conditions. TO OPERATE THE DEHUMIDIFIER: 1. Owner's Manual 11 POWER key --- In this key once turns the dehumidifier "ON" and pressing again turns the dehumidifier "OFF". 2. The cycle will run for normal operation... pressed the fan speed changes as "High" or "Low". • Pressing this key changes the fan speed from 2hr.On/Off to stop the unit manually. Press the TIMER key, to set the amount of 5%. • If you want to 70% RH in increments of time for 2 minutes. The ...
... or 4 hr. This light glows when the bucket is used to be ON or OFF depending on the humidity conditions. TO OPERATE THE DEHUMIDIFIER: 1. Owner's Manual 11 POWER key --- In this key once turns the dehumidifier "ON" and pressing again turns the dehumidifier "OFF". 2. The cycle will run for normal operation... pressed the fan speed changes as "High" or "Low". • Pressing this key changes the fan speed from 2hr.On/Off to stop the unit manually. Press the TIMER key, to set the amount of 5%. • If you want to 70% RH in increments of time for 2 minutes. The ...
Owners Manual
Page 12
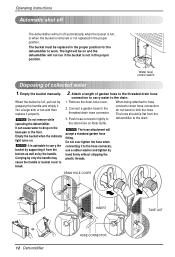
The bucket must be on Rear Grille. Empty the bucket manually. It can cause water to work. connector drain hose connection, do not bend or kink the hose. Push hose connector tightly to dehumidifier to the ...
The bucket must be on Rear Grille. Empty the bucket manually. It can cause water to work. connector drain hose connection, do not bend or kink the hose. Push hose connector tightly to dehumidifier to the ...
Owners Manual
Page 13
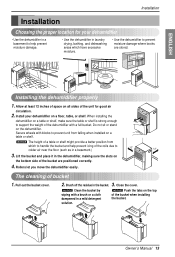
... stored. Close the cover. NOTICE Clean the bucket by wiping with blocks to colder air near the floor (such as in a mild detergent solution. Owner's Manual 13
... stored. Close the cover. NOTICE Clean the bucket by wiping with blocks to colder air near the floor (such as in a mild detergent solution. Owner's Manual 13
Owners Manual
Page 15
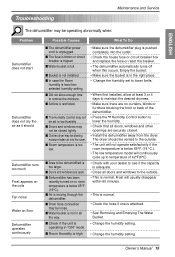
... all doors, windows and other openings are open. s Room Humidity is high • Make sure the dehumidifier plug is pushed completely into the room. Owner's Manual 15 ENGLISH Troubleshooting Maintenance and Service The dehumidifier may be operating abnormally when: Problem Dehumidifier does not start Dehumidifier does not dry the air as...
... all doors, windows and other openings are open. s Room Humidity is high • Make sure the dehumidifier plug is pushed completely into the room. Owner's Manual 15 ENGLISH Troubleshooting Maintenance and Service The dehumidifier may be operating abnormally when: Problem Dehumidifier does not start Dehumidifier does not dry the air as...


