Owner's Manual
Page 1
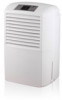
OWNER'S MANUAL DEHUMIDIFIER Please read this manual carefully before operating your set and retain it for future reference. MODEL:LD301EL P/NO:MFL63261211 www.lgappliances.com
OWNER'S MANUAL DEHUMIDIFIER Please read this manual carefully before operating your set and retain it for future reference. MODEL:LD301EL P/NO:MFL63261211 www.lgappliances.com
Owner's Manual
Page 2
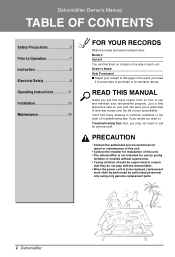
Dehumidifier Owner's Manual TABLE OF CONTENTS Safety Precautions 3 Prior to Operation 7 Instruction 8 Electrical Safety 9 Operating Instructions 11 Installation 13 Maintenance 14 FOR YOUR RECORDS Write the model and ... shall be performed by authorized personnel only using only genuine replacement parts. 2 Dehumidifier You'll find many answers to call for warranty issues. READ THIS MANUAL Inside you need to common problems in the event you will find many helpful hints on the side of each unit.
Dehumidifier Owner's Manual TABLE OF CONTENTS Safety Precautions 3 Prior to Operation 7 Instruction 8 Electrical Safety 9 Operating Instructions 11 Installation 13 Maintenance 14 FOR YOUR RECORDS Write the model and ... shall be performed by authorized personnel only using only genuine replacement parts. 2 Dehumidifier You'll find many answers to call for warranty issues. READ THIS MANUAL Inside you need to common problems in the event you will find many helpful hints on the side of each unit.
Owner's Manual
Page 3
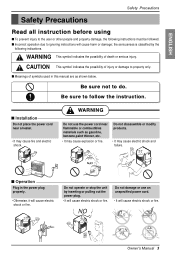
...followed. Be sure not to follow the instruction. Do not disassemble or modify products. • It may cause fire and electric shock. NO Owner's Manual 3 I Installation Do not place the power cord near flammable or combustibles materials such as shown below. Bucket full WARNING Do not use an unspecified power... to ignoring instructions will cause electric shock or fire. ENGLISH Safety Precautions Safety Precautions Read all instruction before using I Operation Plug in this manual are as gasoline, benzene,paint thinner, etc. • It may cause explosion or fire.
...followed. Be sure not to follow the instruction. Do not disassemble or modify products. • It may cause fire and electric shock. NO Owner's Manual 3 I Installation Do not place the power cord near flammable or combustibles materials such as shown below. Bucket full WARNING Do not use an unspecified power... to ignoring instructions will cause electric shock or fire. ENGLISH Safety Precautions Safety Precautions Read all instruction before using I Operation Plug in this manual are as gasoline, benzene,paint thinner, etc. • It may cause explosion or fire.

Owner's Manual
Page 5
... weight. Make sure the dehumidifier is level and strong enough to dehumidify the entire house. Timer 2h4r.hOr. nO/Onf/fOff Fan Speed LowHigh Owner's Manual 5 Do not block the inlet or outlet. • It may cause an accident. Timer 2h4r.hOr.nO/Onf/fOff Fan Speed LoHwigh CHounmtriodlity Bucket full...
... weight. Make sure the dehumidifier is level and strong enough to dehumidify the entire house. Timer 2h4r.hOr. nO/Onf/fOff Fan Speed LowHigh Owner's Manual 5 Do not block the inlet or outlet. • It may cause an accident. Timer 2h4r.hOr.nO/Onf/fOff Fan Speed LoHwigh CHounmtriodlity Bucket full...
Owner's Manual
Page 7
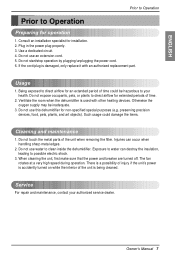
... turned off. Such usage could be inadequate. 3. Service For repair and maintenance, contact your health. Use a dedicated circuit. 4. Do not use an extension cord. 5. Owner's Manual 7 ENGLISH Prior to Operation Prior to clean inside the dehumidifier. Plug in the power plug properly. 3. Do not start/stop operation by plugging/unplugging the...
... turned off. Such usage could be inadequate. 3. Service For repair and maintenance, contact your health. Use a dedicated circuit. 4. Do not use an extension cord. 5. Owner's Manual 7 ENGLISH Prior to Operation Prior to clean inside the dehumidifier. Plug in the power plug properly. 3. Do not start/stop operation by plugging/unplugging the...
Owner's Manual
Page 8
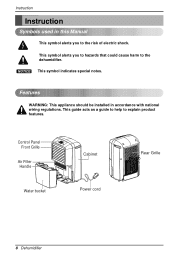
NOTICE This symbol indicates special notes. This symbol alerts you to the risk of electric shock. This guide acts as a guide to help to explain product features. Control Panel LowHigh Bucket Full 4 h2r.hro.n/oonf/foff Front Grille Air Filter Handle Cabinet Water bucket Power cord Rear Grille 8 Dehumidifier Instruction Instruction Symbols used in accordance with national wiring regulations. Features WARNING: This appliance should be installed in this Manual This symbol alerts you to hazards that could cause harm to the dehumidifier.
NOTICE This symbol indicates special notes. This symbol alerts you to the risk of electric shock. This guide acts as a guide to help to explain product features. Control Panel LowHigh Bucket Full 4 h2r.hro.n/oonf/foff Front Grille Air Filter Handle Cabinet Water bucket Power cord Rear Grille 8 Dehumidifier Instruction Instruction Symbols used in accordance with national wiring regulations. Features WARNING: This appliance should be installed in this Manual This symbol alerts you to hazards that could cause harm to the dehumidifier.
Owner's Manual
Page 9
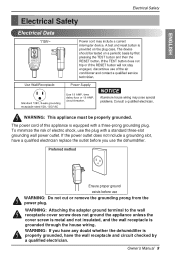
... cord of electric shock, use WARNING: Do not cut or remove the grounding prong from the power plug. WARNING: If you use the dehumidifier. Owner's Manual 9 Electrical Safety WARNING: This appliance must be properly grounded. To minimize the risk of this appliance is properly grounded, have any doubt whether the dehumidifier...
... cord of electric shock, use WARNING: Do not cut or remove the grounding prong from the power plug. WARNING: If you use the dehumidifier. Owner's Manual 9 Electrical Safety WARNING: This appliance must be properly grounded. To minimize the risk of this appliance is properly grounded, have any doubt whether the dehumidifier...
Owner's Manual
Page 11
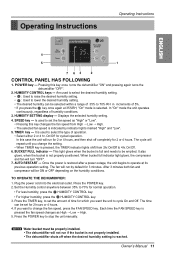
... be properly installed. • The dehumidifier will be selected within a range of 35% to 70% RH in increments of time for 2 hours or 4 hours. 4. Owner's Manual 11 Pressing this case the unit will turn "OFF". 7. TO OPERATE THE DEHUMIDIFIER: 1. Press the TIMER key, to set the fan speed as High →... a power outage, the unit begins to operate at its previous operation setting. AUTO RESTART --- Set the Humidity control anywhere between 35% to stop the unit manually.
... be properly installed. • The dehumidifier will be selected within a range of 35% to 70% RH in increments of time for 2 hours or 4 hours. 4. Owner's Manual 11 Pressing this case the unit will turn "OFF". 7. TO OPERATE THE DEHUMIDIFIER: 1. Press the TIMER key, to set the fan speed as High →... a power outage, the unit begins to operate at its previous operation setting. AUTO RESTART --- Set the Humidity control anywhere between 35% to stop the unit manually.
Owner's Manual
Page 12
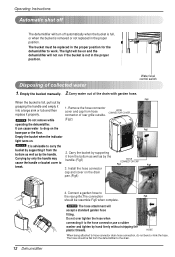
... the bucket is full, pull out by hand firmly without stripping the plastic threads. The light will be resemble Fig5 when complete. Empty the bucket manually. 2.Carry water out of the drain with garden hose. When the bucket is removed or not replaced in the proper position. Carrying by the handle...
... the bucket is full, pull out by hand firmly without stripping the plastic threads. The light will be resemble Fig5 when complete. Empty the bucket manually. 2.Carry water out of the drain with garden hose. When the bucket is removed or not replaced in the proper position. Carrying by the handle...
Owner's Manual
Page 13
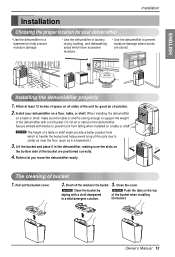
.../foff Installing the dehumidifier properly 1. ENGLISH Installation Installation Choosing the proper location for good air circulation. Pull out the bucket cover. 2. Close the cover. Owner's Manual 13 NOTICE The height of bucket 1. When installing the dehumidifier on a table or shelf, make sure the table or shelf is strong enough to prevent...
.../foff Installing the dehumidifier properly 1. ENGLISH Installation Installation Choosing the proper location for good air circulation. Pull out the bucket cover. 2. Close the cover. Owner's Manual 13 NOTICE The height of bucket 1. When installing the dehumidifier on a table or shelf, make sure the table or shelf is strong enough to prevent...
Owner's Manual
Page 15
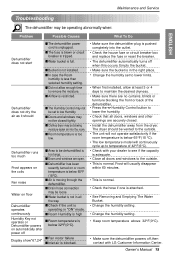
... dryness. • Make sure there are no curtains, blinds or furniture blocking the front or back of 42°F(6°C). • Check with LG Customer Information Center. Frost will usually disappear within 60 minutes. • This is normal. • Check the hose if one is attached. &#... sure the bucket is in the right place. • Change the humidity set to remove the moisture. ■Airflow is restricted. Owner's Manual 15 Maintenance and Service Troubleshooting ENGLISH The dehumidifier may be loose. ■Water bucket is not in all the way. Frost appears on the ...
... dryness. • Make sure there are no curtains, blinds or furniture blocking the front or back of 42°F(6°C). • Check with LG Customer Information Center. Frost will usually disappear within 60 minutes. • This is normal. • Check the hose if one is attached. &#... sure the bucket is in the right place. • Change the humidity set to remove the moisture. ■Airflow is restricted. Owner's Manual 15 Maintenance and Service Troubleshooting ENGLISH The dehumidifier may be loose. ■Water bucket is not in all the way. Frost appears on the ...

Owner's Manual
Page 31
..., during the warranty period. Damage or missing items to the product. 4. USA WHAT THIS WARRANTY COVERS: LG Electronics U.S.A., Inc. ("LG") warrants your LG Dehumidifier ("product") against defect in materials or workmanship under normal household use (e.g. Damage or failure caused by ...or deliver the product freight prepaid, in the owner's manual. Product where the original factory serial numbers have been removed, defaced or changed in other damage to a LG Authorized Service Center. WARRANTY LG DEHUMIDIFIER LIMITED WARRANTY - Note: Replacement products and repair ...
..., during the warranty period. Damage or missing items to the product. 4. USA WHAT THIS WARRANTY COVERS: LG Electronics U.S.A., Inc. ("LG") warrants your LG Dehumidifier ("product") against defect in materials or workmanship under normal household use (e.g. Damage or failure caused by ...or deliver the product freight prepaid, in the owner's manual. Product where the original factory serial numbers have been removed, defaced or changed in other damage to a LG Authorized Service Center. WARRANTY LG DEHUMIDIFIER LIMITED WARRANTY - Note: Replacement products and repair ...


