

User Guide
Page 2
... SAFETY INSTRUCTIONS Basic Safety Precautions 3, 4 Electrical Safety 5, 6 PARTS AND FEATURES Key Parts and Components 7, 8 Control Panel 9, 10 HOW TO USE Before Using Your Dehumidifirer 11, 12 Using The Control 13~16 Defrost Operation/Full Bucket Indication 17 Emptying Collected Water 18 Continuous Drain Operation 19 Transport 20 CARE AND... Registration Information 25 THANK YOU! By following the operating and care instructions in this manual, your purchase and welcome to the LG family. Congratulations on your dehumidifier will provide you with many years of reliable service. 2
... SAFETY INSTRUCTIONS Basic Safety Precautions 3, 4 Electrical Safety 5, 6 PARTS AND FEATURES Key Parts and Components 7, 8 Control Panel 9, 10 HOW TO USE Before Using Your Dehumidifirer 11, 12 Using The Control 13~16 Defrost Operation/Full Bucket Indication 17 Emptying Collected Water 18 Continuous Drain Operation 19 Transport 20 CARE AND... Registration Information 25 THANK YOU! By following the operating and care instructions in this manual, your purchase and welcome to the LG family. Congratulations on your dehumidifier will provide you with many years of reliable service. 2
User Guide
Page 4
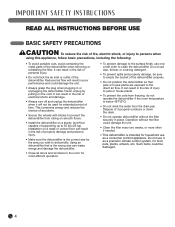
.... • Close all doors and windows to the room for most efficient operation. • To prevent damage to the surface finish, use as a precision climate control system, for extended period of supporting up to 55 lbs (25 kg). Operation without the filter securely in or unplugging the dehumidifier. IMPORTANT SAFETY INSTRUCTIONS...
.... • Close all doors and windows to the room for most efficient operation. • To prevent damage to the surface finish, use as a precision climate control system, for extended period of supporting up to 55 lbs (25 kg). Operation without the filter securely in or unplugging the dehumidifier. IMPORTANT SAFETY INSTRUCTIONS...
User Guide
Page 7
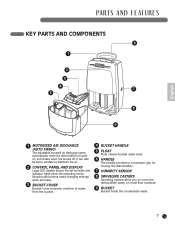
... bucket water level. 6 HANDLE The handle provides a convenient grip for moving the dehumidifier. 7 HUMIDITY SENSOR 8 SWIVELING CASTERS Swiveling casters allow you to distribute the air. 2 CONTROL PANEL AND DISPLAY Large LED display shows the set humidity and indicator lights show the operating mode. English PARTS AND FEATURES KEY PARTS AND COMPONENTS...
... bucket water level. 6 HANDLE The handle provides a convenient grip for moving the dehumidifier. 7 HUMIDITY SENSOR 8 SWIVELING CASTERS Swiveling casters allow you to distribute the air. 2 CONTROL PANEL AND DISPLAY Large LED display shows the set humidity and indicator lights show the operating mode. English PARTS AND FEATURES KEY PARTS AND COMPONENTS...

User Guide
Page 9
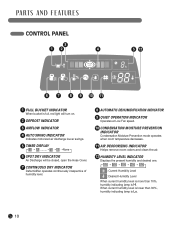
CONTROL PANEL PARTS AND FEATURES English For detailed instructions on and off. 4 AUTO SWING Sets the motorized air discharge to prevent potential water spills. 9 In the ...;¡¡¡ Bucket NOTE: Tips when draining water When removing the bucket, use both hands to oscillate, improving air circulation in the room. 5 HUMIDITY CONTROL Each time that the humidity control button is pressed the humidity setting is shifted: Automatic Dehumidification ¡ Quiet Operation ¡ Condensation Moisture Prevention ¡ Air Deodorizing.
CONTROL PANEL PARTS AND FEATURES English For detailed instructions on and off. 4 AUTO SWING Sets the motorized air discharge to prevent potential water spills. 9 In the ...;¡¡¡ Bucket NOTE: Tips when draining water When removing the bucket, use both hands to oscillate, improving air circulation in the room. 5 HUMIDITY CONTROL Each time that the humidity control button is pressed the humidity setting is shifted: Automatic Dehumidification ¡ Quiet Operation ¡ Condensation Moisture Prevention ¡ Air Deodorizing.
User Guide
Page 10
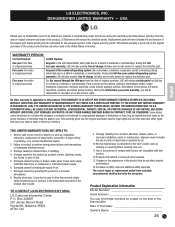
When current humidity level is lower than 70%, humidity indicating lamp is Lo. 10 PARTS AND FEATURES CONTROL PANEL 1 FULL BUCKET INDICATOR When bucket is full, red light will turn on. 2 DEFROST INDICATOR 3 AIRFLOW INDICATOR 4 AUTO SWING INDICATOR Indicates motorized air discharge louver ...
When current humidity level is lower than 70%, humidity indicating lamp is Lo. 10 PARTS AND FEATURES CONTROL PANEL 1 FULL BUCKET INDICATOR When bucket is full, red light will turn on. 2 DEFROST INDICATOR 3 AIRFLOW INDICATOR 4 AUTO SWING INDICATOR Indicates motorized air discharge louver ...

User Guide
Page 11
... not plug other combustion devices, make sure there is a sufficient flow of fresh air into the same outlet; Do not place it as a precision climate control system, for food, pets, plants, artwork, etc. UNPACKING THE DEHUMIDIFIER Remove and store packing materials for reuse. it could overload the outlet and create a fire...
... not plug other combustion devices, make sure there is a sufficient flow of fresh air into the same outlet; Do not place it as a precision climate control system, for food, pets, plants, artwork, etc. UNPACKING THE DEHUMIDIFIER Remove and store packing materials for reuse. it could overload the outlet and create a fire...

User Guide
Page 13
...Automatic Dehumidification mode, with a humidity setting of the dehumidifier will show the set to Automatic Dehumidification. English HOW TO USE USING THE CONTROL POWER Press the POWER button to be retained in memory when the power is off , you turn the dehumidifier ON or OFF. ...turned on , an ascending tone will play and the display will close. PRESS THE MODE BUTTON Mode Features • Maintain humidity level by controlling the dehumidification and air flow. MODE Press the MODE button to clean the air. • In this mode, dehumidification will be re-entered....
...Automatic Dehumidification mode, with a humidity setting of the dehumidifier will show the set to Automatic Dehumidification. English HOW TO USE USING THE CONTROL POWER Press the POWER button to be retained in memory when the power is off , you turn the dehumidifier ON or OFF. ...turned on , an ascending tone will play and the display will close. PRESS THE MODE BUTTON Mode Features • Maintain humidity level by controlling the dehumidification and air flow. MODE Press the MODE button to clean the air. • In this mode, dehumidification will be re-entered....

User Guide
Page 14
... Spot Dry button, lamp will shut off in injury. NOTE: "In order to protect the dehumidifier, the unit will light. HOW TO USE USING THE CONTROLS SPOT DRY Hose Extension Hose English 1 Pull out the hose. 2 Open the Hose Cover. Hose Extension Hose WARNING • Do not move the Dehumidifier byMapnugulleirnag...
... Spot Dry button, lamp will shut off in injury. NOTE: "In order to protect the dehumidifier, the unit will light. HOW TO USE USING THE CONTROLS SPOT DRY Hose Extension Hose English 1 Pull out the hose. 2 Open the Hose Cover. Hose Extension Hose WARNING • Do not move the Dehumidifier byMapnugulleirnag...

User Guide
Page 15
CAUTION • Do not insert fingers or stick other materials into Air Inlet or Air Discharge. English HOW TO USE USING THE CONTROLS CONTINUOUS DRY Dehumidifier will start to move in a moment. • When hands or objects touch Air Discharge, consequently changing rotating angle, restart AUTO Swing operation. &#...
CAUTION • Do not insert fingers or stick other materials into Air Inlet or Air Discharge. English HOW TO USE USING THE CONTROLS CONTINUOUS DRY Dehumidifier will start to move in a moment. • When hands or objects touch Air Discharge, consequently changing rotating angle, restart AUTO Swing operation. &#...

User Guide
Page 16
...reached. ¡¡¡¡ 3 When the humidity reaches the desired level, the dehumidifier will stop . In Automatic Dehumidification Mode, Humidity Control button adjusts the set time. • When time selected elapses, operation stops. NOTE: Empty the bucket, and reset the time. HOW TO... USE USING THE CONTROLS TIMER HUMIDITY CONTROL 1 Be sure to 8 hour in Automatic Dehumidification mode. 2 Press the Humidity Control button. • When pressing first time, you can see the present desired humidity level. •...
...reached. ¡¡¡¡ 3 When the humidity reaches the desired level, the dehumidifier will stop . In Automatic Dehumidification Mode, Humidity Control button adjusts the set time. • When time selected elapses, operation stops. NOTE: Empty the bucket, and reset the time. HOW TO... USE USING THE CONTROLS TIMER HUMIDITY CONTROL 1 Be sure to 8 hour in Automatic Dehumidification mode. 2 Press the Humidity Control button. • When pressing first time, you can see the present desired humidity level. •...

User Guide
Page 23
...; Make sure the dehumidifier plug is adequate. • Don't use with your dealer to be dehumidified is too large. • There may not be automatically controlled by the unit is installed properly. • Clean the air filter. • Change the humidity setting to a lower level. • Be careful when moving the...
...; Make sure the dehumidifier plug is adequate. • Don't use with your dealer to be dehumidified is too large. • There may not be automatically controlled by the unit is installed properly. • Clean the air filter. • Change the humidity setting to a lower level. • Be careful when moving the...
User Guide
Page 25
Replacement parts are fan motors, switches, thermostats, heater, heater protectors, compressor overload, solenoids, circuit boards, auxiliary controls, thermistors, frost controls, ICR pump, capacitors, varistors, and indoor blower bearing. During this full one-year warranty, LGE will meet intended...to territory. USA English Should your home for any labor or on -site service to the instructions described in the United States of : LG Will Replace: One year from accident, alteration, misuse, abuse, or improper installation, repair, or maintenance. This warranty gives you, the ...
Replacement parts are fan motors, switches, thermostats, heater, heater protectors, compressor overload, solenoids, circuit boards, auxiliary controls, thermistors, frost controls, ICR pump, capacitors, varistors, and indoor blower bearing. During this full one-year warranty, LGE will meet intended...to territory. USA English Should your home for any labor or on -site service to the instructions described in the United States of : LG Will Replace: One year from accident, alteration, misuse, abuse, or improper installation, repair, or maintenance. This warranty gives you, the ...

