Owner's Manual
Page 2
.... Damage resulting from the date of purchase. Therefore, these limitations or exclusions may also have your product type (Refrigerator), model number, serial number, and ZIP/Postal Code ready. 1 CUSTOMER ASSISTANCE NUMBERS: To obtain Warranty Coverage: Retain your product .../or after delivery. 6. Territories. LG Refrigerator / Freezer Warranty Period Product Parts Labor Refrigerator / Freezer 1 year 1 year [In-Home Service (Except Model GR-051)] Sealed System (Compressor, Condenser, Evaporator) 7 years 1 year [In-Home Service (Except Model GR-051)] No other express warranty...
.... Damage resulting from the date of purchase. Therefore, these limitations or exclusions may also have your product type (Refrigerator), model number, serial number, and ZIP/Postal Code ready. 1 CUSTOMER ASSISTANCE NUMBERS: To obtain Warranty Coverage: Retain your product .../or after delivery. 6. Territories. LG Refrigerator / Freezer Warranty Period Product Parts Labor Refrigerator / Freezer 1 year 1 year [In-Home Service (Except Model GR-051)] Sealed System (Compressor, Condenser, Evaporator) 7 years 1 year [In-Home Service (Except Model GR-051)] No other express warranty...

Owner's Manual
Page 4
...5 Parts and Features 6-7 Refrigerator Installation Unpacking Installation Installation of Base Grille Refrigerator Doors: How to remove and reverse For Models with Pull-out Drawer For Models with Swinging Door How to remove and Install Pull-Out Drawer Closing and Aligning the doors 8-17 8 8 8 9-16... Door Racks Dairy Compartment Egg Compartment Freezer Section Ice Bin DuraBase Durabase Divider Glide Out Drawer Tilting Door Wired Durabase (Swing Models) Freezer Shelf Refrigerator Care and Cleaning Refrigerator Cleaning Outside Inside Walls Door Lining & Gaskets Plastic Parts (Covers and Panel)...
...5 Parts and Features 6-7 Refrigerator Installation Unpacking Installation Installation of Base Grille Refrigerator Doors: How to remove and reverse For Models with Pull-out Drawer For Models with Swinging Door How to remove and Install Pull-Out Drawer Closing and Aligning the doors 8-17 8 8 8 9-16... Door Racks Dairy Compartment Egg Compartment Freezer Section Ice Bin DuraBase Durabase Divider Glide Out Drawer Tilting Door Wired Durabase (Swing Models) Freezer Shelf Refrigerator Care and Cleaning Refrigerator Cleaning Outside Inside Walls Door Lining & Gaskets Plastic Parts (Covers and Panel)...

Owner's Manual
Page 7
Your refrigerator could have some of the parts may not correspond to familiarize yourself with the parts and features of your model. A Digital Sensor Control B Refrigerator Light C Shelves D Frozen Meat Compartment (Chef Fresh/Snack Pan) * E Optibin Crisper Keeps fruits and vegetable ...Ice Bin G Ice Tray (Inside H) * H Durabase I Read this section to that of the features and parts listed below. PARTS AND FEATURES Drawer Model A A J BB C K D E L F M G N H O I Divider J Dairy Compartment K Door Racks L Fixed Refrigerator Rack M Freezer Light N Pull Out Drawer O Ice maker ...
Your refrigerator could have some of the parts may not correspond to familiarize yourself with the parts and features of your model. A Digital Sensor Control B Refrigerator Light C Shelves D Frozen Meat Compartment (Chef Fresh/Snack Pan) * E Optibin Crisper Keeps fruits and vegetable ...Ice Bin G Ice Tray (Inside H) * H Durabase I Read this section to that of the features and parts listed below. PARTS AND FEATURES Drawer Model A A J BB C K D E L F M G N H O I Divider J Dairy Compartment K Door Racks L Fixed Refrigerator Rack M Freezer Light N Pull Out Drawer O Ice maker ...

Owner's Manual
Page 8
...)* E Optibin Crisper Keeps fruits and vegetables fresh and crisp F Ice Tray * G Ice Bin H Wired Durabase I B C J D E K F L G M H N Read this section to that of your model. NOTE: This guide covers different models. Swing Model PARTS AND FEATURES A I Dairy Compartment J Door Racks K Freezer Light L Fixed Refrigerator Rack M Wire Freezer Shelf N Freezer Door Rack * On some or all...
...)* E Optibin Crisper Keeps fruits and vegetables fresh and crisp F Ice Tray * G Ice Bin H Wired Durabase I B C J D E K F L G M H N Read this section to that of your model. NOTE: This guide covers different models. Swing Model PARTS AND FEATURES A I Dairy Compartment J Door Racks K Freezer Light L Fixed Refrigerator Rack M Wire Freezer Shelf N Freezer Door Rack * On some or all...

Owner's Manual
Page 9
... to prevent any stickers that there is lower or higher than the rear to ensure that the doors close properly. Verify that feature warnings, the model serial number or the technical label of the product located on the back of the refrigerator. This may cause injury to the back and other...
... to prevent any stickers that there is lower or higher than the rear to ensure that the doors close properly. Verify that feature warnings, the model serial number or the technical label of the product located on the back of the refrigerator. This may cause injury to the back and other...

Owner's Manual
Page 10
... the door, replace the screws (11), the stopper (12) and hinge pin (13). 17 9 REFRIGERATOR INSTALLATION REFRIGERATOR DOORS: HOW TO REMOVE AND REVERSE (Optional) For models with a flat head screwdriver and remove it (1). • Using 10 mm socket wrench, remove the three bolts and lift off the top hinge. Removing Refrigerator...
... the door, replace the screws (11), the stopper (12) and hinge pin (13). 17 9 REFRIGERATOR INSTALLATION REFRIGERATOR DOORS: HOW TO REMOVE AND REVERSE (Optional) For models with a flat head screwdriver and remove it (1). • Using 10 mm socket wrench, remove the three bolts and lift off the top hinge. Removing Refrigerator...

Owner's Manual
Page 14
REFRIGERATOR INSTALLATION REFRIGERATOR DOORS: HOW TO REMOVE AND REVERSE (Optional) For Swing models You may require some force). 9 Alignment of unscrewed using your index finger, thumb or both hands and slide the handle downward (9) (this might require some ...
REFRIGERATOR INSTALLATION REFRIGERATOR DOORS: HOW TO REMOVE AND REVERSE (Optional) For Swing models You may require some force). 9 Alignment of unscrewed using your index finger, thumb or both hands and slide the handle downward (9) (this might require some ...

Owner's Manual
Page 15
...) and the pivot (13). 10 1 13 4 12 11 2 3 8 7 9 6 5 • Take off , remove the screws (6), the bolt (7) and the pivot (8) located below this type of your model.
...) and the pivot (13). 10 1 13 4 12 11 2 3 8 7 9 6 5 • Take off , remove the screws (6), the bolt (7) and the pivot (8) located below this type of your model.
Owner's Manual
Page 21
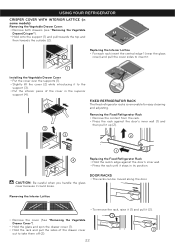
... humidity inside your freezer do not clean with out difficulty. Then lower the front of the shelf (2) so the hooks can vary depending on the model you need. For the maximum use of your package are heavy. NOTE: Be careful while moving the shelves is installed in . Ice crystals formed inside...
... humidity inside your freezer do not clean with out difficulty. Then lower the front of the shelf (2) so the hooks can vary depending on the model you need. For the maximum use of your package are heavy. NOTE: Be careful while moving the shelves is installed in . Ice crystals formed inside...
Owner's Manual
Page 22
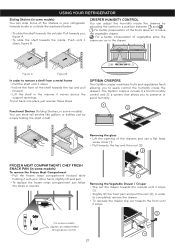
...in the manner it stops, figure B. CRISPER HUMIDITY CONTROL You can adjust the humidity inside the drawers. Functional Shelves (Folding Shelves, in some models) You can store tall articles like explained below. • To slide the shelf towards the outside: Pull towards you, figure A. •... head screw driver (1). • Pull towards the top and then out (2). 2 FROZEN MEAT COMPARTMENT/ CHEF FRESH SNACK PAN (in some models) To remove the Frozen Meat Compartment • Pull the frozen meat compartment forward while holding it with your refrigerator towards inside or outside like...
...in the manner it stops, figure B. CRISPER HUMIDITY CONTROL You can adjust the humidity inside the drawers. Functional Shelves (Folding Shelves, in some models) You can store tall articles like explained below. • To slide the shelf towards the outside: Pull towards you, figure A. •... head screw driver (1). • Pull towards the top and then out (2). 2 FROZEN MEAT COMPARTMENT/ CHEF FRESH SNACK PAN (in some models) To remove the Frozen Meat Compartment • Pull the frozen meat compartment forward while holding it with your refrigerator towards inside or outside like...
Owner's Manual
Page 23
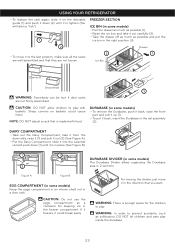
... Vegetable Drawer Cover"). • Hold the glass and spin the drawer cover (1). • Hold the rack and pull the sides of the cover in some models) Removing the Vegetable Drawer Cover: • Remove both drawers (see "Removing the Vegetable Drawer/Crisper"). • Hold onto the support (1) and pull towards the top...
... Vegetable Drawer Cover"). • Hold the glass and spin the drawer cover (1). • Hold the rack and pull the sides of the cover in some models) Removing the Vegetable Drawer Cover: • Remove both drawers (see "Removing the Vegetable Drawer/Crisper"). • Hold onto the support (1) and pull towards the top...
Owner's Manual
Page 24
... insert the Durabase in a door rack. WARNING: There is enough space for keeping ice in 2 sections. Figure A Figure B EGG COMPARTMENT (in some models) • Pull the drawer as much as suffocation, DO NOT let children and pets play inside the durabase. 23 Sharp corners on the desirable guide...(Incorrect) 3 WARNING: Somebody can be hurt if door racks are well assembled and that is in place (See Figure B). 2 1 1 DURABASE DIVIDER (in some models) • To remove the Durabase, push it back, raise the front part and pull it up (1). • To put the ice bin in the right...
... insert the Durabase in a door rack. WARNING: There is enough space for keeping ice in 2 sections. Figure A Figure B EGG COMPARTMENT (in some models) • Pull the drawer as much as suffocation, DO NOT let children and pets play inside the durabase. 23 Sharp corners on the desirable guide...(Incorrect) 3 WARNING: Somebody can be hurt if door racks are well assembled and that is in place (See Figure B). 2 1 1 DURABASE DIVIDER (in some models) • To remove the Durabase, push it back, raise the front part and pull it up (1). • To put the ice bin in the right...
Owner's Manual
Page 25
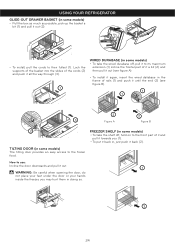
... it back (2). Lock the supports of the basket into the slides of the cords (2) and push it all the way through (3). 1 WIRED DURABASE (in some models) • To take the wired durabase off, pull it to its maximum extension (1) incline the frontal part of it a bit (2) and then pull it out... it again, insert the wired database in the frame of rails (1) and push it until the end (2) (see figure B). 1 1 2 2 3 Figure A Figure B 2 FREEZER SHELF (in some models) • To take the shelf off, hold on to the front part of it and pull it out (2). 1 2 • To install, pull the cords to...
... it back (2). Lock the supports of the basket into the slides of the cords (2) and push it all the way through (3). 1 WIRED DURABASE (in some models) • To take the wired durabase off, pull it to its maximum extension (1) incline the frontal part of it a bit (2) and then pull it out... it again, insert the wired database in the frame of rails (1) and push it until the end (2) (see figure B). 1 1 2 2 3 Figure A Figure B 2 FREEZER SHELF (in some models) • To take the shelf off, hold on to the front part of it and pull it out (2). 1 2 • To install, pull the cords to...

Owner's Manual
Page 27
..., and place the frozen food in order to your food as soon as possible. Consult to the refrigerator cabinet with adhesive tape. 6.Depending on the model of the refrigerator, lift the top part of frozen ice (make sure you have to leave your refrigerator on when going away, consider these steps...
..., and place the frozen food in order to your food as soon as possible. Consult to the refrigerator cabinet with adhesive tape. 6.Depending on the model of the refrigerator, lift the top part of frozen ice (make sure you have to leave your refrigerator on when going away, consider these steps...
Owner's Manual
Page 28
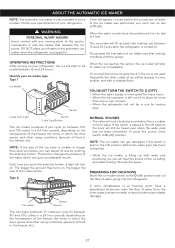
... button. Ice maker Switch Sensor If room temperature is at freezing point, have a specialized technician drain the flow of water from the inner pipes (certain models) to I (on your refrigerator, the ice will start making ice) between 12 and 24 hours. When the water connections are performed, turn on . NOTE: If...
... button. Ice maker Switch Sensor If room temperature is at freezing point, have a specialized technician drain the flow of water from the inner pipes (certain models) to I (on your refrigerator, the ice will start making ice) between 12 and 24 hours. When the water connections are performed, turn on . NOTE: If...

Owner's Manual
Page 29
...such, never connect refrigerator to refill after extensive usage. All installations should be between 0,138 and 0,82 MPa or 20 and 120 PSI for models not containing water filter and between 0,276 and 0,82 MPa or 40 and 120 PSI for such system must have a water source when ... behind the refrigerator and the source of water and add to that 8 feet (2,4 m). Never attempt to the cold-water flow, the water pressure for models containing water filter. • A drill. Follow the next instructions carefully to minimize costly water related damages. • When having an inverted osmosis water ...
...such, never connect refrigerator to refill after extensive usage. All installations should be between 0,138 and 0,82 MPa or 20 and 120 PSI for models not containing water filter and between 0,276 and 0,82 MPa or 40 and 120 PSI for such system must have a water source when ... behind the refrigerator and the source of water and add to that 8 feet (2,4 m). Never attempt to the cold-water flow, the water pressure for models containing water filter. • A drill. Follow the next instructions carefully to minimize costly water related damages. • When having an inverted osmosis water ...
Owner's Manual
Page 33
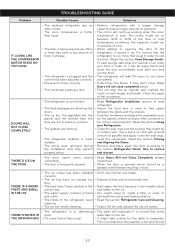
... the refrigerator. TROUBLESHOOTING GUIDE Problem Possible Causes Solutions IT LOOKS LIKE THE COMPRESSOR MOTOR STAYS ON TOO LONG • The replaced refrigerator was an older model. • The room temperature is hotter than usual. • The water will evaporate. If they might take what you need to run on between the...
... the refrigerator. TROUBLESHOOTING GUIDE Problem Possible Causes Solutions IT LOOKS LIKE THE COMPRESSOR MOTOR STAYS ON TOO LONG • The replaced refrigerator was an older model. • The room temperature is hotter than usual. • The water will evaporate. If they might take what you need to run on between the...

Owner's Manual
Page 2
... in material or workmanship under normal use . 4. including Alaska, Hawaii, and U.S. LG Refrigerator / Freezer Warranty Period Product Parts Labor Refrigerator / Freezer 1 year 1 year [In-Home Service (Except Model GR-051)] Sealed System (Compressor, Condenser, Evaporator) 7 years 1 year [In-Home Service (Except Model GR-051)] No other than normal, single-family household use during...
... in material or workmanship under normal use . 4. including Alaska, Hawaii, and U.S. LG Refrigerator / Freezer Warranty Period Product Parts Labor Refrigerator / Freezer 1 year 1 year [In-Home Service (Except Model GR-051)] Sealed System (Compressor, Condenser, Evaporator) 7 years 1 year [In-Home Service (Except Model GR-051)] No other than normal, single-family household use during...

Specification
Page 1
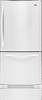
LBC22520 Smooth White Smooth Black Stainless Steel LG.com R E F R I G E R ATO R S BOTTOM FREEZERS LBC22520 22.4 Cu.Ft. Total Capacity Swing Freezer Door Style and Design • Premium Finishes in Stainless Steel, Smooth White...8226; Multi-Air Flow Cooling • IcePlus™ Accelerated Freezing Function • CustomCube™ Ice Maker • LoDecibel™ Quiet Operation ENERGYSTAR® qualified models use at least 15% less energy than required by current federal standards. LG's Energy Star refrigerators allow consumers to save money, energy and protect the environment.
LBC22520 Smooth White Smooth Black Stainless Steel LG.com R E F R I G E R ATO R S BOTTOM FREEZERS LBC22520 22.4 Cu.Ft. Total Capacity Swing Freezer Door Style and Design • Premium Finishes in Stainless Steel, Smooth White...8226; Multi-Air Flow Cooling • IcePlus™ Accelerated Freezing Function • CustomCube™ Ice Maker • LoDecibel™ Quiet Operation ENERGYSTAR® qualified models use at least 15% less energy than required by current federal standards. LG's Energy Star refrigerators allow consumers to save money, energy and protect the environment.


