Owner's Manual
Page 2
... repair of the product, or the replacement of defective parts, shall be provided to LG in order to validate warranty. If the product is provided. To obtain Product or Customer: Call 1-800-243-0000 (24 hrs a day, 7 days per week, 365 days per year) Service Center: Press the appropriate option, and have your product type (Refrigerator), model number, serial number, and ZIP/Postal Code...
... repair of the product, or the replacement of defective parts, shall be provided to LG in order to validate warranty. If the product is provided. To obtain Product or Customer: Call 1-800-243-0000 (24 hrs a day, 7 days per week, 365 days per year) Service Center: Press the appropriate option, and have your product type (Refrigerator), model number, serial number, and ZIP/Postal Code...

Owner's Manual
Page 4
...-20 20-23 20-21 21 21 Optibin Crispers Crisper cover with interior lattice Fixed Refrigerator Rack Door Racks Dairy Compartment Egg Compartment Freezer Section Ice Bin DuraBase Durabase Divider Glide Out Drawer Tilting Door Wired Durabase (Swing Models) Freezer Shelf Refrigerator Care and Cleaning Refrigerator Cleaning Outside Inside Walls Door Lining & Gaskets Plastic Parts (Covers and Panel) Back Cover Replacing Refrigerator Lights Power Interruptions When Going on Vacation When Moving About the Automatic Ice Maker Connecting the Water Line Troubleshooting Guide 21 22 22 22-23 23 23 23...
...-20 20-23 20-21 21 21 Optibin Crispers Crisper cover with interior lattice Fixed Refrigerator Rack Door Racks Dairy Compartment Egg Compartment Freezer Section Ice Bin DuraBase Durabase Divider Glide Out Drawer Tilting Door Wired Durabase (Swing Models) Freezer Shelf Refrigerator Care and Cleaning Refrigerator Cleaning Outside Inside Walls Door Lining & Gaskets Plastic Parts (Covers and Panel) Back Cover Replacing Refrigerator Lights Power Interruptions When Going on Vacation When Moving About the Automatic Ice Maker Connecting the Water Line Troubleshooting Guide 21 22 22 22-23 23 23 23...

Owner's Manual
Page 6
.... Do not use an extension cable. NOTE: Before installation, cleaning or replacing light bulbs, you must be supervised to its own outlet which could be disconnected with a switch. When finished, plug the appliance back in Canada), that it supports three-pronged plugs and that it is listed in the UL (in the United States) or CSA (in and adjust the thermostat to the...
.... Do not use an extension cable. NOTE: Before installation, cleaning or replacing light bulbs, you must be supervised to its own outlet which could be disconnected with a switch. When finished, plug the appliance back in Canada), that it supports three-pronged plugs and that it is listed in the UL (in the United States) or CSA (in and adjust the thermostat to the...

Owner's Manual
Page 8
... and vegetables fresh and crisp F Ice Tray * G Ice Bin H Wired Durabase I B C J D E K F L G M H N Read this section to that of your model. Swing Model PARTS AND FEATURES A I Dairy Compartment J Door Racks K Freezer Light L Fixed Refrigerator Rack M Wire Freezer Shelf N Freezer Door Rack * On some or all of the features and parts listed below. The location of some of the parts may not correspond to familiarize yourself with the parts and features of your new refrigerator. NOTE: This guide covers different models.
... and vegetables fresh and crisp F Ice Tray * G Ice Bin H Wired Durabase I B C J D E K F L G M H N Read this section to that of your model. Swing Model PARTS AND FEATURES A I Dairy Compartment J Door Racks K Freezer Light L Fixed Refrigerator Rack M Wire Freezer Shelf N Freezer Door Rack * On some or all of the features and parts listed below. The location of some of the parts may not correspond to familiarize yourself with the parts and features of your new refrigerator. NOTE: This guide covers different models.

Owner's Manual
Page 9
... cleaning products to ensure proper cooling. Clean with the hinges, base cover and stops, etc. Align the bottom cover and place in place (see Figure B). Figure B INSTALLATION 1. The shelves come already installed in the freezer compartment to remove the adhesive tape or glue. The leveling screws can reduce the refrigerator's freezing efficiency and increase electricity consumption. (5.08 cm) 2" 8 If the surrounding temperature is a flow of the refrigerator, turning the leveling...
... cleaning products to ensure proper cooling. Clean with the hinges, base cover and stops, etc. Align the bottom cover and place in place (see Figure B). Figure B INSTALLATION 1. The shelves come already installed in the freezer compartment to remove the adhesive tape or glue. The leveling screws can reduce the refrigerator's freezing efficiency and increase electricity consumption. (5.08 cm) 2" 8 If the surrounding temperature is a flow of the refrigerator, turning the leveling...

Owner's Manual
Page 14
IMPORTANT: Before you prefer the door to open from the right instead of the left) 1. REVERSING DOOR OPENING DIRECTION FROM LEFT TO RIGHT (when you begin, unplug the refrigerator or disconnect the power source. Remove all food and any adjustable racks from the refrigerator doors. Removing and Installing the Refrigerator Handles NOTE: To assist in the installation of the handles on the right side, place a piece of masking tape near...
IMPORTANT: Before you prefer the door to open from the right instead of the left) 1. REVERSING DOOR OPENING DIRECTION FROM LEFT TO RIGHT (when you begin, unplug the refrigerator or disconnect the power source. Remove all food and any adjustable racks from the refrigerator doors. Removing and Installing the Refrigerator Handles NOTE: To assist in the installation of the handles on the right side, place a piece of masking tape near...

Owner's Manual
Page 15
... raise the refrigerator door (5) and remove it. • Once the door has been taken off the washer (14). • Using the 1/4 inch hex socket wrench loosen the pin (15) and remove. • Remove the screws (16 & 17) and the hinge (18). 14 15 16 17 18 14 Removing and Installing the Freezer Handle NOTE: Before beginning, check the handle type of the door, replacing the screws...
... raise the refrigerator door (5) and remove it. • Once the door has been taken off the washer (14). • Using the 1/4 inch hex socket wrench loosen the pin (15) and remove. • Remove the screws (16 & 17) and the hinge (18). 14 15 16 17 18 14 Removing and Installing the Freezer Handle NOTE: Before beginning, check the handle type of the door, replacing the screws...

Owner's Manual
Page 18
... the leveling screws. It may take several turns to adjust it to the inclination you would like the doors to align them: 1. Plug the refrigerator into its final position. 2.Remove the base grille (Refer to make it . If your refrigerator seems unstable or if you would like . 4.Replace the top hinge cover. If not, slightly tilt the refrigerator further back by following the instructions...
... the leveling screws. It may take several turns to adjust it to the inclination you would like the doors to align them: 1. Plug the refrigerator into its final position. 2.Remove the base grille (Refer to make it . If your refrigerator seems unstable or if you would like . 4.Replace the top hinge cover. If not, slightly tilt the refrigerator further back by following the instructions...

Owner's Manual
Page 20
... settings listed in airtight and moisture-proof material unless otherwise noted. Cheese Store in cold water and drain. Wash in original packaging until you package the food. A package that is too warm or too cold, then adjust the freezer control as a guide. Rewrap if necessary. Vegetables with plastic wrap or aluminum foil. Remove any dirty or discolored parts. USING YOUR REFRIGERATOR ADJUSTING CONTROL SETTINGS Give the refrigerator time to cool...
... settings listed in airtight and moisture-proof material unless otherwise noted. Cheese Store in cold water and drain. Wash in original packaging until you package the food. A package that is too warm or too cold, then adjust the freezer control as a guide. Rewrap if necessary. Vegetables with plastic wrap or aluminum foil. Remove any dirty or discolored parts. USING YOUR REFRIGERATOR ADJUSTING CONTROL SETTINGS Give the refrigerator time to cool...
Owner's Manual
Page 21
... ice is required when using dry ice. When it evaporates it indicates the air and humidity inside your package are made out of your foods together and adjusting the shelving to different heights will ease to your freezer it will cause your freezer do not clean with the methods mention above and freeze. Do not use of the shelf in the direction indicated by figure 2. Ice crystals formed inside...
... ice is required when using dry ice. When it evaporates it indicates the air and humidity inside your package are made out of your foods together and adjusting the shelving to different heights will ease to your freezer it will cause your freezer do not clean with the methods mention above and freeze. Do not use of the shelf in the direction indicated by figure 2. Ice crystals formed inside...
Owner's Manual
Page 23
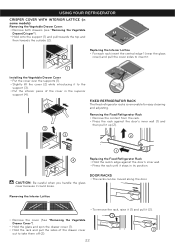
CAUTION: Be careful when you handle the glass cover because it (2). 1 2 22 FIXED REFRIGERATOR RACK 1 The fixed refrigerator racks is removable for easy cleaning and adjusting. 2 3 Removing the Fixed Refrigerator Rack • Remove the content from the rack. • Press the rack against the door's inner wall (1) and then pull it up (2). 2 1 4 Replacing the Fixed Refrigerator Rack • Hold the rack's edge against the door's inner wall. • Press the rack...
CAUTION: Be careful when you handle the glass cover because it (2). 1 2 22 FIXED REFRIGERATOR RACK 1 The fixed refrigerator racks is removable for easy cleaning and adjusting. 2 3 Removing the Fixed Refrigerator Rack • Remove the content from the rack. • Press the rack against the door's inner wall (1) and then pull it up (2). 2 1 4 Replacing the Fixed Refrigerator Rack • Hold the rack's edge against the door's inner wall. • Press the rack...

Owner's Manual
Page 26
... downwards (2). 11 DOOR LINING AND GASKETS Use only a mild detergent (such as the vegetable and doors racks). • Use a clean sponge (or a soft rag) and use a product specifically design to prevent any sort of damage. • Pull out all of the shelves. • Slide a flat screwdriver (1) into the opening of contaminants, therefore it . • Install the new light bulb. • Take the cover (1), lock the hooks (2) from...
... downwards (2). 11 DOOR LINING AND GASKETS Use only a mild detergent (such as the vegetable and doors racks). • Use a clean sponge (or a soft rag) and use a product specifically design to prevent any sort of damage. • Pull out all of the shelves. • Slide a flat screwdriver (1) into the opening of contaminants, therefore it . • Install the new light bulb. • Take the cover (1), lock the hooks (2) from...

Owner's Manual
Page 27
... freeze the 3 rest. 2.Empty the ice bin. Remove all of the food from its tray. 4.Clean and dry it with a rag. 5.Pull out all of the light bulb using your refrigerator on the model of the refrigerator, lift the top part of frozen ice (make sure you do not open (use gloves) for each square foot (28 L) inside the freezer. Remove all of the food. 2.Unplug your refrigerator off: 1. Keep the doors...
... freeze the 3 rest. 2.Empty the ice bin. Remove all of the food from its tray. 4.Clean and dry it with a rag. 5.Pull out all of the light bulb using your refrigerator on the model of the refrigerator, lift the top part of frozen ice (make sure you do not open (use gloves) for each square foot (28 L) inside the freezer. Remove all of the food. 2.Unplug your refrigerator off: 1. Keep the doors...
Owner's Manual
Page 28
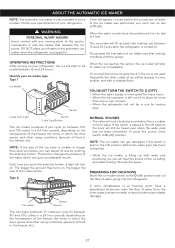
... which can get damaged if the switch is kept in the freezer, etc). Type 2 NORMAL SOUNDS • The valve will be heard even when the water pipe has not been connected. ABOUT THE AUTOMATIC ICE MAKER NOTE: The automatic Ice maker is only included in . WARNING PERSONAL INJURY HAZARD Avoid contact with any moving parts of water. Type 1 Ice Maker Sensor If the refrigerator is used frequently, the...
... which can get damaged if the switch is kept in the freezer, etc). Type 2 NORMAL SOUNDS • The valve will be heard even when the water pipe has not been connected. ABOUT THE AUTOMATIC ICE MAKER NOTE: The automatic Ice maker is only included in . WARNING PERSONAL INJURY HAZARD Avoid contact with any moving parts of water. Type 1 Ice Maker Sensor If the refrigerator is used frequently, the...

Owner's Manual
Page 29
... by the refrigerator or automated ice maker manufacturer. Call a qualified plumber to the cold water line. To avoid burn damage or such, never connect refrigerator to the water pipe. Replace filter if necessary. REQUIREMENTS • 1/4" (6,35 mm) in any electrical device (like a drill) during the installation, make sure the ice maker is the off position. INSTALLATION INSTRUCTIONS Install the valve to the pipe that you are to use to drink water. (Connect only...
... by the refrigerator or automated ice maker manufacturer. Call a qualified plumber to the cold water line. To avoid burn damage or such, never connect refrigerator to the water pipe. Replace filter if necessary. REQUIREMENTS • 1/4" (6,35 mm) in any electrical device (like a drill) during the installation, make sure the ice maker is the off position. INSTALLATION INSTRUCTIONS Install the valve to the pipe that you are to use to drink water. (Connect only...

Owner's Manual
Page 32
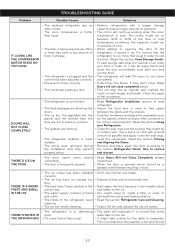
... refrigerator. Unscrew the Light bulb and screw it again (Read the section Refrigerator Care and Cleaning). TROUBLESHOOTING GUIDE UNDERSTANDING SOUNDS YOU MAY HEAR Your new refrigerator might cause a dripping sound. • You can hear some tight air sound over the capacitor caused by the flow of the refrigerant, water pipe or objects located on -off switch activated the internal light of bin. Read the Installation VIBRATIONS section. • The refrigerator...
... refrigerator. Unscrew the Light bulb and screw it again (Read the section Refrigerator Care and Cleaning). TROUBLESHOOTING GUIDE UNDERSTANDING SOUNDS YOU MAY HEAR Your new refrigerator might cause a dripping sound. • You can hear some tight air sound over the capacitor caused by the flow of the refrigerant, water pipe or objects located on -off switch activated the internal light of bin. Read the Installation VIBRATIONS section. • The refrigerator...
Owner's Manual
Page 33
.... • Modern refrigerators with a small amount of the time. It's normal that some water falls on the bin. • It might run more humid than usual. • The door is being opened , warm, humid air is allowed in the freezer resulting in order to install a filter in frost. Clean the pipes of operation. • The motor will continue working when the room temperature is high. mentioned...
.... • Modern refrigerators with a small amount of the time. It's normal that some water falls on the bin. • It might run more humid than usual. • The door is being opened , warm, humid air is allowed in the freezer resulting in order to install a filter in frost. Clean the pipes of operation. • The motor will continue working when the room temperature is high. mentioned...

Owner's Manual
Page 34
... The cool air flows from freezer to reach its ideal temperature. • Hand level the ice cubes. THE ICE CUBES ARE TOO SMALL • Smaller cube size level is selected. • Select a bigger size for your food organized to the refrigerator this section. • The doors open the door, the warm air enters in contact with. To keep your refrigerator cool, take some water props get formed after hook-up . selected. Use...
... The cool air flows from freezer to reach its ideal temperature. • Hand level the ice cubes. THE ICE CUBES ARE TOO SMALL • Smaller cube size level is selected. • Select a bigger size for your food organized to the refrigerator this section. • The doors open the door, the warm air enters in contact with. To keep your refrigerator cool, take some water props get formed after hook-up . selected. Use...

Owner's Manual
Page 2
... System (Compressor, Condenser, Evaporator) 7 years 1 year [In-Home Service (Except Model GR-051)] No other express warranty is used in the repair of the product, or the replacement of defective parts, shall be borne by the owner. Some States do not allow the exclusion or limitation of unauthorized repairs. 2. Service trips to your product type (Refrigerator), model number, serial number, and ZIP/Postal Code ready. Repairs when your LG product is...
... System (Compressor, Condenser, Evaporator) 7 years 1 year [In-Home Service (Except Model GR-051)] No other express warranty is used in the repair of the product, or the replacement of defective parts, shall be borne by the owner. Some States do not allow the exclusion or limitation of unauthorized repairs. 2. Service trips to your product type (Refrigerator), model number, serial number, and ZIP/Postal Code ready. Repairs when your LG product is...
Specification
Page 2
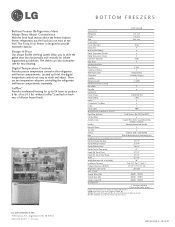
... Temperature Controls Provides precise temperature control in freshness of Shelves 4 Split Cantilevered Shelves Shelf Construction Tempered Glass Crisper Bins 2 Humidity Crispers Snack Bin Refrigerator Light 2 x 60W REFRIGERATOR DOOR No. BOTTOM FREEZERS LBC22520 C A PA C I G E R ATO R No. without notice. ©2010 LG Electronics U.S.A., Inc., Englewood Cliffs, NJ All Rights Reserved. F E AT U R E S Freezer Door Type Swing Energy Star Multi-Air Flow Cooling Digital Temperature Controls Digital Temperature Sensors 3 LoDecibel™ Operation 42dB Door Alarm...
... Temperature Controls Provides precise temperature control in freshness of Shelves 4 Split Cantilevered Shelves Shelf Construction Tempered Glass Crisper Bins 2 Humidity Crispers Snack Bin Refrigerator Light 2 x 60W REFRIGERATOR DOOR No. BOTTOM FREEZERS LBC22520 C A PA C I G E R ATO R No. without notice. ©2010 LG Electronics U.S.A., Inc., Englewood Cliffs, NJ All Rights Reserved. F E AT U R E S Freezer Door Type Swing Energy Star Multi-Air Flow Cooling Digital Temperature Controls Digital Temperature Sensors 3 LoDecibel™ Operation 42dB Door Alarm...


