
Owner's Manual (English)
Page 2
... the room for more than a short period of power supply you are Dangerous High Voltages inside . In order to allow the proper operation of this manual or listed on a sloping shelf unless properly secured. On Safety Use only the power cord supplied with your service technician for its installation, use, and...
... the room for more than a short period of power supply you are Dangerous High Voltages inside . In order to allow the proper operation of this manual or listed on a sloping shelf unless properly secured. On Safety Use only the power cord supplied with your service technician for its installation, use, and...

Owner's Manual (English)
Page 8
... side panel of the rear view. This is needed to change the 15 pin high density (3 row) D-sub VGA connector on the supplied cable to manually run this function automatically adjusts the display to secure the connection. 3. A7 However, be aware that is executed automatically. (Only Analog Mode) NOTE ' Self Image...
... side panel of the rear view. This is needed to change the 15 pin high density (3 row) D-sub VGA connector on the supplied cable to manually run this function automatically adjusts the display to secure the connection. 3. A7 However, be aware that is executed automatically. (Only Analog Mode) NOTE ' Self Image...
Owner's Manual (English)
Page 13
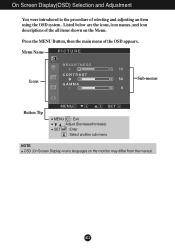
A12 On Screen Display(OSD) Selection and Adjustment You were introduced to the procedure of the OSD appears. Press the MENU Button, then the main menu of selecting and adjusting an item using the OSD system. Menu Name PICTURE Icons Sub-menus Button Tip MENU : Exit : Adjust (Decrease/Increase) SET : Enter : Select another sub-menu NOTE OSD (On Screen Display) menu languages on the Menu. Listed below are the icons, icon names, and icon descriptions of the all items shown on the monitor may differ from the manual.
A12 On Screen Display(OSD) Selection and Adjustment You were introduced to the procedure of the OSD appears. Press the MENU Button, then the main menu of selecting and adjusting an item using the OSD system. Menu Name PICTURE Icons Sub-menus Button Tip MENU : Exit : Adjust (Decrease/Increase) SET : Enter : Select another sub-menu NOTE OSD (On Screen Display) menu languages on the Menu. Listed below are the icons, icon names, and icon descriptions of the all items shown on the monitor may differ from the manual.
Owner's Manual (English)
Page 16
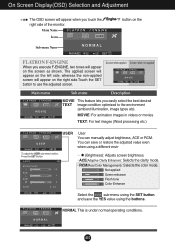
... on the left side, whereas the non-applied screen will appear on the screen as shown. NORMAL This is under normal operating conditions. You can manually adjust brightness, ACE or RCM. On Screen Display(OSD) Selection and Adjustment The OSD screen will appear when you easily select the best desired TEXT...
... on the left side, whereas the non-applied screen will appear on the screen as shown. NORMAL This is under normal operating conditions. You can manually adjust brightness, ACE or RCM. On Screen Display(OSD) Selection and Adjustment The OSD screen will appear when you easily select the best desired TEXT...
Owner's Manual (English)
Page 17
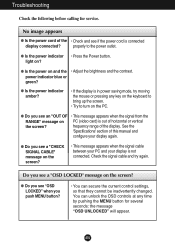
... the screen? G Do you push MENU button? • You can unlock the OSD controls at any key on PC (video card) is out of this manual and configure your display is not connected. G Do you see an "OUT OF • This message appears when the signal from the RANGE" message on...
... the screen? G Do you push MENU button? • You can unlock the OSD controls at any key on PC (video card) is out of this manual and configure your display is not connected. G Do you see an "OUT OF • This message appears when the signal from the RANGE" message on...


