
User Manual
Page 2
Ensure that the socket-outlet is OFF. Operate the display only from a power source indicated in the specifications of time. So are dangerous. There are Dangerous High Voltages inside . Keep children from the wall outlet. During a lightning storm or when the display is ...
Ensure that the socket-outlet is OFF. Operate the display only from a power source indicated in the specifications of time. So are dangerous. There are Dangerous High Voltages inside . Keep children from the wall outlet. During a lightning storm or when the display is ...

User Manual
Page 12
If you set OFF, it will automatically be enabled only when the input signal is different the required specifications, the color level may deteriorate due to video signal distortion. FACTORY Restore all factory default settings except RESET "LANGUAGE." If necessary, perform the white balance ... adjust the focus of the OSD window on the screen. This item allows you set the power INDICATOR indicator on the front side of the monitor to set ON at any time, the power indicator will go off. If this function to ON or OFF. SETUP MENU MENU OSDPOSITION To adjust...
If you set OFF, it will automatically be enabled only when the input signal is different the required specifications, the color level may deteriorate due to video signal distortion. FACTORY Restore all factory default settings except RESET "LANGUAGE." If necessary, perform the white balance ... adjust the focus of the OSD window on the screen. This item allows you set the power INDICATOR indicator on the front side of the monitor to set ON at any time, the power indicator will go off. If this function to ON or OFF. SETUP MENU MENU OSDPOSITION To adjust...

User Manual
Page 14
... changed. Is the power on the screen? Check and see "OSD LOCKED" when you see an "OUT OF RANGE" message on the screen? See the 'Specifications' section of the display. Do you see a "OSD LOCKED" message on and the power indicator blue or green? Troubleshooting Check the following before calling for...
... changed. Is the power on the screen? Check and see "OSD LOCKED" when you see an "OUT OF RANGE" message on the screen? See the 'Specifications' section of the display. Do you see a "OSD LOCKED" message on and the power indicator blue or green? Troubleshooting Check the following before calling for...

User Manual
Page 17
... or PC-outlet type NOTE Information in this document is subject to change without notice. A16 Specifications Display Sync Input Video Input Resolution Plug&Play Power Consumption Dimensions &Weight (with tilt stand) 17 inches (43.2 cm) Flat Panel Active matrix-TFT LCD Anti-Glare coating 17 inches viewable 0.264 mm pixel pitch Horizontal Freq.
... or PC-outlet type NOTE Information in this document is subject to change without notice. A16 Specifications Display Sync Input Video Input Resolution Plug&Play Power Consumption Dimensions &Weight (with tilt stand) 17 inches (43.2 cm) Flat Panel Active matrix-TFT LCD Anti-Glare coating 17 inches viewable 0.264 mm pixel pitch Horizontal Freq.
User Manual
Page 18
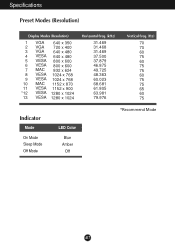
Specifications Preset Modes (Resolution) Display Modes (Resolution) 1 VGA 640 x 350 2 VGA 720 x 400 3 VGA 640 x 480 4 VESA 640 x 480 5 VESA 800 x 600 6 VESA 800 x 600 7 MAC 832 x 624 8 VESA 1024 x 768 9 VESA 1024 x 768 10 MAC 1152 x 870 11 VESA 1152 x 900 *12 VESA 1280 x 1024 13 VESA 1280 x 1024 Horizontal Freq. (kHz) 31.469 31.468 31.469 37.500 37.879 46.875 49.725 48.363 60.023 68.681 61.805 63.981 79.976 Vertical Freq. (Hz) 70 70 60 75 60 75 75 60 75 75 65 60 75 Indicator Mode On Mode Sleep Mode Off Mode LED Color Blue Amber Off *Recommend Mode A17
Specifications Preset Modes (Resolution) Display Modes (Resolution) 1 VGA 640 x 350 2 VGA 720 x 400 3 VGA 640 x 480 4 VESA 640 x 480 5 VESA 800 x 600 6 VESA 800 x 600 7 MAC 832 x 624 8 VESA 1024 x 768 9 VESA 1024 x 768 10 MAC 1152 x 870 11 VESA 1152 x 900 *12 VESA 1280 x 1024 13 VESA 1280 x 1024 Horizontal Freq. (kHz) 31.469 31.468 31.469 37.500 37.879 46.875 49.725 48.363 60.023 68.681 61.805 63.981 79.976 Vertical Freq. (Hz) 70 70 60 75 60 75 75 60 75 75 65 60 75 Indicator Mode On Mode Sleep Mode Off Mode LED Color Blue Amber Off *Recommend Mode A17
User Manual
Page 19
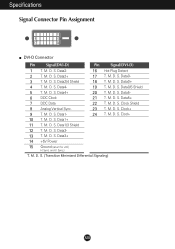
... 8 Analog Vertical Sync. 23 T. S. D. S. D. D. D. S. Sync.) T. D. Data0/5 Shield 5 T. M. M. D. S. S. D. Data2- 16 Hot Plug Detect 2 T. D. Data2/4 Shield 18 T. S. D. D. M. S. Clock- 10 T. S. (Transition Minimized Differential Signaling) A18 Specifications Signal Connector Pin Assignment 1 8 9 16 17 24 DVI-D Connector Pin Signal(DVI-D) Pin Signal(DVI-D) 1 T. D. Data4+ 20 T. S. M. S. M. S. S. M. Data5- 6 DDC Clock 21 T. Data3+ 14 +5V Power 15 Ground (return for...
... 8 Analog Vertical Sync. 23 T. S. D. S. D. D. D. S. Sync.) T. D. Data0/5 Shield 5 T. M. M. D. S. S. D. Data2- 16 Hot Plug Detect 2 T. D. Data2/4 Shield 18 T. S. D. D. M. S. Clock- 10 T. S. (Transition Minimized Differential Signaling) A18 Specifications Signal Connector Pin Assignment 1 8 9 16 17 24 DVI-D Connector Pin Signal(DVI-D) Pin Signal(DVI-D) 1 T. D. Data4+ 20 T. S. M. S. M. S. S. M. Data5- 6 DDC Clock 21 T. Data3+ 14 +5V Power 15 Ground (return for...
User Manual
Page 20
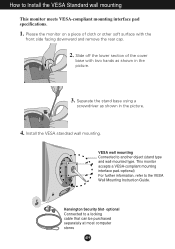
...) For further information, refer to a locking cable that can be purchased separately at most computer stores A19 Install the VESA standrad wall mounting. Please the monitor on a piece of the cover base with the front side facing downward and remove the rear cap. 2. optional Connected to the VESA Wall Mounting Instruction... soft surface with two hands as shown in the picture. 3. Kensington Security Slot- VESA wall mounting Connected to Install the VESA Standard wall mounting This monitor meets VESA-compliant mounting interface pad specifications. 1.
...) For further information, refer to a locking cable that can be purchased separately at most computer stores A19 Install the VESA standrad wall mounting. Please the monitor on a piece of the cover base with the front side facing downward and remove the rear cap. 2. optional Connected to the VESA Wall Mounting Instruction... soft surface with two hands as shown in the picture. 3. Kensington Security Slot- VESA wall mounting Connected to Install the VESA Standard wall mounting This monitor meets VESA-compliant mounting interface pad specifications. 1.

User Manual
Page 22
LGE recommends connecting high-power USB devices directly to the computer A21 Making use with high-power USB devices such as a video camera, scanner, etc. Optional USB Specifications USB standard Downstream power supply Communication speed USB port Rev. 1.1 complied BUS-powered hub 100mA for each (MAX) 12 Mbps (full), 1.5 Mbps (low) 1 Upstream port 2 Downstream ports IMPORTANT: These USB connectors are not designed for use of USB (Universal Serial Bus) -
LGE recommends connecting high-power USB devices directly to the computer A21 Making use with high-power USB devices such as a video camera, scanner, etc. Optional USB Specifications USB standard Downstream power supply Communication speed USB port Rev. 1.1 complied BUS-powered hub 100mA for each (MAX) 12 Mbps (full), 1.5 Mbps (low) 1 Upstream port 2 Downstream ports IMPORTANT: These USB connectors are not designed for use of USB (Universal Serial Bus) -
