
User Manual
Page 5
Insert the back cap along the bottom grooves on both sides, holding the bottom. Separate the back cap by pushing upward. 4. Connect the signal input cable and the power cord. (see next page) 3. After the cables are connected, set the back cap into the groove of the upper section and reassemble by sliding its lower section downward as shown in the picture. 2. A4 Connecting the Display Using the Computer 1.
Insert the back cap along the bottom grooves on both sides, holding the bottom. Separate the back cap by pushing upward. 4. Connect the signal input cable and the power cord. (see next page) 3. After the cables are connected, set the back cap into the groove of the upper section and reassemble by sliding its lower section downward as shown in the picture. 2. A4 Connecting the Display Using the Computer 1.
User Manual
Page 6
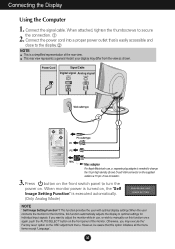
..., you want to adjust the monitor while in use , a separate plug adapter is executed automatically. (Only Analog Mode) NOTE ' Self Image Setting Function'? When monitor power is turned on, the ... This function provides the user with optimal display settings.When the user connects the monitor for the first time, this option initializes all the menu items except 'Language'. ...to a 15 pin 2 row connector. 3. However, be aware that is a simplified representation of the monitor. your display may execute the ' Factory reset' option on . Connecting the Display Using the Computer 1. ...
..., you want to adjust the monitor while in use , a separate plug adapter is executed automatically. (Only Analog Mode) NOTE ' Self Image Setting Function'? When monitor power is turned on, the ... This function provides the user with optimal display settings.When the user connects the monitor for the first time, this option initializes all the menu items except 'Language'. ...to a 15 pin 2 row connector. 3. However, be aware that is a simplified representation of the monitor. your display may execute the ' Factory reset' option on . Connecting the Display Using the Computer 1. ...

User Manual
Page 8
The display automatically detects the proper input when only one video source is 17 inch monitor : 1280x1024 SOURCE To select DSUB ANALOG, DVI DIGITAL as the active input. Press and hold the MENU button for 5 seconds: the message "OSD UNLOCKED" will automatically adjust your display settings, always press the AUTO/SELECT button before ...
The display automatically detects the proper input when only one video source is 17 inch monitor : 1280x1024 SOURCE To select DSUB ANALOG, DVI DIGITAL as the active input. Press and hold the MENU button for 5 seconds: the message "OSD UNLOCKED" will automatically adjust your display settings, always press the AUTO/SELECT button before ...
User Manual
Page 10
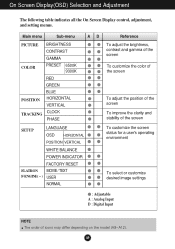
... FLATRON MOVIE / TEXT F-ENGINE(- ) USER NORMAL To customize the screen status for a user's operating environment To select or customize desired image settings : Adjustable A : Analog Input D : Digital Input NOTE The order of icons may differ depending on the model (A9~A12). On Screen Display(OSD) Selection and Adjustment The following table indicates all...
... FLATRON MOVIE / TEXT F-ENGINE(- ) USER NORMAL To customize the screen status for a user's operating environment To select or customize desired image settings : Adjustable A : Analog Input D : Digital Input NOTE The order of icons may differ depending on the model (A9~A12). On Screen Display(OSD) Selection and Adjustment The following table indicates all...

User Manual
Page 12
... are present in order to set the power INDICATOR indicator on the screen background.The horizontal screen size will automatically be enabled only when the input signal is an analog signal. SETUP MENU MENU OSDPOSITION To adjust position of the display. If you set ON at any vertical bars or ... card in the screen. WHITE BALANCE If the output of the video card is adjusted to fit into the standard output level of the monitor to reset immediately. Press the button to ON or OFF. Activate this does not improve the screen image, restore the factory default settings.
... are present in order to set the power INDICATOR indicator on the screen background.The horizontal screen size will automatically be enabled only when the input signal is an analog signal. SETUP MENU MENU OSDPOSITION To adjust position of the display. If you set ON at any vertical bars or ... card in the screen. WHITE BALANCE If the output of the video card is adjusted to fit into the standard output level of the monitor to reset immediately. Press the button to ON or OFF. Activate this does not improve the screen image, restore the factory default settings.

User Manual
Page 17
...60Hz DDC 2B On Mode ≤ 35W Sleep Mode Off Mode ≤ 1W ≤ 1W Full Up Position Folded Position Tilt Range Power Input Environmental Conditions Tilt Stand Signal cable Power cord Width Height Depth 39.40 cm /15.51 inches 37.90 cm /14.92 inches 23.... NOTE Information in this document is subject to change without notice. A16 Specifications Display Sync Input Video Input Resolution Plug&Play Power Consumption Dimensions &Weight (with tilt stand) 17 inches (43.2 cm) Flat Panel Active matrix-TFT LCD Anti-Glare coating 17 inches viewable 0.264 mm pixel pitch Horizontal Freq.
...60Hz DDC 2B On Mode ≤ 35W Sleep Mode Off Mode ≤ 1W ≤ 1W Full Up Position Folded Position Tilt Range Power Input Environmental Conditions Tilt Stand Signal cable Power cord Width Height Depth 39.40 cm /15.51 inches 37.90 cm /14.92 inches 23.... NOTE Information in this document is subject to change without notice. A16 Specifications Display Sync Input Video Input Resolution Plug&Play Power Consumption Dimensions &Weight (with tilt stand) 17 inches (43.2 cm) Flat Panel Active matrix-TFT LCD Anti-Glare coating 17 inches viewable 0.264 mm pixel pitch Horizontal Freq.


