Owner's Manual (English)
Page 1
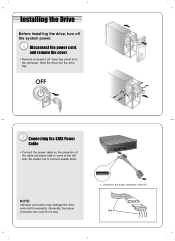
Installing the Drive Before installing the drive, turn off the system power. Be careful not to the left side. Generally, the power connector can only fit one way. Connecting the SATA Power Cable • Connect the power cable so the projection of the PC. NOTE: Improper connection may damage the drive and void the warranty. Red Slide the drive into the drive bay. Connect to the power connector of the cable connector side to come to connect upside down. Disconnect the power cord, and remove the cover. • Remove a vacant 5.25" drive bay panel from the computer.
Installing the Drive Before installing the drive, turn off the system power. Be careful not to the left side. Generally, the power connector can only fit one way. Connecting the SATA Power Cable • Connect the power cable so the projection of the PC. NOTE: Improper connection may damage the drive and void the warranty. Red Slide the drive into the drive bay. Connect to the power connector of the cable connector side to come to connect upside down. Disconnect the power cord, and remove the cover. • Remove a vacant 5.25" drive bay panel from the computer.
Owner's Manual (English)
Page 2
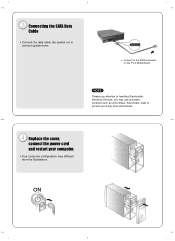
NOTE Please pay attention to handling Electrostatic Sensitive Devices, you may use anti-static products such as wrist straps, heel straps, mats to protect your computer. • Your computer configuration may different from electrostatic. Be careful not to the SATA connector on the PC's Motherboard. Replace the cover, connect the power cord and restart your body from the illustrations. Connecting the SATA Data Cable • Connect the data cable. Connect to connect upside down.
NOTE Please pay attention to handling Electrostatic Sensitive Devices, you may use anti-static products such as wrist straps, heel straps, mats to protect your computer. • Your computer configuration may different from electrostatic. Be careful not to the SATA connector on the PC's Motherboard. Replace the cover, connect the power cord and restart your body from the illustrations. Connecting the SATA Data Cable • Connect the data cable. Connect to connect upside down.
Owner's Manual (English)
Page 3
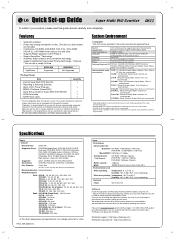
...loading and ejection of disc. (The disc can use a variety of Drive LightScribe GH22LS30 Supported GH22NS30 Not Supported Package Items Item - RAM, CD-Digital Audio & CD-Extra, CD-Plus, CD...space. (The free space needed for Super Multi DVD Rewriter - CD-RW: 40X max. Please visit www.lgservice.com and install the program, "LG ODD Online F/W update." Worldwide support ;...max. DVD-R DL: 12X max. P/NO. Once you wish) begin to prevent possible compatibility issues. SATA Data cable - SATA Power cable Quantity 1 1 1 1 1 • You may change without prior notice. We recommend ...
...loading and ejection of disc. (The disc can use a variety of Drive LightScribe GH22LS30 Supported GH22NS30 Not Supported Package Items Item - RAM, CD-Digital Audio & CD-Extra, CD-Plus, CD...space. (The free space needed for Super Multi DVD Rewriter - CD-RW: 40X max. Please visit www.lgservice.com and install the program, "LG ODD Online F/W update." Worldwide support ;...max. DVD-R DL: 12X max. P/NO. Once you wish) begin to prevent possible compatibility issues. SATA Data cable - SATA Power cable Quantity 1 1 1 1 1 • You may change without prior notice. We recommend ...

