Owners Manual
Page 3
...CD-RW media using CD-RW drives NOT bearing the logo Compact Disc ReWritable High Speed may be recognized by the same Compact Disc ReWritable High Speed logo on the disc label or packaging material, or by the Microsoft Corporation. s The company names and product names written in this unit as a CD player, use this manual... are trademarks or registered trademarks of the respective companies. This unit uses High Speed CD-RW discs with the following mark. High Speed CD-RW Media may result in the United States and other...
...CD-RW media using CD-RW drives NOT bearing the logo Compact Disc ReWritable High Speed may be recognized by the same Compact Disc ReWritable High Speed logo on the disc label or packaging material, or by the Microsoft Corporation. s The company names and product names written in this unit as a CD player, use this manual... are trademarks or registered trademarks of the respective companies. This unit uses High Speed CD-RW discs with the following mark. High Speed CD-RW Media may result in the United States and other...

Owners Manual
Page 5
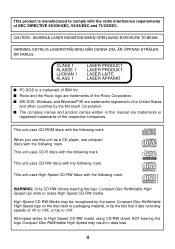
... the state of discs. Manual for the inserted media. Internal CD-R/RW Drive - In the optimum write control system, the drive automatically selects the best recording speed for CD Recording Software Quantity 1 1 1 1 4 1 1 2 E-IDE (ATAPI) cable - As a result, for CD-R/RW Drive - Package Items Item - CD Recording Software - Manual for high speed write/rewrite, you for purchasing this CD-R/RW Drive. Audio Cable - Features •...
... the state of discs. Manual for the inserted media. Internal CD-R/RW Drive - In the optimum write control system, the drive automatically selects the best recording speed for CD Recording Software Quantity 1 1 1 1 4 1 1 2 E-IDE (ATAPI) cable - As a result, for CD-R/RW Drive - Package Items Item - CD Recording Software - Manual for high speed write/rewrite, you for purchasing this CD-R/RW Drive. Audio Cable - Features •...
Owners Manual
Page 9
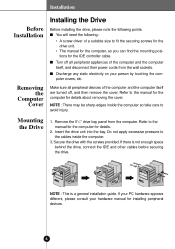
...cables inside the computer so take care to the manual for the computer for installing peripheral devices. 6 If your PC hardware appears different, please consult your person by touching the computer covers, etc. Remove the 51/4″ drive bay panel from the wall sockets. Make sure ...controller cable. s Discharge any static electricity on your hardware manual for details. 2. s You will need the following points. s Turn off , and then remove the cover. Refer to fit the securing screws for the drive unit. • The manual for the computer, so you can find the mounting ...
...cables inside the computer so take care to the manual for the computer for installing peripheral devices. 6 If your PC hardware appears different, please consult your person by touching the computer covers, etc. Remove the 51/4″ drive bay panel from the wall sockets. Make sure ...controller cable. s Discharge any static electricity on your hardware manual for details. 2. s You will need the following points. s Turn off , and then remove the cover. Refer to fit the securing screws for the drive unit. • The manual for the computer, so you can find the mounting ...
Owners Manual
Page 10
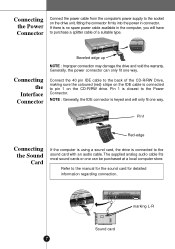
...pin 1 on the IDE cable is keyed and will have to purchase a splitter cable of the CD-R/RW Drive, making sure the coloured (red) stripe on the CD-R/RW drive. Refer to the manual for the sound card for detailed information regarding connection. DIGITAL AUDIO R ANALOG AUDIO G L C ...S L M A 39 40 D G INTERFACE 1 POWER +5 GND +12 2 POWER +5 GND +12 Beveled edge up NOTE : Improper connection may damage the drive and void the warranty. Generally, the power connector can only fit one can be purchased at a local computer store. Connecting the Interface Connector Connect the...
...pin 1 on the IDE cable is keyed and will have to purchase a splitter cable of the CD-R/RW Drive, making sure the coloured (red) stripe on the CD-R/RW drive. Refer to the manual for the sound card for detailed information regarding connection. DIGITAL AUDIO R ANALOG AUDIO G L C ...S L M A 39 40 D G INTERFACE 1 POWER +5 GND +12 2 POWER +5 GND +12 Beveled edge up NOTE : Improper connection may damage the drive and void the warranty. Generally, the power connector can only fit one can be purchased at a local computer store. Connecting the Interface Connector Connect the...
Owners Manual
Page 11
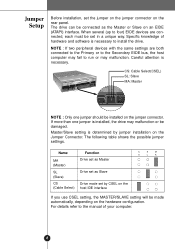
... Setup Before installation, set by jumper installation on the hardware configuration. Careful attention is necessary to install the drive. Master/Slave setting is installed, the drive may malfunction. NOTE : If two peripheral devices with the same settings are both connected to the Primary or...jumper connector. Name MA (Master) SL (Slave) CS (Cable Select) Function Drive set as Master Drive set as the Master or Slave on an EIDE (ATAPI) interface. For details refer to the manual of hardware and software is necessary. Specific knowledge of your computer. 8 The...
... Setup Before installation, set by jumper installation on the hardware configuration. Careful attention is necessary to install the drive. Master/Slave setting is installed, the drive may malfunction. NOTE : If two peripheral devices with the same settings are both connected to the Primary or...jumper connector. Name MA (Master) SL (Slave) CS (Cable Select) Function Drive set as Master Drive set as the Master or Slave on an EIDE (ATAPI) interface. For details refer to the manual of hardware and software is necessary. Specific knowledge of your computer. 8 The...
Owners Manual
Page 15
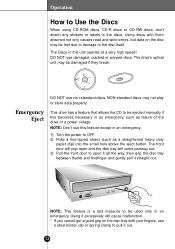
... Discs When using CD-ROM discs, CD-R discs or CD-RW discs, don't attach any stickers or labels to be ejected manually if this becomes necessary in an emergency, such as a straightened heavy duty paper clip) into the small hole above the eject button. This drive has a feature that allows the CD to the discs.... store data properly. NOTE: Don't use a steel binder clip or spring clamp to OFF. 2) Poke a fine-tipped object (such as failure of the drive or a power outage. DO NOT use non-standard discs. The front door will come partway out. 3) Pull the front door to be used only in...
... Discs When using CD-ROM discs, CD-R discs or CD-RW discs, don't attach any stickers or labels to be ejected manually if this becomes necessary in an emergency, such as a straightened heavy duty paper clip) into the small hole above the eject button. This drive has a feature that allows the CD to the discs.... store data properly. NOTE: Don't use a steel binder clip or spring clamp to OFF. 2) Poke a fine-tipped object (such as failure of the drive or a power outage. DO NOT use non-standard discs. The front door will come partway out. 3) Pull the front door to be used only in...
