LG E2411PU-BN Support and Manuals
Get Help and Manuals for this LG item
View All Support Options Below
Free LG E2411PU-BN manuals!
Problems with LG E2411PU-BN?
Ask a Question
Free LG E2411PU-BN manuals!
Problems with LG E2411PU-BN?
Ask a Question
Popular LG E2411PU-BN Manual Pages
Owners Manual - Page 1
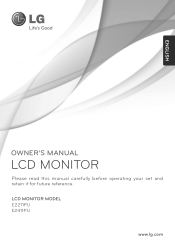
ENGLISH
OWNER'S MANUAL
LCD MONITOR
Please read this manual carefully before operating your set and retain it for future reference. LCD MONITOR MODEL E2211PU E2411PU
www.lg.com
Owners Manual - Page 2
... the house. It can be left unattended for replacement. The power supply cord is easily accessible after installation. Do not throw any way, please contact the manufacturer or the nearest authorized repair service provider for more than a short period of time. It can cause injury to human, problem to the product. So are dangerous. Call...
Owners Manual - Page 3
...impact or effect on the screen for repair.
If you drop the product, the...the screen and cause image burn-in and related problems are provided with glossy bezels the user should ...high temperatures and humidity. Important Precautions
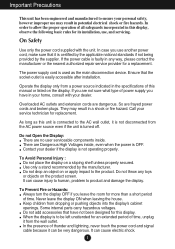
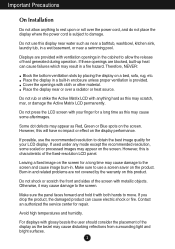
On Installation
Do not allow the release of heat generated...a swimming pool.
Contact an authorized the service center for a long time may cause damage...
Owners Manual - Page 8
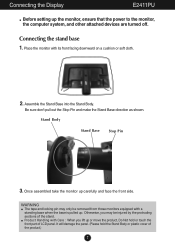
...Stand Body. Once assembled take the monitor up the monitor, ensure that the power to the monitor, the computer system, and other attached... tape and locking pin may be removed from those monitors equipped with a standing base when the base is ...the monitor with Care : When you may only be injured by the protruding sections of the product.)
7 Connecting the Display
E2411PU
Before setting up ...
Owners Manual - Page 9
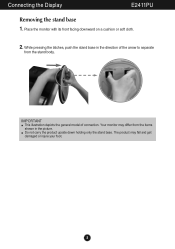
... the picture. The product may differ from the stand body. Place the monitor with its front facing downward on a cushion or soft cloth.
2. Your monitor may fall and get damaged or injure your foot.
8 IMPORTANT This illustration depicts the general model of the arrow to separate
from the items shown in the direction...
Owners Manual - Page 13
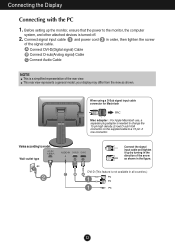
... up the monitor, ensure that the power to the monitor, the computer
system, and other attached devices is a simplified representation of the rear view. This rear view represents a general model; your display...plug adapter is not available in order, then tighten the screw
of the arrow as shown. Before setting up by turning in the figure. DVI-D (This feature is needed to change the 15 pin...
Owners Manual - Page 14
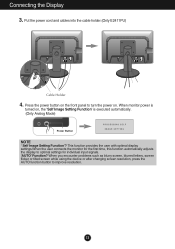
... cables into the cable holder.(Only E2411PU)
Cable Holder
4. Press the power button on the front panel to turn the power on , the 'Self Image Setting Function' is
turned on . When monitor power is executed automatically. (Only Analog Mode)
Power Button
NOTE ' Self Image Setting Function'? When you encounter problems such as blurry screen, blurred...
Owners Manual - Page 15
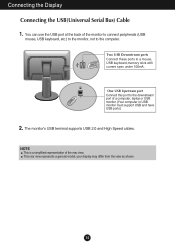
... use the USB port at the back of the monitor to connect peripherals (USB
mouse, USB keyboard, etc.) to the monitor, not to the downstream port of the rear view.
The monitor's USB terminal supports USB 2.0 and High Speed cables.
This rear view represents a general model; Connecting the Display Connecting the USB(Universal Serial Bus...
Owners Manual - Page 17
... mode). Control Panel Functions
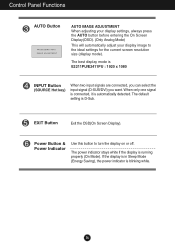
AUTO Button
AUTO IMAGE ADJUSTMENT When adjusting your display settings, always press the AUTO button before entering the On Screen Display(OSD). (... stays white if the display is automatically detected. The best display mode is D-Sub. The default setting is E2211PU/E2411PU : 1920 x 1080
INPUT Button (SOURCE Hot key)
When two input signals are connected, you ...
Owners Manual - Page 19
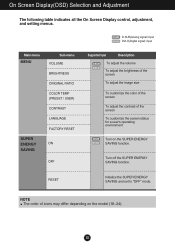
... RATIO
COLOR TEMP (PRESET / USER)
CONTRAST
LANGUAGE
FACTORY RESET
SUPER
ENERGY
ON
SAVING
OFF
Supported input
Description
DSUB DVI-D
To adjust the volume
To adjust the brightness of the screen
To... status for a user's operating environment
DSUB DVI-D
Turn on the model (18~24).
18 On Screen Display(OSD) Selection and Adjustment
The following table indicates all the On Screen...
Owners Manual - Page 20
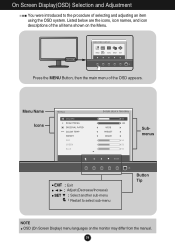
... and adjusting an item using the OSD system.
Listed below are the icons, icon names, and icon descriptions of the all items shown on the monitor may differ from the manual.
19
Owners Manual - Page 26
...
display connected? See the
'Specifications' section of the display. ... settings, so that they cannot be inadvertently changed.
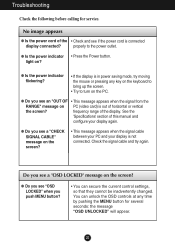
light on the screen? frequency range of this manual ...a "CHECK SIGNAL CABLE" message on the PC.
Troubleshooting
Check the following before calling for several seconds: the ... pushing the MENU button for service. Do you push MENU button?
• You...
Owners Manual - Page 27
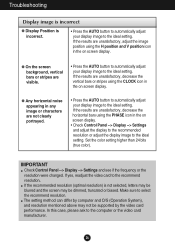
... to automatically adjust your display image to the ideal setting. Troubleshooting
Display image is incorrect
G Display Position is not ... --> Settings and adjust the display to the recommended resolution or adjust the display image to the ideal setting. If... resolution. Set the color setting higher than 24 bits (true color). Make sure to the ideal setting. The setting method can...
Owners Manual - Page 28
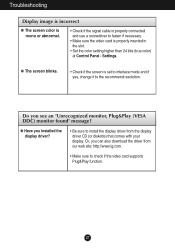
... installed the display driver?
• Be sure to install the display driver from our web site: http://www.lg.com.
• Make sure to the recommend resolution. G Have you see an "Unrecognized monitor, Plug&Play (VESA DDC) monitor found" message? Or, you can also download the driver from the display driver CD (or diskette) that comes with your display. Settings.
Troubleshooting...
Owners Manual - Page 34

... sure to read the Safety Precautions before using the product. Keep the OWNER'S MANUAL(CD) in an accessible place for energy efficiency. Record it below should you ever need service. The model and serial number of the SET is a set of the SET. As an ENERGY STAR Partner LGE U. has determined that this product meets the...
LG E2411PU-BN Reviews
We have not received any reviews for LG yet.