
Owner's Manual
Page 2
... in the specifications of power supply you are not sure what type of this display, observe the following basic rules for its installation, use, and servicing. Operate the display only from the AC power source even if the unit is faulty in potential electrical shock or fire hazards. If you have not been designed for replacement. Do not Open the Display: There are...
... in the specifications of power supply you are not sure what type of this display, observe the following basic rules for its installation, use, and servicing. Operate the display only from the AC power source even if the unit is faulty in potential electrical shock or fire hazards. If you have not been designed for replacement. Do not Open the Display: There are...

Owner's Manual
Page 3
... the fixed-resolution LCD panel. Displays are not covered by placing the display on the screen. If possible, use a screen saver on the product. Leaving a fixed image on this will have no impact or effect on the screen. Contact an authorized the service center for a long time as near a bathtub, washbowl, kitchen sink, laundry tub, in a fire hazard. Do not press the LCD screen with ventilation openings...
... the fixed-resolution LCD panel. Displays are not covered by placing the display on the screen. If possible, use a screen saver on the product. Leaving a fixed image on this will have no impact or effect on the screen. Contact an authorized the service center for a long time as near a bathtub, washbowl, kitchen sink, laundry tub, in a fire hazard. Do not press the LCD screen with ventilation openings...

Owner's Manual
Page 6
... down holding only the stand base. The product may differ from the stand base, use a coin to tighten. 3. When you desire to disintegrate the monitor from the items shown in the picture. Once assembled take the monitor up the monitor, ensure that the power to the monitor, the computer system, and other attached devices is turned off. 1. Connecting the Display Before setting up carefully and face...
... down holding only the stand base. The product may differ from the stand base, use a coin to tighten. 3. When you desire to disintegrate the monitor from the items shown in the picture. Once assembled take the monitor up the monitor, ensure that the power to the monitor, the computer system, and other attached devices is turned off. 1. Connecting the Display Before setting up carefully and face...

Owner's Manual
Page 7
Adjust the position of the screen, do not put your finger(s). You can hurt your finger(s) in between the head of the monitor and the stand body. Tilt Range : -5˚ to maintain an ergonomic and comfortable viewing position, the forward tilt angle of the monitor should not exceed 5 degrees. 6 ERGONOMIC It is turned off. Connecting the Display Before setting up the monitor, ensure that the power to the...
Adjust the position of the screen, do not put your finger(s). You can hurt your finger(s) in between the head of the monitor and the stand body. Tilt Range : -5˚ to maintain an ergonomic and comfortable viewing position, the forward tilt angle of the monitor should not exceed 5 degrees. 6 ERGONOMIC It is turned off. Connecting the Display Before setting up the monitor, ensure that the power to the...

Owner's Manual
Page 8
... power cord 2 in order, then tighten the screw of the rear view. When using the device or after changing screen resolution, press the AUTO function button to improve resolution. 7 When you encounter problems such as shown. your display may differ from the view as blurry screen, blurred letters, screen flicker or tilted screen while using a D-Sub signal input cable connector for individual input signals. 'AUTO' Function? A Connect DVI-D(Digital signal) Cable C Connect HDMI Cable B Connect D-sub(Analog signal) Cable NOTE This is turned off. 2. This function provides the user...
... power cord 2 in order, then tighten the screw of the rear view. When using the device or after changing screen resolution, press the AUTO function button to improve resolution. 7 When you encounter problems such as shown. your display may differ from the view as blurry screen, blurred letters, screen flicker or tilted screen while using a D-Sub signal input cable connector for individual input signals. 'AUTO' Function? A Connect DVI-D(Digital signal) Cable C Connect HDMI Cable B Connect D-sub(Analog signal) Cable NOTE This is turned off. 2. This function provides the user...

Owner's Manual
Page 10
Control Panel Functions AUTO Button AUTO IMAGE ADJUSTMENT When adjusting your display settings, always press the AUTO button before entering the On Screen Display(OSD). (Only Analog Mode) This will automatically adjust your display image to turn the display on or off. The best display mode is blinking white. 9 If the display is in Sleep Mode (Energy Saving), the power indicator is E2240V/E2340V: 1920 x 1080 INPUT Button (SOURCE Hot key) When two input signals at least are connected, you can select the input signal (D-SUB/DVI/HDMI) you want. Power Button & Power Indicator Use...
Control Panel Functions AUTO Button AUTO IMAGE ADJUSTMENT When adjusting your display settings, always press the AUTO button before entering the On Screen Display(OSD). (Only Analog Mode) This will automatically adjust your display image to turn the display on or off. The best display mode is blinking white. 9 If the display is in Sleep Mode (Energy Saving), the power indicator is E2240V/E2340V: 1920 x 1080 INPUT Button (SOURCE Hot key) When two input signals at least are connected, you can select the input signal (D-SUB/DVI/HDMI) you want. Power Button & Power Indicator Use...

Owner's Manual
Page 12
... DVI-D : DVI-D(Digital signal) input HDMI : HDMI signal Main menu Sub-menu Supported input Description PICTURE BRIGHTNESS CONTRAST SHARPNESS BLACK LEVEL DSUB DVI-D HDMI HDMI To adjust the brightness, contrast and sharpness of the screen COLOR COLOR TEMP (PRESET / USER) GAMMA DSUB DVI-D HDMI To customize the color of the screen DISPLAY HORIZONTAL VERTICAL CLOCK PHASE OVERSCAN DSUB DSUB HDMI To adjust the position of the screen To improve the clarity and stability of the screen VOLUME HDMI To adjust the volume OTHERS MODE LANGUAGE POWER INDICATOR WHITE BALANCE FACTORY RESET...
... DVI-D : DVI-D(Digital signal) input HDMI : HDMI signal Main menu Sub-menu Supported input Description PICTURE BRIGHTNESS CONTRAST SHARPNESS BLACK LEVEL DSUB DVI-D HDMI HDMI To adjust the brightness, contrast and sharpness of the screen COLOR COLOR TEMP (PRESET / USER) GAMMA DSUB DVI-D HDMI To customize the color of the screen DISPLAY HORIZONTAL VERTICAL CLOCK PHASE OVERSCAN DSUB DSUB HDMI To adjust the position of the screen To improve the clarity and stability of the screen VOLUME HDMI To adjust the volume OTHERS MODE LANGUAGE POWER INDICATOR WHITE BALANCE FACTORY RESET...

Owner's Manual
Page 14
... video signal, it is the darkest screen the monitor can set the offset level. BLUE Set your own gamma value. : 0 / 1 / 2 On the monitor, high gamma values display whitish images and low gamma values display blackish images. 13 SHARPNESS To adjust the clearness of the screen. Exit : Exit USER : Decrease : Increase : Select another sub-menu * Offset? CONTRAST To adjust the contrast of the screen. GREEN Set your own red color levels. As the criteria for HDMI input...
... video signal, it is the darkest screen the monitor can set the offset level. BLUE Set your own gamma value. : 0 / 1 / 2 On the monitor, high gamma values display whitish images and low gamma values display blackish images. 13 SHARPNESS To adjust the clearness of the screen. Exit : Exit USER : Decrease : Increase : Select another sub-menu * Offset? CONTRAST To adjust the contrast of the screen. GREEN Set your own red color levels. As the criteria for HDMI input...
Owner's Manual
Page 15
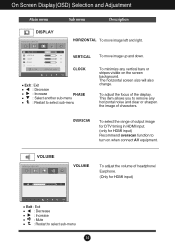
... turn on the screen background. VOLUME To adjust the volume of output image for DTV timing in HDMI input. (only for HDMI input) Exit : Exit : Decrease : Increase : Mute : Restart to select sub-menu To minimize any horizontal noise and clear or sharpen the image of the display. The horizontal screen size will also change. OVERSCAN To select the range of headphone/ Earphone. (Only for HDMI input) Recommend overscan function to remove any vertical...
... turn on the screen background. VOLUME To adjust the volume of output image for DTV timing in HDMI input. (only for HDMI input) Exit : Exit : Decrease : Increase : Mute : Restart to select sub-menu To minimize any horizontal noise and clear or sharpen the image of the display. The horizontal screen size will also change. OVERSCAN To select the range of headphone/ Earphone. (Only for HDMI input) Recommend overscan function to remove any vertical...

Owner's Manual
Page 16
... the monitor to video signal distortion. Press the , buttons to provide the optimal image. NOTE If this function when white and black colors are displayed. If necessary, execute the WHITE BALANCE function again. Using this function to set ON at any time, the power indicator will be turned on the front side of the video card is an analog signal. 15 Activate this does not improve the screen image, restore the factory default settings...
... the monitor to video signal distortion. Press the , buttons to provide the optimal image. NOTE If this function when white and black colors are displayed. If necessary, execute the WHITE BALANCE function again. Using this function to set ON at any time, the power indicator will be turned on the front side of the video card is an analog signal. 15 Activate this does not improve the screen image, restore the factory default settings...

Owner's Manual
Page 18
D-SUB/DVI-D input MOVIE Select this when you want to use the product in the most general using environment. On Screen Display(OSD) Selection and Adjustment Main menu Sub menu Description D-SUB/DVI-D input NORMAL Select this when you are watching a video or movie. HDMI input Exit : Exit , : Move : Select another sub-menu : Restart to use the original standard video. * In the General (Standard) mode, the is turned off. HDMI input STANDARD Select this when you want to select sub-menu 17
D-SUB/DVI-D input MOVIE Select this when you want to use the product in the most general using environment. On Screen Display(OSD) Selection and Adjustment Main menu Sub menu Description D-SUB/DVI-D input NORMAL Select this when you are watching a video or movie. HDMI input Exit : Exit , : Move : Select another sub-menu : Restart to use the original standard video. * In the General (Standard) mode, the is turned off. HDMI input STANDARD Select this when you want to select sub-menu 17

Owner's Manual
Page 19
... the left and video mode on the document (Word etc.) HDMI input GAME Select this when you watching general sports. On Screen Display(OSD) Selection and Adjustment Main menu Sub menu Description D-SUB/DVI-D input INTERNET Select this when you are working on the right so that the consumers can check the difference after applying the video mode. D-SUB/DVI-D input HDMI input DEMO This is used for advertising in the...
... the left and video mode on the document (Word etc.) HDMI input GAME Select this when you watching general sports. On Screen Display(OSD) Selection and Adjustment Main menu Sub menu Description D-SUB/DVI-D input INTERNET Select this when you are working on the right so that the consumers can check the difference after applying the video mode. D-SUB/DVI-D input HDMI input DEMO This is used for advertising in the...

Owner's Manual
Page 20
Exit : Exit , : Move : Select another sub-menu : Restart to original. * This function works only if input resolution is lower than monitor ratio (16:9). ORIGINAL Change the input image signal ratio to select sub-menu 19 On Screen Display(OSD) Selection and Adjustment Main menu Sub menu Description WIDE Switch to full screen mode according to input image signal.
Exit : Exit , : Move : Select another sub-menu : Restart to original. * This function works only if input resolution is lower than monitor ratio (16:9). ORIGINAL Change the input image signal ratio to select sub-menu 19 On Screen Display(OSD) Selection and Adjustment Main menu Sub menu Description WIDE Switch to full screen mode according to input image signal.

Owner's Manual
Page 22
... if the power cord is not connected. light on the screen? frequency range of this manual and configure your display is connected display connected? See the 'Specifications' section of the display. Troubleshooting Check the following before calling for several seconds: the message "OSD UNLOCKED" will appear. 21 No image appears G Is the power cord of horizontal or vertical the screen? properly to turn on the PC. G Do you see a "CHECK SIGNAL CABLE" message on PC (video card) is in power saving mode, try...
... if the power cord is not connected. light on the screen? frequency range of this manual and configure your display is connected display connected? See the 'Specifications' section of the display. Troubleshooting Check the following before calling for several seconds: the message "OSD UNLOCKED" will appear. 21 No image appears G Is the power cord of horizontal or vertical the screen? properly to turn on the PC. G Do you see a "CHECK SIGNAL CABLE" message on PC (video card) is in power saving mode, try...

Owner's Manual
Page 23
... AUTO button to automatically adjust your display image to the recommend resolution. IMPORTANT Check Control Panel --> Display --> Settings and see if the frequency or the resolution were changed. If the results are unsatisfactory, decrease the vertical bars or stripes using the CLOCK icon in any image or characters are unsatisfactory, decrease the horizontal bars using the H position and V position icon in the on screen display. • Check Control Panel --> Display --> Settings and adjust the display to the recommended resolution or adjust the display image...
... AUTO button to automatically adjust your display image to the recommend resolution. IMPORTANT Check Control Panel --> Display --> Settings and see if the frequency or the resolution were changed. If the results are unsatisfactory, decrease the vertical bars or stripes using the CLOCK icon in any image or characters are unsatisfactory, decrease the horizontal bars using the H position and V position icon in the on screen display. • Check Control Panel --> Display --> Settings and adjust the display to the recommended resolution or adjust the display image...

Owner's Manual
Page 24
... screen blinks. • Check if the screen is set to interlace mode and if yes, change it to compressed sound format. 23 The Audio function is not working G Picture OK & No sound. • Check whether volume is "0". • Check sound muted. • HDMI cable installed properly. • Head phone cable installed properly. • Check sound format. Troubleshooting Display image is incorrect G The screen color is mono or abnormal. • Check if the signal cable is properly connected and use a screwdriver to check if the video card supports Plug...
... screen blinks. • Check if the screen is set to interlace mode and if yes, change it to compressed sound format. 23 The Audio function is not working G Picture OK & No sound. • Check whether volume is "0". • Check sound muted. • HDMI cable installed properly. • Head phone cable installed properly. • Check sound format. Troubleshooting Display image is incorrect G The screen color is mono or abnormal. • Check if the signal cable is properly connected and use a screwdriver to check if the video card supports Plug...

Owner's Manual
Page 25
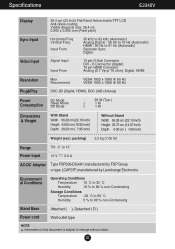
... Temperature -20 ˚C to 60 ˚C Humidity 5 % to 90 % non-Condensing Stand Base Attached ( ), Detached ( O ) Power cord Wall-outlet type NOTE Information in this document is subject to 61 Hz (Automatic) Separate Sync. Digital Video Input Signal Input Input Form 15 pin D-Sub Connector DVI - Specifications E2240V Display 54.6 cm (21.5 inch) Flat Panel Active matrix-TFT LCD Anti-Glare coating Visible diagonal size: 54.6 cm 0.248 x 0.248 mm (Pixel pitch) Sync Input Horizontal Freq. Vertical Freq.
... Temperature -20 ˚C to 60 ˚C Humidity 5 % to 90 % non-Condensing Stand Base Attached ( ), Detached ( O ) Power cord Wall-outlet type NOTE Information in this document is subject to 61 Hz (Automatic) Separate Sync. Digital Video Input Signal Input Input Form 15 pin D-Sub Connector DVI - Specifications E2240V Display 54.6 cm (21.5 inch) Flat Panel Active matrix-TFT LCD Anti-Glare coating Visible diagonal size: 54.6 cm 0.248 x 0.248 mm (Pixel pitch) Sync Input Horizontal Freq. Vertical Freq.
Owner's Manual
Page 26
... inch) Weight (excl. Specifications E2340V Display 58.4 cm (23 inch) Flat Panel Active matrix-TFT LCD Anti-Glare coating Visible diagonal size: 58.4 cm 0.265 x 0.265 mm (Pixel pitch) Sync Input Horizontal Freq. Vertical Freq. Input Form 30 kHz to 83 kHz (Automatic) Analog,Digital : 56 Hz to 75 Hz (Automatic) HDMI : 56 Hz to change without notice. 25 packing) 3.2 kg (7.05 lb) Range Power Input Tilt: -5˚ to 15˚ 12 V 3.0 A AC-DC Adapter...
... inch) Weight (excl. Specifications E2340V Display 58.4 cm (23 inch) Flat Panel Active matrix-TFT LCD Anti-Glare coating Visible diagonal size: 58.4 cm 0.265 x 0.265 mm (Pixel pitch) Sync Input Horizontal Freq. Vertical Freq. Input Form 30 kHz to 83 kHz (Automatic) Analog,Digital : 56 Hz to 75 Hz (Automatic) HDMI : 56 Hz to change without notice. 25 packing) 3.2 kg (7.05 lb) Range Power Input Tilt: -5˚ to 15˚ 12 V 3.0 A AC-DC Adapter...

Owner's Manual
Page 27
Specifications Preset Modes (Resolution) D-SUB/DVI-D Timing Display Modes (Resolution) 1 720 x 400 2 640 x 480 3 640 x 480 4 800 x 600 5 800 x 600 6 1024 x 768 7 1024 x 768 8 1152 x 864 9 1280 x 1024 10 1280 x 1024 11 1680 x 1050 *12 1920 x 1080 Horizontal Freq. (kHz) 31.468 31.469 ...Mode HDMI Timing Display Modes (Resolution) 1 480P 2 576P 3 720P 4 720P 5 1080i 6 1080i 7 1080P 8 1080P Horizontal Freq. (kHz) 31.50 31.25 37.50 45.00 28.12 33.75 56.25 67.50 Vertical Freq. (Hz) 60 50 50 60 50 60 50 60 Indicator MODE On Mode Sleep Mode Off Mode LED Color White White Blinking...
Specifications Preset Modes (Resolution) D-SUB/DVI-D Timing Display Modes (Resolution) 1 720 x 400 2 640 x 480 3 640 x 480 4 800 x 600 5 800 x 600 6 1024 x 768 7 1024 x 768 8 1152 x 864 9 1280 x 1024 10 1280 x 1024 11 1680 x 1050 *12 1920 x 1080 Horizontal Freq. (kHz) 31.468 31.469 ...Mode HDMI Timing Display Modes (Resolution) 1 480P 2 576P 3 720P 4 720P 5 1080i 6 1080i 7 1080P 8 1080P Horizontal Freq. (kHz) 31.50 31.25 37.50 45.00 28.12 33.75 56.25 67.50 Vertical Freq. (Hz) 60 50 50 60 50 60 50 60 Indicator MODE On Mode Sleep Mode Off Mode LED Color White White Blinking...
Specification
Page 2
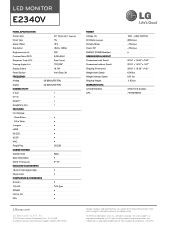
LED MONITOR E2340V PANEL SPECIFICATION Screen Size 23" Class (23.0" diagonal) Panel Type TN Aspect Ratio 16:9 Resolution 1920 x 1080p Brightness (cd/m2) 250 Contrast Ratio (DFC) 5,000,000:1 Response Time (GTG) 5ms (Typical) Viewing Angle (H/V) 170º/160º Display Colors 16.7M Panel Surface Anti-Glare, 3H FREQUENCY Analog 3 0 - 8 3kHz / 5 6 -75Hz Digital 3 0 - 8 3kHz / 5 6 -75Hz Connectivity D-Sub 1 DVI-D 1 HDMI™ 1 Headphone Out 1 Features Fun Package Photo Effect • 4:3 in...
LED MONITOR E2340V PANEL SPECIFICATION Screen Size 23" Class (23.0" diagonal) Panel Type TN Aspect Ratio 16:9 Resolution 1920 x 1080p Brightness (cd/m2) 250 Contrast Ratio (DFC) 5,000,000:1 Response Time (GTG) 5ms (Typical) Viewing Angle (H/V) 170º/160º Display Colors 16.7M Panel Surface Anti-Glare, 3H FREQUENCY Analog 3 0 - 8 3kHz / 5 6 -75Hz Digital 3 0 - 8 3kHz / 5 6 -75Hz Connectivity D-Sub 1 DVI-D 1 HDMI™ 1 Headphone Out 1 Features Fun Package Photo Effect • 4:3 in...


