
Service Manual
Page 6
of Programs No. of Temperature Controls No. of Dry Levels Sound levels Sensor Moisture Temperature Reversible Door Drum Dryer Rack Child Lock Interior Light Product (WxHxD) Packing (WxHxD) Blue White Navy Blue ... 1/2" x 44 3/4" x 30 3/4" REMARK AC 120V AC 240V (ELECTRIC MODEL) AC 120V AC 120V (GAS MODEL) Electrode sensor Thermistor 5 of Dry Options No. Net/Gross No. ITEM DLE7177WM/DLE8377WM DLE8377NM DLG7188WM/DLG8388WM DLG8388NM Material & Finish Color Top Plate Door Trim POWER SUPPLY ELECTRICITY CONSUMPTION MOTOR HEATER LAMP GAS VALVE CONTROL TYPE DRUM...
of Programs No. of Temperature Controls No. of Dry Levels Sound levels Sensor Moisture Temperature Reversible Door Drum Dryer Rack Child Lock Interior Light Product (WxHxD) Packing (WxHxD) Blue White Navy Blue ... 1/2" x 44 3/4" x 30 3/4" REMARK AC 120V AC 240V (ELECTRIC MODEL) AC 120V AC 120V (GAS MODEL) Electrode sensor Thermistor 5 of Dry Options No. Net/Gross No. ITEM DLE7177WM/DLE8377WM DLE8377NM DLG7188WM/DLG8388WM DLG8388NM Material & Finish Color Top Plate Door Trim POWER SUPPLY ELECTRICITY CONSUMPTION MOTOR HEATER LAMP GAS VALVE CONTROL TYPE DRUM...
Service Manual
Page 7
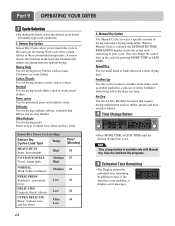
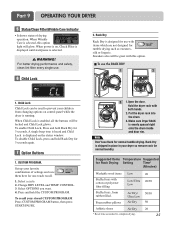
Hold the dryer rack with both hands. 2 Put the dryer rack into the drum 3 Check and be sure that the front of the rack is properly seated behind the lint filter. 6 2 FEATURES AND BENEFITS 20% NORMAL NORMAL MEDIUM SENSOR DRY 0:20 EST. TIME REMAINING OFF MID HIGH 3 INSTALLATION INSTRUCTIONS Dryer Rack Installation Instructions 1Open the door.
Hold the dryer rack with both hands. 2 Put the dryer rack into the drum 3 Check and be sure that the front of the rack is properly seated behind the lint filter. 6 2 FEATURES AND BENEFITS 20% NORMAL NORMAL MEDIUM SENSOR DRY 0:20 EST. TIME REMAINING OFF MID HIGH 3 INSTALLATION INSTRUCTIONS Dryer Rack Installation Instructions 1Open the door.
Service Manual
Page 14
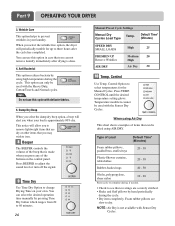
Default settings can be adjusted by users. 4 DRYER CYCLE PROCESS Cycle Default Conditions of operation and termination Drying Cooling Wrinkle care Temp- Default Tempsensor Control time Control** Time HEAVY DUTY HIGH (Normal) 54min Saturation 68±4°C (5min) ...Normal) 55min Saturation 66±4°C (5min) 47±5°C NORMAL MEDIUM (Normal) 41min Saturation 60±4°C (5min) 47±5°C Sensor Dry * PERM PRESS LOW (Normal) 36min Saturation 52±3°C (5min) 47±5°C 3Hr DELICATES LOW (Normal) 32min Saturation 52±3°C (5min...
Default settings can be adjusted by users. 4 DRYER CYCLE PROCESS Cycle Default Conditions of operation and termination Drying Cooling Wrinkle care Temp- Default Tempsensor Control time Control** Time HEAVY DUTY HIGH (Normal) 54min Saturation 68±4°C (5min) ...Normal) 55min Saturation 66±4°C (5min) 47±5°C NORMAL MEDIUM (Normal) 41min Saturation 60±4°C (5min) 47±5°C Sensor Dry * PERM PRESS LOW (Normal) 36min Saturation 52±3°C (5min) 47±5°C 3Hr DELICATES LOW (Normal) 32min Saturation 52±3°C (5min...

Service Manual
Page 27
... discharge. (When discharging, contact the metal plug of Power cord with earth line.) Trouble Symptom Degree of dryness does not match with Dry Level. YES • Check Electro Load and Harness Connector. • Check Harnesslinking connector. • Replace Control and Check. Is ... ~ 20 2.0V ~ 4.0V ) Remark Weight after removing from the Controller. Take 6pin Connector from Washing Machine Damp Dry 10% ~ Dried clothes 205 ~ 240 Over 4.0V Completely-dried clothes 26 Is the measurement within the range of Table 2 NO when measuring the voltage in Electric load, is resistance ...
... discharge. (When discharging, contact the metal plug of Power cord with earth line.) Trouble Symptom Degree of dryness does not match with Dry Level. YES • Check Electro Load and Harness Connector. • Check Harnesslinking connector. • Replace Control and Check. Is ... ~ 20 2.0V ~ 4.0V ) Remark Weight after removing from the Controller. Take 6pin Connector from Washing Machine Damp Dry 10% ~ Dried clothes 205 ~ 240 Over 4.0V Completely-dried clothes 26 Is the measurement within the range of Table 2 NO when measuring the voltage in Electric load, is resistance ...

Service Manual
Page 29
... between Heater terminal and below 1Ω between terminal TH2 (Safety Thermostat). Check if the value of measured resistance is below 9 ~ 11Ω? YES Check Controller. Drying time takes longer. Measurement Condition After turning Power off , and do voltage discharge. (When discharging, contact the metal plug of measured resistance is below 18...
... between Heater terminal and below 1Ω between terminal TH2 (Safety Thermostat). Check if the value of measured resistance is below 9 ~ 11Ω? YES Check Controller. Drying time takes longer. Measurement Condition After turning Power off , and do voltage discharge. (When discharging, contact the metal plug of measured resistance is below 18...

Service Manual
Page 30
... measuring Valve 2 voltage, Value is more than1.5 ~ 2.5kΩ? NO YES • Change Valve • Harness check • Controller change 29 Test 7 GAS Valve test - Drying time takes longer. YES (Measure after Igniter off) YES NO • Check Gas connection or Gas supply When measuring terminal resistance on Valve 1 and Valve...
... measuring Valve 2 voltage, Value is more than1.5 ~ 2.5kΩ? NO YES • Change Valve • Harness check • Controller change 29 Test 7 GAS Valve test - Drying time takes longer. YES (Measure after Igniter off) YES NO • Check Gas connection or Gas supply When measuring terminal resistance on Valve 1 and Valve...
Service Manual
Page 33
GAS VALVE FLOW START KEY PUSH VALVE 1 ON (VALVE 2 OFF) IGNITER ON IGNITER NO TEMPERATURE ABOUT 370°F YES FLAME DETECT OPEN IGNITER OFF VALVE 2 ON GAS IGNITION YES DRYING NO FLAME DETECT CLOSE VALVE 2 OFF GAS IGNITION START VALVE 1 IGNITER FLAME DETECT VALVE 2 ON ON CLOSE OFF OFF OPEN ON GAS IGNITION GAS VALVE STRUCTURE Adjustment Screw 32
GAS VALVE FLOW START KEY PUSH VALVE 1 ON (VALVE 2 OFF) IGNITER ON IGNITER NO TEMPERATURE ABOUT 370°F YES FLAME DETECT OPEN IGNITER OFF VALVE 2 ON GAS IGNITION YES DRYING NO FLAME DETECT CLOSE VALVE 2 OFF GAS IGNITION START VALVE 1 IGNITER FLAME DETECT VALVE 2 ON ON CLOSE OFF OFF OPEN ON GAS IGNITION GAS VALVE STRUCTURE Adjustment Screw 32
Owners Manual
Page 3
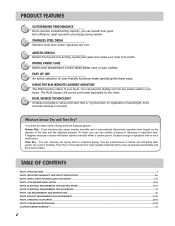
...Display Unit can manualy set drying time to complete drying. DUAL SENSOR TECHNOLOGY 7 It makes it automatically determines operation time based on the dryness of load weight, more effective for this dryer. SPECIFICATIONS ...3 PART2. TROUBLESHOOTING GUIDE...31-33 LG DRYER LIMITED WARRANTY...34 ... (REMOTE LAUNDRY MONITOR) 6 The RLM monitors status of user-friendly functions make your home. Your dryer provides sensor drying and time drying programs. Sensor Dry : Dryer electronically sense laundry humidity and it possible to sense even less than a 1 kg load size. TABLE OF...
...Display Unit can manualy set drying time to complete drying. DUAL SENSOR TECHNOLOGY 7 It makes it automatically determines operation time based on the dryness of load weight, more effective for this dryer. SPECIFICATIONS ...3 PART2. TROUBLESHOOTING GUIDE...31-33 LG DRYER LIMITED WARRANTY...34 ... (REMOTE LAUNDRY MONITOR) 6 The RLM monitors status of user-friendly functions make your home. Your dryer provides sensor drying and time drying programs. Sensor Dry : Dryer electronically sense laundry humidity and it possible to sense even less than a 1 kg load size. TABLE OF...
Owners Manual
Page 6
... a grounded metal, permanent wiring system or an equipment-grounding conductor must be exposed to the weather. 7) Do not tamper with gasoline, dry-cleaning solvents, or other personal injury or property damage when using your dryer, please exercise care and follow basic safety precautions, including the ... Check with all instructions before using the appliance. 4) Before the appliance is removed from service or discarded, remove the door to the drying compartment. 5) Do not reach into an appropriate outlet that is moving. 6) Do not install or store this appliance where it will ...
... a grounded metal, permanent wiring system or an equipment-grounding conductor must be exposed to the weather. 7) Do not tamper with gasoline, dry-cleaning solvents, or other personal injury or property damage when using your dryer, please exercise care and follow basic safety precautions, including the ... Check with all instructions before using the appliance. 4) Before the appliance is removed from service or discarded, remove the door to the drying compartment. 5) Do not reach into an appropriate outlet that is moving. 6) Do not install or store this appliance where it will ...
Owners Manual
Page 7
... to the state to cause cancer, birth defects or other flammable vapors or liquids in the area surrounding this appliance. • Do not dry anything flammable on it, even after washing. • No washer can completely remove oil. Properly adjusted dryers will minimize combustion. WARNING! &#... minor exposure to follow all occupants. • Immediately call the fire department. ! Exposure to the outdoors. 6 Do not use any gasoline, dry-cleaning solvents any kind of oil on any gas or electrical appliance. • Do not touch any phone in this appliance. ! Part 2 ...
... to the state to cause cancer, birth defects or other flammable vapors or liquids in the area surrounding this appliance. • Do not dry anything flammable on it, even after washing. • No washer can completely remove oil. Properly adjusted dryers will minimize combustion. WARNING! &#... minor exposure to follow all occupants. • Immediately call the fire department. ! Exposure to the outdoors. 6 Do not use any gasoline, dry-cleaning solvents any kind of oil on any gas or electrical appliance. • Do not touch any phone in this appliance. ! Part 2 ...
Owners Manual
Page 10
... the duct to the base.(Duct is as short as possible. • Clean old ducts before installing this dryer Note Vent end will cause undesirable drying performance. IMPORTANT: To reduce the risk of exhaust duct must be vented to reduce condensation and lint build-up on all duct joints • Insulate...
... the duct to the base.(Duct is as short as possible. • Clean old ducts before installing this dryer Note Vent end will cause undesirable drying performance. IMPORTANT: To reduce the risk of exhaust duct must be vented to reduce condensation and lint build-up on all duct joints • Insulate...
Owners Manual
Page 12
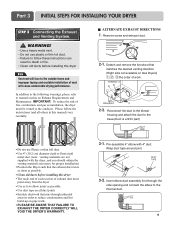
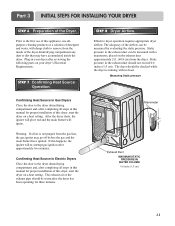
...checked while the dryer is not purged from the dryer. Confirming Heat Source in Gas Dryers Close the door to the dryer drum/drying compartment and, after approximately two minutes. Effective dryer operation requires appropriate dryer airflow. If this manual for proper installation of the ... static pressure. STEP 7 Confirming Heat Source Operation. Part 3 INITIAL STEPS FOR INSTALLING YOUR DRYER STEP 6 Preparation of the dryer drum/drying compartment any dust or dirt that may go off before the gas and the main burner have accumulated inside of the Dryer. Plug-in...
...checked while the dryer is not purged from the dryer. Confirming Heat Source in Gas Dryers Close the door to the dryer drum/drying compartment and, after approximately two minutes. Effective dryer operation requires appropriate dryer airflow. If this manual for proper installation of the ... static pressure. STEP 7 Confirming Heat Source Operation. Part 3 INITIAL STEPS FOR INSTALLING YOUR DRYER STEP 6 Preparation of the dryer drum/drying compartment any dust or dirt that may go off before the gas and the main burner have accumulated inside of the Dryer. Plug-in...
Owners Manual
Page 22
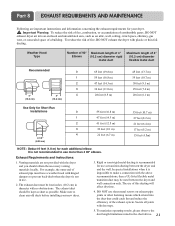
.... 3. Make sure to prevent back-draft when the dryer is recommended for each additional elbow. For example, the outer end of this ducting will affect dry time. 4. The exhaust duct should obtain the necessary venting materials locally. Part 8 EXHAUST REQUIREMENTS AND MAINTENANCE Following are not provided with the above . 2 1 Important Warning...
.... 3. Make sure to prevent back-draft when the dryer is recommended for each additional elbow. For example, the outer end of this ducting will affect dry time. 4. The exhaust duct should obtain the necessary venting materials locally. Part 8 EXHAUST REQUIREMENTS AND MAINTENANCE Following are not provided with the above . 2 1 Important Warning...
Owners Manual
Page 23
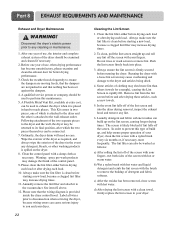
...Dryer Maintenance ! Check the weather hoods frequently to the wall exhaust outlet. Annually remove the lint filter and attach it is clean before drying each load or after which is attached to the dryer and the other washing products is attached to ensure the dampers are moving freely...lint. Push the lint screen firmly back into the dryer during removal, inspect the exhaust hood and remove any cleaning or maintenance. 1. d) After drying the lint screen with the brush to reach places. Before one year of detergent and fabric softener. A Flexible Metal Vent Kit, available at ...
...Dryer Maintenance ! Check the weather hoods frequently to the wall exhaust outlet. Annually remove the lint filter and attach it is clean before drying each load or after which is attached to the dryer and the other washing products is attached to ensure the dampers are moving freely...lint. Push the lint screen firmly back into the dryer during removal, inspect the exhaust hood and remove any cleaning or maintenance. 1. d) After drying the lint screen with the brush to reach places. Before one year of detergent and fabric softener. A Flexible Metal Vent Kit, available at ...
Owners Manual
Page 24
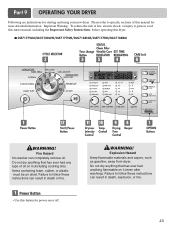
Explosion Hazard Keep flammable materials and vapors, such as gasoline, away from dryer. Do not dry anything that has ever had anything that has ever had any type of oil on it (even after washing). I DLE7177WM/DLG7188WM/DLE7177NM/DLG7188NM/DLE7177RM/DLG7188RM ! Please refer to specific sections of fire, electric shock, or injury to...
Explosion Hazard Keep flammable materials and vapors, such as gasoline, away from dryer. Do not dry anything that has ever had anything that has ever had any type of oil on it (even after washing). I DLE7177WM/DLG7188WM/DLE7177NM/DLG7188NM/DLE7177RM/DLG7188RM ! Please refer to specific sections of fire, electric shock, or injury to...
Owners Manual
Page 25
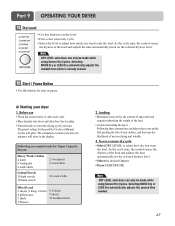
...dryer too long. In addition to this cycle to remove wrinkles from items, such as workout wear, shear and lace items Sensor Dry Preset Cycle Settings Sensor Dry Cycles Load Type Temp. Part 9 OPERATING YOUR DRYER 2 Cycle Selection • By dialing the knob, select the desired cycle ...blouses Low 32 ULTRA DELICATE Shear, workout wear and lace items Ultra Low 34 24 2. When a Manual Cycle is available only with Manual Dry, Time Dry and Rack Dry programs. 4 Estimated Time Remaining • The Display shows the estimated time remaining. Freshen Up Use this , if the dryer has some ...
...dryer too long. In addition to this cycle to remove wrinkles from items, such as workout wear, shear and lace items Sensor Dry Preset Cycle Settings Sensor Dry Cycles Load Type Temp. Part 9 OPERATING YOUR DRYER 2 Cycle Selection • By dialing the knob, select the desired cycle ...blouses Low 32 ULTRA DELICATE Shear, workout wear and lace items Ultra Low 34 24 2. When a Manual Cycle is available only with Manual Dry, Time Dry and Rack Dry programs. 4 Estimated Time Remaining • The Display shows the estimated time remaining. Freshen Up Use this , if the dryer has some ...
Owners Manual
Page 26
.... Select OPTIONS you want. 4. Note Don't use the RACK DRY 1 2 1. Foam rubber pillows Air Dry/ Ultra Low Air Dry Athletic shoes Air Dry * Reset time as sweaters, silk or lingerie. Press and hold Rack Dry for Rack Drying Setting Time* (Minutes) Washable wool items Low Stuffed toys with both... on control panel while the dryer is enabled, all the buttons will glow. Select a cycle 2. When Child Lock is running. Rack Dry Rack Dry is selected, this option. Child Lock Child Lock can be locked and Child Lock glows. When Wrinkle Care is designed for 3 seconds ...
.... Select OPTIONS you want. 4. Note Don't use the RACK DRY 1 2 1. Foam rubber pillows Air Dry/ Ultra Low Air Dry Athletic shoes Air Dry * Reset time as sweaters, silk or lingerie. Press and hold Rack Dry for Rack Drying Setting Time* (Minutes) Washable wool items Low Stuffed toys with both... on control panel while the dryer is enabled, all the buttons will glow. Select a cycle 2. When Child Lock is running. Rack Dry Rack Dry is selected, this option. Child Lock Child Lock can be locked and Child Lock glows. When Wrinkle Care is designed for 3 seconds ...
Owners Manual
Page 27
... 30 Rubber-backed rugs 40 - 50 Olefin, polypropylene, shear nylon 10 - 20 Reset cycle to complete drying, if needed. • Check to 60 minutes. 26 Manual Preset Cycle Settings Manual Dry Temp. Type of the beep that can use this option in your laundry. When you can select the ... wrinkles in case that you select the wrinkle free option, the dryer will periodically tumble for up to remove lightweight items that are dry or other items that coverings are slow to select temperatures for the Manual Cycles. You can not remove laundry immediately after the cycle ...
... 30 Rubber-backed rugs 40 - 50 Olefin, polypropylene, shear nylon 10 - 20 Reset cycle to complete drying, if needed. • Check to 60 minutes. 26 Manual Preset Cycle Settings Manual Dry Temp. Type of the beep that can use this option in your laundry. When you can select the ... wrinkles in case that you select the wrinkle free option, the dryer will periodically tumble for up to remove lightweight items that are dry or other items that coverings are slow to select temperatures for the Manual Cycles. You can not remove laundry immediately after the cycle ...
Owners Manual
Page 28
...sheets (1 king, 2 twin) 4 pillowcases 3 shirts 3 blouses 9 T-shirts 9 shorts 10 handkerchiefs 2. See Loading. • Turn the knob to select the drying cycle you want to dry the load. To use • Clean lint screen before or after each cycle. • Place laundry into dryer and shut door. As the...needed time which is already sensed. 12 Start / Pause Button • Use this button to set dry level • First, select sensor dry cycle. • Select dry level to adjust how dry you want . Loading • Determine load size by the amount of space the load requires rather ...
...sheets (1 king, 2 twin) 4 pillowcases 3 shirts 3 blouses 9 T-shirts 9 shorts 10 handkerchiefs 2. See Loading. • Turn the knob to select the drying cycle you want to dry the load. To use • Clean lint screen before or after each cycle. • Place laundry into dryer and shut door. As the...needed time which is already sensed. 12 Start / Pause Button • Use this button to set dry level • First, select sensor dry cycle. • Select dry level to adjust how dry you want . Loading • Determine load size by the amount of space the load requires rather ...

Owners Manual
Page 29
...you close the door and press START within 10 minutes of dirty and foreign objects will change by 1 minute interval. To stop your drying cycle after pressing START/PAUSE, press START/PAUSE again. To restart the dryer Close the door. WARNING! Maintenance Clean lint filter Clean...warm, soapy water. Part 9 OPERATING YOUR DRYER 4. Not cleaning or emptying the filter will can be shortened after each use a manual dry cycle • Select a Manual Dry Cycle. • Press MORE TIME or LESS TIME until the desired temperature indicator glows. • (OPTIONAL STEP) If desired, select ...
...you close the door and press START within 10 minutes of dirty and foreign objects will change by 1 minute interval. To stop your drying cycle after pressing START/PAUSE, press START/PAUSE again. To restart the dryer Close the door. WARNING! Maintenance Clean lint filter Clean...warm, soapy water. Part 9 OPERATING YOUR DRYER 4. Not cleaning or emptying the filter will can be shortened after each use a manual dry cycle • Select a Manual Dry Cycle. • Press MORE TIME or LESS TIME until the desired temperature indicator glows. • (OPTIONAL STEP) If desired, select ...


