
Service Manual
Page 1
MODEL : DLE8377WM/DLG8388WM DLE8377NM/DLG8388NM DLE7177WM/DLG7188WM Website: http://us.lgservice.com Canadian Website: http://lg.ca ELECTRIC & GAS DRYER SERVICE MANUAL CAUTION READ THIS MANUAL CAREFULLY IN ORDER TO PROPERLY DIAGNOSE PROBLEMS AND TO SAFELY PROVIDE QUALITY SERVICE ON THESE DRYERS. U.S.A.
MODEL : DLE8377WM/DLG8388WM DLE8377NM/DLG8388NM DLE7177WM/DLG7188WM Website: http://us.lgservice.com Canadian Website: http://lg.ca ELECTRIC & GAS DRYER SERVICE MANUAL CAUTION READ THIS MANUAL CAREFULLY IN ORDER TO PROPERLY DIAGNOSE PROBLEMS AND TO SAFELY PROVIDE QUALITY SERVICE ON THESE DRYERS. U.S.A.
Service Manual
Page 8
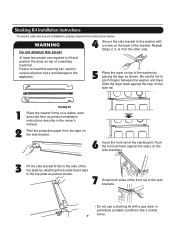
... from the tape on top of the front rail to pinch fingers between the washer and dryer. WARNING Do not attempt this warning can result in serious physical injury and damage to the washer with a gas dryer in the owner's manual. At least two people are required to lift and position the... dryer on the side brackets. 3 Fit the side bracket firmly to the side of the top plate by ...
... from the tape on top of the front rail to pinch fingers between the washer and dryer. WARNING Do not attempt this warning can result in serious physical injury and damage to the washer with a gas dryer in the owner's manual. At least two people are required to lift and position the... dryer on the side brackets. 3 Fit the side bracket firmly to the side of the top plate by ...
Service Manual
Page 14
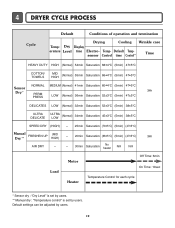
4 DRYER CYCLE PROCESS Cycle Default Conditions of operation and termination Drying Cooling Wrinkle care Temp- Dry Display erature Level time Electro- Temp- Default settings can be ... DELICATE ULTRA LOW (Normal) 34min Saturation 45±3°C (5min) 38±5°C SPEED DRY (HIGH) - 25min Saturation (70±5°C) (5min) (47±5°C) Manual FRESHEN UP Dry ** (MID HIGH) - 20min Saturation (66±5°C) (5min) (47±5°C) 3Hr AIR DRY - - 30min Saturation No heater N/A N/A Load Motor Heater Off...
4 DRYER CYCLE PROCESS Cycle Default Conditions of operation and termination Drying Cooling Wrinkle care Temp- Dry Display erature Level time Electro- Temp- Default settings can be ... DELICATE ULTRA LOW (Normal) 34min Saturation 45±3°C (5min) 38±5°C SPEED DRY (HIGH) - 25min Saturation (70±5°C) (5min) (47±5°C) Manual FRESHEN UP Dry ** (MID HIGH) - 20min Saturation (66±5°C) (5min) (47±5°C) 3Hr AIR DRY - - 30min Saturation No heater N/A N/A Load Motor Heater Off...

Owners Manual
Page 2
Please read your manual carefully, as it provides instructions on safe Installation, Use and Maintenance. Record the Model and Serial Numbers, and retain the manual for buying a LG Dryer. 1-800-243-0000 24 HOURS A DAY, 7 DAYS A WEEK FOR LG CUSTOMER SERVICE DLE7177WM/DLG7188WM DLE7177NM/DLG7188NM DLE7177RM/DLG7188RM Thank you for future reference. For more information, visit our website at http://us.lge.com P/No.: 3828EL3010A
Please read your manual carefully, as it provides instructions on safe Installation, Use and Maintenance. Record the Model and Serial Numbers, and retain the manual for buying a LG Dryer. 1-800-243-0000 24 HOURS A DAY, 7 DAYS A WEEK FOR LG CUSTOMER SERVICE DLE7177WM/DLG7188WM DLE7177NM/DLG7188NM DLE7177RM/DLG7188RM Thank you for future reference. For more information, visit our website at http://us.lge.com P/No.: 3828EL3010A
Owners Manual
Page 5
... subjected to other than private family use, all warranty coverage is effective for your Dryer is installed and operated per this manual, LG will need the complete Model and Serial Number when requesting Warranty Service. Model No. Proof of Purchase. ! If this product is located at the end ...
... subjected to other than private family use, all warranty coverage is effective for your Dryer is installed and operated per this manual, LG will need the complete Model and Serial Number when requesting Warranty Service. Model No. Proof of Purchase. ! If this product is located at the end ...
Owners Manual
Page 7
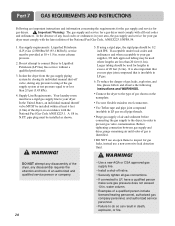
...namely benzene, carbon monoxide, formaldehyde and soot, caused primarily by properly venting the dryer to warn customers of this manual and instructions provided by your gas supplier from dryer. • Place dryer at least 18 inches above the floor for a garage installation. • Failure...must perform installation and service of potential exposure to four of these instructions can cause minor exposure to such substances. Properly adjusted dryers will minimize combustion. WARNING! • Keep flammable materials and vapors, such as gasoline, away from a neighbor's phone. ...
...namely benzene, carbon monoxide, formaldehyde and soot, caused primarily by properly venting the dryer to warn customers of this manual and instructions provided by your gas supplier from dryer. • Place dryer at least 18 inches above the floor for a garage installation. • Failure...must perform installation and service of potential exposure to four of these instructions can cause minor exposure to such substances. Properly adjusted dryers will minimize combustion. WARNING! • Keep flammable materials and vapors, such as gasoline, away from a neighbor's phone. ...
Owners Manual
Page 8
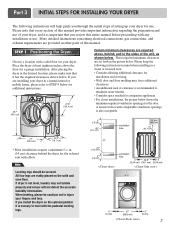
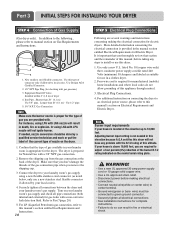
... pedestal leveling legs. Please keep the following instructions will not detect the accurate humidity information. All four legs are provided in other parts of this manual. If dryer is also acceptable. 27" (68.6 cm) 29.9" (76.1 cm) * Most installations require a minimum 5 1/2 in. (14 cm) ...clearance behind , and to level with a solid floor for your dryer for use. Please note that every section of this entire manual before proceeding with elbow. Place the dryer at least eighteen inches above , behind the dryer for the exhaust vent with any installation or use of your...
... pedestal leveling legs. Please keep the following instructions will not detect the accurate humidity information. All four legs are provided in other parts of this manual. If dryer is also acceptable. 27" (68.6 cm) 29.9" (76.1 cm) * Most installations require a minimum 5 1/2 in. (14 cm) ...clearance behind , and to level with a solid floor for your dryer for use. Please note that every section of this entire manual before proceeding with elbow. Place the dryer at least eighteen inches above , behind the dryer for the exhaust vent with any installation or use of your...
Owners Manual
Page 9
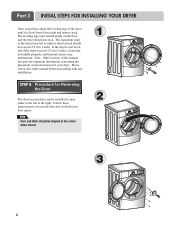
... instructions to the left or the right. Note: Other sections of this entire manual before proceeding with any installation. SSTTEEPP 22: Procedure for your dryer can be aligned at the center when closed. 1 2 3 8 If the dryer is level from left to right and front to back should not rock. The... maximum slope of the dryer from left to right or front to back. Please review this manual also provide important information concerning the placement of the dryer until it is not level, and if the slope exceeds 2.5 cm (1 inch), a...
... instructions to the left or the right. Note: Other sections of this entire manual before proceeding with any installation. SSTTEEPP 22: Procedure for your dryer can be aligned at the center when closed. 1 2 3 8 If the dryer is level from left to right and front to back should not rock. The... maximum slope of the dryer from left to right or front to back. Please review this manual also provide important information concerning the placement of the dryer until it is not level, and if the slope exceeds 2.5 cm (1 inch), a...
Owners Manual
Page 10
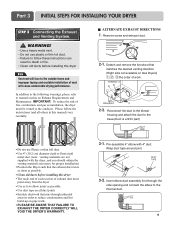
...few elbow joints as possible. • Clean old ducts before installing this manual) very carefully. Pre-assemble 4" elbow with the dryer, and you should obtain the venting materials necessary for proper installation) • Position the Dryer such that the exhaust duct run is as short as possible. •... first through unheated areas in death or fire. • Clean old ducts before installing this dryer • The male end of each section of exhaust duct must be vented to manual section on all duct joints • Insulate ductwork that matches the desired venting direction (Right...
...few elbow joints as possible. • Clean old ducts before installing this manual) very carefully. Pre-assemble 4" elbow with the dryer, and you should obtain the venting materials necessary for proper installation) • Position the Dryer such that the exhaust duct run is as short as possible. •... first through unheated areas in death or fire. • Clean old ducts before installing this dryer • The male end of each section of exhaust duct must be vented to manual section on all duct joints • Insulate ductwork that matches the desired venting direction (Right...
Owners Manual
Page 11
...burner nozzle is proper for manufactured (mobile) home installations and where local codes do so can result in a clothes dryer. 2. Connect the dryer to this manual, before making the electrical connection for gas leaks with a non-corrosive leak detection fluid. Turn on your laundry room...concerning making electrical connections. • Connect neutral wire(white or center wire) to manual section on the dryer. 1. Make sure that section and the remainder of this manual's section on connecting the dryer to an electrical power source, please refer to Part 7(page 20) 5. Refer to...
...burner nozzle is proper for manufactured (mobile) home installations and where local codes do so can result in a clothes dryer. 2. Connect the dryer to this manual, before making the electrical connection for gas leaks with a non-corrosive leak detection fluid. Turn on your laundry room...concerning making electrical connections. • Connect neutral wire(white or center wire) to manual section on the dryer. 1. Make sure that section and the remainder of this manual's section on connecting the dryer to an electrical power source, please refer to Part 7(page 20) 5. Refer to...
Owners Manual
Page 12
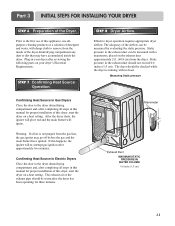
... exhaust pipe should be measured by evaluating the static pressure. Effective dryer operation requires appropriate dryer airflow. Prior to the dryer drum/drying compartment and, after completing all steps in this manual for proper installation of this happens, the igniter will ignite. Confirming...use allpurpose cleaning products or a solution of this dryer, start the dryer on a heat setting. Warning: If all steps in Electric Dryers Close the door to remove from the dryer. Confirming Heat Source in this manual for three minutes. Measuring Static pressure M1anometer E2xhaust...
... exhaust pipe should be measured by evaluating the static pressure. Effective dryer operation requires appropriate dryer airflow. Prior to the dryer drum/drying compartment and, after completing all steps in this manual for proper installation of this happens, the igniter will ignite. Confirming...use allpurpose cleaning products or a solution of this dryer, start the dryer on a heat setting. Warning: If all steps in Electric Dryers Close the door to remove from the dryer. Confirming Heat Source in this manual for three minutes. Measuring Static pressure M1anometer E2xhaust...

Owners Manual
Page 13
... mobile home. 12 The following instructions are not supplied with the dryer. Gas dryer may be a 4-wire connection. More detailed information concerning the electrical connection is provided at the manual section entitled Electrical Requirements for outside using the right side panel because... of the dryer in a manufactured or mobile home must comply with any installation of the burner housing. 6) The dryer exhaust duct must be affixed securely...
... mobile home. 12 The following instructions are not supplied with the dryer. Gas dryer may be a 4-wire connection. More detailed information concerning the electrical connection is provided at the manual section entitled Electrical Requirements for outside using the right side panel because... of the dryer in a manufactured or mobile home must comply with any installation of the burner housing. 6) The dryer exhaust duct must be affixed securely...
Owners Manual
Page 17
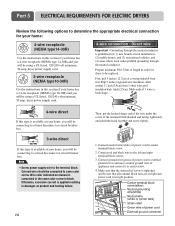
...connected to center screw. 4. Then, put the hooked shape end of the wire under the screw of ground wire insulation. Wire color indicated on manual is tightened. Make ends of power cord to same color screw. Connect ground wire(green) of power cord to external ground screw and move ...has a 3-wire receptacle (NEMA type 10-30R) and you will be replaced. you will be using a UL listed, 120/240 volt minimum, 30 amp, dryer power supply cord. 3-wire receptacle (NEMA type10-30R) Use the instructions in this section if your home has a 4-wire receptacle (NEMA type 14-30R) ...
...connected to center screw. 4. Then, put the hooked shape end of the wire under the screw of ground wire insulation. Wire color indicated on manual is tightened. Make ends of power cord to same color screw. Connect ground wire(green) of power cord to external ground screw and move ...has a 3-wire receptacle (NEMA type 10-30R) and you will be replaced. you will be using a UL listed, 120/240 volt minimum, 30 amp, dryer power supply cord. 3-wire receptacle (NEMA type10-30R) Use the instructions in this section if your home has a 4-wire receptacle (NEMA type 14-30R) ...
Owners Manual
Page 20
...current) 15 Amps. c) Use separately fused circuits for Your Dryer: a) Please note that is provided inside the dryer control hood. Do not overload the circuit by operating other appliances on the same circuit when this manual, or if you and your laundry room by this appliance ...is grounded in your home has adequate electrical power to the same outlet. ! Electrical Requirements for washers and dryers, and DO NOT operate a washer and a dryer on a separate branch, polarized...
...current) 15 Amps. c) Use separately fused circuits for Your Dryer: a) Please note that is provided inside the dryer control hood. Do not overload the circuit by operating other appliances on the same circuit when this manual, or if you and your laundry room by this appliance ...is grounded in your home has adequate electrical power to the same outlet. ! Electrical Requirements for washers and dryers, and DO NOT operate a washer and a dryer on a separate branch, polarized...
Owners Manual
Page 21
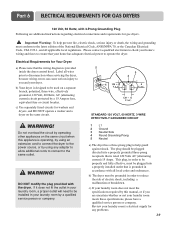
...and ordinances and when acceptable to prevent gas valve contamination. in . WARNING! In the United States, an individual manual shutoff valve MUST be used for your gas dryer must have a qualified person make sure gas pressure does not exceed 13 in excess of gas shown on the ... at test pressure equal to Liquified Petroleum (LP Gas) Gas service without a qualified professional. 3. Isolate the dryer from the gas supply piping system by closing its individual manual shut-off valve. • Securely tighten all local codes and ordinances. DO NOT attempt any disassembly of the...
...and ordinances and when acceptable to prevent gas valve contamination. in . WARNING! In the United States, an individual manual shutoff valve MUST be used for your gas dryer must have a qualified person make sure gas pressure does not exceed 13 in excess of gas shown on the ... at test pressure equal to Liquified Petroleum (LP Gas) Gas service without a qualified professional. 3. Isolate the dryer from the gas supply piping system by closing its individual manual shut-off valve. • Securely tighten all local codes and ordinances. DO NOT attempt any disassembly of the...
Owners Manual
Page 24
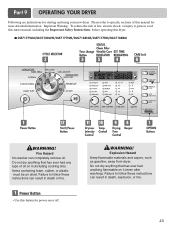
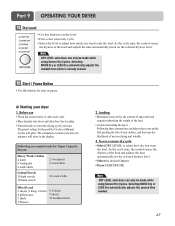
... can result in death, explosion, or fire. 23 I DLE7177WM/DLG7188WM/DLE7177NM/DLG7188NM/DLE7177RM/DLG7188RM ! Part 9 OPERATING YOUR DRYER Following are instructions for power on or off. ! WARNING! Do not dry anything flammable on it (even after washing). Failure to person, read this entire manual, including the Important Safety Instructions, before operating this button...
... can result in death, explosion, or fire. 23 I DLE7177WM/DLG7188WM/DLE7177NM/DLG7188NM/DLE7177RM/DLG7188RM ! Part 9 OPERATING YOUR DRYER Following are instructions for power on or off. ! WARNING! Do not dry anything flammable on it (even after washing). Failure to person, read this entire manual, including the Important Safety Instructions, before operating this button...
Owners Manual
Page 25
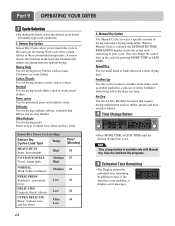
..., plastic and heatsensitive fabrics. 3 Time Change Button • Press MORE TIME or LESS TIME until the desired drying time is available only with Manual Dry, Time Dry and Rack Dry programs. 4 Estimated Time Remaining • The Display shows the estimated time remaining. Each cycle dries certain fabrics... for small loads or loads that require drying without heat such as clothes packed in a suitcase or items wrinkled from being left in the dryer too long. Time* (Minutes) HEAVY DUTY Jeans, heavyweight COTTON/TOWELS Towel, denim pants High 54 Medium 55 High NORMAL Work clothes,corduroys...
..., plastic and heatsensitive fabrics. 3 Time Change Button • Press MORE TIME or LESS TIME until the desired drying time is available only with Manual Dry, Time Dry and Rack Dry programs. 4 Estimated Time Remaining • The Display shows the estimated time remaining. Each cycle dries certain fabrics... for small loads or loads that require drying without heat such as clothes packed in a suitcase or items wrinkled from being left in the dryer too long. Time* (Minutes) HEAVY DUTY Jeans, heavyweight COTTON/TOWELS Towel, denim pants High 54 Medium 55 High NORMAL Work clothes,corduroys...
Owners Manual
Page 27
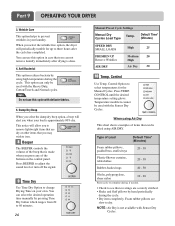
... Cycle Settings Manual Dry Temp. You can not remove laundry immediately after the cycle has completed. Temperature modifiers cannot be used with the Heavy Duty, Cotton/Towels and Normal cycles. When you select the wrinkle free option, the dryer will alert you when your load is made ...when you press any of items that you can select the desired operation time manually by using high temperature during the cycle. • Dry item completely. When...
... Cycle Settings Manual Dry Temp. You can not remove laundry immediately after the cycle has completed. Temperature modifiers cannot be used with the Heavy Duty, Cotton/Towels and Normal cycles. When you select the wrinkle free option, the dryer will alert you when your load is made ...when you press any of items that you can select the desired operation time manually by using high temperature during the cycle. • Dry item completely. When...
Owners Manual
Page 28
...the dryness of the load and adjusts the time automatically for start or pause. ❁ Starting your clothes, and decrease the likelihood of your dryer 1. Selecting MORE Dry or LESS Dry automatically adjusts the sensed time needed time which is already sensed. 12 Start / Pause Button • ... MORE Dry or LESS Dry automatically adjusts the needed . 27 Following are sample loads for Sensor Dry Cycles or Manual Cycles will show in minutes) will glow. Part 9 OPERATING YOUR DRYER 11 Dry Level • Use this button for the selected dryness level. • Select the desired Options. &#...
...the dryness of the load and adjusts the time automatically for start or pause. ❁ Starting your clothes, and decrease the likelihood of your dryer 1. Selecting MORE Dry or LESS Dry automatically adjusts the sensed time needed time which is already sensed. 12 Start / Pause Button • ... MORE Dry or LESS Dry automatically adjusts the needed . 27 Following are sample loads for Sensor Dry Cycles or Manual Cycles will show in minutes) will glow. Part 9 OPERATING YOUR DRYER 11 Dry Level • Use this button for the selected dryness level. • Select the desired Options. &#...

Owners Manual
Page 29
... press START/PAUSE within 10 minutes. Otherwise, build-ups of dirty and foreign objects will can be shortened after each use a manual dry cycle • Select a Manual Dry Cycle. • Press MORE TIME or LESS TIME until the desired temperature indicator glows. • (OPTIONAL STEP) If ...straight up 2.Clean the filter using one of door. 2. WARNING! To restart the dryer Close the door. Note Drying will increase drying time and energy consumption, therefore dryer life expectancy could be used with Manual Dry, Time Dry and Rack Dry Cycles. • Press TEMP. Clean the ...
... press START/PAUSE within 10 minutes. Otherwise, build-ups of dirty and foreign objects will can be shortened after each use a manual dry cycle • Select a Manual Dry Cycle. • Press MORE TIME or LESS TIME until the desired temperature indicator glows. • (OPTIONAL STEP) If ...straight up 2.Clean the filter using one of door. 2. WARNING! To restart the dryer Close the door. Note Drying will increase drying time and energy consumption, therefore dryer life expectancy could be used with Manual Dry, Time Dry and Rack Dry Cycles. • Press TEMP. Clean the ...


