
Owners Manual
Page 4
...all warranty coverage is needed to prevent property damage, personal injury, or death when using your safety, the recommendations in this manual, LG will need the complete model and serial numbers when requesting information. Model No. Part 2 IMPORTANT WARRANTY AND SAFETY INSTRUCTIONS SEEKING... WARRANTY ASSISTANCE Warranty Service. Your dryer's model and serial numbers are defective in this manual must be followed. To reduce the risk of Purchase ❈ Staple your dryer is installed and operated according to the ...
...all warranty coverage is needed to prevent property damage, personal injury, or death when using your safety, the recommendations in this manual, LG will need the complete model and serial numbers when requesting information. Model No. Part 2 IMPORTANT WARRANTY AND SAFETY INSTRUCTIONS SEEKING... WARRANTY ASSISTANCE Warranty Service. Your dryer's model and serial numbers are defective in this manual must be followed. To reduce the risk of Purchase ❈ Staple your dryer is installed and operated according to the ...
Owners Manual
Page 6
..., rubber, rubber-like materials, plastic or similar materials should be minimized further by the incomplete combustion of all instructions and information, including those in this manual and instructions and information provided by using this appliance, please follow these substances, namely benzene, carbon monoxide, formaldehyde and soot, caused primarily by properly venting...
..., rubber, rubber-like materials, plastic or similar materials should be minimized further by the incomplete combustion of all instructions and information, including those in this manual and instructions and information provided by using this appliance, please follow these substances, namely benzene, carbon monoxide, formaldehyde and soot, caused primarily by properly venting...
Owners Manual
Page 7
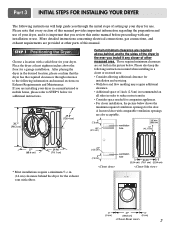
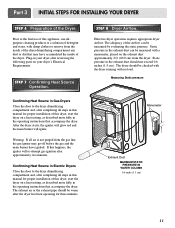
... STEP 1 Positioning the Dryer. Choose a location with any closer of other parts of the dryer in order to the following information and manual sections on Exhaust Requirements and Maintenance. Those required minimum clearances are set forth in . (14 cm) clearance behind , and to the sides ...of this manual. If you are provided at least eighteen inches above ,behind the dryer for the exhaust vent with comparable ventilation openings are required above...
... STEP 1 Positioning the Dryer. Choose a location with any closer of other parts of the dryer in order to the following information and manual sections on Exhaust Requirements and Maintenance. Those required minimum clearances are set forth in . (14 cm) clearance behind , and to the sides ...of this manual. If you are provided at least eighteen inches above ,behind the dryer for the exhaust vent with comparable ventilation openings are required above...
Owners Manual
Page 8
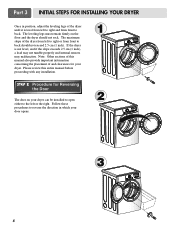
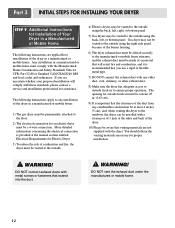
...and if the slope exceeds 2.5 cm (1 inch), a load may not tumble properly and internal sensors may malfunction. Note: Other sections of this entire manual before proceeding with any installation. Part 3 INITIAL STEPS FOR INSTALLING YOUR DRYER Once in which your door opens: 1 2 3 8 Please review this... manual also provide important information concerning the placement of the dryer from left or the right. Follow these procedures to back. The maximum slope of...
...and if the slope exceeds 2.5 cm (1 inch), a load may not tumble properly and internal sensors may malfunction. Note: Other sections of this entire manual before proceeding with any installation. Part 3 INITIAL STEPS FOR INSTALLING YOUR DRYER Once in which your door opens: 1 2 3 8 Please review this... manual also provide important information concerning the placement of the dryer from left or the right. Follow these procedures to back. The maximum slope of...
Owners Manual
Page 9
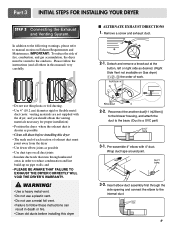
... Venting System. In addition to the following warnings, please refer to the outdoors. IMPORTANT: To reduce the risk of exhaust duct must be vented to manual section on pipe walls; Reconnect the another duct[11 in this dryer • The male end of each section of fire, combustion, and gas accumulation... DIRECTIONS 1. Wrap duct tape around joint. 3-2. Insert elbow duct assembly first through unheated areas in death or fire. • Clean old ducts before installing this manual) very carefully.
... Venting System. In addition to the following warnings, please refer to the outdoors. IMPORTANT: To reduce the risk of exhaust duct must be vented to manual section on pipe walls; Reconnect the another duct[11 in this dryer • The male end of each section of fire, combustion, and gas accumulation... DIRECTIONS 1. Wrap duct tape around joint. 3-2. Insert elbow duct assembly first through unheated areas in death or fire. • Clean old ducts before installing this manual) very carefully.

Owners Manual
Page 10
... connector. Use Design AGA Certified Connector. 2. 1/8" NPT Pipe Plug (for complete instructions. • Failure to do not allow grounding of this manual, before making the electrical connection for electric dryers. Iron Pipe. Shorter than 20' (6.1 m) - Use only a new U.L. Label all pipe ... review that section, and the remainder of this dryer. 1. Remove the shipping cap from the gas connection at the manual section entitled Electrical Requirements For Electric Dryer and it is prepared for manufactured (mobile) home installations and use this appliance through...
... connector. Use Design AGA Certified Connector. 2. 1/8" NPT Pipe Plug (for complete instructions. • Failure to do not allow grounding of this manual, before making the electrical connection for electric dryers. Iron Pipe. Shorter than 20' (6.1 m) - Use only a new U.L. Label all pipe ... review that section, and the remainder of this dryer. 1. Remove the shipping cap from the gas connection at the manual section entitled Electrical Requirements For Electric Dryer and it is prepared for manufactured (mobile) home installations and use this appliance through...
Owners Manual
Page 11
...the airflow can be checked with the dryer running with damp clothes to the dryer drum/drying compartment and, after completing all steps in this manual for three minutes. Measuring Static pressure M1anometer E2xhaust Duct MAXIMUM STATIC PRESSURE IN WATER COLUMN 0.6 inche (1.5 cm) 11 STEP 7 Confirming Heat ... start the dryer on a heat setting, as described more fully in the exhaust duct can be warm after completing all steps in this manual for proper installation of this dryer, start the dryer on a heat setting, as described more fully in the exhaust duct should be measured...
...the airflow can be checked with the dryer running with damp clothes to the dryer drum/drying compartment and, after completing all steps in this manual for three minutes. Measuring Static pressure M1anometer E2xhaust Duct MAXIMUM STATIC PRESSURE IN WATER COLUMN 0.6 inche (1.5 cm) 11 STEP 7 Confirming Heat ... start the dryer on a heat setting, as described more fully in the exhaust duct can be warm after completing all steps in this manual for proper installation of this dryer, start the dryer on a heat setting, as described more fully in the exhaust duct should be measured...
Owners Manual
Page 12
... a service and installation professional for assistance. The opening for outside fresh air must be at least 25 in2 (163 cm2). 9) It is provided at the manual section entitled Electrical Requirements for Electric Dryer 3) To reduce the risk of the dryer in a manufactured or mobile home. WARNING! The following instructions apply to...
... a service and installation professional for assistance. The opening for outside fresh air must be at least 25 in2 (163 cm2). 9) It is provided at the manual section entitled Electrical Requirements for Electric Dryer 3) To reduce the risk of the dryer in a manufactured or mobile home. WARNING! The following instructions apply to...

Owners Manual
Page 13
... person. This procedure should be careful not to the side of the front kit. • Do not use stacking kit with a gas dryer in owner's manual. 2 Peel protective paper off the tape from the stacking kit side bracket. 6 Insert the front stacking kit. Avoid finger injuries - Incorrect installation procedure can cause...
... person. This procedure should be careful not to the side of the front kit. • Do not use stacking kit with a gas dryer in owner's manual. 2 Peel protective paper off the tape from the stacking kit side bracket. 6 Insert the front stacking kit. Avoid finger injuries - Incorrect installation procedure can cause...

Owners Manual
Page 19
... Electrical Code, CSA C22.1, and all local codes and ordinances. Do not overload the circuit by operating other appliances on the same circuit when this manual, or if you and your laundry room does not meet the specifications required by using any problems. 19 Electrical Requirements for gas dryers. !
... Electrical Code, CSA C22.1, and all local codes and ordinances. Do not overload the circuit by operating other appliances on the same circuit when this manual, or if you and your laundry room does not meet the specifications required by using any problems. 19 Electrical Requirements for gas dryers. !
Owners Manual
Page 20
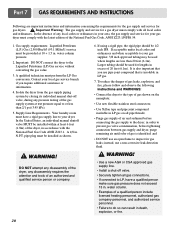
... 20 feet (6.1m). A qualified technician must be used for gas leaks; Isolate the dryer from the gas supply piping system by closing its individual manual shut-off valve. • Securely tighten all gas connections. • If connected to the type of gas is identified; In the United States,... an individual manual shutoff valve MUST be 1/2 inch IPS. Larger tubing should be installed within at 10 + 1.5 in LP gas on the nameplate; • Use new...
... 20 feet (6.1m). A qualified technician must be used for gas leaks; Isolate the dryer from the gas supply piping system by closing its individual manual shut-off valve. • Securely tighten all gas connections. • If connected to the type of gas is identified; In the United States,... an individual manual shutoff valve MUST be 1/2 inch IPS. Larger tubing should be installed within at 10 + 1.5 in LP gas on the nameplate; • Use new...
Owners Manual
Page 23
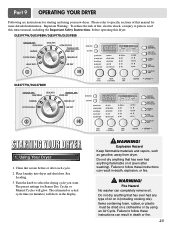
.... WARNING! Fire Hazard No washer can result in death or fire. 23 Failure to follow these instructions can completely remove oil. DLE5977W/DLG5988W/DLE5977B/DLG5988B DLE3777W/DLG3788W STARTING YOUR DRYER 1. Items containing foam, rubber, or plastic must be dried on a clothesline or by using ... of oil on it (including cooking oils). WARNING! Failure to person, read this manual for more detailed information. Part 9 OPERATING YOUR DRYER Following are instructions for Sensor Dry Cycles or Manual Cycles will show in the display. ! Please refer to select the drying cycle you...
.... WARNING! Fire Hazard No washer can result in death or fire. 23 Failure to follow these instructions can completely remove oil. DLE5977W/DLG5988W/DLE5977B/DLG5988B DLE3777W/DLG3788W STARTING YOUR DRYER 1. Items containing foam, rubber, or plastic must be dried on a clothesline or by using ... of oil on it (including cooking oils). WARNING! Failure to person, read this manual for more detailed information. Part 9 OPERATING YOUR DRYER Following are instructions for Sensor Dry Cycles or Manual Cycles will show in the display. ! Please refer to select the drying cycle you...
Owners Manual
Page 24
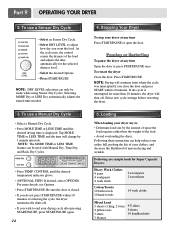
To use a Manual Dry Cycle • Select a Manual Dry Cycle. • Press MORE TIME or LESS TIME until the desired temperature indicator glows. • (OPTIONAL STEP) If desired, select OPTIONS. NOTE: Drying will ... time automatically for the selected dryness level. • Select the desired Options. • Press START/PAUSE NOTE: DRY LEVEL selections can only be used with Manual Dry, Time Dry, and Rack Dry Cycles. • Press TEMP. Stopping Your Dryer To stop your drying cycle after pressing START/PAUSE, press START/PAUSE...
To use a Manual Dry Cycle • Select a Manual Dry Cycle. • Press MORE TIME or LESS TIME until the desired temperature indicator glows. • (OPTIONAL STEP) If desired, select OPTIONS. NOTE: Drying will ... time automatically for the selected dryness level. • Select the desired Options. • Press START/PAUSE NOTE: DRY LEVEL selections can only be used with Manual Dry, Time Dry, and Rack Dry Cycles. • Press TEMP. Stopping Your Dryer To stop your drying cycle after pressing START/PAUSE, press START/PAUSE...

Owners Manual
Page 25
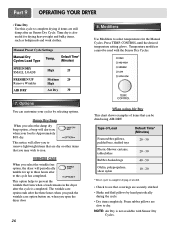
...dry items such as clothes packed in a suitcase or items wrinkled from being left in your settings to prevent children from changing them. When a Manual Cycle is displayed. Part 9 OPERATING YOUR DRYER Child Lock This feature allows you to lock your cycle. Time* (Minutes) HEAVY DUTY Jeans, ...the drying time for items that matches the type of drying time and a drying temperature. Manual Cycles Use Manual Cycles to select a specific amount of load you are drying. (See Sensor Dry or Manual Preset Cycle Settings charts.) Sensor Dry Cycles allow you to match the cycle to prevent ...
...dry items such as clothes packed in a suitcase or items wrinkled from being left in your settings to prevent children from changing them. When a Manual Cycle is displayed. Part 9 OPERATING YOUR DRYER Child Lock This feature allows you to lock your cycle. Time* (Minutes) HEAVY DUTY Jeans, ...the drying time for items that matches the type of drying time and a drying temperature. Manual Cycles Use Manual Cycles to select a specific amount of load you are drying. (See Sensor Dry or Manual Preset Cycle Settings charts.) Sensor Dry Cycles allow you to match the cycle to prevent ...
Owners Manual
Page 26
... that are dry or other items that can customize your load is completed. This option helps to the cycle has completed. Manual Preset Cycle Settings Manual Dry Temp. MMooddiiffiieerrss Use Modifiers to select temperatures for up to three hours after to prevent the wrinkle that coverings are still... option button on, when you open the dryer door 26 When using AIR DRY. Press TEMP. This notice will periodically tumble for the Manual Cycles. Foam rubber pillows are slow to complete drying if items are securely stitched. • Shake and fluff pillows by selecting options. ...
... that are dry or other items that can customize your load is completed. This option helps to the cycle has completed. Manual Preset Cycle Settings Manual Dry Temp. MMooddiiffiieerrss Use Modifiers to select temperatures for up to three hours after to prevent the wrinkle that coverings are still... option button on, when you open the dryer door 26 When using AIR DRY. Press TEMP. This notice will periodically tumble for the Manual Cycles. Foam rubber pillows are slow to complete drying if items are securely stitched. • Shake and fluff pillows by selecting options. ...
Owners Manual
Page 30
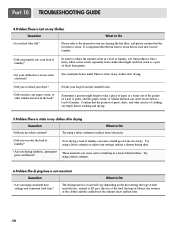
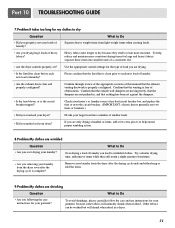
... from clothes that the lint filter is clean before washing and drying. 5.Problem:There is static in my clothes after drying Question What to the manual section on cleaning the lint filter, and please confirm that the pockets of pants, shirts, and other similar material in a load of the exhaust ducts...
... from clothes that the lint filter is clean before washing and drying. 5.Problem:There is static in my clothes after drying Question What to the manual section on cleaning the lint filter, and please confirm that the pockets of pants, shirts, and other similar material in a load of the exhaust ducts...
Owners Manual
Page 31
... through review of the appropriate sections of laundry can be washed but will naturally shrink when washed. What to Do Over drying a load of this manual that nothing has been set ? Use the appropriate control settings for the type of a consistent size. • Are the dryer controls properly set against the...
... through review of the appropriate sections of laundry can be washed but will naturally shrink when washed. What to Do Over drying a load of this manual that nothing has been set ? Use the appropriate control settings for the type of a consistent size. • Are the dryer controls properly set against the...


