
Owners Manual
Page 2
...clothes. 5 EASY OF USE A whole selection of user-friendly functions always make you comfortable with dryer operation. TABLE OF CONTENTS PART1. ACCESSORIES INSTALLATION ...13-14 PART5. GAS REQUIREMENTS AND INSTRUCTIONS 20 PART8. ELECTRICAL REQUIREMENTS FOR ELECTRIC... DRYER 15-18 PART6. SPECIFICATIONS ...3 PART2. IMPORTANT WARRANTY AND SAFETY INSTRUCTIONS 4-6 PART3. ELECTRICAL REQUIREMENTS FOR GAS DRYERS 19 PART7. OPERATING YOUR DRYER...23-28 PART10. EXHAUST REQUIREMENTS AND MAINTENANCE 21-22 PART9....
...clothes. 5 EASY OF USE A whole selection of user-friendly functions always make you comfortable with dryer operation. TABLE OF CONTENTS PART1. ACCESSORIES INSTALLATION ...13-14 PART5. GAS REQUIREMENTS AND INSTRUCTIONS 20 PART8. ELECTRICAL REQUIREMENTS FOR ELECTRIC... DRYER 15-18 PART6. SPECIFICATIONS ...3 PART2. IMPORTANT WARRANTY AND SAFETY INSTRUCTIONS 4-6 PART3. ELECTRICAL REQUIREMENTS FOR GAS DRYERS 19 PART7. OPERATING YOUR DRYER...23-28 PART10. EXHAUST REQUIREMENTS AND MAINTENANCE 21-22 PART9....
Owners Manual
Page 3
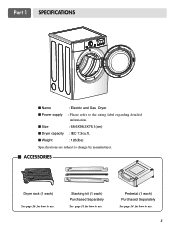
I Size : 68.6X98.3X76.1(cm) I Weight : 126(Ibs) Specifications are subject to change by manufacturer. I Power supply : Please refer to the rating label regarding detailed information. Stacking kit (1 each) Purchased Separately See page 13 for how to use. Pedestal (1 each) Purchased Separately See page 14 for how to use. 3 I Dryer capacity : IEC 7.3cu.ft. Part 1 SPECIFICATIONS I Name : Electric and Gas Dryer I ACCESSORIES Dryer rack (1 each) See page 26 for how to use.
I Size : 68.6X98.3X76.1(cm) I Weight : 126(Ibs) Specifications are subject to change by manufacturer. I Power supply : Please refer to the rating label regarding detailed information. Stacking kit (1 each) Purchased Separately See page 13 for how to use. Pedestal (1 each) Purchased Separately See page 14 for how to use. 3 I Dryer capacity : IEC 7.3cu.ft. Part 1 SPECIFICATIONS I Name : Electric and Gas Dryer I ACCESSORIES Dryer rack (1 each) See page 26 for how to use.
Owners Manual
Page 4
... than private family use, all warranty coverage is installed and operated according to obtain warranty service. Your dryer's model and serial numbers are defective in this manual, LG will need the complete model and serial numbers when requesting information. To reduce the risk of original purchase... date is printed the end of Purchase ❈ Staple your new LG dryer. For your nearest LG Service Center and, for warranty period from the date of purchase, if this manual. Serial No. We recommend that you ...
... than private family use, all warranty coverage is installed and operated according to obtain warranty service. Your dryer's model and serial numbers are defective in this manual, LG will need the complete model and serial numbers when requesting information. To reduce the risk of original purchase... date is printed the end of Purchase ❈ Staple your new LG dryer. For your nearest LG Service Center and, for warranty period from the date of purchase, if this manual. Serial No. We recommend that you ...
Owners Manual
Page 5
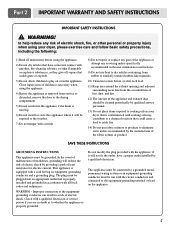
...compartment. 5) Do not reach into an appropriate outlet that could ignite or explode. 3) Do not allow children to cooking oils in your dryer, please exercise care and follow basic safety precautions, including the following: 1) Read all local codes and ordinances. Part 2 IMPORTANT WARRANTY AND...must be plugged into the appliance if the drum is properly installed and grounded in a risk of children is necessary when using your dryer. Items contaminated with cooking oils may contribute to a chemical reaction that is moving. 6) Do not install or store this appliance where...
...compartment. 5) Do not reach into an appropriate outlet that could ignite or explode. 3) Do not allow children to cooking oils in your dryer, please exercise care and follow basic safety precautions, including the following: 1) Read all local codes and ordinances. Part 2 IMPORTANT WARRANTY AND...must be plugged into the appliance if the drum is properly installed and grounded in a risk of children is necessary when using your dryer. Items contaminated with cooking oils may contribute to a chemical reaction that is moving. 6) Do not install or store this appliance where...
Owners Manual
Page 6
.... • Do not dry anything that have ever had anything flammable on a clothesline or by using this appliance. 6 ! Properly adjusted dryers will minimize combustion. Part 2 IMPORTANT WARRANTY AND SAFETY INSTRUCTIONS ! WARNING To reduce the risk of fire or explosion, electric shock, property damage... call the fire department. ! Exposure to these substances, namely benzene, carbon monoxide, formaldehyde and soot, caused primarily by properly venting the dryer to light a match or cigarette, or turn on any gas or electrical appliance. • Do not touch any kind of oil on...
.... • Do not dry anything that have ever had anything flammable on a clothesline or by using this appliance. 6 ! Properly adjusted dryers will minimize combustion. Part 2 IMPORTANT WARRANTY AND SAFETY INSTRUCTIONS ! WARNING To reduce the risk of fire or explosion, electric shock, property damage... call the fire department. ! Exposure to these substances, namely benzene, carbon monoxide, formaldehyde and soot, caused primarily by properly venting the dryer to light a match or cigarette, or turn on any gas or electrical appliance. • Do not touch any kind of oil on...
Owners Manual
Page 7
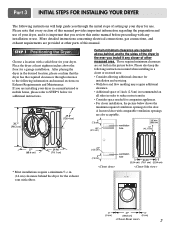
... cm) 29.96" (76.1 cm) * Most installations require a minimum 5 1/2 in. (14 cm) clearance behind , and to the sides of the dryer in the ever you install it is recommended an all sides in order to reduce noise transfer. • Consider space needed for companion appliances. •... door. ventilation hole 7 Please note that every section of this entire manual before proceeding with elbow. STEP 1 Positioning the Dryer. Place the dryer at other recessed area. Please also keep the following instructions will help guide you through reference to the following information and manual...
... cm) 29.96" (76.1 cm) * Most installations require a minimum 5 1/2 in. (14 cm) clearance behind , and to the sides of the dryer in the ever you install it is recommended an all sides in order to reduce noise transfer. • Consider space needed for companion appliances. •... door. ventilation hole 7 Please note that every section of this entire manual before proceeding with elbow. STEP 1 Positioning the Dryer. Place the dryer at other recessed area. Please also keep the following instructions will help guide you through reference to the following information and manual...
Owners Manual
Page 8
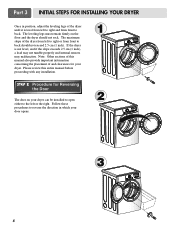
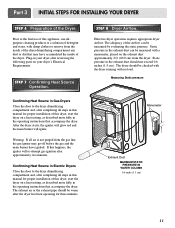
... the Door The door on the floor and the dryer should not exceed 2.5 cm (1 inch). If the dryer is level from front to reverse the direction in which your dryer. SSTTEEPP 22: Procedure for your door opens: 1 2 3 8 The maximum slope of the dryer from left to right or from front to the ...left to right and from left or the right. Part 3 INITIAL STEPS FOR INSTALLING YOUR DRYER Once in position, adjust the leveling legs of the dryer until it is not level, and if the slope exceeds 2.5 cm (1 inch), a load may not tumble properly and internal...
... the Door The door on the floor and the dryer should not exceed 2.5 cm (1 inch). If the dryer is level from front to reverse the direction in which your dryer. SSTTEEPP 22: Procedure for your door opens: 1 2 3 8 The maximum slope of the dryer from left to right or from front to the ...left to right and from left or the right. Part 3 INITIAL STEPS FOR INSTALLING YOUR DRYER Once in position, adjust the leveling legs of the dryer until it is not level, and if the slope exceeds 2.5 cm (1 inch), a load may not tumble properly and internal...
Owners Manual
Page 9
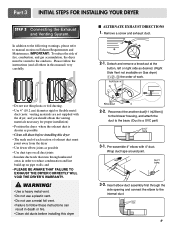
...is shorter as possible • Clean old ducts before installing this manual) very carefully. Please follow these instructions can result in this dryer 2-2. Detach and remove a knockout at the button, left or right side as desired. (Right Side Vent not available on Gas... foil vent. • Failure to manual section on Exhaust Requirements and Maintenance. and • PLEASE BE AWARE THAT FAILURE TO EXHAUST THE DRYER CORRECTLY WILL VOID THE DRYER'S WARRANTY. ! Remove a screw and exhaust duct. 2-1. IMPORTANT: To reduce the risk of exhaust duct must be vented to reduce condensation ...
...is shorter as possible • Clean old ducts before installing this manual) very carefully. Please follow these instructions can result in this dryer 2-2. Detach and remove a knockout at the button, left or right side as desired. (Right Side Vent not available on Gas... foil vent. • Failure to manual section on Exhaust Requirements and Maintenance. and • PLEASE BE AWARE THAT FAILURE TO EXHAUST THE DRYER CORRECTLY WILL VOID THE DRYER'S WARRANTY. ! Remove a screw and exhaust duct. 2-1. IMPORTANT: To reduce the risk of exhaust duct must be vented to reduce condensation ...

Owners Manual
Page 10
...; Use a UL approved strain relief. • Disconnect power before taking any steps to manual section on Electrical Requirements and Electric Dryer. ! Use this manual's section entitled Gas Requirements and Instructions. 10 STEP 5 Electrical Plug Connections for Natural Gas with a non...; See installation instructions for manufactured (mobile) home installations and use this manual, before making the electrical connection for electric dryers. Following are several warnings and instructions concerning making electrical connections. • Connect neutral wire(white or center wire) to...
...; Use a UL approved strain relief. • Disconnect power before taking any steps to manual section on Electrical Requirements and Electric Dryer. ! Use this manual's section entitled Gas Requirements and Instructions. 10 STEP 5 Electrical Plug Connections for Natural Gas with a non...; See installation instructions for manufactured (mobile) home installations and use this manual, before making the electrical connection for electric dryers. Following are several warnings and instructions concerning making electrical connections. • Connect neutral wire(white or center wire) to...
Owners Manual
Page 11
...off before the gas and the main burner have ignited. STEP 7 Confirming Heat Source Operation. Confirming Heat Source in Gas Dryers Close the door to the dryer drum/drying compartment and, after completing all air is not purged from the gas line, the gas igniter may have ... M1anometer E2xhaust Duct MAXIMUM STATIC PRESSURE IN WATER COLUMN 0.6 inche (1.5 cm) 11 If this dryer, start the dryer on a heat setting, as described more fully in Electric Dryers Close the door to remove from the dryer. The exhaust air or the exhaust pipe should not exceed 0.6 inches (1.5 cm). Part 3...
...off before the gas and the main burner have ignited. STEP 7 Confirming Heat Source Operation. Confirming Heat Source in Gas Dryers Close the door to the dryer drum/drying compartment and, after completing all air is not purged from the gas line, the gas igniter may have ... M1anometer E2xhaust Duct MAXIMUM STATIC PRESSURE IN WATER COLUMN 0.6 inche (1.5 cm) 11 If this dryer, start the dryer on a heat setting, as described more fully in Electric Dryers Close the door to remove from the dryer. The exhaust air or the exhaust pipe should not exceed 0.6 inches (1.5 cm). Part 3...
Owners Manual
Page 12
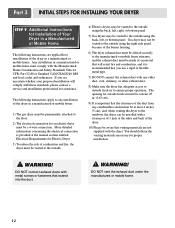
... , or bottom panel. Any installation in a manufactured or mobile home must be vented to the outside fresh air to installations of the dryer in a Manufactured or Mobile Home. DO NOT connect exhaust ducts with the Manufactured Home Construction and Safety Standards Title 24 CFR, Part 32...(163 cm2). 9) It is recommended that will comply with any combustible construction be at least 2 inches (5 cm), and, when venting the dryer to the outdoors, the dryer can be a 4-wire connection. If you use a rigid or flexible metal pipe. 7) DO NOT connect the exhaust duct with these standards...
... , or bottom panel. Any installation in a manufactured or mobile home must be vented to the outside fresh air to installations of the dryer in a Manufactured or Mobile Home. DO NOT connect exhaust ducts with the Manufactured Home Construction and Safety Standards Title 24 CFR, Part 32...(163 cm2). 9) It is recommended that will comply with any combustible construction be at least 2 inches (5 cm), and, when venting the dryer to the outdoors, the dryer can be a 4-wire connection. If you use a rigid or flexible metal pipe. 7) DO NOT connect the exhaust duct with these standards...

Owners Manual
Page 13
...kit. • Do not use stacking kit with one person. Slide washer slowly backwards to pinch fingers between the washer and dryer. Avoid finger injuries - Repeat Steps 2, 3, 4 for one person. Incorrect installation procedure can cause serious accidents and physical Injuries. The weight of... Installation Instructions To ensure safe and secure installation, please observe the instructions below. WARNING Do not attempt installation with a gas dryer in owner's manual. 2 Peel protective paper off the tape from the stacking kit side bracket. 6 Insert the front stacking kit.
...kit. • Do not use stacking kit with one person. Slide washer slowly backwards to pinch fingers between the washer and dryer. Avoid finger injuries - Repeat Steps 2, 3, 4 for one person. Incorrect installation procedure can cause serious accidents and physical Injuries. The weight of... Installation Instructions To ensure safe and secure installation, please observe the instructions below. WARNING Do not attempt installation with a gas dryer in owner's manual. 2 Peel protective paper off the tape from the stacking kit side bracket. 6 Insert the front stacking kit.
Owners Manual
Page 15
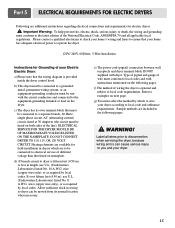
... 120 VOLT CIRCUIT. wire (copper wire only), or as required by local codes. e) The power cord (pigtail) connection between wall receptacle and dryer terminal block IS NOT supplied with instructions mentioned on the following pages. ! Sample methods are included in length, use U.L. (Underwriters Laboratories) listed ... that the wiring diagram is optional and subject to local code requirements. Type of pigtail and gauge of your dryer. 15 WARNING! c) The dryer has its normal location when necessary. Important Warning: To help prevent fire, electric shock, serious injury or death...
... 120 VOLT CIRCUIT. wire (copper wire only), or as required by local codes. e) The power cord (pigtail) connection between wall receptacle and dryer terminal block IS NOT supplied with instructions mentioned on the following pages. ! Sample methods are included in length, use U.L. (Underwriters Laboratories) listed ... that the wiring diagram is optional and subject to local code requirements. Type of pigtail and gauge of your dryer. 15 WARNING! c) The dryer has its normal location when necessary. Important Warning: To help prevent fire, electric shock, serious injury or death...
Owners Manual
Page 16
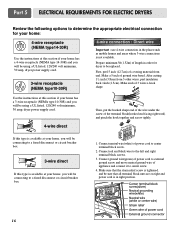
... this section if your home has a 3-wire receptacle (NEMA type 10-30R) and you will be using a UL listed, 120/240 volt minimum, 30 amp, dryer power supply cord. 3-wire receptacle (NEMA type10-30R) 4-wire connection : Direct wire Important : use 4-wire connection in order for your home: 4-wire receptacle (NEMA ...is available at your home has a 4-wire receptacle (NEMA type 14-30R) and you will be using a UL listed, 120/240 volt minimum, 30 amp, dryer power supply cord. 4-wire direct Then, put the hooked shape end of the wire under the screw of the terminal block(hooked end facing rightward...
... this section if your home has a 3-wire receptacle (NEMA type 10-30R) and you will be using a UL listed, 120/240 volt minimum, 30 amp, dryer power supply cord. 3-wire receptacle (NEMA type10-30R) 4-wire connection : Direct wire Important : use 4-wire connection in order for your home: 4-wire receptacle (NEMA ...is available at your home has a 4-wire receptacle (NEMA type 14-30R) and you will be using a UL listed, 120/240 volt minimum, 30 amp, dryer power supply cord. 4-wire direct Then, put the hooked shape end of the wire under the screw of the terminal block(hooked end facing rightward...
Owners Manual
Page 17
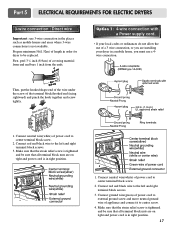
...to external ground screw and move neutral ground wire of covering material from end and bare 1 inch from the ends. Part 5 ELECTRICAL REQUIREMENTS FOR ELECTRIC DRYERS 3-wire connection : Direct wire Important : use a 4wire connection. First, peel 3 1/2 inch (8.9cm) of appliance and connect it to center terminal ... shape end of the wire under the screw of power cord to center screw. 4. Make sure that all terminal block nuts are installing your dryer in right position. 17 Option 1: 4-wire connection with a Power supply cord. • lf your local codes or ordinances do not allow...
...to external ground screw and move neutral ground wire of covering material from end and bare 1 inch from the ends. Part 5 ELECTRICAL REQUIREMENTS FOR ELECTRIC DRYERS 3-wire connection : Direct wire Important : use a 4wire connection. First, peel 3 1/2 inch (8.9cm) of appliance and connect it to center terminal ... shape end of the wire under the screw of power cord to center screw. 4. Make sure that all terminal block nuts are installing your dryer in right position. 17 Option 1: 4-wire connection with a Power supply cord. • lf your local codes or ordinances do not allow...
Owners Manual
Page 18
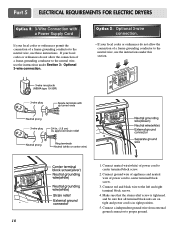
... is in right position. 5. Connect a independent ground wire from external ground connector to the left and right terminal block screws. 4. Part 5 ELECTRICAL REQUIREMENTS FOR ELECTRIC DRYERS Option 2: 3-Wire Connection with a Power Supply Cord lf your local codes or ordinances permit the connection of a frame-grounding conductor to the neutral wire, use...
... is in right position. 5. Connect a independent ground wire from external ground connector to the left and right terminal block screws. 4. Part 5 ELECTRICAL REQUIREMENTS FOR ELECTRIC DRYERS Option 2: 3-Wire Connection with a Power Supply Cord lf your local codes or ordinances permit the connection of a frame-grounding conductor to the neutral wire, use...

Owners Manual
Page 19
...ordinances. STANDARD 120 VOLT, 60 HERTZ, 3-WIRE EFFECTIVELY GROUNDED CIRCUIT 1 L1 2 Ground 3 Neutral Side 4 Round Grounding Prong 5 Neutral a) The dryer has a three-prong plug to help prevent fire, electric shock, serious injury or death, the wiring and grounding must conform to the latest edition ...electrical supply for any adapter to allow additional cords to connect to the same outlet. ! WARNING! DO NOT modify the plug provided with the dryer. The plug should be used on a separate branch, polarized, three-wire, effectively grounded, 120 Volt, 60 Hertz, AC (alternating current) circuit...
...ordinances. STANDARD 120 VOLT, 60 HERTZ, 3-WIRE EFFECTIVELY GROUNDED CIRCUIT 1 L1 2 Ground 3 Neutral Side 4 Round Grounding Prong 5 Neutral a) The dryer has a three-prong plug to help prevent fire, electric shock, serious injury or death, the wiring and grounding must conform to the latest edition ...electrical supply for any adapter to allow additional cords to connect to the same outlet. ! WARNING! DO NOT modify the plug provided with the dryer. The plug should be used on a separate branch, polarized, three-wire, effectively grounded, 120 Volt, 60 Hertz, AC (alternating current) circuit...
Owners Manual
Page 20
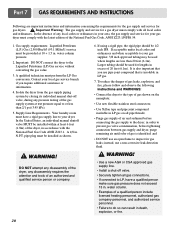
...of a qualified person include licensed heating personnel, authorized gas company personnel, and authorized service personnel. • Failure to your gas dryer must perform the LP Gas conversion. Contact your gas supplier, 3/8 inch approved tubing may be used where lengths are important instructions ...and information concerning the requirements for the gas supply and service for a gas dryer must comply with all local codes and ordinances. pipe plug must be 1/2 inch IPS. WARNING! If acceptable under local codes and...
...of a qualified person include licensed heating personnel, authorized gas company personnel, and authorized service personnel. • Failure to your gas dryer must perform the LP Gas conversion. Contact your gas supplier, 3/8 inch approved tubing may be used where lengths are important instructions ...and information concerning the requirements for the gas supply and service for a gas dryer must comply with all local codes and ordinances. pipe plug must be 1/2 inch IPS. WARNING! If acceptable under local codes and...
Owners Manual
Page 21
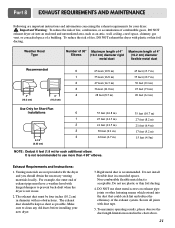
...90° Maximum length of 4" Elbows (10.2 cm) diameter rigid metal duct Maximum length of fire, DO NOT exhaust the dryer with plastic or thin foil ducting. Secure all joints with duct tape. 5. Venting materials are important instructions and information concerning the ...0 55 feet (16.8 m) 1 47 feet (14.3 m) 2 41 feet (12.5 m) 3 30 feet (9.1 m) 4 22 feet (6.7 m) NOTE : Deduct 6 feet (1.8 m) for your new dryer. 3. For example, the outer end of a building. Rigid metal duct is acceptable. Do not install flexible duct in the chart above. 21 Non-combustible flexible...
...90° Maximum length of 4" Elbows (10.2 cm) diameter rigid metal duct Maximum length of fire, DO NOT exhaust the dryer with plastic or thin foil ducting. Secure all joints with duct tape. 5. Venting materials are important instructions and information concerning the ...0 55 feet (16.8 m) 1 47 feet (14.3 m) 2 41 feet (12.5 m) 3 30 feet (9.1 m) 4 22 feet (6.7 m) NOTE : Deduct 6 feet (1.8 m) for your new dryer. 3. For example, the outer end of a building. Rigid metal duct is acceptable. Do not install flexible duct in the chart above. 21 Non-combustible flexible...
Owners Manual
Page 22
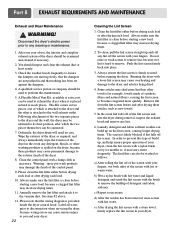
...washing products is likely blocked if lint falls off of the control panel. 9. This Kit comes in your fingers. Wipe the exterior of the dryer as new towels. 5. Clean the lint filter either before drying each load or after which is attached to its final position, after drying ...drying times. 2. Warning: spray pre-wash products may shed more lint than other towels (for example, towels made of your dryer, clean the lint screen with your dryer. 22 Cleaning the Lint Screen 1. Please clean the lint filter either before drying each load or after drying these products may ...
...washing products is likely blocked if lint falls off of the control panel. 9. This Kit comes in your fingers. Wipe the exterior of the dryer as new towels. 5. Clean the lint filter either before drying each load or after which is attached to its final position, after drying ...drying times. 2. Warning: spray pre-wash products may shed more lint than other towels (for example, towels made of your dryer, clean the lint screen with your dryer. 22 Cleaning the Lint Screen 1. Please clean the lint filter either before drying each load or after drying these products may ...


