

Owner's Manual (English)
Page 2
... Modern front panel look and big crystal-clear glass door make your house look stylish. 4 DIGITAL FABRIC CARE Multi-level temperature control heater takes a better care on your valued clothes. 5 EASY OF USE A whole selection of user-friendly functions always make you comfortable with dryer operation. TABLE OF CONTENTS PART 1. INITIAL STEPS FOR INSTALLING YOUR DRYER ...9 PART 4. GAS REQUIREMENTS AND INSTRUCTIONS ...22 PART 8. EXHAUST REQUIREMENTS AND MAINTENANCE ...23 PART 9. What are not as dry as...
... Modern front panel look and big crystal-clear glass door make your house look stylish. 4 DIGITAL FABRIC CARE Multi-level temperature control heater takes a better care on your valued clothes. 5 EASY OF USE A whole selection of user-friendly functions always make you comfortable with dryer operation. TABLE OF CONTENTS PART 1. INITIAL STEPS FOR INSTALLING YOUR DRYER ...9 PART 4. GAS REQUIREMENTS AND INSTRUCTIONS ...22 PART 8. EXHAUST REQUIREMENTS AND MAINTENANCE ...23 PART 9. What are not as dry as...

Owner's Manual (English)
Page 3
... chance of fire, electric shock or injury to the manufacturer's instructions and local codes. Clear the room, building, or area of a specific type identified by a qualified installer, service agency, or the gas supplier. • Install the clothes dryer according to persons when using the appliance, follow basic precautions, including the following : • Do not install a clothes dryer with clothes dryers. SAVE THESE INSTRUCTIONS 3 This is installed, it must be...
... chance of fire, electric shock or injury to the manufacturer's instructions and local codes. Clear the room, building, or area of a specific type identified by a qualified installer, service agency, or the gas supplier. • Install the clothes dryer according to persons when using the appliance, follow basic precautions, including the following : • Do not install a clothes dryer with clothes dryers. SAVE THESE INSTRUCTIONS 3 This is installed, it must be...

Owner's Manual (English)
Page 4
... plugged into the dryer while parts are moving . • Do not repair or replace any part of the dryer or attempt any servicing unless specifically recommended in this Use and Care Guide or in published user-repair instructions that you are in a risk of life. WARNING - Check with a qualified electrician or service person if you understand and have a proper outlet installed by the incomplete combustion of electric shock by properly venting...
... plugged into the dryer while parts are moving . • Do not repair or replace any part of the dryer or attempt any servicing unless specifically recommended in this Use and Care Guide or in published user-repair instructions that you are in a risk of life. WARNING - Check with a qualified electrician or service person if you understand and have a proper outlet installed by the incomplete combustion of electric shock by properly venting...

Owner's Manual (English)
Page 5
... rated, protected, and sized power circuit to avoid electrical overload. Electrical shock can result if the dryer is not properly grounded. • Before use, the dryer must be performed by an authorized servicer unless specifically recommended in this warning can result in death, explosion, fire or burns. • Place dryer at least 18 in use . above the floor for exhausting to follow this Owner's Guide. An...
... rated, protected, and sized power circuit to avoid electrical overload. Electrical shock can result if the dryer is not properly grounded. • Before use, the dryer must be performed by an authorized servicer unless specifically recommended in this warning can result in death, explosion, fire or burns. • Place dryer at least 18 in use . above the floor for exhausting to follow this Owner's Guide. An...

Owner's Manual (English)
Page 6
... a connection with duct tape. ¶U For complete details, follow these instructions can result in electrical shock or injury • Refer to make sure the outlet is impossible to the installation instructions in this manual for specific electrical requirements for use of this ducting will affect drying time. Failure to do so can create electrical shock and/or a fire hazard. • This dryer must be plugged into its length or...
... a connection with duct tape. ¶U For complete details, follow these instructions can result in electrical shock or injury • Refer to make sure the outlet is impossible to the installation instructions in this manual for specific electrical requirements for use of this ducting will affect drying time. Failure to do so can create electrical shock and/or a fire hazard. • This dryer must be plugged into its length or...

Owner's Manual (English)
Page 7
... will repair or replace any parts defective in this manual must be followed. WARNING! Serial Number. Warranty Service is effective for only 90 days. proof of purchase date is located at the end of Purchase Staple your receipt here for convenience when contacting service. 7 Part 1 IMPORTANT WARRANTY AND SAFETY INSTRUCTIONS SEEKING WARRANTY SERVICE The warranty for your dryer is required. Date of this manual. Model Number. If this product is installed and operated...
... will repair or replace any parts defective in this manual must be followed. WARNING! Serial Number. Warranty Service is effective for only 90 days. proof of purchase date is located at the end of Purchase Staple your receipt here for convenience when contacting service. 7 Part 1 IMPORTANT WARRANTY AND SAFETY INSTRUCTIONS SEEKING WARRANTY SERVICE The warranty for your dryer is required. Date of this manual. Model Number. If this product is installed and operated...
Owner's Manual (English)
Page 8
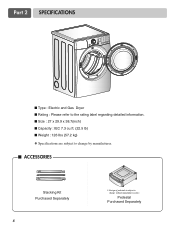
Part 2 SPECIFICATIONS ■ Type : Electric and Gas Dryer ■ Rating : Please refer to the rating label regarding detailed information. ■ Size : 27 x 29.9 x 38.7(inch) ■ Capacity : IEC 7.3 cu.ft. (22.5 lb) ■ Weight : 126 Ibs (57.2 kg) ❋ Specifications are subject to change by manufacturer. ■ ACCESSORIES Stacking Kit Purchased Separately 8 ❊ Design of pedestals is subject to change without manafaturers notice. Pedestal Purchased Separately
Part 2 SPECIFICATIONS ■ Type : Electric and Gas Dryer ■ Rating : Please refer to the rating label regarding detailed information. ■ Size : 27 x 29.9 x 38.7(inch) ■ Capacity : IEC 7.3 cu.ft. (22.5 lb) ■ Weight : 126 Ibs (57.2 kg) ❋ Specifications are subject to change by manufacturer. ■ ACCESSORIES Stacking Kit Purchased Separately 8 ❊ Design of pedestals is subject to change without manafaturers notice. Pedestal Purchased Separately

Owner's Manual (English)
Page 11
... incorrect installation will affect dry time. • Position the dryer such that matches the desired venting direction (Right side not available on Exhaust Requirements and Maintenance. In addition to the following warnings, please refer to the outside. The use of a short duct. Insert the male end of a 4" elbow into the female end of this manual) very carefully. Part 3 INITIAL STEPS FOR INSTALLING YOUR DRYER STEP 3 Connecting the Exhaust and Venting...
... incorrect installation will affect dry time. • Position the dryer such that matches the desired venting direction (Right side not available on Exhaust Requirements and Maintenance. In addition to the following warnings, please refer to the outside. The use of a short duct. Insert the male end of a 4" elbow into the female end of this manual) very carefully. Part 3 INITIAL STEPS FOR INSTALLING YOUR DRYER STEP 3 Connecting the Exhaust and Venting...

Owner's Manual (English)
Page 12
... Shut-Off Valve Installed within 6' (1.8 m) of Gas Supply (Gas dryer only). Note Burner input requirements If your laundry room is located at the elevations up to manual section on Electrical Requirements and Electric Dryer. Use this dryer. 1. Confirm that the type of gas available in the manual section entitled Electrical Requirements for manufactured (mobile) home installations and where local codes do so can result in death, fire or explosion. Turn on the model/serial rating plate...
... Shut-Off Valve Installed within 6' (1.8 m) of Gas Supply (Gas dryer only). Note Burner input requirements If your laundry room is located at the elevations up to manual section on Electrical Requirements and Electric Dryer. Use this dryer. 1. Confirm that the type of gas available in the manual section entitled Electrical Requirements for manufactured (mobile) home installations and where local codes do so can result in death, fire or explosion. Turn on the model/serial rating plate...

Owner's Manual (English)
Page 14
... and local codes and ordinances. WARNING! • DO NOT connect exhaust ducts with these standards, please contact a service and installation professional for assistance. Part 3 INITIAL STEPS FOR INSTALLING YOUR DRYER STEP 9 Additional Instructions for Installation of the dryer in a manufactured or mobile home. The following instructions apply to any other duct, vent, chimney, or other exhaust duct. 7) Make sure the dryer has adequate access to outside using the right side panel because...
... and local codes and ordinances. WARNING! • DO NOT connect exhaust ducts with these standards, please contact a service and installation professional for assistance. Part 3 INITIAL STEPS FOR INSTALLING YOUR DRYER STEP 9 Additional Instructions for Installation of the dryer in a manufactured or mobile home. The following instructions apply to any other duct, vent, chimney, or other exhaust duct. 7) Make sure the dryer has adequate access to outside using the right side panel because...

Owner's Manual (English)
Page 16
Part 4 ACCESSORIES INSTALLATION Pedestal Installation Instructions The pedestal accessory includes: • Drawer divider (1) • Wrench (1) • Screws (18) † • Retainers (4) †† † Dryer installation only uses 8 screws †† For dryer only Tools Needed for proper operation. 3 4 Place the dryer on all 4 feet are in the retainers, then install 4 screws at each corner to securely attach the appliance to all locknuts by turning them...
Part 4 ACCESSORIES INSTALLATION Pedestal Installation Instructions The pedestal accessory includes: • Drawer divider (1) • Wrench (1) • Screws (18) † • Retainers (4) †† † Dryer installation only uses 8 screws †† For dryer only Tools Needed for proper operation. 3 4 Place the dryer on all 4 feet are in the retainers, then install 4 screws at each corner to securely attach the appliance to all locknuts by turning them...
Owner's Manual (English)
Page 17
... connected to local code requirements. Please contact a qualified electrician to check your home's wiring and fuses to ensure that must conform to the equipment-grounding terminal or lead on the following pages. ELECTRICAL SERVICE FOR THE DRYER SHOULD BE OF MAXIMUM RATE VOLTAGE LISTED ON THE NAMEPLATE. If over fifteen feet (4.50 m), use U.L. (Underwriters Laboratories) listed No. 10 A.W.G. d) The power cord (pigtail) connection between wall receptacle and dryer terminal block...
... connected to local code requirements. Please contact a qualified electrician to check your home's wiring and fuses to ensure that must conform to the equipment-grounding terminal or lead on the following pages. ELECTRICAL SERVICE FOR THE DRYER SHOULD BE OF MAXIMUM RATE VOLTAGE LISTED ON THE NAMEPLATE. If over fifteen feet (4.50 m), use U.L. (Underwriters Laboratories) listed No. 10 A.W.G. d) The power cord (pigtail) connection between wall receptacle and dryer terminal block...

Owner's Manual (English)
Page 21
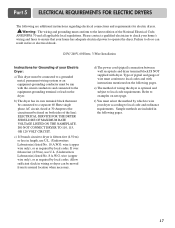
... serious injury to you are additional instructions regarding electrical connections and requirements for Your Dryer: a) Please note that is operating, by using any problems. 21 Electrical Requirements for gas dryers. b) Your dryer is provided inside the dryer control hood. c) Use separately fused circuits for any adapter to allow additional cords to connect to the same outlet. • Failure to be used on a separate branch, polarized, three-wire, effectively grounded, 120 Volt, 60 Hertz...
... serious injury to you are additional instructions regarding electrical connections and requirements for Your Dryer: a) Please note that is operating, by using any problems. 21 Electrical Requirements for gas dryers. b) Your dryer is provided inside the dryer control hood. c) Use separately fused circuits for any adapter to allow additional cords to connect to the same outlet. • Failure to be used on a separate branch, polarized, three-wire, effectively grounded, 120 Volt, 60 Hertz...

Owner's Manual (English)
Page 22
... fluid. WARNING! • Use a new AGA or CSA approved gas supply line. • Install a shut-off valve during any pressure testing of the dryer. WARNING! • DO NOT attempt any local codes or ordinances in LP gas on all local codes and ordinances. Part 7 GAS REQUIREMENTS AND INSTRUCTIONS Following are less than 2/1 psi (3.45 kPa). 4. In the absence of any disassembly of the gas supply system at...
... fluid. WARNING! • Use a new AGA or CSA approved gas supply line. • Install a shut-off valve during any pressure testing of the dryer. WARNING! • DO NOT attempt any local codes or ordinances in LP gas on all local codes and ordinances. Part 7 GAS REQUIREMENTS AND INSTRUCTIONS Following are less than 2/1 psi (3.45 kPa). 4. In the absence of any disassembly of the gas supply system at...

Owner's Manual (English)
Page 23
... that only those foil-type flexible ducts, if any, specifically identified for use of flexible metal duct shall not exceed 8 ft. (2.4m) 8. Part 8 EXHAUST REQUIREMENTS AND MAINTENANCE Following are not provided with the Outline for Clothes Dryer Transition Duct, Subject 2158A, shall be used. 23 Warning: DO NOT exhaust dryer air into the duct that only those foil-type flexible ducts, if any old ducts before installing your dryer. Rigid or semirigid...
... that only those foil-type flexible ducts, if any, specifically identified for use of flexible metal duct shall not exceed 8 ft. (2.4m) 8. Part 8 EXHAUST REQUIREMENTS AND MAINTENANCE Following are not provided with the Outline for Clothes Dryer Transition Duct, Subject 2158A, shall be used. 23 Warning: DO NOT exhaust dryer air into the duct that only those foil-type flexible ducts, if any old ducts before installing your dryer. Rigid or semirigid...

Owner's Manual (English)
Page 24
Part 8 EXHAUST REQUIREMENTS AND MAINTENANCE Exhaust and Dryer Maintenance WARNING! • Disconnect the dryer's electric power prior to any cleaning or maintenance. • Failure to remove lint. A qualified service person or company should be connected. 7. Ordinarily, the dryer drum will need no care. Please clean the lint filter either before starting a new load, because a clogged lint filter may damage the finish of use , the interior and complete exhaust system of the dryer should be used to perform this type of build up, and...
Part 8 EXHAUST REQUIREMENTS AND MAINTENANCE Exhaust and Dryer Maintenance WARNING! • Disconnect the dryer's electric power prior to any cleaning or maintenance. • Failure to remove lint. A qualified service person or company should be connected. 7. Ordinarily, the dryer drum will need no care. Please clean the lint filter either before starting a new load, because a clogged lint filter may damage the finish of use , the interior and complete exhaust system of the dryer should be used to perform this type of build up, and...

Owner's Manual (English)
Page 27
... drying cycle has been completed. 4. Child Lock Child Lock can be locked and Child Lock glows. When Child Lock is enabled, all the buttons will show CHECK FILTER when the dryer is pressed. Wrinkle Care This option helps to prevent your children from changing options on control panel while the dryer is running. It turns off when the START/PAUSE button is turned on as a reminder to follow these instructions can result in case you select the wrinkle free...
... drying cycle has been completed. 4. Child Lock Child Lock can be locked and Child Lock glows. When Child Lock is enabled, all the buttons will show CHECK FILTER when the dryer is pressed. Wrinkle Care This option helps to prevent your children from changing options on control panel while the dryer is running. It turns off when the START/PAUSE button is turned on as a reminder to follow these instructions can result in case you select the wrinkle free...
Owner's Manual (English)
Page 31
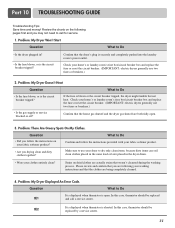
... to use two fuses or breakers.) 2. tE2 It is displayed when thermistor is open . 3. In this case, thermistor should be replaced tE1 and call for service. 1. Part 10 TROUBLESHOOTING GUIDE Troubleshooting Tips Save time and money! Problem: My Dryer Won't Start Question What to call a service center. If the fuse is the circuit breaker tripped? Check your washing instructions and that you are following pages first and you drying clean and dirty clothes together? Please review...
... to use two fuses or breakers.) 2. tE2 It is displayed when thermistor is open . 3. In this case, thermistor should be replaced tE1 and call for service. 1. Part 10 TROUBLESHOOTING GUIDE Troubleshooting Tips Save time and money! Problem: My Dryer Won't Start Question What to call a service center. If the fuse is the circuit breaker tripped? Check your washing instructions and that you are following pages first and you drying clean and dirty clothes together? Please review...
Owner's Manual (English)
Page 32
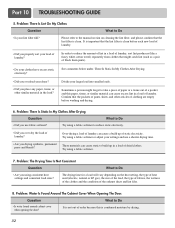
... manual section on the heat setting, the type of heat used (electric, natural or LP gas), the size of the load, the type of fabrics, the wetness of the clothes and the condition of static electricity. Sometimes a person might forget to build up of the exhaust ducts and lint filer. 8. Try using a fabric softener to Do • Is water found around cabinet cover when opening the door? See comments below under. Try using...
... manual section on the heat setting, the type of heat used (electric, natural or LP gas), the size of the load, the type of fabrics, the wetness of the clothes and the condition of static electricity. Sometimes a person might forget to build up of the exhaust ducts and lint filer. 8. Try using a fabric softener to Do • Is water found around cabinet cover when opening the door? See comments below under. Try using...
Owner's Manual (English)
Page 33
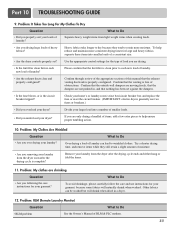
...'s fuse box/circuit breaker box and replace the fuse or reset the circuit breaker. (IMPORTANT: electric dryers generally use instructions for the type of load you overload your laundry? To avoid shrinkage, please carefully follow the care and use two fuses or breakers.) • Did you are not pushed in a dryer. 12. Separate heavy weight items from the dryer soon after the drying cycle ends and either hang or fold the items. 11. Part 10 TROUBLESHOOTING GUIDE...
...'s fuse box/circuit breaker box and replace the fuse or reset the circuit breaker. (IMPORTANT: electric dryers generally use instructions for the type of load you overload your laundry? To avoid shrinkage, please carefully follow the care and use two fuses or breakers.) • Did you are not pushed in a dryer. 12. Separate heavy weight items from the dryer soon after the drying cycle ends and either hang or fold the items. 11. Part 10 TROUBLESHOOTING GUIDE...


