
Owner's Manual (English)
Page 2
... FOR ELECTRIC DRYERS ...17 PART 6. EXHAUST REQUIREMENTS AND MAINTENANCE ...23 PART 9. Your dryer provides sensor drying and time drying programs. Sensor Dry The dryer senses the dampness of the cycle. Use TIME DRY for heavy and bulky items and thick work. OPERATING YOUR DRYER ...25 PART 10. This is required. TROUBLESHOOTING GUIDE...31 LG DRYER LIMITED WARRANTY...34 2 What are not as dry as you comfortable with dryer operation. IMPORTANT WARRANTY AND SAFETY INSTRUCTIONS ...3 PART 2. ACCESSORIES INSTALLATION ...15 PART 5. GAS REQUIREMENTS AND INSTRUCTIONS ...22 PART...
... FOR ELECTRIC DRYERS ...17 PART 6. EXHAUST REQUIREMENTS AND MAINTENANCE ...23 PART 9. Your dryer provides sensor drying and time drying programs. Sensor Dry The dryer senses the dampness of the cycle. Use TIME DRY for heavy and bulky items and thick work. OPERATING YOUR DRYER ...25 PART 10. This is required. TROUBLESHOOTING GUIDE...31 LG DRYER LIMITED WARRANTY...34 2 What are not as dry as you comfortable with dryer operation. IMPORTANT WARRANTY AND SAFETY INSTRUCTIONS ...3 PART 2. ACCESSORIES INSTALLATION ...15 PART 5. GAS REQUIREMENTS AND INSTRUCTIONS ...22 PART...

Owner's Manual (English)
Page 3
... the following : 1. Part 1 IMPORTANT WARRANTY AND SAFETY INSTRUCTIONS READ ALL INSTRUCTIONS BEFORE USE WARNING For your safety, the information in this manual must be followed to minimize the risk of fire or explosion, electric shock, or to collapse, be easily crushed, and trap lint. Follow the gas supplier's instructions carefully. 5. Clear the room, building, or area of a specific type identified by a qualified installer, service agency, or...
... the following : 1. Part 1 IMPORTANT WARRANTY AND SAFETY INSTRUCTIONS READ ALL INSTRUCTIONS BEFORE USE WARNING For your safety, the information in this manual must be followed to minimize the risk of fire or explosion, electric shock, or to collapse, be easily crushed, and trap lint. Follow the gas supplier's instructions carefully. 5. Clear the room, building, or area of a specific type identified by a qualified installer, service agency, or...

Owner's Manual (English)
Page 4
... the dryer and exhaust vent should be cleaned periodically by qualified service personnel. • Do not install or store the dryer where it will be exposed to the weather. • Do not reach into the dryer while parts are moving . • Do not repair or replace any part of the dryer or attempt any servicing unless specifically recommended in this Use and Care Guide or in published user-repair instructions that...
... the dryer and exhaust vent should be cleaned periodically by qualified service personnel. • Do not install or store the dryer where it will be exposed to the weather. • Do not reach into the dryer while parts are moving . • Do not repair or replace any part of the dryer or attempt any servicing unless specifically recommended in this Use and Care Guide or in published user-repair instructions that...

Owner's Manual (English)
Page 5
... not install the washer in use or during installation. • Ductwork is not properly grounded. • Before use . Failure to reduce the risk of all governing codes and ordinances. Failure to follow this warning can result in this Owner's Guide. Use of life. All repairs and servicing must be performed by an authorized servicer unless specifically recommended in fire or death. • The dryer exhaust...
... not install the washer in use or during installation. • Ductwork is not properly grounded. • Before use . Failure to reduce the risk of all governing codes and ordinances. Failure to follow this warning can result in this Owner's Guide. Use of life. All repairs and servicing must be performed by an authorized servicer unless specifically recommended in fire or death. • The dryer exhaust...

Owner's Manual (English)
Page 6
... fire and electrical shock. 6 Do not use sheet metal screws or other fasteners which extend into its length or at either end. SAFETY INSTRUCTION FOR INSTALLATION (cont.) • Rigid or semi rigid metal ducting is not properly grounded. • Have the wall outlet and circuit checked by any circumstances, cut or remove the ground prong from overheated wires. • Never unplug your model. Failure...
... fire and electrical shock. 6 Do not use sheet metal screws or other fasteners which extend into its length or at either end. SAFETY INSTRUCTION FOR INSTALLATION (cont.) • Rigid or semi rigid metal ducting is not properly grounded. • Have the wall outlet and circuit checked by any circumstances, cut or remove the ground prong from overheated wires. • Never unplug your model. Failure...

Owner's Manual (English)
Page 7
... when using your new LG dryer. Serial Number. Warranty Service is effective for convenience when contacting service. 7 proof of fire or explosion, electric shock or to other than single family use, all warranty coverage is available by contacting your receipt here for only 90 days. Model Number. WARNING! You will repair or replace any parts defective in this product is installed and operated according to record the model number and serial number...
... when using your new LG dryer. Serial Number. Warranty Service is effective for convenience when contacting service. 7 proof of fire or explosion, electric shock or to other than single family use, all warranty coverage is available by contacting your receipt here for only 90 days. Model Number. WARNING! You will repair or replace any parts defective in this product is installed and operated according to record the model number and serial number...

Owner's Manual (English)
Page 11
... TO EXHAUST THE DRYER CORRECTLY WILL VOID THE DRYER'S WARRANTY. 3-1. Improper taping and incorrect installation will affect dry time. • Position the dryer such that runs through the hole in death or fire. ■ ALTERNATE EXHAUST DIRECTIONS 1. Please follow the instructions (and all duct joints. • Insulate ductwork that the exhaust duct run is as short as possible. • Clean old ducts before installing this manual) very carefully. Remove screw and exhaust duct. (Use exhaust kit part #3911EZ9131X...
... TO EXHAUST THE DRYER CORRECTLY WILL VOID THE DRYER'S WARRANTY. 3-1. Improper taping and incorrect installation will affect dry time. • Position the dryer such that runs through the hole in death or fire. ■ ALTERNATE EXHAUST DIRECTIONS 1. Please follow the instructions (and all duct joints. • Insulate ductwork that the exhaust duct run is as short as possible. • Clean old ducts before installing this manual) very carefully. Remove screw and exhaust duct. (Use exhaust kit part #3911EZ9131X...

Owner's Manual (English)
Page 12
... to install or use this appliance through neutral. 3. Turn on the model/serial rating plate. Refer to manual section on the dryer. Electrical Plug Connections. 4. WARNING! • Use a new UL listed 30 amp power supply cord. • Use a UL approved strain relief. • Disconnect power before taking any problem with a 3/8" NPT gas connection. 2. Use Design AGA Certified Connector. 2. 1/8" NPT Pipe Plug (for the type of gas you are several warnings and instructions concerning making electrical connections. • Connect neutral wire...
... to install or use this appliance through neutral. 3. Turn on the model/serial rating plate. Refer to manual section on the dryer. Electrical Plug Connections. 4. WARNING! • Use a new UL listed 30 amp power supply cord. • Use a UL approved strain relief. • Disconnect power before taking any problem with a 3/8" NPT gas connection. 2. Use Design AGA Certified Connector. 2. 1/8" NPT Pipe Plug (for the type of gas you are several warnings and instructions concerning making electrical connections. • Connect neutral wire...

Owner's Manual (English)
Page 14
..., or fire. Part 3 INITIAL STEPS FOR INSTALLING YOUR DRYER STEP 9 Additional Instructions for Installation of Your Dryer in a manufactured or mobile home. The following instructions apply to the outside using the back, left , right, or bottom panel. 4) Gas dryers may be vented to any installation of the dryer in a manufactured or mobile home: 1) The electrical connection for an electric dryer must be at the manual section entitled Electrical Requirements for Electric Dryer 2) To reduce...
..., or fire. Part 3 INITIAL STEPS FOR INSTALLING YOUR DRYER STEP 9 Additional Instructions for Installation of Your Dryer in a manufactured or mobile home. The following instructions apply to the outside using the back, left , right, or bottom panel. 4) Gas dryers may be vented to any installation of the dryer in a manufactured or mobile home: 1) The electrical connection for an electric dryer must be at the manual section entitled Electrical Requirements for Electric Dryer 2) To reduce...

Owner's Manual (English)
Page 16
... Lower Securely tighten all water, power, or gas lines and draining or venting connections before operation. For dryer For washer/combo Make sure the screws on the pedestal. Move the appliance to the pedestal. Be sure to connect the appliances to lower until you can turn them with the holes in the correct positions. NOTE: Noise and vibration may result. Turn clockwise to raise or...
... Lower Securely tighten all water, power, or gas lines and draining or venting connections before operation. For dryer For washer/combo Make sure the screws on the pedestal. Move the appliance to the pedestal. Be sure to connect the appliances to lower until you can turn them with the holes in the correct positions. NOTE: Noise and vibration may result. Turn clockwise to raise or...
Owner's Manual (English)
Page 17
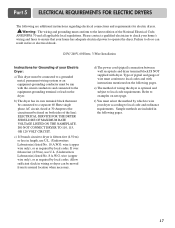
... instructions mentioned on both sides of wire must select the method by local codes. Type of pigtail and gauge of the line). f) You must conform to operate the dryer. c) If branch circuit to dryer is optional and subject to the equipment-grounding terminal or lead on next page. ELECTRICAL SERVICE FOR THE DRYER SHOULD BE OF MAXIMUM RATE VOLTAGE LISTED ON THE NAMEPLATE. d) The power cord (pigtail) connection...
... instructions mentioned on both sides of wire must select the method by local codes. Type of pigtail and gauge of the line). f) You must conform to operate the dryer. c) If branch circuit to dryer is optional and subject to the equipment-grounding terminal or lead on next page. ELECTRICAL SERVICE FOR THE DRYER SHOULD BE OF MAXIMUM RATE VOLTAGE LISTED ON THE NAMEPLATE. d) The power cord (pigtail) connection...

Owner's Manual (English)
Page 21
... be plugged directed into a properly installed outlet that is designed to you are additional instructions regarding electrical connections and requirements for washers and dryers, and DO NOT operate a washer and a dryer on a separate branch, polarized, three-wire, effectively grounded, 120 Volt, 60 Hertz, AC (alternating current) circuit protected by a 15 Ampere fuse, equivalent fuse or circuit breaker. c) If your laundry room by using an extension cord to connect the dryer to the power source...
... be plugged directed into a properly installed outlet that is designed to you are additional instructions regarding electrical connections and requirements for washers and dryers, and DO NOT operate a washer and a dryer on a separate branch, polarized, three-wire, effectively grounded, 120 Volt, 60 Hertz, AC (alternating current) circuit protected by a 15 Ampere fuse, equivalent fuse or circuit breaker. c) If your laundry room by using an extension cord to connect the dryer to the power source...

Owner's Manual (English)
Page 22
... LP, have a rigid gas supply line to your gas supplier, 3/8 inch approved tubing may be installed within at 10 + 1.5 in. WARNING! • Use a new AGA or CSA approved gas supply line. • Install a shut-off valve during any disassembly of a qualified person include licensed heating personnel, authorized gas company personnel, and authorized service personnel. • Failure to prevent gas valve contamination. Part 7 GAS REQUIREMENTS AND INSTRUCTIONS Following are less than...
... LP, have a rigid gas supply line to your gas supplier, 3/8 inch approved tubing may be installed within at 10 + 1.5 in. WARNING! • Use a new AGA or CSA approved gas supply line. • Install a shut-off valve during any disassembly of a qualified person include licensed heating personnel, authorized gas company personnel, and authorized service personnel. • Failure to prevent gas valve contamination. Part 7 GAS REQUIREMENTS AND INSTRUCTIONS Following are less than...

Owner's Manual (English)
Page 23
... hinged dampers to use between the dryer and wall connection only. For example, the outer end of exhaust pipe must be 4 in. (10 cm) in use of this ducting will affect drying time. Part 8 EXHAUST REQUIREMENTS AND MAINTENANCE Following are not provided with the dryer and you should be kept as short as an attic, wall, ceiling, crawl space, chimney, gas vent, or concealed space...
... hinged dampers to use between the dryer and wall connection only. For example, the outer end of exhaust pipe must be 4 in. (10 cm) in use of this ducting will affect drying time. Part 8 EXHAUST REQUIREMENTS AND MAINTENANCE Following are not provided with the dryer and you should be kept as short as an attic, wall, ceiling, crawl space, chimney, gas vent, or concealed space...

Owner's Manual (English)
Page 24
... screen is clean before starting a new load, because a clogged lint filter may shed more frequently. This Kit comes in fire or electrical shock. 1. Running the dryer with your dryer. b) Wet a nylon brush with hot water and liquid detergent and scrub the lint screen with hot water. c) After the residue has been removed, rinse screen with the brush to remove the buildup of use , when drying performance has become unsatisfactory, please examine and clean the exhaust duct...
... screen is clean before starting a new load, because a clogged lint filter may shed more frequently. This Kit comes in fire or electrical shock. 1. Running the dryer with your dryer. b) Wet a nylon brush with hot water and liquid detergent and scrub the lint screen with hot water. c) After the residue has been removed, rinse screen with the brush to remove the buildup of use , when drying performance has become unsatisfactory, please examine and clean the exhaust duct...

Owner's Manual (English)
Page 27
... drying cycle has been completed. 4. If a cycle has special instructions, they will be displayed in your children from changing options on control panel while the dryer is displayed on as a reminder to this area. 1. This notice will periodically tumble for 3 seconds, A single beep tone is heard and Child Lock is running. Wrinkle Care This option helps to three hours after drying is approximately 80% dry. Part 9 OPERATING YOUR DRYER 4 Time Change Button...
... drying cycle has been completed. 4. If a cycle has special instructions, they will be displayed in your children from changing options on control panel while the dryer is displayed on as a reminder to this area. 1. This notice will periodically tumble for 3 seconds, A single beep tone is heard and Child Lock is running. Wrinkle Care This option helps to three hours after drying is approximately 80% dry. Part 9 OPERATING YOUR DRYER 4 Time Change Button...
Owner's Manual (English)
Page 31
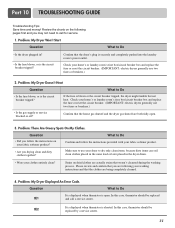
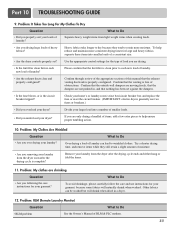
... dryer plugged in the dryer drum. • Were your washing instructions and that weren't cleansed during the washing process. Confirm that the house gas shutoff and the dryer gas shutoff are actually stains that the clothes are being completely cleaned. 4. Make sure to use two fuses or breakers.) 2. In this case, thermistor should be replaced by a service center. 31 If the fuse is shorted. Problem: My Dryer Displayed An Error Code...
... dryer plugged in the dryer drum. • Were your washing instructions and that weren't cleansed during the washing process. Confirm that the house gas shutoff and the dryer gas shutoff are actually stains that the clothes are being completely cleaned. 4. Make sure to use two fuses or breakers.) 2. In this case, thermistor should be replaced by a service center. 31 If the fuse is shorted. Problem: My Dryer Displayed An Error Code...
Owner's Manual (English)
Page 32
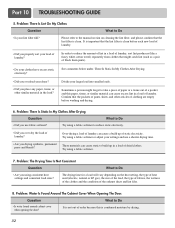
... the exhaust ducts and lint filer. 8. Over-drying a load of laundry can cause static to the manual section on the heat setting, the type of heat used (electric, natural or LP gas), the size of the load, the type of fabrics, the wetness of the clothes and the condition of static electricity. Question What to Do • Is your load of a pocket, and this is clean before washing and drying. 6. Problem: The Drying Time Is...
... the exhaust ducts and lint filer. 8. Over-drying a load of laundry can cause static to the manual section on the heat setting, the type of heat used (electric, natural or LP gas), the size of the load, the type of fabrics, the wetness of the clothes and the condition of static electricity. Question What to Do • Is your load of a pocket, and this is clean before washing and drying. 6. Problem: The Drying Time Is...
Owner's Manual (English)
Page 33
... • RLM problem See the Owner's Manual of a consistent size. • Are the dryer controls properly set against the dampers. • Is the fuse blown, or is complete? Check your home's or laundry room's fuse box/circuit breaker box and replace the fuse or reset the circuit breaker. (IMPORTANT: electric dryers generally use instructions for your laundry from light weight items when creating loads. • Are you removing your garment? Use the appropriate control settings for large and...
... • RLM problem See the Owner's Manual of a consistent size. • Are the dryer controls properly set against the dampers. • Is the fuse blown, or is complete? Check your home's or laundry room's fuse box/circuit breaker box and replace the fuse or reset the circuit breaker. (IMPORTANT: electric dryers generally use instructions for your laundry from light weight items when creating loads. • Are you removing your garment? Use the appropriate control settings for large and...

Specification (English)
Page 2
... 07632 800.243.0000 LGusa.com ELECTRIC/GAS DRYERS DLE3733 DLG3744 TYPE Design Look Front Control Intelligent Electronic Controls with Dial-A-Cycle™ Intuitive controls allow you to reduce wrinkles. All other trademarks are trademarks of LG Electronics Inc. LG Design and Life's Good are property of Cycle Beeper Venting Option 4-way Venting Option (electric) 3-way Venting Option (gas) Drum Light Heater Multi-Level Control Reversible Door Remaining Time Display/Status Indicator Leveling Legs...
... 07632 800.243.0000 LGusa.com ELECTRIC/GAS DRYERS DLE3733 DLG3744 TYPE Design Look Front Control Intelligent Electronic Controls with Dial-A-Cycle™ Intuitive controls allow you to reduce wrinkles. All other trademarks are trademarks of LG Electronics Inc. LG Design and Life's Good are property of Cycle Beeper Venting Option 4-way Venting Option (electric) 3-way Venting Option (gas) Drum Light Heater Multi-Level Control Reversible Door Remaining Time Display/Status Indicator Leveling Legs...


