
Owners Manual
Page 1
L _mpletamente AuIomAti_ _. Retain it for buying an LG dryer. cuidado_mente, ya que bre la _ura instalaci6n, manejo futuras refe4_encias,archive secadora. DLE5911W DLE2511W DLG5911W DLG2511W andGasD Thank you for fialure reference and record the model and serial Jm_rs of your owner's manual carefully, as it provides instructions on safe installation, use, and maintenance. Please read your dryer.
L _mpletamente AuIomAti_ _. Retain it for buying an LG dryer. cuidado_mente, ya que bre la _ura instalaci6n, manejo futuras refe4_encias,archive secadora. DLE5911W DLE2511W DLG5911W DLG2511W andGasD Thank you for fialure reference and record the model and serial Jm_rs of your owner's manual carefully, as it provides instructions on safe installation, use, and maintenance. Please read your dryer.
Owners Manual
Page 2
...MAiN • TENANCE ...2..2 FEATURES AND BENEFITS ... 23 TROUBLESHOOTING TIPS ... _-_ BEFORE YOU CALL FOR SERVICE ... 28 CUSTOMER SERVICE ... _-31 SERVICE TELEPHONE NUMBER ... 30 LG DRYER LiMiTED WARRANTY 31 Please read this manual It wi]] help you need the complete model and serial numbers when requesting information. Your dryer's model... are located on the Mode] and Seria] Number Plate. You will need more information about the care and operation of Purchase 2 LG SERVICE Call : 1-877-714-7486 Use the space below to record the model number and seria] number of your new...
...MAiN • TENANCE ...2..2 FEATURES AND BENEFITS ... 23 TROUBLESHOOTING TIPS ... _-_ BEFORE YOU CALL FOR SERVICE ... 28 CUSTOMER SERVICE ... _-31 SERVICE TELEPHONE NUMBER ... 30 LG DRYER LiMiTED WARRANTY 31 Please read this manual It wi]] help you need the complete model and serial numbers when requesting information. Your dryer's model... are located on the Mode] and Seria] Number Plate. You will need more information about the care and operation of Purchase 2 LG SERVICE Call : 1-877-714-7486 Use the space below to record the model number and seria] number of your new...

Owners Manual
Page 3
JI Do not store or u_ gasoline or other flammable vapors and liquids in this or any electrical switches. ProF_rly adjustcd drycrs will minimize combustion. ALL INSTFIJ ONS I:E UgNG. Do not use any phone in your mfety, tl_ tions in the vicinity of thcse subs|rances, namely benzene, carbon monoxide, fonnaldehyde and _)ol, cau_:d primarily by Ox)perly venting _le dqer to the outdoors. 3 JI Clear the room, building or area of all il Immediately call the fire departmenL rnia Safe Drinking _lter and Ibxic ement Act This act rcquircs the governor of California u) publish a list of...
JI Do not store or u_ gasoline or other flammable vapors and liquids in this or any electrical switches. ProF_rly adjustcd drycrs will minimize combustion. ALL INSTFIJ ONS I:E UgNG. Do not use any phone in your mfety, tl_ tions in the vicinity of thcse subs|rances, namely benzene, carbon monoxide, fonnaldehyde and _)ol, cau_:d primarily by Ox)perly venting _le dqer to the outdoors. 3 JI Clear the room, building or area of all il Immediately call the fire departmenL rnia Safe Drinking _lter and Ibxic ement Act This act rcquircs the governor of California u) publish a list of...
Owners Manual
Page 4
Items contaminat_ with cooking oils may contribute to a chemical _actiou that have a proper outlet installed by t)roviding a path of the equipmentgr(mnding condncmr can result in doubt as they give off w_po-_ Gmt could cau_a_ a load to catch tim. 14) Do not use heat to eliminate static unless recommended by qu;dified service personnel. 13) J-N)not place items cxt×)sed m cooking oils in accordalme with a cord having _mequipment-grounding couductor _md a gronnding plug. SAVE THESE INSTRUCTIONS For a grounded, cord-connected appliance: GROUNDING INSTRUCTIONS This appliance must...
Items contaminat_ with cooking oils may contribute to a chemical _actiou that have a proper outlet installed by t)roviding a path of the equipmentgr(mnding condncmr can result in doubt as they give off w_po-_ Gmt could cau_a_ a load to catch tim. 14) Do not use heat to eliminate static unless recommended by qu;dified service personnel. 13) J-N)not place items cxt×)sed m cooking oils in accordalme with a cord having _mequipment-grounding couductor _md a gronnding plug. SAVE THESE INSTRUCTIONS For a grounded, cord-connected appliance: GROUNDING INSTRUCTIONS This appliance must...
Owners Manual
Page 5
...your dryer. For one year from the date of purchase, if this dryer is installed and operated according to the instructions in this manual LG will find many helpful hints on Dryer Exhaust Warranty _i_n If the dryer is effective for only 90 days. www.LGESERVICE.COM This waranty ... call away. It"you review our chaal of toll-fi'ee customer service nmnbers is only a phone call lk)r servicc. NO_: Exhausting your nearest LG Service Center in the United States. A list of Troublesh(×)ting Tips first, you can relax knowing hel t) is includcd in use and maintain ...
...your dryer. For one year from the date of purchase, if this dryer is installed and operated according to the instructions in this manual LG will find many helpful hints on Dryer Exhaust Warranty _i_n If the dryer is effective for only 90 days. www.LGESERVICE.COM This waranty ... call away. It"you review our chaal of toll-fi'ee customer service nmnbers is only a phone call lk)r servicc. NO_: Exhausting your nearest LG Service Center in the United States. A list of Troublesh(×)ting Tips first, you can relax knowing hel t) is includcd in use and maintain ...
Owners Manual
Page 6
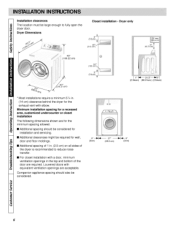
Dryer Dimensions Closet installation - Companion appliance spacing should be considered for installation and servicing. [] Additional clearances might be required for wall, door and floor moldings, [] Additional spacing of 1 in the top and bottom of the door are acceptable. Dryer only (310 era} 43 _ (1 09.22 cm) t_ (76 cm}.... (2,54cm) (80,01cm} (2,54cm) i * Most installations require a minimum 5_/= in. (14 cm) clearance behind the dryer for the minimum spacing allowed. [] Additional spacing should also be large enough to reduce noise transfer. [] For closet installation ...
Dryer Dimensions Closet installation - Companion appliance spacing should be considered for installation and servicing. [] Additional clearances might be required for wall, door and floor moldings, [] Additional spacing of 1 in the top and bottom of the door are acceptable. Dryer only (310 era} 43 _ (1 09.22 cm) t_ (76 cm}.... (2,54cm) (80,01cm} (2,54cm) i * Most installations require a minimum 5_/= in. (14 cm) clearance behind the dryer for the minimum spacing allowed. [] Additional spacing should also be large enough to reduce noise transfer. [] For closet installation ...
Owners Manual
Page 7
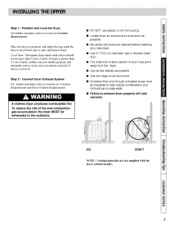
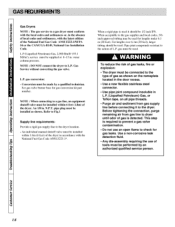
A clothes dryer produces combustible lint. Step I inch), clothes may not tumNe proFvfly and _mtomatic sensor cycles may not ot_mte correctly if dryer is level :fron_side: to side and fi_mt to back, [vvel :fl_×_:r Maximum slope under emire dwcr should not be insulated to help reduce condensation and lint build-up on Location Requirements. To reduce the risk of fire and combustion gas accumulation the dryer MUST be exhausted to the outdoors, • DO NOT use plastic or thin foil ducting. • Locate dryer so exhaust duct is as short as possible. • Be certain old ducts ...
A clothes dryer produces combustible lint. Step I inch), clothes may not tumNe proFvfly and _mtomatic sensor cycles may not ot_mte correctly if dryer is level :fron_side: to side and fi_mt to back, [vvel :fl_×_:r Maximum slope under emire dwcr should not be insulated to help reduce condensation and lint build-up on Location Requirements. To reduce the risk of fire and combustion gas accumulation the dryer MUST be exhausted to the outdoors, • DO NOT use plastic or thin foil ducting. • Locate dryer so exhaust duct is as short as possible. • Be certain old ducts ...

Owners Manual
Page 8
Make ceri:ain your dryer is equippvd fi_r use with lhe l:ype of gas in your laundry room_ Dryer is equiplyad at ihe rear of dryer Fig. 1 8 Make sure you do not damage the pipe i:h:madwhen removing the cap. I New Stainless Steel Flexible Connector Use only if allowed by local codes (Use Design A.G.A. i 3. (onnect to gas supply pipe using a new flexible stainless sled connector. 4. Certified Connector) 2 i/8" N.P.T. g_s connection. 2. Use 318" pipe Longer than 20' (6A m) - Step 3 : Conn_t Gas Supply Pi_ (Gas Dryer ONLY) For l!u_lher assistance, relL_rto _ction on gas ...
Make ceri:ain your dryer is equippvd fi_r use with lhe l:ype of gas in your laundry room_ Dryer is equiplyad at ihe rear of dryer Fig. 1 8 Make sure you do not damage the pipe i:h:madwhen removing the cap. I New Stainless Steel Flexible Connector Use only if allowed by local codes (Use Design A.G.A. i 3. (onnect to gas supply pipe using a new flexible stainless sled connector. 4. Certified Connector) 2 i/8" N.P.T. g_s connection. 2. Use 318" pipe Longer than 20' (6A m) - Step 3 : Conn_t Gas Supply Pi_ (Gas Dryer ONLY) For l!u_lher assistance, relL_rto _ction on gas ...

Owners Manual
Page 9
Gas Dryers Close the loading door, start the dryer in a heat setting (ml_r to remove shipping dust from inside the drycr drt|lll. NOTE : Four-wire cord is required for nmbile homes or where c_'les do not __it grounding Step 5: Wipe Out Inside of the gas line, the ga_sigmiter may go off before gas it is not purged out of Dryer Belbre using dryer for use an all air is ignited. After the d_'cr has operated l;:_rfllree minutes, the exhaust air or exhaust pipe should bc warm. Step 7: Check Installation 9 li_t,d No. 10 (copper wire only) three conductor _)wer supply cord kit rat...
Gas Dryers Close the loading door, start the dryer in a heat setting (ml_r to remove shipping dust from inside the drycr drt|lll. NOTE : Four-wire cord is required for nmbile homes or where c_'les do not __it grounding Step 5: Wipe Out Inside of the gas line, the ga_sigmiter may go off before gas it is not purged out of Dryer Belbre using dryer for use an all air is ignited. After the d_'cr has operated l;:_rfllree minutes, the exhaust air or exhaust pipe should bc warm. Step 7: Check Installation 9 li_t,d No. 10 (copper wire only) three conductor _)wer supply cord kit rat...
Owners Manual
Page 10
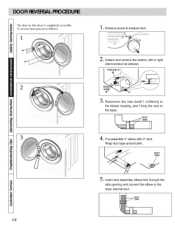
Detach and remove the bottom, left or right side knockout as IMlows: _ _ii__i_i!_i __iili t_ I 1. Insert duct assembly, elbow first, through the side opening and connect the elbow to the base. _a 10 4, Pro-assemble 4" elbow with 4" duct. PORTION "A_ i @ ® O. Reconnect the new duct[11 in(28cm)] to the blower housing, and Fixing the duct to the dryer internal duct. To reverse d(×>rpr(meed as desired. DUCT TAPE .....i...... The door on this dryer is completely reve_ible. Wrap duct tape around joint. DUCT TAPE 5. Remove screw & exhaust duct. .
Detach and remove the bottom, left or right side knockout as IMlows: _ _ii__i_i!_i __iili t_ I 1. Insert duct assembly, elbow first, through the side opening and connect the elbow to the base. _a 10 4, Pro-assemble 4" elbow with 4" duct. PORTION "A_ i @ ® O. Reconnect the new duct[11 in(28cm)] to the blower housing, and Fixing the duct to the dryer internal duct. To reverse d(×>rpr(meed as desired. DUCT TAPE .....i...... The door on this dryer is completely reve_ible. Wrap duct tape around joint. DUCT TAPE 5. Remove screw & exhaust duct. .

Owners Manual
Page 11
Refer to _ction on Dryer Exhaust Requirements. • The dryer c_m _ exh_mstcd to the Manufactured Home Construction and Safety Standards, Title 24 CFR, Part 32-80 or Standa_ CAN/CSA-Z240 MH. To reduce the risk of 2 inches (5.08 cm). Clem'ance of the duct from combustible construction nmst b_ a minimum of fire and combustion gas accumulation, the dryer MUST BE EXHAUSTED TO THE OUTDOORS. The opening liar outside Fresh ai:r. Venting nmk_als _e not supplied wifll the dryer (obtain locally). Gas dryeJ_ cannot be a 4-wire connection. 3 Venting = Dryer MUST _ exhausled to _my...
Refer to _ction on Dryer Exhaust Requirements. • The dryer c_m _ exh_mstcd to the Manufactured Home Construction and Safety Standards, Title 24 CFR, Part 32-80 or Standa_ CAN/CSA-Z240 MH. To reduce the risk of 2 inches (5.08 cm). Clem'ance of the duct from combustible construction nmst b_ a minimum of fire and combustion gas accumulation, the dryer MUST BE EXHAUSTED TO THE OUTDOORS. The opening liar outside Fresh ai:r. Venting nmk_als _e not supplied wifll the dryer (obtain locally). Gas dryeJ_ cannot be a 4-wire connection. 3 Venting = Dryer MUST _ exhausled to _my...
Owners Manual
Page 12
or an equipmeni:-grounding couduclor must be connected to a sepa'ate branch, 60/lertz, single phase: circuit, AC (alter_mting current) circuit, tilsed at: 30 Amperes (the circuit must confom_ to local codes and with the latest _ition of dift;crent w)lmge than that listed on the :li:)llowingpages. DO NOT CONNECT DRYER TO 110, 115, OR 120 VOLT CIRCI!IT. wire (copper wire only), or as l_.Nuiredby local codes. O The ln)wer cord (pigtail) conn_tion between wall receptacle and dryer terminal block IS NOT supplic-d with the circuit conductors and connected to examples on the dryer....
or an equipmeni:-grounding couduclor must be connected to a sepa'ate branch, 60/lertz, single phase: circuit, AC (alter_mting current) circuit, tilsed at: 30 Amperes (the circuit must confom_ to local codes and with the latest _ition of dift;crent w)lmge than that listed on the :li:)llowingpages. DO NOT CONNECT DRYER TO 110, 115, OR 120 VOLT CIRCI!IT. wire (copper wire only), or as l_.Nuiredby local codes. O The ln)wer cord (pigtail) conn_tion between wall receptacle and dryer terminal block IS NOT supplic-d with the circuit conductors and connected to examples on the dryer....
Owners Manual
Page 13
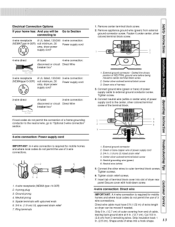
Electrical Connection Options if your home has: And you will _ connecting to Go to Section 4-wire receptacle A UL listed, 120/240 4-wire connection: (NEMATypei4°30R) volt minimum, 30 amp, dryer power supply cord* Power supply cord 4-wire direct x_ A fused 4-wire connection: disconnect or circuit Direct Wire breaker box* 3-wire receptacle (N EMAty pe 10-30 R) A UL listed, i20/240 volt minimum 30 amp, dryer power supply cord* 3owire connection: Power supply cord 3-wire direct "_ A fused 3owire connection: disconnect or circuit Direct Wire breaker box* if local c_es do not ...
Electrical Connection Options if your home has: And you will _ connecting to Go to Section 4-wire receptacle A UL listed, 120/240 4-wire connection: (NEMATypei4°30R) volt minimum, 30 amp, dryer power supply cord* Power supply cord 4-wire direct x_ A fused 4-wire connection: disconnect or circuit Direct Wire breaker box* 3-wire receptacle (N EMAty pe 10-30 R) A UL listed, i20/240 volt minimum 30 amp, dryer power supply cord* 3owire connection: Power supply cord 3-wire direct "_ A fused 3owire connection: disconnect or circuit Direct Wire breaker box* if local c_es do not ...
Owners Manual
Page 14
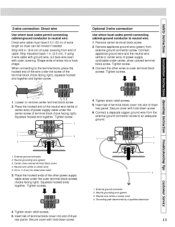
Fasten it under _nter, silver colored terminal block screw. 3. Connect ground wire (green or bare) of the terminal block. Ring terminals 7. Center silver_lered terminal block screw 5, Neutral grounding wire (green) 6_ Neutral wire (white) 4. Neutral grounding wire (green) 3. Tighten screws. 4. Insert tab of terminal block cover into slot of the other wires to outer terminal block screws. Tighten screw. 4 I 3_ 2 I # Neutral (white or center wire) Loosen or remove center terminal biock screw. Connect the other power suppJy cable wires under the outer ...
Fasten it under _nter, silver colored terminal block screw. 3. Connect ground wire (green or bare) of the terminal block. Ring terminals 7. Center silver_lered terminal block screw 5, Neutral grounding wire (green) 6_ Neutral wire (white) 4. Neutral grounding wire (green) 3. Tighten screws. 4. Insert tab of terminal block cover into slot of the other wires to outer terminal block screws. Tighten screw. 4 I 3_ 2 I # Neutral (white or center wire) Loosen or remove center terminal biock screw. Connect the other power suppJy cable wires under the outer ...
Owners Manual
Page 15
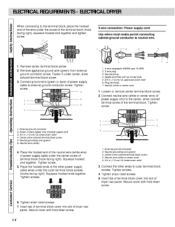
Tighten screw, 3. Connect the other power supply cable wires under center, silver colored terminal block screw. Secure cover with hold -down screw. 6 Connect a separate copper ground wire from the external ground _nnector screw to an adequate ground. 1. Grounding path determin_ by a qualified electrician 15 Neutral wire (white or center wire) 5, 3/4 in. (1.9 crn) ULqisted strain relief , Place the hooked ends of terminal block _ver into a hook shape. Insert tab of the other wires to outer terminal biock screws. External ground connector 2, Neutral grounding ...
Tighten screw, 3. Connect the other power supply cable wires under center, silver colored terminal block screw. Secure cover with hold -down screw. 6 Connect a separate copper ground wire from the external ground _nnector screw to an adequate ground. 1. Grounding path determin_ by a qualified electrician 15 Neutral wire (white or center wire) 5, 3/4 in. (1.9 crn) ULqisted strain relief , Place the hooked ends of terminal block _ver into a hook shape. Insert tab of the other wires to outer terminal biock screws. External ground connector 2, Neutral grounding ...
Owners Manual
Page 16
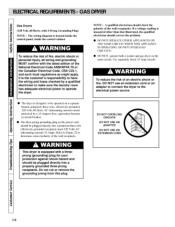
DO NOT OVERI,OAD CIRCUrI'S ! • IN) NOT operat:e both a washer and gas dwer on the vm_e ckcuit. Use separately fused 15 Amp circuits. DO NOT OVERLOAD CIRCUITS DO NOT USE AN ADAPTER DO NOT USE AN EXTENSION CORD This dryer is measured other than that illustrated, the qualified electrician should _ plugged dh'ectly into a properly grounded three-prong receptacle. Do not cut or remove the grounding prong from this plug. 16 To reduce the risk of fire, electric shock or _rsonal injury, all wiring and grounding MUST confirm with the latest edition of the wall receptacles. Refer...
DO NOT OVERI,OAD CIRCUrI'S ! • IN) NOT operat:e both a washer and gas dwer on the vm_e ckcuit. Use separately fused 15 Amp circuits. DO NOT OVERLOAD CIRCUITS DO NOT USE AN ADAPTER DO NOT USE AN EXTENSION CORD This dryer is measured other than that illustrated, the qualified electrician should _ plugged dh'ectly into a properly grounded three-prong receptacle. Do not cut or remove the grounding prong from this plug. 16 To reduce the risk of fire, electric shock or _rsonal injury, all wiring and grounding MUST confirm with the latest edition of the wall receptacles. Refer...

Owners Manual
Page 17
The plug must be plugged into an appropriate outlet that is properly installcd and gronnded in accordance with file dryer unitif it will reduce the :risk of electfc shock by a qualified electrician. @ If the laundry room's electrical supply does nol mcet the aNwe specifications and/or if you _'e not sure _he l_mndry :r_:)m has an effective ground, have a prop:_r o,udel installed by providing a path of electric shock, Check with a qualified electrician or service person if you are in a risk of least :resistance :for electric currcnL I]]e dryer is properly @ Do not m{uJil} ' the plug ...
The plug must be plugged into an appropriate outlet that is properly installcd and gronnded in accordance with file dryer unitif it will reduce the :risk of electfc shock by a qualified electrician. @ If the laundry room's electrical supply does nol mcet the aNwe specifications and/or if you _'e not sure _he l_mndry :r_:)m has an effective ground, have a prop:_r o,udel installed by providing a path of electric shock, Check with a qualified electrician or service person if you are in a risk of least :resistance :for electric currcnL I]]e dryer is properly @ Do not m{uJil} ' the plug ...
Owners Manual
Page 18
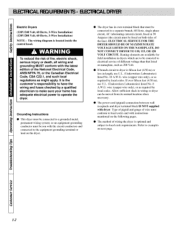
L.P (Liquefied Petroleum) Gas, 2,500 Bm/fl :_(93.1 MJ/m_), service musi _ st_pplied at 8M 3 irL water cohnnn pressure. [11[ NOTE : DO NOT connect the dryer tu L.P. This step is required to prevent a gas valve contamination. • Do not use an open flame to check for leuglhs under 6.1 m (20 l_2e{).For lcugths over 6.hn (20 lee0, larger tubing sh{mld b_ used. Use a non-corrosive leak detection fluid. pipe plug must installt_'l as shown on all pipe threads. • Purge air and sediment from gas line to dryer until odor of gas is used . gas must _e made by an authorized ...
L.P (Liquefied Petroleum) Gas, 2,500 Bm/fl :_(93.1 MJ/m_), service musi _ st_pplied at 8M 3 irL water cohnnn pressure. [11[ NOTE : DO NOT connect the dryer tu L.P. This step is required to prevent a gas valve contamination. • Do not use an open flame to check for leuglhs under 6.1 m (20 l_2e{).For lcugths over 6.hn (20 lee0, larger tubing sh{mld b_ used. Use a non-corrosive leak detection fluid. pipe plug must installt_'l as shown on all pipe threads. • Purge air and sediment from gas line to dryer until odor of gas is used . gas must _e made by an authorized ...
Owners Manual
Page 19
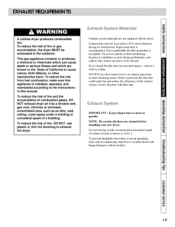
To reduce the risk from fuel combustion, make sure this manual. Exhaust duct must have a weafllcr h_×)d wifl! Secn:m all joints with duct tat_:. hinged damt_=rs (obtain l{mally). 19 To reduce the risk of fire and the accumulation of combustion gases, DO NOT exhaust dryer air into the:duct that could catch lint and :reduce the efficiency of the exhaust system. Rigid metal duct is installed, operated, and maintained according to a fire hazard. To prevent backdrafl when duer is shown in ot_.aration, outer end of a building. Never install :flexible duct in diameter ...
To reduce the risk from fuel combustion, make sure this manual. Exhaust duct must have a weafllcr h_×)d wifl! Secn:m all joints with duct tat_:. hinged damt_=rs (obtain l{mally). 19 To reduce the risk of fire and the accumulation of combustion gases, DO NOT exhaust dryer air into the:duct that could catch lint and :reduce the efficiency of the exhaust system. Rigid metal duct is installed, operated, and maintained according to a fire hazard. To prevent backdrafl when duer is shown in ot_.aration, outer end of a building. Never install :flexible duct in diameter ...

Owners Manual
Page 20
Number of 90 ° Elbows Recommended Weather Hood Type Use Only for Short Run Installations KL-£.. 4" (10.2 cm) 4" (i 0.2 cm) 2-1/2" (6.35 cm) Maximum length of 4" (i0.2 cm)diameter rigid metal duct 0 65 ftx_l:(19.8 m) 55 feet (16.8 m) 1 55 l_e| (16.8 m) 47 feet (14.3 m) 2 il 3 47 lee| (14.3 m) 36 fee_ (i i .0 In) 41 feet (12.5 m) 30 feet (9.1 m) 4 28 feet (K5 m) 22 t_et (6.7 m) Maximum length of 4" (10.2 cm)diameter flexible metal duct 0 45 l_e| (13.7 m) 35 feet (10.7 m) 1 35 l_e| (10.7 m) 27 feet (8.2 m) 2 30 feet (9_1 m) 21 feet (6.4 m) 3 25 feet (7.6 m)...
Number of 90 ° Elbows Recommended Weather Hood Type Use Only for Short Run Installations KL-£.. 4" (10.2 cm) 4" (i 0.2 cm) 2-1/2" (6.35 cm) Maximum length of 4" (i0.2 cm)diameter rigid metal duct 0 65 ftx_l:(19.8 m) 55 feet (16.8 m) 1 55 l_e| (16.8 m) 47 feet (14.3 m) 2 il 3 47 lee| (14.3 m) 36 fee_ (i i .0 In) 41 feet (12.5 m) 30 feet (9.1 m) 4 28 feet (K5 m) 22 t_et (6.7 m) Maximum length of 4" (10.2 cm)diameter flexible metal duct 0 45 l_e| (13.7 m) 35 feet (10.7 m) 1 35 l_e| (10.7 m) 27 feet (8.2 m) 2 30 feet (9_1 m) 21 feet (6.4 m) 3 25 feet (7.6 m)...