
Owners Manual
Page 4
... of file ti_bric soflner or product. In the event of maltunction o:r breakdown, grounding will not fit the ontleL have come into _ae appliance if the drum is prot_rly installed ;rod grounded in the appliance. Do not modify" the plug provided with the circuit conductors and connected to a grounded metal _rmanent wMng...
... of file ti_bric soflner or product. In the event of maltunction o:r breakdown, grounding will not fit the ontleL have come into _ae appliance if the drum is prot_rly installed ;rod grounded in the appliance. Do not modify" the plug provided with the circuit conductors and connected to a grounded metal _rmanent wMng...
Owners Manual
Page 28
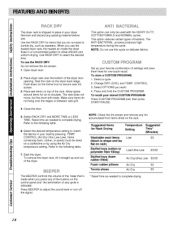
The rack does not move, but the drum will rotate. To remove the dryer rack, lift it straight up your load by using the Air Dry temperature settings. Use RACK DRY to allow ...
The rack does not move, but the drum will rotate. To remove the dryer rack, lift it straight up your load by using the Air Dry temperature settings. Use RACK DRY to allow ...
Owners Manual
Page 31
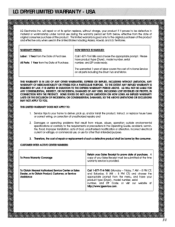
OTHE_NT ANY IMPUEDWA_NT'_ IS _JIRED BYLAW,iT ISLIMED IN DURAT_NTOTHEEXPRF.SWSARRANTYPE_.ODABOVE. LG Electronics Inc, will repair or at its option replace, _th, ourf charge, your p_duct tybe (Drye0, model number, serial number, and _P Code; Thereforet,... SeMce trips to deliver, pick up, and/or Install _ product, instruct, or replace house fu_ or correct wiring, or correct.on all parts [_[uding the Drum Tub and Motor, THBWA_ iS IN UEUOF ANY OTHERWA_NTIES, D(PR_ OR IMPLIEDI,NCLUD|NG_HOLIT LIMffATIONA, NY WARRANTOYF M_::HANTABIL_ ORFITN_ FORA PART_U_ PURPOSET. The warranted...
OTHE_NT ANY IMPUEDWA_NT'_ IS _JIRED BYLAW,iT ISLIMED IN DURAT_NTOTHEEXPRF.SWSARRANTYPE_.ODABOVE. LG Electronics Inc, will repair or at its option replace, _th, ourf charge, your p_duct tybe (Drye0, model number, serial number, and _P Code; Thereforet,... SeMce trips to deliver, pick up, and/or Install _ product, instruct, or replace house fu_ or correct wiring, or correct.on all parts [_[uding the Drum Tub and Motor, THBWA_ iS IN UEUOF ANY OTHERWA_NTIES, D(PR_ OR IMPLIEDI,NCLUD|NG_HOLIT LIMffATIONA, NY WARRANTOYF M_::HANTABIL_ ORFITN_ FORA PART_U_ PURPOSET. The warranted...
Service Manual
Page 4
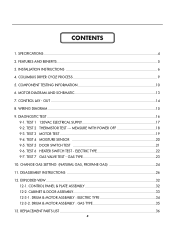
...10 6. TEST 1 120VAC ELECTRICAL SUPPLY 17 9-2. MEASURE WITH POWER OFF 18 9-3. CHANGE GAS SETTING (NATURAL GAS, PROPANE GAS 24 11. DISASSEMBLY INSTRUCTIONS 26 12. DRUM & MOTOR ASSEMBLY : ELECTRIC TYPE 34 12-3-2. REPLACEMENT PARTS LIST 36 3 GAS TYPE 23 10. CONTROL PANEL & PLATE ASSEMBLY 32 12-2. OUT ...14 8. TEST...- CABINET & DOOR ASSEMBLY 33 12-3-1. SPECIFICATIONS ...4 2. DIAGNOSTIC TEST ...16 9-1. FEATURES AND BENEFITS ...5 3. TEST 4 MOISTURE SENSOR 20 9-5. ELECTRIC TYPE 22 9-7. COLUMBUS DRYER CYCLE PROCESS 9 5. DRUM & MOTOR ASSEMBLY : GAS TYPE 35 13.
...10 6. TEST 1 120VAC ELECTRICAL SUPPLY 17 9-2. MEASURE WITH POWER OFF 18 9-3. CHANGE GAS SETTING (NATURAL GAS, PROPANE GAS 24 11. DISASSEMBLY INSTRUCTIONS 26 12. DRUM & MOTOR ASSEMBLY : ELECTRIC TYPE 34 12-3-2. REPLACEMENT PARTS LIST 36 3 GAS TYPE 23 10. CONTROL PANEL & PLATE ASSEMBLY 32 12-2. OUT ...14 8. TEST...- CABINET & DOOR ASSEMBLY 33 12-3-1. SPECIFICATIONS ...4 2. DIAGNOSTIC TEST ...16 9-1. FEATURES AND BENEFITS ...5 3. TEST 4 MOISTURE SENSOR 20 9-5. ELECTRIC TYPE 22 9-7. COLUMBUS DRYER CYCLE PROCESS 9 5. DRUM & MOTOR ASSEMBLY : GAS TYPE 35 13.
Service Manual
Page 5
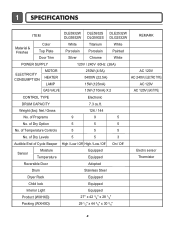
1 SPECIFICATIONS ITEM DLE5932W DLE5932S DLE2532W DLG5932W DLG5932S DLG2532W REMARK Material & Finishes Color Top Plate Door Trim White Porcelain Silver Titanium Porcelain Chrome White Painted White POWER SUPPLY 120V / 240V 60Hz (26A) ELECTRICITY ...(4.5A) 5400W (22.5A) 15W (125mA) AC 120V AC 240V ( ELECTRIC TYPE) AC 120V GAS VALVE 13W (110mA) X 2 AC 120V ( GAS TYPE) CONTROL TYPE Electronic DRUM CAPACITY 7.3 cu.ft. of Cycle Beeper High / Low / Off High / Low / Off On / Off Sensor Moisture Temperature Equipped Equipped Electro sensor Thermistor Reversible Door Adopted...
1 SPECIFICATIONS ITEM DLE5932W DLE5932S DLE2532W DLG5932W DLG5932S DLG2532W REMARK Material & Finishes Color Top Plate Door Trim White Porcelain Silver Titanium Porcelain Chrome White Painted White POWER SUPPLY 120V / 240V 60Hz (26A) ELECTRICITY ...(4.5A) 5400W (22.5A) 15W (125mA) AC 120V AC 240V ( ELECTRIC TYPE) AC 120V GAS VALVE 13W (110mA) X 2 AC 120V ( GAS TYPE) CONTROL TYPE Electronic DRUM CAPACITY 7.3 cu.ft. of Cycle Beeper High / Low / Off High / Low / Off On / Off Sensor Moisture Temperature Equipped Equipped Electro sensor Thermistor Reversible Door Adopted...
Service Manual
Page 17
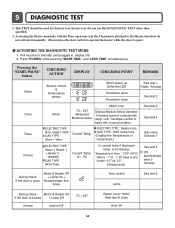
... 2 Once Twice 3 times Motor Motor runs 70 ~ 237 Measured Moisture Value. ELECTRIC TYPE : Heater runs GAS TYPE : GAS Valve runs (Display the Temperature of Inside drum.) ELECTRIC TYPE Motor + Heater 1 + Heater 2 (5400W) GAS TYPE Motor Type Current Temp. (5 ~ 70) In normal state if displayed temp. Motor & Heater Off + Lamp On + Buzzer...
... 2 Once Twice 3 times Motor Motor runs 70 ~ 237 Measured Moisture Value. ELECTRIC TYPE : Heater runs GAS TYPE : GAS Valve runs (Display the Temperature of Inside drum.) ELECTRIC TYPE Motor + Heater 1 + Heater 2 (5400W) GAS TYPE Motor Type Current Temp. (5 ~ 70) In normal state if displayed temp. Motor & Heater Off + Lamp On + Buzzer...
Service Manual
Page 20
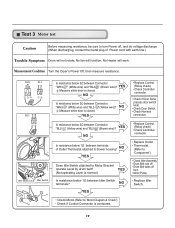
...; Check Harness connection. " (Yellow wire)? NO Is resistance below 1Ω between terminals of Power cord with earth line.) Trouble Symptom Drum will not rotate; NO Measure while door is closed . Measurement Condition Turn the Dryer's Power Off, then measure resistance. " (White ... Check Controller connector. • Replace Outlet • Thermostat. (Refer to 'Component') • Check Idler Assembly. • Drum Belt cuts off • Drum Belt takes off , and do voltage discharge. (When discharging, contact the metal plug of Outlet Thermostat attached to turn Power off...
...; Check Harness connection. " (Yellow wire)? NO Is resistance below 1Ω between terminals of Power cord with earth line.) Trouble Symptom Drum will not rotate; NO Measure while door is closed . Measurement Condition Turn the Dryer's Power Off, then measure resistance. " (White ... Check Controller connector. • Replace Outlet • Thermostat. (Refer to 'Component') • Check Idler Assembly. • Drum Belt cuts off • Drum Belt takes off , and do voltage discharge. (When discharging, contact the metal plug of Outlet Thermostat attached to turn Power off...
Service Manual
Page 22
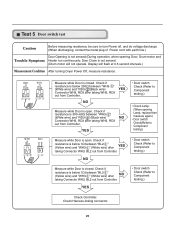
...testing.) Measure while Door is closed . YES • Door switch Check (Refer to Component testing.) Check Controller. Door Close is not sensed. (Drum motor will flash at 0.5 second intervals.) Measurement Condition After turning Dryer Power Off, measure resistance. " (White wire) and "RD3- " (... " (White wire) and "RD3- YES • Door switch Check (Refer to Component testing.) • Check Lamp. (When opening Door, Drum motor and Trouble Symptom Heater run continuously; Check if resistance is below 250Ω between "BL2- " (White wire) after taking Connector WH3,...
...testing.) Measure while Door is closed . YES • Door switch Check (Refer to Component testing.) Check Controller. Door Close is not sensed. (Drum motor will flash at 0.5 second intervals.) Measurement Condition After turning Dryer Power Off, measure resistance. " (White wire) and "RD3- " (... " (White wire) and "RD3- YES • Door switch Check (Refer to Component testing.) • Check Lamp. (When opening Door, Drum motor and Trouble Symptom Heater run continuously; Check if resistance is below 250Ω between "BL2- " (White wire) after taking Connector WH3,...

Service Manual
Page 29
... candelabra-base bulb. 5. Disengage belt from motor and idler pulleys. 4. Remove the Cover Cabinet and Tub drum [front]. -2 3. Open the top plate. 2. Remove 4 screws. 5. Carefully remove Drum out through front of dryer. 1. Remove the screw holding the drum lamp shield in place. 3. Remove Cover Cabinet. 3. Disconnect the door lamp and electro sensor connector...
... candelabra-base bulb. 5. Disengage belt from motor and idler pulleys. 4. Remove the Cover Cabinet and Tub drum [front]. -2 3. Open the top plate. 2. Remove 4 screws. 5. Carefully remove Drum out through front of dryer. 1. Remove the screw holding the drum lamp shield in place. 3. Remove Cover Cabinet. 3. Disconnect the door lamp and electro sensor connector...
Service Manual
Page 31
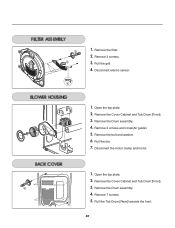
Disconnect electro sensor. 1. Remove the Drum assembly. 4. Remove 3 screws. 3. Remove the bolt and washer. 6. Disconnect the motor clamp and motor. 1. Remove the Drum assembly. 4. Open the top plate. 2. Pull the grill. 4. Remove the Cover Cabinet and Tub Drum [Front]. 3. Remove the Cover Cabinet and Tub Drum [Front]. 3. Pull the Tub Drum [Rear] towards the front. 30 1. Remove 7 screws. 5. Pull the fan. 7. Open the top plate. 2. Remove the filter. 2. Remove 2 screws and cover(Air guide). 5.
Disconnect electro sensor. 1. Remove the Drum assembly. 4. Remove 3 screws. 3. Remove the bolt and washer. 6. Disconnect the motor clamp and motor. 1. Remove the Drum assembly. 4. Open the top plate. 2. Pull the grill. 4. Remove the Cover Cabinet and Tub Drum [Front]. 3. Remove the Cover Cabinet and Tub Drum [Front]. 3. Pull the Tub Drum [Rear] towards the front. 30 1. Remove 7 screws. 5. Pull the fan. 7. Open the top plate. 2. Remove the filter. 2. Remove 2 screws and cover(Air guide). 5.
Service Manual
Page 32
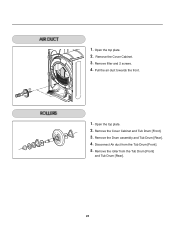
Remove the Cover Cabinet. 3. Open the top plate. 2. Open the top plate. 2. Remove the Cover Cabinet and Tub Drum [Front]. 3. Pull the air duct towards the front. 1. Disconnect Air duct from the Tub Drum [Front] and Tub Drum [Rear]. 31 1. Remove filter and 2 screws. 4. Remove the roller from the Tub Drum [Front]. 5. Remove the Drum assembly and Tub Drum [Rear]. 4.
Remove the Cover Cabinet. 3. Open the top plate. 2. Open the top plate. 2. Remove the Cover Cabinet and Tub Drum [Front]. 3. Pull the air duct towards the front. 1. Disconnect Air duct from the Tub Drum [Front] and Tub Drum [Rear]. 31 1. Remove filter and 2 screws. 4. Remove the roller from the Tub Drum [Front]. 5. Remove the Drum assembly and Tub Drum [Rear]. 4.
Service Manual
Page 35
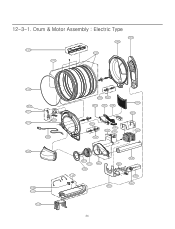
12-3-1. Drum & Motor Assembly : Electric Type F200 K400 K120 K140 K100 K130 K222 K221 K210 K240 K230 K350 F130 F110 F120 K250 K251 K330 K320 K340 K250 K251 K360 K550 K560 K310 K620 K610 F140 K515 K510 K540 K520 K640 K600 K530 K650 K651 34
12-3-1. Drum & Motor Assembly : Electric Type F200 K400 K120 K140 K100 K130 K222 K221 K210 K240 K230 K350 F130 F110 F120 K250 K251 K330 K320 K340 K250 K251 K360 K550 K560 K310 K620 K610 F140 K515 K510 K540 K520 K640 K600 K530 K650 K651 34


