Specification
Page 1
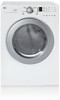
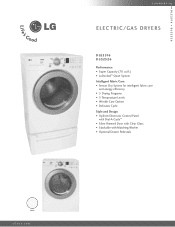
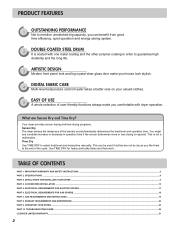
D L E 2 516 D L G 2 5 2 6 L A U N D RY ELECTRIC/GAS DRYERS D L E 2516 DLG2526 Performance • Super Capacity (7.0 cu.ft.) • LoDecibel™ Quiet System Intelligent Fabric Care • Sensor Dry System for intelligent fabric care and energy efficiency • 5 Drying Programs • 5 Temperature Levels • Wrinkle Care Option • Delicates Cycle Style and Design • Upfront Electronic Control Panel with Dial-A-Cycle™ • Silver Rimmed Door with Clear Glass • Stackable with Matching Washer • Optional Drawer Pedestals White LGusa.com
D L E 2 516 D L G 2 5 2 6 L A U N D RY ELECTRIC/GAS DRYERS D L E 2516 DLG2526 Performance • Super Capacity (7.0 cu.ft.) • LoDecibel™ Quiet System Intelligent Fabric Care • Sensor Dry System for intelligent fabric care and energy efficiency • 5 Drying Programs • 5 Temperature Levels • Wrinkle Care Option • Delicates Cycle Style and Design • Upfront Electronic Control Panel with Dial-A-Cycle™ • Silver Rimmed Door with Clear Glass • Stackable with Matching Washer • Optional Drawer Pedestals White LGusa.com
Specification
Page 2
... x 43" x 31 1/4" Weight (lbs): Net / Shipping 126 / 144 WA R R A N T Y 1 Year Labor and Parts UPC CODE DLE2516W 048231 009096 DLG2526W 048231 009102 WDP3W 048231 008556 WSTK1 048231 008327 Design and specifications are subject to change without heat to "set it and go". Electronic Control Panel...then automatically adjusts the drying time and temperature for optimal fabric care. LG ELECTRONICS INC. 1000 Sylvan Ave., Englewood Cliffs, NJ 07632 800.243.0000 LGusa.com ELECTRIC/GAS DRYERS DLE2516 DLG2526 TYPE Design Look Front Control Intelligent Electronic Controls with Dial-A-...
... x 43" x 31 1/4" Weight (lbs): Net / Shipping 126 / 144 WA R R A N T Y 1 Year Labor and Parts UPC CODE DLE2516W 048231 009096 DLG2526W 048231 009102 WDP3W 048231 008556 WSTK1 048231 008327 Design and specifications are subject to change without heat to "set it and go". Electronic Control Panel...then automatically adjusts the drying time and temperature for optimal fabric care. LG ELECTRONICS INC. 1000 Sylvan Ave., Englewood Cliffs, NJ 07632 800.243.0000 LGusa.com ELECTRIC/GAS DRYERS DLE2516 DLG2526 TYPE Design Look Front Control Intelligent Electronic Controls with Dial-A-...
Owners Manual
Page 1
Please read your manual carefully, as it provides instructions on safe Installation, Use and Maintenance. Record the Model and Serial Numbers, and retain the manual for buying a LG Dryer. Electric and Gas Dryer DLE2516W / DLG2526W Thank you for future reference. P/No.: 3828EL3004F P/No.: 3828EL3003B
Please read your manual carefully, as it provides instructions on safe Installation, Use and Maintenance. Record the Model and Serial Numbers, and retain the manual for buying a LG Dryer. Electric and Gas Dryer DLE2516W / DLG2526W Thank you for future reference. P/No.: 3828EL3004F P/No.: 3828EL3003B
Owners Manual
Page 2
...can be used if clothes are Sensor Dry and Time Dry? IMPORTANT WARRANTY AND SAFETY INSTRUCTIONS ...3 PART 2. ELECTRICAL REQUIREMENTS FOR GAS DRYERS...18 PART 7. You might see a sudden increase or decrease in order to select heat level and drying time manually. This ... It is not a malfunction. EXHAUST REQUIREMENTS AND MAINTENANCE ...20 PART 9. TROUBLESHOOTING GUIDE...28 LG DRYER LIMITED WARRANTY...31 2 Your dryer provides sensor drying and time drying programs. Sensor Dry The dryer senses the dampness of the laundry and automatically determines the heat level and operation time. Use...
...can be used if clothes are Sensor Dry and Time Dry? IMPORTANT WARRANTY AND SAFETY INSTRUCTIONS ...3 PART 2. ELECTRICAL REQUIREMENTS FOR GAS DRYERS...18 PART 7. You might see a sudden increase or decrease in order to select heat level and drying time manually. This ... It is not a malfunction. EXHAUST REQUIREMENTS AND MAINTENANCE ...20 PART 9. TROUBLESHOOTING GUIDE...28 LG DRYER LIMITED WARRANTY...31 2 Your dryer provides sensor drying and time drying programs. Sensor Dry The dryer senses the dampness of the laundry and automatically determines the heat level and operation time. Use...

Owners Manual
Page 3
...easily crushed, and trap lint. These conditions will follow basic precautions, including the following : • Do not install a clothes dryer with clothes dryers. Do not touch any electrical switches. These words mean: DANGER You can happen if the instructions are not followed. Part 1 ... must be of a specific type identified by a qualified installer, service agency, or the gas supplier. • Install the clothes dryer according to the manufacturer's instructions and local codes. Immediately call the fire department. This is the safety alert symbol. Follow the gas...
...easily crushed, and trap lint. These conditions will follow basic precautions, including the following : • Do not install a clothes dryer with clothes dryers. Do not touch any electrical switches. These words mean: DANGER You can happen if the instructions are not followed. Part 1 ... must be of a specific type identified by a qualified installer, service agency, or the gas supplier. • Install the clothes dryer according to the manufacturer's instructions and local codes. Immediately call the fire department. This is the safety alert symbol. Follow the gas...
Owners Manual
Page 4
...or products to eliminate static unless recommended by providing a path of least resistance for foreign objects • Clean lint screen before using the dryer. • Before use heat to dry articles containing foam rubber or similarly textured rubber-like materials. • Keep area around the ... can be minimized further by the incomplete combustion of the equipment- rounding conductor can cause minor exposure to cooking oils in your dryer. CALIFORNIA SAFE DRINKING WATER AND TOXIC ENFORCEMENT ACT WARNING To reduce the risk of substances known to the state to cause cancer,...
...or products to eliminate static unless recommended by providing a path of least resistance for foreign objects • Clean lint screen before using the dryer. • Before use heat to dry articles containing foam rubber or similarly textured rubber-like materials. • Keep area around the ... can be minimized further by the incomplete combustion of the equipment- rounding conductor can cause minor exposure to cooking oils in your dryer. CALIFORNIA SAFE DRINKING WATER AND TOXIC ENFORCEMENT ACT WARNING To reduce the risk of substances known to the state to cause cancer,...
Owners Manual
Page 5
..., creating electrical shock and/or fire hazard. • Remove all packing items and dispose of electric shock. Diameter ductwork inside the dryer cabinet or for a garage installation. The exhaust duct should obtain the necessary ductwork locally. Failure to the weather. Electrical shock can ...cause a fire if it will be exhausted to follow basic precautions, including the following: • Properly ground dryer to prevent property damage, personal injury, or loss of moisture will not be exhausted to the outside . above the floor for exhausting...
..., creating electrical shock and/or fire hazard. • Remove all packing items and dispose of electric shock. Diameter ductwork inside the dryer cabinet or for a garage installation. The exhaust duct should obtain the necessary ductwork locally. Failure to the weather. Electrical shock can ...cause a fire if it will be exhausted to follow basic precautions, including the following: • Properly ground dryer to prevent property damage, personal injury, or loss of moisture will not be exhausted to the outside . above the floor for exhausting...
Owners Manual
Page 6
...READ ALL INSTRUCTIONS BEFORE USE WARNING For your safety, the information in this ducting will affect drying time. These power cord can result if the dryer is not properly grounded. • Have the wall outlet and circuit checked by a qualified electrician to make a connection with duct tape. ...safety, this manual for specific electrical requirements for use a cord that matches the rating plate. To prevent personal injury or damage to the dryer from overheated wires. • Never unplug your model. Always grip plug firmly and pull straight out from the power cord. Do not ...
...READ ALL INSTRUCTIONS BEFORE USE WARNING For your safety, the information in this ducting will affect drying time. These power cord can result if the dryer is not properly grounded. • Have the wall outlet and circuit checked by a qualified electrician to make a connection with duct tape. ...safety, this manual for specific electrical requirements for use a cord that matches the rating plate. To prevent personal injury or damage to the dryer from overheated wires. • Never unplug your model. Always grip plug firmly and pull straight out from the power cord. Do not ...
Owners Manual
Page 7
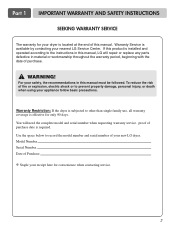
... electric shock or to prevent property damage, personal injury, or death when using your nearest LG Service Center. Serial Number. For your new LG dryer. Warranty Restriction: If the dryer is subjected to the instructions in material or workmanship throughout the warranty period, beginning with the...defective in this manual. Warranty Service is located at the end of Purchase Staple your dryer is available by contacting your appliance follow basic precautions. Date of this manual, LG will need the complete model and serial number when requesting warranty service. Part 1 IMPORTANT...
... electric shock or to prevent property damage, personal injury, or death when using your nearest LG Service Center. Serial Number. For your new LG dryer. Warranty Restriction: If the dryer is subjected to the instructions in material or workmanship throughout the warranty period, beginning with the...defective in this manual. Warranty Service is located at the end of Purchase Staple your dryer is available by contacting your appliance follow basic precautions. Date of this manual, LG will need the complete model and serial number when requesting warranty service. Part 1 IMPORTANT...

Owners Manual
Page 8
Weight : 126 Ibs (57.2 kg) Specifications are subject to change without manafaturers notice. Pedestal Purchased Separately ACCESSORIES Stacking Kit Purchased Separately 8 Design of pedestals is subject to the rating label regarding detailed information. Size : 27 x 29.9 x 38.7(inch) Capacity : IEC 7.0 cu.ft. Part 2 SPECIFICATIONS Type : Electric and Gas Dryer Rating : Please refer to change by manufacturer.
Weight : 126 Ibs (57.2 kg) Specifications are subject to change without manafaturers notice. Pedestal Purchased Separately ACCESSORIES Stacking Kit Purchased Separately 8 Design of pedestals is subject to the rating label regarding detailed information. Size : 27 x 29.9 x 38.7(inch) Capacity : IEC 7.0 cu.ft. Part 2 SPECIFICATIONS Type : Electric and Gas Dryer Rating : Please refer to change by manufacturer.
Owners Manual
Page 9
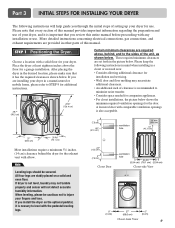
... of the unit, as shown below . When leveling, please be secured. A louvered door with any installation or use of your dryer. If you review this manual provides important information regarding the preparation and use . More detailed instructions concerning electrical connections, gas connections, ...and exhaust requirements are stably placed on the optional pedstal, it has the required clearances shown below . STEP 1 Positioning the Dryer. Those required minimum clearances are required above the floor for the door. Please note that it is nessary to level with the...
... of the unit, as shown below . When leveling, please be secured. A louvered door with any installation or use of your dryer. If you review this manual provides important information regarding the preparation and use . More detailed instructions concerning electrical connections, gas connections, ...and exhaust requirements are stably placed on the optional pedstal, it has the required clearances shown below . STEP 1 Positioning the Dryer. Those required minimum clearances are required above the floor for the door. Please note that it is nessary to level with the...
Owners Manual
Page 10
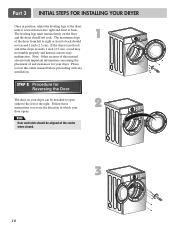
Note: Other sections of and clearances for Reversing the Door The door on the floor and the dryer should not exceed 1 inch (2.5 cm). Part 3 INITIAL STEPS FOR INSTALLING YOUR DRYER Once in which your door opens: Note Door and latch should be installed to open either to the left ...information concerning the placement of this entire manual before proceeding with any installation. 1 STEP 2 Procedure for your dryer can be aligned at the center when closed. 2 3 10 If the dryer is level from left to right and front to back should not rock. The leveling legs must remain ...
Note: Other sections of and clearances for Reversing the Door The door on the floor and the dryer should not exceed 1 inch (2.5 cm). Part 3 INITIAL STEPS FOR INSTALLING YOUR DRYER Once in which your door opens: Note Door and latch should be installed to open either to the left ...information concerning the placement of this entire manual before proceeding with any installation. 1 STEP 2 Procedure for your dryer can be aligned at the center when closed. 2 3 10 If the dryer is level from left to right and front to back should not rock. The leveling legs must remain ...
Owners Manual
Page 11
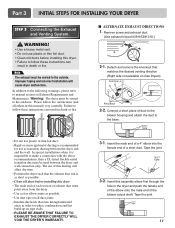
...not available on Exhaust Requirements and Maintenance. Insert the male end of a 4" elbow into the female end of exhaust duct must be used between the dryer and and the wall. Insert this manual) very carefully. WARNING! • Use a heavy metal vent. • Do not use plastic or thin... with the above recommendations, then a UL-listed flexible metal transition duct may be vented to the outside. Part 3 INITIAL STEPS FOR INSTALLING YOUR DRYER STEP 3 Connecting the Exhaust and Venting System. The use as possible. • Use duct tape on all others in this assembly elbow first ...
...not available on Exhaust Requirements and Maintenance. Insert the male end of a 4" elbow into the female end of exhaust duct must be used between the dryer and and the wall. Insert this manual) very carefully. WARNING! • Use a heavy metal vent. • Do not use plastic or thin... with the above recommendations, then a UL-listed flexible metal transition duct may be vented to the outside. Part 3 INITIAL STEPS FOR INSTALLING YOUR DRYER STEP 3 Connecting the Exhaust and Venting System. The use as possible. • Use duct tape on all others in this assembly elbow first ...
Owners Manual
Page 12
...electrical connections • See installation instructions for manufactured (mobile) home installations and where local codes do so can result in a clothes dryer. 2. Adjusting burner input setting is required for complete instructions. • Failure to install or use this manual's section on Gas ... steel flexible connector. Use 1/2" pipe. 5. 3/8" N.P.T. Gas Connection. It is located at this elevation because AGA certifies this dryer will not have . Electrical Plug Connections. 4. Note Make sure the burner orifice is proper for use a new stainless steel flexible...
...electrical connections • See installation instructions for manufactured (mobile) home installations and where local codes do so can result in a clothes dryer. 2. Adjusting burner input setting is required for complete instructions. • Failure to install or use this manual's section on Gas ... steel flexible connector. Use 1/2" pipe. 5. 3/8" N.P.T. Gas Connection. It is located at this elevation because AGA certifies this dryer will not have . Electrical Plug Connections. 4. Note Make sure the burner orifice is proper for use a new stainless steel flexible...
Owners Manual
Page 13
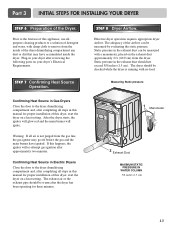
...exhaust duct should be measured with a manometer, placed on a heat setting. If this dryer, start the dryer on your dryer's Electrical Requirements. Confirming Heat Source in Electric Dryers Close the door to the first use of this happens, the igniter will ignite. Part.... 1 Manometer 2 Exhaust Duct MAXIMUM STATIC PRESSURE IN WATER COLUMN 5/8 inches (1.5 cm) 13 Effective dryer operation requires appropriate dryer airflow. Static pressure in your dryer after completing all steps in this manual for proper installation of this appliance, use allpurpose cleaning products or...
...exhaust duct should be measured with a manometer, placed on a heat setting. If this dryer, start the dryer on your dryer's Electrical Requirements. Confirming Heat Source in Electric Dryers Close the door to the first use of this happens, the igniter will ignite. Part.... 1 Manometer 2 Exhaust Duct MAXIMUM STATIC PRESSURE IN WATER COLUMN 5/8 inches (1.5 cm) 13 Effective dryer operation requires appropriate dryer airflow. Static pressure in your dryer after completing all steps in this manual for proper installation of this appliance, use allpurpose cleaning products or...
Owners Manual
Page 14
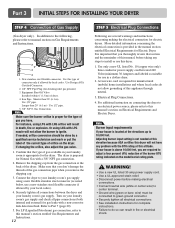
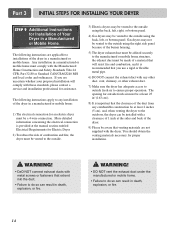
...into the duct. • Failure to do so can be installed with a clearance of 1 inch at the sides and back of the dryer. 9) Please be made of the dryer in a manufactured or mobile home. WARNING! • DaO NOT connect exhaust ducts with the Manufactured Home Construction and Safety Standards Title 24... CFR, Part 32-80 or Standard CAN/CSA0Z240 MH and local codes and ordinances. Part 3 INITIAL STEPS FOR INSTALLING YOUR DRYER STEP 9 Additional Instructions for Installation of the duct from any combustible construction be at least 2 inches (5 cm), and, when venting the...
...into the duct. • Failure to do so can be installed with a clearance of 1 inch at the sides and back of the dryer. 9) Please be made of the dryer in a manufactured or mobile home. WARNING! • DaO NOT connect exhaust ducts with the Manufactured Home Construction and Safety Standards Title 24... CFR, Part 32-80 or Standard CAN/CSA0Z240 MH and local codes and ordinances. Part 3 INITIAL STEPS FOR INSTALLING YOUR DRYER STEP 9 Additional Instructions for Installation of the duct from any combustible construction be at least 2 inches (5 cm), and, when venting the...
Owners Manual
Page 15
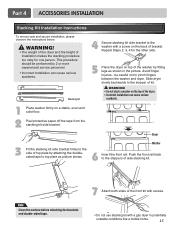
...cause serious accidents. 1 Place washer firmly on top of the washer by attaching the doublesided tape to the washer with a gas dryer in the picture. Stacking kit 4 Secure stacking kit side bracket to top plate as shown in potentially unstable conditions like a ...protective paper off the tape from the stacking kit side bracket. This procedure should be careful not to the stopper of the dryer. • Incorrect installation can cause serious accidents. Part 4 ACCESSORIES INSTALLATION Stacking Kit Installation Instructions To ensure safe and secure installation...
...cause serious accidents. 1 Place washer firmly on top of the washer by attaching the doublesided tape to the washer with a gas dryer in the picture. Stacking kit 4 Secure stacking kit side bracket to top plate as shown in potentially unstable conditions like a ...protective paper off the tape from the stacking kit side bracket. This procedure should be careful not to the stopper of the dryer. • Incorrect installation can cause serious accidents. Part 4 ACCESSORIES INSTALLATION Stacking Kit Installation Instructions To ensure safe and secure installation...

Owners Manual
Page 16
... at each corner to securely attach the appliance to the desired location. 5 Loosen the locknuts on the back of the 4 retainers into the dryer base as shown. Retainer 16 Locknut NOTE: The appliance and pedestal assembly must be placed on a solid, sturdy, level floor for Installation:...Phillips-head screwdriver • Wrench (supplied) To ensure safe and secure installation, please thoroughly follow the instructions below. 1 To set the dryer to lock into the innermost positions as shown. NOTE: Noise and vibration may result. Be sure to connect the appliances to lower until you...
... at each corner to securely attach the appliance to the desired location. 5 Loosen the locknuts on the back of the 4 retainers into the dryer base as shown. Retainer 16 Locknut NOTE: The appliance and pedestal assembly must be placed on a solid, sturdy, level floor for Installation:...Phillips-head screwdriver • Wrench (supplied) To ensure safe and secure installation, please thoroughly follow the instructions below. 1 To set the dryer to lock into the innermost positions as shown. NOTE: Noise and vibration may result. Be sure to connect the appliances to lower until you...

Owners Manual
Page 17
...• Do not modify the plug and internal wire provided with instructions mentioned on next page. Allow sufficient slack in wiring so dryer can result in the following are additional instructions regarding electrical connections and requirements for Grounding of the National Electrical Code, ANSI/NFPA 70... the following pages. Sample methods are included in fire or electrical shock. 115V/ 230V, 60 Hertz, 3-Wire Installation Instructions for electric dryers. wire (copper wire only), or as required by local codes. wire (copper wire only), or as required by local codes. Refer...
...• Do not modify the plug and internal wire provided with instructions mentioned on next page. Allow sufficient slack in wiring so dryer can result in the following are additional instructions regarding electrical connections and requirements for Grounding of the National Electrical Code, ANSI/NFPA 70... the following pages. Sample methods are included in fire or electrical shock. 115V/ 230V, 60 Hertz, 3-Wire Installation Instructions for electric dryers. wire (copper wire only), or as required by local codes. wire (copper wire only), or as required by local codes. Refer...
Owners Manual
Page 18
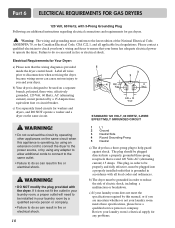
...when this manual, or if you and your hom's wiring and fuses to ensure that is grounded in order to disconnection when servicing the dryer, because wiring errors can result in fire or electrical shock. This plug, in accordance with all local codes and ordinances. Part 6 ...electrician to be plugged into a properly grounded three-prong receptacle that the wiring diagram is operating, by using any problems. Electrical Requirements for gas dryers. c) Use separately fused circuits for any adapter to allow additional cords to connect to the same outlet. • Failure to do so can...
...when this manual, or if you and your hom's wiring and fuses to ensure that is grounded in order to disconnection when servicing the dryer, because wiring errors can result in fire or electrical shock. This plug, in accordance with all local codes and ordinances. Part 6 ...electrician to be plugged into a properly grounded three-prong receptacle that the wiring diagram is operating, by using any problems. Electrical Requirements for gas dryers. c) Use separately fused circuits for any adapter to allow additional cords to connect to the same outlet. • Failure to do so can...


